
User Manual - Wall Oven
Page 2
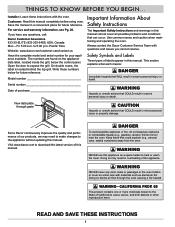
... to heat or warm the room. Visit www.dacor.com to the appliance without updating this manual cannot cover all possible problems and conditions that can occur. Doing so may need to make changes to download the latest version of the appliance. Important Information About Safety Instructions Customer: Read this appliance as aluminum foil. For service and warranty information, see Pg. 20. Model number The...
... to heat or warm the room. Visit www.dacor.com to the appliance without updating this manual cannot cover all possible problems and conditions that can occur. Doing so may need to make changes to download the latest version of the appliance. Important Information About Safety Instructions Customer: Read this appliance as aluminum foil. For service and warranty information, see Pg. 20. Model number The...
User Manual - Wall Oven
Page 3
..., the meat probe or cookie sheets on grease fires. Be careful to be turned off power to burst and cause injury. • Do not use . • Exercise caution when opening the oven door. They will be harmful to the accompanying installation instructions. • Do not heat unopened food containers such as pot holders. When the filter is not installed, the spinning fan blades at the circuit breaker or fuse box...
..., the meat probe or cookie sheets on grease fires. Be careful to be turned off power to burst and cause injury. • Do not use . • Exercise caution when opening the oven door. They will be harmful to the accompanying installation instructions. • Do not heat unopened food containers such as pot holders. When the filter is not installed, the spinning fan blades at the circuit breaker or fuse box...
User Manual - Wall Oven
Page 4
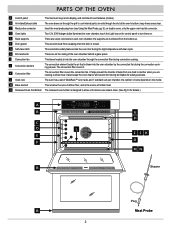
.... D Oven lights Two 12V, 20W halogen bulbs illuminate the oven chamber; E Rack supports There are numbered from one food to cool internal parts; H Broil elements These are cooking a whole meal. B Air intake/Exhaust slots The oven draws air through the slot at the oven's bottom; C Meat probe connector Insert the meat probe plug here (see Using the Meat Probe, pg. 9); air exits through the grill to another when you are on the model. The convection filter covers it...
.... D Oven lights Two 12V, 20W halogen bulbs illuminate the oven chamber; E Rack supports There are numbered from one food to cool internal parts; H Broil elements These are cooking a whole meal. B Air intake/Exhaust slots The oven draws air through the slot at the oven's bottom; C Meat probe connector Insert the meat probe plug here (see Using the Meat Probe, pg. 9); air exits through the grill to another when you are on the model. The convection filter covers it...

User Manual - Wall Oven
Page 5
...breads; This key turns the interior oven light on /off . Select a mode for each oven (see below). this keypad to start cooking; double ovens have one of these keypads for oven operation by touching one of day and information about oven operations, including cooking temperature, and remaining cook time. Control Panel PARTS OF THE OVEN A START/CONTINUE B Operating Mode keypad C CANCEL/SECURE D Display E Number keypad F Time-Delay Cooking keys G TIMER 1, TIMER 2 H CLOCK I J Double Oven 3 operations include cooking, self-cleaning, temperature probe use, and on ;
...breads; This key turns the interior oven light on /off . Select a mode for each oven (see below). this keypad to start cooking; double ovens have one of these keypads for oven operation by touching one of day and information about oven operations, including cooking temperature, and remaining cook time. Control Panel PARTS OF THE OVEN A START/CONTINUE B Operating Mode keypad C CANCEL/SECURE D Display E Number keypad F Time-Delay Cooking keys G TIMER 1, TIMER 2 H CLOCK I J Double Oven 3 operations include cooking, self-cleaning, temperature probe use, and on ;

User Manual - Wall Oven
Page 6
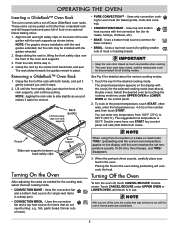
... you should turn the oven on the beep. 3. Touch CANCEL/SECURE. You can select Fahrenheit (factory default) or Celsius as desired. 1. Inserting a Standard Oven Rack 1. The control panel is hot, use or if self-clean or Sabbath mode is cool. Begin to switch off residual oils used . • PREHEATING: When baking/roasting, the oven preheats automatically. Touch the # key to slide the rack in manufacturing. Touch the CLOCK key. Setting the Temperature Scale...
... you should turn the oven on the beep. 3. Touch CANCEL/SECURE. You can select Fahrenheit (factory default) or Celsius as desired. 1. Inserting a Standard Oven Rack 1. The control panel is hot, use or if self-clean or Sabbath mode is cool. Begin to switch off residual oils used . • PREHEATING: When baking/roasting, the oven preheats automatically. Touch the # key to slide the rack in manufacturing. Touch the CLOCK key. Setting the Temperature Scale...
User Manual - Wall Oven
Page 7
..., thinner cuts of the rack supports, and continue pulling. The suggested broil temperature is in the oven. You can be pulled out further than a standard rack and still support pots and pans full of the rack with the convection fan (for detailed about the various cooking modes. 1. NOTE When using Pure Convection or a bake or roast mode: "PRE-" (preheating) and the current oven temperature appear on the control panel. 2. be installed with the rack • CONVECTION ROAST - Double ovens: Touch...
..., thinner cuts of the rack supports, and continue pulling. The suggested broil temperature is in the oven. You can be pulled out further than a standard rack and still support pots and pans full of the rack with the convection fan (for detailed about the various cooking modes. 1. NOTE When using Pure Convection or a bake or roast mode: "PRE-" (preheating) and the current oven temperature appear on the control panel. 2. be installed with the rack • CONVECTION ROAST - Double ovens: Touch...

User Manual - Wall Oven
Page 8
... time. About the Lock-Out Feature To disable the control-panel keys: • Touch-hold CANCEL/SECURE for a longer time (perhaps hours). Roasting-Cooking of the selected cooking mode. Baking Tips 12 • For best results, use a single rack in a convection mode. • Follow the recipe's original cooking time and temperature, and use . To disable/enable the 12-hour timer: 1. Changing the Cooking Mode To change the cooking temperature or mode. Broiling-Cooking with intense heat for both ovens. The control-panel keys stop working...
... time. About the Lock-Out Feature To disable the control-panel keys: • Touch-hold CANCEL/SECURE for a longer time (perhaps hours). Roasting-Cooking of the selected cooking mode. Baking Tips 12 • For best results, use a single rack in a convection mode. • Follow the recipe's original cooking time and temperature, and use . To disable/enable the 12-hour timer: 1. Changing the Cooking Mode To change the cooking temperature or mode. Broiling-Cooking with intense heat for both ovens. The control-panel keys stop working...

User Manual - Wall Oven
Page 11
...; CLOCK to view the time • START TIME to view the set start . (For 12:35, touch 1-2-3-5. If you plug in the probe when in Broil and Sabbath modes, the probe symbol blinks, indicating an error. • If you put the meat in Broil and Sabbath modes. Enter the new temperature. If you use hot pads or oven mitts to handle, connect, and detach the meat probe when the oven is 3/4 in the oven during the self-clean...
...; CLOCK to view the time • START TIME to view the set start . (For 12:35, touch 1-2-3-5. If you plug in the probe when in Broil and Sabbath modes, the probe symbol blinks, indicating an error. • If you put the meat in Broil and Sabbath modes. Enter the new temperature. If you use hot pads or oven mitts to handle, connect, and detach the meat probe when the oven is 3/4 in the oven during the self-clean...

User Manual - Wall Oven
Page 12
... heat settings in . • The meat probe feature takes precedence over time-delay cooking. safe internal cooking temp's are disabled as well as recommended, then place it reaches the selected probe temp regardless of BAKE. When using the PROOF key, the oven presets the temperature.) 2. Put the dough in the oven, and turn on the display if the probe is disabled. Set the timer for Sabbath and Holy Day use the oven to set STOP TIME or COOK TIME...
... heat settings in . • The meat probe feature takes precedence over time-delay cooking. safe internal cooking temp's are disabled as well as recommended, then place it reaches the selected probe temp regardless of BAKE. When using the PROOF key, the oven presets the temperature.) 2. Put the dough in the oven, and turn on the display if the probe is disabled. Set the timer for Sabbath and Holy Day use the oven to set STOP TIME or COOK TIME...

User Manual - Wall Oven
Page 13
... want to change the offset for (CONV BAKE, CONV BROIL, PURE CONV, CONV ROAST, BAKE or BROIL). Touch START. In compliance with Jewish law, the bake elements are adjusted randomly when these keys are automatically canceled when Sabbath mode is selected. • Suggestion: Use a rack thermometer to Sabbath mode at the displayed temperature, but cook times may enter a number from your oven, you can turn off . Opening the door compromises the reading. Touch BAKE or PURE...
... want to change the offset for (CONV BAKE, CONV BROIL, PURE CONV, CONV ROAST, BAKE or BROIL). Touch START. In compliance with Jewish law, the bake elements are adjusted randomly when these keys are automatically canceled when Sabbath mode is selected. • Suggestion: Use a rack thermometer to Sabbath mode at the displayed temperature, but cook times may enter a number from your oven, you can turn off . Opening the door compromises the reading. Touch BAKE or PURE...

User Manual - Wall Oven
Page 14
... the display. Wipe the interior door surfaces outside the door gasket with a water-mild soap solution. • Clean as instructed only the oven parts listed in self-clean mode. • The oven lights do not operate while the oven is off surfaces deposits on kitchen fans or vents to metal expanding/contracting as instructed. Touch START. Clean the door gasket by dabbing it has locked may still be hot, so be self-cleaned at the input time...
... the display. Wipe the interior door surfaces outside the door gasket with a water-mild soap solution. • Clean as instructed only the oven parts listed in self-clean mode. • The oven lights do not operate while the oven is off surfaces deposits on kitchen fans or vents to metal expanding/contracting as instructed. Touch START. Clean the door gasket by dabbing it has locked may still be hot, so be self-cleaned at the input time...

User Manual - Wall Oven
Page 15
.... 6. Cleaning the Interior Convection Filter WARNING Before cooking again, re-install the filter to ensure proper function and to 185°F (85°C), and touch START. 5. Double ovens: Both ovens may clean the oven's light lens by touching CANCEL/SECURE for 6 seconds. Close the oven door, touch BAKE, then set for the door to unlock before pouring. 3. Set the timer (see soil starting to accumulate in the oven directly after steam cleaning is hot. • Do not use...
.... 6. Cleaning the Interior Convection Filter WARNING Before cooking again, re-install the filter to ensure proper function and to 185°F (85°C), and touch START. 5. Double ovens: Both ovens may clean the oven's light lens by touching CANCEL/SECURE for 6 seconds. Close the oven door, touch BAKE, then set for the door to unlock before pouring. 3. Set the timer (see soil starting to accumulate in the oven directly after steam cleaning is hot. • Do not use...

User Manual - Wall Oven
Page 16
... detergent and warm water. The meat probe has silicone handles, a wire, a plug and a stainless-steel skewer. To clean the skewer, use the oven with the lens covers installed. When you may use a screwdriver to the oven. WARNING Clips Taking care not to the oven at the circuit breaker/fuse box. 3. Oils from below, gently pry it in the socket. 6. To clean the oven racks, apply a hot water-detergent solution. Light socket Light bulb 4. In reinstalling...
... detergent and warm water. The meat probe has silicone handles, a wire, a plug and a stainless-steel skewer. To clean the skewer, use the oven with the lens covers installed. When you may use a screwdriver to the oven. WARNING Clips Taking care not to the oven at the circuit breaker/fuse box. 3. Oils from below, gently pry it in the socket. 6. To clean the oven racks, apply a hot water-detergent solution. Light socket Light bulb 4. In reinstalling...
User Manual - Wall Oven
Page 17
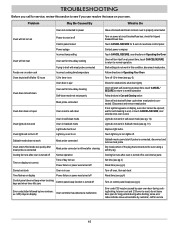
... on control panel beep (see pg 4) Error code C33 may be opened; Touch CANCEL/SECURE for self-cleaning to broil with meat probe connected Incorrect cooking time/temperature 12-hr timer is on Oven door is ajar Oven set for service 15 Disconnect and remove meat probe If lock symbol appears on power at circuit breaker/fuse box; check for obstructions; call for long periods during cooking/broiling; disconnect meat probe. touch CANCEL/ SECURE to return to normal operation Follow directions in Sabbath mode (see pg. 10) Replace light bulbs. Sabbath mode cannot start self-clean...
... on control panel beep (see pg 4) Error code C33 may be opened; Touch CANCEL/SECURE for self-cleaning to broil with meat probe connected Incorrect cooking time/temperature 12-hr timer is on Oven door is ajar Oven set for service 15 Disconnect and remove meat probe If lock symbol appears on power at circuit breaker/fuse box; check for obstructions; call for long periods during cooking/broiling; disconnect meat probe. touch CANCEL/ SECURE to return to normal operation Follow directions in Sabbath mode (see pg. 10) Replace light bulbs. Sabbath mode cannot start self-clean...
Installation Instruction - Wall Oven
Page 2
... Labels 1 General Safety Precautions 1 Customer-Assurance Information 2 Electrical Specifications 2 Product Dimensions 3 Installation Specifications 4 Planning the Installation 4 Installation Instructions 6 Verifying the Package Contents 6 Removing An Oven Door 6 Making the Electrical Connection 6 Installing the Oven in the Cabinet 8 Reinstalling An Oven Door 9 Verifying Proper Operation 9 Installation Checklist 9 French Installation Instructions 11 BEFORE YOU BEGIN... All specifications are subject to change without notice; READ AND SAVE THESE INSTRUCTIONS II Dacor ®...
... Labels 1 General Safety Precautions 1 Customer-Assurance Information 2 Electrical Specifications 2 Product Dimensions 3 Installation Specifications 4 Planning the Installation 4 Installation Instructions 6 Verifying the Package Contents 6 Removing An Oven Door 6 Making the Electrical Connection 6 Installing the Oven in the Cabinet 8 Reinstalling An Oven Door 9 Verifying Proper Operation 9 Installation Checklist 9 French Installation Instructions 11 BEFORE YOU BEGIN... All specifications are subject to change without notice; READ AND SAVE THESE INSTRUCTIONS II Dacor ®...
Installation Instruction - Wall Oven
Page 3
... these installation instructions. er. The installer must be hot) during self-cleaning and permanently damage the oven. • To prevent oven and cookware/utensil damage, do not leave aluminum foil, cookie sheets, utensils, etc. The owner shall ensure the oven's proper installation and is not designed for service required to install the oven safely. • Do not install/repair/replace any part of the oven unless as specified in the manuals. Use...
... these installation instructions. er. The installer must be hot) during self-cleaning and permanently damage the oven. • To prevent oven and cookware/utensil damage, do not leave aluminum foil, cookie sheets, utensils, etc. The owner shall ensure the oven's proper installation and is not designed for service required to install the oven safely. • Do not install/repair/replace any part of the oven unless as specified in the manuals. Use...
Installation Instruction - Wall Oven
Page 4
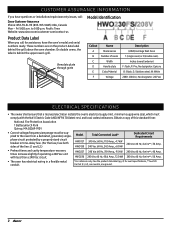
..., 24.5 Amp., 6.0 kW Dedicated Circuit Requirements 240 Vac 60 Hz, 4 wire**, 30 Amp. • Preheat times and cavity temperature-recovery times increase slightly if operating a 240 Vac unit with the Nat'l Electric Code ANSI/NFPA 70 (latest rev.) and local codes/ordinances. minimum supply wire size), which must be supplied to 5:00 p.m. See the product data label (pg. 2) for assistance, have questions or installation/repair/warranty issues, call: Dacor Customer...
..., 24.5 Amp., 6.0 kW Dedicated Circuit Requirements 240 Vac 60 Hz, 4 wire**, 30 Amp. • Preheat times and cavity temperature-recovery times increase slightly if operating a 240 Vac unit with the Nat'l Electric Code ANSI/NFPA 70 (latest rev.) and local codes/ordinances. minimum supply wire size), which must be supplied to 5:00 p.m. See the product data label (pg. 2) for assistance, have questions or installation/repair/warranty issues, call: Dacor Customer...
Installation Instruction - Wall Oven
Page 8
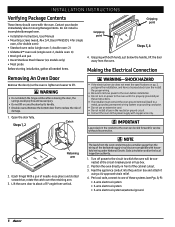
... circuit. • Connect the oven to about missing/damaged items. Do not install a incomplete/damaged oven. • Installation Instructions, User Manual • Mounting screws (wood, #6 x 3/4, Dacor PN 83331; 4 for single oven, 6 for service without disconnection. double oven: 2) • GlideRack™ oven rack (single oven: 2, double oven: 4) • Broil grill and pan • Dacor Stainless Steel Cleaner (s/s models only) • Meat probe Before starting installation, gather all needed items. Gripping point Gripping point Steps 3, 4 4. WARNING • Do not detach the hinge...
... circuit. • Connect the oven to about missing/damaged items. Do not install a incomplete/damaged oven. • Installation Instructions, User Manual • Mounting screws (wood, #6 x 3/4, Dacor PN 83331; 4 for single oven, 6 for service without disconnection. double oven: 2) • GlideRack™ oven rack (single oven: 2, double oven: 4) • Broil grill and pan • Dacor Stainless Steel Cleaner (s/s models only) • Meat probe Before starting installation, gather all needed items. Gripping point Gripping point Steps 3, 4 4. WARNING • Do not detach the hinge...
Installation Instruction - Wall Oven
Page 11
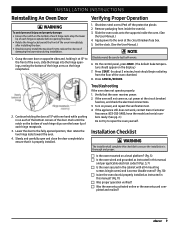
... model and serial numbers ready. (See pg. 2.) Do not try to the oven at 15° with all 4 mounting screws (single ovens) and 6 screws (double ovens)? (Pg. 10) FF Is/are the oven door(s) properly installed as instructed in on each hinge receptacle. 3. Grasp the oven door on opposite sides and, holding the door at the circuit breaker/fuse box. 5. Troubleshooting If the oven does not operate properly: 1. Installation Checklist WARNING The installer shall complete this manual...
... model and serial numbers ready. (See pg. 2.) Do not try to the oven at 15° with all 4 mounting screws (single ovens) and 6 screws (double ovens)? (Pg. 10) FF Is/are the oven door(s) properly installed as instructed in on each hinge receptacle. 3. Grasp the oven door on opposite sides and, holding the door at the circuit breaker/fuse box. 5. Troubleshooting If the oven does not operate properly: 1. Installation Checklist WARNING The installer shall complete this manual...
Specification - 30" Double Wall Oven
Page 1
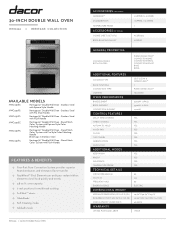
... 30" Double Wall Oven - HWO230 | 30-INCH DOUBLE WALL OVEN ACCESSORIES (INCLUDED) GLIDERACK™ STANDARD RACK TEMPERATURE PROBE ACCESSORIES (OPTIONAL) COOKIE SHEETS (SET OF 3) BROIL-ROASTING PAN SET 2 (UPPER) / 2 (LOWER) 1 (UPPER) / 1 (LOWER) 1 ACSRO303 AORPVR GENERAL PROPERTI ES COOKING MODES BOTH CAVITIES PURE CONVECTION™ CONVECTION BAKE CONVECTION BROIL CONVECTION ROAST BAKE BROIL ADD ITIONAL FEATURES CLEANING TYPE RACK POSITIONS CONVECTION TYPE LIGHTING O V E N PE R F O R M A N C E BAKE ELEMENT BROIL ELEMENT CONVECTION ELEMENT CONTROL FEATURES DELAY TIME COOKING TIMED COOKING...
... 30" Double Wall Oven - HWO230 | 30-INCH DOUBLE WALL OVEN ACCESSORIES (INCLUDED) GLIDERACK™ STANDARD RACK TEMPERATURE PROBE ACCESSORIES (OPTIONAL) COOKIE SHEETS (SET OF 3) BROIL-ROASTING PAN SET 2 (UPPER) / 2 (LOWER) 1 (UPPER) / 1 (LOWER) 1 ACSRO303 AORPVR GENERAL PROPERTI ES COOKING MODES BOTH CAVITIES PURE CONVECTION™ CONVECTION BAKE CONVECTION BROIL CONVECTION ROAST BAKE BROIL ADD ITIONAL FEATURES CLEANING TYPE RACK POSITIONS CONVECTION TYPE LIGHTING O V E N PE R F O R M A N C E BAKE ELEMENT BROIL ELEMENT CONVECTION ELEMENT CONTROL FEATURES DELAY TIME COOKING TIMED COOKING...


