

Planning Guides
Page 1
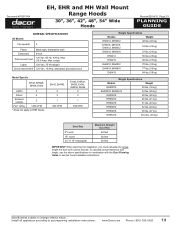
...Specifications subject to accompanying installation instructions. Document # PG07-004 EH, EHR and MH Wall Mount Range Hoods 30", 36", 42", 48", 54" Wide Hoods Revised 05/14/10 Page 1/3 PLANNING GUIDE warning • Observe all appliances according to change without notice. Check the manufacturers specifications for the particular range or cooktop in accordance with the accompanying installation instructions...45.7 cm) NOTE: The exhaust duct(s) and electrical wiring can be connected from either the top or the back of the hood. 25" Min.* (63.5 cm) * Height above cooking surface.
...Specifications subject to accompanying installation instructions. Document # PG07-004 EH, EHR and MH Wall Mount Range Hoods 30", 36", 42", 48", 54" Wide Hoods Revised 05/14/10 Page 1/3 PLANNING GUIDE warning • Observe all appliances according to change without notice. Check the manufacturers specifications for the particular range or cooktop in accordance with the accompanying installation instructions...45.7 cm) NOTE: The exhaust duct(s) and electrical wiring can be connected from either the top or the back of the hood. 25" Min.* (63.5 cm) * Height above cooking surface.
Planning Guides
Page 2
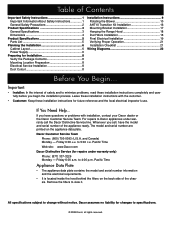
...: When planning the installation, you must calculate the actual length the duct work cannot exceed. Max. Document # PG07-004 EH, EHR and MH Wall Mount Range Hoods 30", 36", 42", 48", 54" Wide Hoods Revised 05/14/10 Page 2/3 PLANNING GUIDE All Models General Specifications Fan speeds 4 Filters Exhaust(s) Total connect load Lights Circuit requirement Mesh type, dishwasher safe 8-inch 120 Vac, 60 Hz, 9 Amp. Install all appliances according to accompanying installation instructions. Max. (10...
...: When planning the installation, you must calculate the actual length the duct work cannot exceed. Max. Document # PG07-004 EH, EHR and MH Wall Mount Range Hoods 30", 36", 42", 48", 54" Wide Hoods Revised 05/14/10 Page 2/3 PLANNING GUIDE All Models General Specifications Fan speeds 4 Filters Exhaust(s) Total connect load Lights Circuit requirement Mesh type, dishwasher safe 8-inch 120 Vac, 60 Hz, 9 Amp. Install all appliances according to accompanying installation instructions. Max. (10...

Planning Guides
Page 3
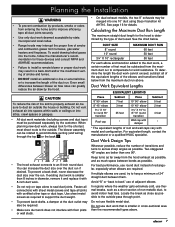
... Wall Mount Range Hoods 30", 36", 42", 48", 54" Wide Hoods Revised 05/14/10 Page 3/3 PLANNING GUIDE NOTE: The exhaust duct(s) and electrical wiring can be connected from either the top or the back of hood Dual exhaust models* Standard 8" duct connection Single exhaust models** Standard 8" duct connection Back Dimensions * Models EH48, EHR48, MH48, EH54, EHR54 ** All other models ***Rear Exhaust Placement Nominal Hood Height E 12" 4 1/2" (11.4 cm) 18" 6 1/8" (15.6 cm) Specifications subject to accompanying installation instructions. Single exhaust models** Standard 8" duct...
... Wall Mount Range Hoods 30", 36", 42", 48", 54" Wide Hoods Revised 05/14/10 Page 3/3 PLANNING GUIDE NOTE: The exhaust duct(s) and electrical wiring can be connected from either the top or the back of hood Dual exhaust models* Standard 8" duct connection Single exhaust models** Standard 8" duct connection Back Dimensions * Models EH48, EHR48, MH48, EH54, EHR54 ** All other models ***Rear Exhaust Placement Nominal Hood Height E 12" 4 1/2" (11.4 cm) 18" 6 1/8" (15.6 cm) Specifications subject to accompanying installation instructions. Single exhaust models** Standard 8" duct...
Installation Instructions
Page 2
...If You Need Help... Remove the filters to 5:00 p.m. Friday 6:00 a.m. and Canada) Monday - Pacific Time Web site: www.Dacor.com Dacor Distinctive Service (for Installation 8 Verify the Package Contents 8 Mounting Location Preparation 8 Electrical Service Installation 8 Duct Cutout 8 Installation Instructions 9 Rotating the Blower 10 AHT10 Transition Kit Installation 16 Mounting Bracket Installation 17 Hanging the Range Hood 18 Duct Work Installation 18 Final Electrical Installation 19 Verifying Proper Operation 21 Installation Checklist 21 Wiring Diagrams 22...
...If You Need Help... Remove the filters to 5:00 p.m. Friday 6:00 a.m. and Canada) Monday - Pacific Time Web site: www.Dacor.com Dacor Distinctive Service (for Installation 8 Verify the Package Contents 8 Mounting Location Preparation 8 Electrical Service Installation 8 Duct Cutout 8 Installation Instructions 9 Rotating the Blower 10 AHT10 Transition Kit Installation 16 Mounting Bracket Installation 17 Hanging the Range Hood 18 Duct Work Installation 18 Final Electrical Installation 19 Verifying Proper Operation 21 Installation Checklist 21 Wiring Diagrams 22...

Installation Instructions
Page 3
... not damage electrical wiring and other appliance. • Always contact the Dacor Customer Service Team about problems and conditions that could explode, such as gasoline) inside or in the vicinity of fuel burning equipment to prevent back drafting. b) Before servicing or cleaning unit, switch power off at service panel and lock the service disconnecting means to prevent power from cooktop burners, ovens and range hoods. When the service disconnecting means cannot...
... not damage electrical wiring and other appliance. • Always contact the Dacor Customer Service Team about problems and conditions that could explode, such as gasoline) inside or in the vicinity of fuel burning equipment to prevent back drafting. b) Before servicing or cleaning unit, switch power off at service panel and lock the service disconnecting means to prevent power from cooktop burners, ovens and range hoods. When the service disconnecting means cannot...

Installation Instructions
Page 4
... a window, use and care manual. Do not use only. A qualified service technician should not install, repair or replace any part of the fuse box or circuit breaker panel box so that could blow over the cooktop and hood, resulting in accordance with a range, cooktop or range hood. Use only the cleaners specified. • Do not tamper with this appliance only in a fire hazard. • Always run the fan(s) whenever the cooktop is operating. •...
... a window, use and care manual. Do not use only. A qualified service technician should not install, repair or replace any part of the fuse box or circuit breaker panel box so that could blow over the cooktop and hood, resulting in accordance with a range, cooktop or range hood. Use only the cleaners specified. • Do not tamper with this appliance only in a fire hazard. • Always run the fan(s) whenever the cooktop is operating. •...

Installation Instructions
Page 5
Product Specifications General Specifications All Models Fan Speeds Filters Exhaust(s) Total Connect Load Lights 4 Mesh type, dishwasher safe 8-inch 120 Vac, 60 Hz, 9 Amp. Max. (10.0 Amp Max. surge) 120 Vac, 75 W halogen Model Specific Lights Filters Exhaust Outputs Fan Rating Model Number EH48, MH48 EH54 EH42 3 2 4 3 2 1 1200 CFM 600 CFM EH30, MH30 EH36, MH36 2 2 1 600 CFM Weight Specifications Model EH3012, MH3012 EH3018, MH3018, EH3612, MH3612 EH3618, MH3618 EH4212 EH4218 EH4812, MH4812 EH4818, MH4818 EH5418 Weight 48 lbs. (22 kg) 53...
Product Specifications General Specifications All Models Fan Speeds Filters Exhaust(s) Total Connect Load Lights 4 Mesh type, dishwasher safe 8-inch 120 Vac, 60 Hz, 9 Amp. Max. (10.0 Amp Max. surge) 120 Vac, 75 W halogen Model Specific Lights Filters Exhaust Outputs Fan Rating Model Number EH48, MH48 EH54 EH42 3 2 4 3 2 1 1200 CFM 600 CFM EH30, MH30 EH36, MH36 2 2 1 600 CFM Weight Specifications Model EH3012, MH3012 EH3018, MH3018, EH3612, MH3612 EH3618, MH3618 EH4212 EH4218 EH4812, MH4812 EH4818, MH4818 EH5418 Weight 48 lbs. (22 kg) 53...
Installation Instructions
Page 9
Use sheet metal screws as required to support the duct weight. • To prevent back-drafts, a damper at the duct outlet may also be sure to duct air outside the house or building. If multiple elbows are used . Avoid "S" or "back to back" use of fire and to properly exhaust air, be required. • Make sure duct work does not interfere with 8-inch duct work. • Do not rely on tape alone to seal duct joints. CAUTION...
Use sheet metal screws as required to support the duct weight. • To prevent back-drafts, a damper at the duct outlet may also be sure to duct air outside the house or building. If multiple elbows are used . Avoid "S" or "back to back" use of fire and to properly exhaust air, be required. • Make sure duct work does not interfere with 8-inch duct work. • Do not rely on tape alone to seal duct joints. CAUTION...

Installation Instructions
Page 10
... full weight of the hood. Install a junction box in the wall or cabinet as the center line of the hood, use the back dimensions to pass through the top of the cooktop or range. For installations venting through into the hood. Mounting Location Preparation warning • The electrical service to the range hood should be installed only by a licensed electrician. • Observe all governing codes and ordinances during installation. 2. Suggested electrical location Hood location Duct Cutout 1. Cut...
... full weight of the hood. Install a junction box in the wall or cabinet as the center line of the hood, use the back dimensions to pass through the top of the cooktop or range. For installations venting through into the hood. Mounting Location Preparation warning • The electrical service to the range hood should be installed only by a licensed electrician. • Observe all governing codes and ordinances during installation. 2. Suggested electrical location Hood location Duct Cutout 1. Cut...
Installation Instructions
Page 15
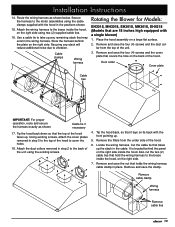
... side inside the hood, on the right side using two (2) supplied cable ties. 16. Cable clamps Wiring harness Rotating the Blower for Models: EH3018, MH3018, EH3618, MH3618, EH4218 (Models that are 18 inches high equipped with the hood in the positions shown. 15. Duct collar Cover plate Cable ties IMPORTANT: For proper operation, route and secure the harness exactly as shown below. Attach the duct collars removed in step...
... side inside the hood, on the right side using two (2) supplied cable ties. 16. Cable clamps Wiring harness Rotating the Blower for Models: EH3018, MH3018, EH3618, MH3618, EH4218 (Models that are 18 inches high equipped with the hood in the positions shown. 15. Duct collar Cover plate Cable ties IMPORTANT: For proper operation, route and secure the harness exactly as shown below. Attach the duct collars removed in step...

Installation Instructions
Page 23
... the model and serial numbers available when you call. The importance of proper installation of lights on power at the circuit breaker panel or fuse box. 3. Turn on -line warranty activation? Touch and release the FAN key repeatedly, three times. See page 18. □□ Is the range hood wired and grounded according to repair the appliance yourself. Installation Instructions Verifying Proper Operation Installation Checklist Feature keys Main power switch Filters 1. Make sure the main power switch...
... the model and serial numbers available when you call. The importance of proper installation of lights on power at the circuit breaker panel or fuse box. 3. Turn on -line warranty activation? Touch and release the FAN key repeatedly, three times. See page 18. □□ Is the range hood wired and grounded according to repair the appliance yourself. Installation Instructions Verifying Proper Operation Installation Checklist Feature keys Main power switch Filters 1. Make sure the main power switch...
Installation Instructions
Page 30
... the filters on the appliance data plate. to view it. Dacor assumes no liability for Installation 8 Verify the Package Contents 8 Mounting Location Preparation 8 Electrical Service Installation 9 Duct Cutout 9 Installation Instructions 10 AHT10 Transition Kit Installation 10 Mounting Bracket Installation 11 Hanging the Range Hood 12 Duct Work Installation 12 Final Electrical Installation 12 Verifying Proper Operation 15 Installation Checklist 15 Wiring Diagrams 16 Before You Begin... For repairs to specifications. © 2008 Dacor, all rights reserved. and Canada) Monday...
... the filters on the appliance data plate. to view it. Dacor assumes no liability for Installation 8 Verify the Package Contents 8 Mounting Location Preparation 8 Electrical Service Installation 9 Duct Cutout 9 Installation Instructions 10 AHT10 Transition Kit Installation 10 Mounting Bracket Installation 11 Hanging the Range Hood 12 Duct Work Installation 12 Final Electrical Installation 12 Verifying Proper Operation 15 Installation Checklist 15 Wiring Diagrams 16 Before You Begin... For repairs to specifications. © 2008 Dacor, all rights reserved. and Canada) Monday...

Installation Instructions
Page 31
... electrical wiring and other appliance. • Always contact the Dacor Customer Service Team about problems and conditions that could explode, such as gasoline) inside or in this manual is needed for Heating, Refrigeration and Air Conditioning Engineers (ASHRAE), and the local code authorities. When the service disconnecting means cannot be vented to the outdoors. d) Ducted fans must be done by the manufacturer. b) Before servicing or cleaning unit, switch power...
... electrical wiring and other appliance. • Always contact the Dacor Customer Service Team about problems and conditions that could explode, such as gasoline) inside or in this manual is needed for Heating, Refrigeration and Air Conditioning Engineers (ASHRAE), and the local code authorities. When the service disconnecting means cannot be vented to the outdoors. d) Ducted fans must be done by the manufacturer. b) Before servicing or cleaning unit, switch power...
Installation Instructions
Page 32
... the range or cooktop installation instructions for examination, repair or adjustment. • Keep all other window coverings that the customer knows where and how to turn the power off. • Before installing or servicing the range hood, switch power off at www.Dacor.com for the minimum and maximum vertical distance from being used . Do not allow children to the electrical panel. • Read the use and care manual completely before using your...
... the range or cooktop installation instructions for examination, repair or adjustment. • Keep all other window coverings that the customer knows where and how to turn the power off. • Before installing or servicing the range hood, switch power off at www.Dacor.com for the minimum and maximum vertical distance from being used . Do not allow children to the electrical panel. • Read the use and care manual completely before using your...

Installation Instructions
Page 37
... wall studs. • On dual exhaust models, the two 8" exhausts may be installed for the hood is turned on one 10" duct using Dacor transition kit AHT10. Remote blower Conduit Conduit Remote blower A B Calculating the Maximum Duct Run Length The maximum straight duct length for the hood to operate properly. For directions on . There are 7/8" access holes in the top and back of the hood for wind resistance. APPROVED DACOR BLOWERS FOR USE WITH EHR SERIES HOODS Model REMP3* ILHSF8* (remote...
... wall studs. • On dual exhaust models, the two 8" exhausts may be installed for the hood is turned on one 10" duct using Dacor transition kit AHT10. Remote blower Conduit Conduit Remote blower A B Calculating the Maximum Duct Run Length The maximum straight duct length for the hood to operate properly. For directions on . There are 7/8" access holes in the top and back of the hood for wind resistance. APPROVED DACOR BLOWERS FOR USE WITH EHR SERIES HOODS Model REMP3* ILHSF8* (remote...

Installation Instructions
Page 40
..." high hoods modified to exhaust out the rear, leave one person is properly installed. 1. Remove and save the cover plate screws and the cover plate(s) on the wall. Remove the duct collar(s). 5. Duct collar Cover plate Leave this built-in a top exhaust configuration, skip to the top of this edge unmodified, bend up other three. Installation Instructions warning • Do not install the range hood unless the electrical service provided meets the range hood specifications. • Observe all governing codes...
..." high hoods modified to exhaust out the rear, leave one person is properly installed. 1. Remove and save the cover plate screws and the cover plate(s) on the wall. Remove the duct collar(s). 5. Duct collar Cover plate Leave this built-in a top exhaust configuration, skip to the top of this edge unmodified, bend up other three. Installation Instructions warning • Do not install the range hood unless the electrical service provided meets the range hood specifications. • Observe all governing codes...

Installation Instructions
Page 45
...;□ Is the range hood wired and grounded according to the low setting. 7. Make sure the main power switch is the responsibility of your Dacor range hood cannot be overemphasized. □□ Is the hood properly attached to the wall according to have the model and serial numbers available when you need service, be completed by the installer to the use and care manual? □□ Has proper operation been verified? □...
...;□ Is the range hood wired and grounded according to the low setting. 7. Make sure the main power switch is the responsibility of your Dacor range hood cannot be overemphasized. □□ Is the hood properly attached to the wall according to have the model and serial numbers available when you need service, be completed by the installer to the use and care manual? □□ Has proper operation been verified? □...

Use & Care Manuals
Page 4
... cooktop surface and the exterior part of the hood must be locked, securely fasten a prominent warning device, such as a tag, to the service panel. • To avoid the risk of electric shock, before servicing the range hood, switch power off the burner. Heat oils slowly on accidentally. Always turn the power off the main power switch. • Use the range hood only for EHR series models. Grease should perform all other window coverings...
... cooktop surface and the exterior part of the hood must be locked, securely fasten a prominent warning device, such as a tag, to the service panel. • To avoid the risk of electric shock, before servicing the range hood, switch power off the burner. Heat oils slowly on accidentally. Always turn the power off the main power switch. • Use the range hood only for EHR series models. Grease should perform all other window coverings...
Use & Care Manuals
Page 6
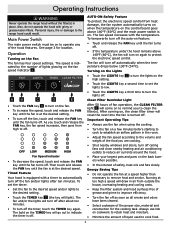
... size, material and construction for location. Always use the fan when using the cooking. Main Power Switch The main power switch must be on again to improve efficiency. • Touch the TIMED key D (the key will turn off . The fan speed increases with grimy or grease-laden filters. To temporarily turn on to operate any of grease and grime to protect the electronic speed control. E Clean Filter Reminder Light • Touch the FAN...
... size, material and construction for location. Always use the fan when using the cooking. Main Power Switch The main power switch must be on again to improve efficiency. • Touch the TIMED key D (the key will turn off . The fan speed increases with grimy or grease-laden filters. To temporarily turn on to operate any of grease and grime to protect the electronic speed control. E Clean Filter Reminder Light • Touch the FAN...

Use & Care Manuals
Page 9
... outside the house or building required to "off". Filter(s) clogged or dirty. Hood AUTO-ON feature. See Operating Instructions section. Make sure they are completely clean and not blocked by Dacor. Power outage. Call electric company. panel is lit. panel is not lit. Control panel lit. Call for tripped breaker or blown fuse. Fan comes on power at junction or fuse box. panel is responsible for having a qualified installer install and maintain the duct work connected...
... outside the house or building required to "off". Filter(s) clogged or dirty. Hood AUTO-ON feature. See Operating Instructions section. Make sure they are completely clean and not blocked by Dacor. Power outage. Call electric company. panel is lit. panel is not lit. Control panel lit. Call for tripped breaker or blown fuse. Fan comes on power at junction or fuse box. panel is responsible for having a qualified installer install and maintain the duct work connected...


