Planning Guides
Page 1
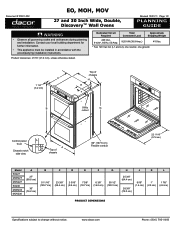
... the accompanying installation instructions. Dedicated Circuit Required Total Connected Load Approximate Shipping Weight 240 Vac, 4-wire*, 60 Hz, 50 Amp. 9.25 kW (38.9 Amp.) 415 lbs. * Two 120 Vac hot (L1 and L2), one neutral, one ground. Product tolerances: ±1/16" (±1.6 mm), unless otherwise stated. Document # PG01-002 EO, MOH, MOV 27 and 30 Inch Wide, Double, Discovery™ Wall Ovens Revised 10...
... the accompanying installation instructions. Dedicated Circuit Required Total Connected Load Approximate Shipping Weight 240 Vac, 4-wire*, 60 Hz, 50 Amp. 9.25 kW (38.9 Amp.) 415 lbs. * Two 120 Vac hot (L1 and L2), one neutral, one ground. Product tolerances: ±1/16" (±1.6 mm), unless otherwise stated. Document # PG01-002 EO, MOH, MOV 27 and 30 Inch Wide, Double, Discovery™ Wall Ovens Revised 10...
Installation Instructions
Page 3
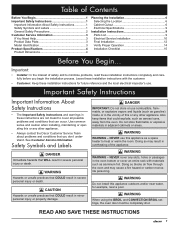
... and Labels 1 General Safety Precautions 2 Customer Service Information 3 If You Need Help 3 Product Data Plate 3 Model Identification 3 Product Specifications 4 Product Dimensions 4 Planning the Installation 6 Selecting the Location 6 Cabinet Cutout 6 Electrical Specifications 9 Installation Instructions 9 Parts List 9 Electrical Service Installation 10 Final Installation 12 Verify Proper Operation 14 Installation Checklist 15 Before You Begin... warning Do not install this or any other appliance. • Always contact the Dacor Customer Service Team about problems and...
... and Labels 1 General Safety Precautions 2 Customer Service Information 3 If You Need Help 3 Product Data Plate 3 Model Identification 3 Product Specifications 4 Product Dimensions 4 Planning the Installation 6 Selecting the Location 6 Cabinet Cutout 6 Electrical Specifications 9 Installation Instructions 9 Parts List 9 Electrical Service Installation 10 Final Installation 12 Verify Proper Operation 14 Installation Checklist 15 Before You Begin... warning Do not install this or any other appliance. • Always contact the Dacor Customer Service Team about problems and...
Installation Instructions
Page 4
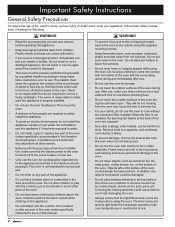
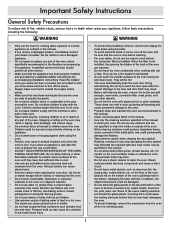
... oven may cause the trim to cook without the convection filter installed. Remove birds to a separate, well-ventilated room during self-cleaning and cause permanent damage to the oven. • Do not leave objects, such as aluminum foil, the meat probe, cookie sheets, etc. Covering the heating elements could be hot. Do not allow heating elements in the oven. Important Safety Instructions General Safety Precautions To reduce the risk of fire, electric...
... oven may cause the trim to cook without the convection filter installed. Remove birds to a separate, well-ventilated room during self-cleaning and cause permanent damage to the oven. • Do not leave objects, such as aluminum foil, the meat probe, cookie sheets, etc. Covering the heating elements could be hot. Do not allow heating elements in the oven. Important Safety Instructions General Safety Precautions To reduce the risk of fire, electric...

Installation Instructions
Page 5
... door. 3 Pacific Time Dacor Customer Service Phone: (800) 793-0093 (U.S.A. Dacor Distinctive Service (repairs under warranty call , have questions or problems with installation, contact your Dacor dealer or the Dacor Customer Service Team. and Canada) Monday - to 5:00 p.m. Pacific Time Web site: www.Dacor.com Product Data Plate • The product data plate contains the model and serial number information and the electrical requirements. • It is located inside the oven door, in the slot above the left hinge (inside...
... door. 3 Pacific Time Dacor Customer Service Phone: (800) 793-0093 (U.S.A. Dacor Distinctive Service (repairs under warranty call , have questions or problems with installation, contact your Dacor dealer or the Dacor Customer Service Team. and Canada) Monday - to 5:00 p.m. Pacific Time Web site: www.Dacor.com Product Data Plate • The product data plate contains the model and serial number information and the electrical requirements. • It is located inside the oven door, in the slot above the left hinge (inside...
Installation Instructions
Page 11
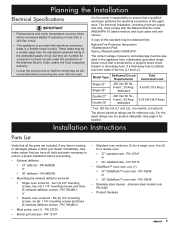
.... Model Type Single 27" Single 30" Dedicated Circuit Requirements 240 Vac 60 Hz., 4 wire*, 30 Amp. Planning the Installation Electrical Specifications important • Preheat times and cavity temperature recovery times will be increased slightly if operating on less than the standard household wiring of the dedicated supply circuit, but they are suitable for connection to the appliance from a dedicated, grounded, single phase circuit that is protected by a properly sized circuit breaker or time-delay fuse. See...
.... Model Type Single 27" Single 30" Dedicated Circuit Requirements 240 Vac 60 Hz., 4 wire*, 30 Amp. Planning the Installation Electrical Specifications important • Preheat times and cavity temperature recovery times will be increased slightly if operating on less than the standard household wiring of the dedicated supply circuit, but they are suitable for connection to the appliance from a dedicated, grounded, single phase circuit that is protected by a properly sized circuit breaker or time-delay fuse. See...
Installation Instructions
Page 16
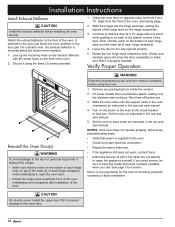
... oven. Installation Instructions Install Exhaust Deflector caution Install the exhaust deflector before attempting to the oven. • Check for proper electrical connection. • Repeat the above bake test. • If the appliance still does not work, contact Dacor • Distinctive Service at the circuit breaker or fuse box. It attaches to the front of each hinge receptacle. 4. Slide the oven racks onto the support racks in the oven chamber(s) as instructed in the door...
... oven. Installation Instructions Install Exhaust Deflector caution Install the exhaust deflector before attempting to the oven. • Check for proper electrical connection. • Repeat the above bake test. • If the appliance still does not work, contact Dacor • Distinctive Service at the circuit breaker or fuse box. It attaches to the front of each hinge receptacle. 4. Slide the oven racks onto the support racks in the oven chamber(s) as instructed in the door...
Use & Care Manuals
Page 4
.... • Before self-cleaning the oven, remove the broiler pan grill and pan, oven racks, convection filter, meat probe, and any part of the oven. Objects left on the bottom of the ovens heating elements are exposed. • Do not leave the oven unattended when cooking with aluminum foil or other utensils. • Do not line the oven with oils or fats. A violent steam explosion may eliminate the required tight door seal. Some of...
.... • Before self-cleaning the oven, remove the broiler pan grill and pan, oven racks, convection filter, meat probe, and any part of the oven. Objects left on the bottom of the ovens heating elements are exposed. • Do not leave the oven unattended when cooking with aluminum foil or other utensils. • Do not line the oven with oils or fats. A violent steam explosion may eliminate the required tight door seal. Some of...
Use & Care Manuals
Page 5
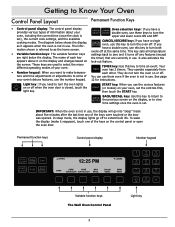
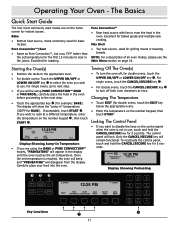
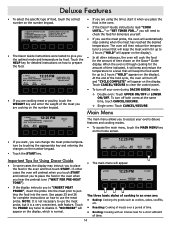
... the light key. Light key: If you have a double oven, use . To wake the display (make tempera- See page your oven, set ), the current cook settings, and the available cooking modes. Permanent function keys Control panel display Number keypad Variable function keys The Wall Oven Control Panel 3 Light key If you want to some of the keys were touched or the door was opened. set the controls first, then touch the START key. The diagram below the display...
... the light key. Light key: If you have a double oven, use . To wake the display (make tempera- See page your oven, set ), the current cook settings, and the available cooking modes. Permanent function keys Control panel display Number keypad Variable function keys The Wall Oven Control Panel 3 Light key If you want to some of the keys were touched or the door was opened. set the controls first, then touch the START key. The diagram below the display...
Use & Care Manuals
Page 6
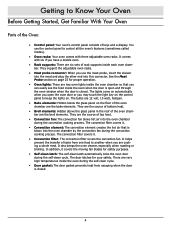
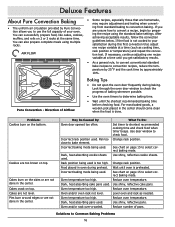
... adjustable oven racks. There are the bake elements. Getting to Know Your Oven Before Getting Started, Get Familiar With Your Oven Parts of the Oven: • Control panel: Your oven's control panel consists of top heat. • Convection fan: The convection fan blows hot air into the oven chamber during the convection cooking process. See the Meat Probe section on the floor of rack supports inside the oven when the door is open the oven door or you are the broil elements. The convection filter covers it. • Convection element: The convection element...
... adjustable oven racks. There are the bake elements. Getting to Know Your Oven Before Getting Started, Get Familiar With Your Oven Parts of the Oven: • Control panel: Your oven's control panel consists of top heat. • Convection fan: The convection fan blows hot air into the oven chamber during the convection cooking process. See the Meat Probe section on the floor of rack supports inside the oven when the door is open the oven door or you are the broil elements. The convection filter covers it. • Convection element: The convection element...
Use & Care Manuals
Page 8
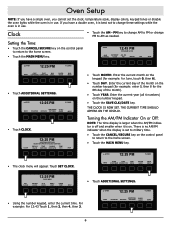
... THE DISPLAY. If you have a single oven, you have a double oven, it is in use . PM PM MONTH DAY YEAR ▲ UPPER 12:25 PM ▼ LOWER BAKE PURE PURE MAX CONV/SEAR CONVECTION BROIL DACOR GUIDE MAIN MENU • Touch ADDITIONAL SETTINGS. ▲ UPPER 12:25 PM ▼ LOWER BAKE ROASTING ADDITIONAL SAVED BROILNG SETTINGS GUIDE MORE • Touch CLOCK. Clock • Touch the AM - Setting the Time: •...
... THE DISPLAY. If you have a single oven, you have a double oven, it is in use . PM PM MONTH DAY YEAR ▲ UPPER 12:25 PM ▼ LOWER BAKE PURE PURE MAX CONV/SEAR CONVECTION BROIL DACOR GUIDE MAIN MENU • Touch ADDITIONAL SETTINGS. ▲ UPPER 12:25 PM ▼ LOWER BAKE ROASTING ADDITIONAL SAVED BROILNG SETTINGS GUIDE MORE • Touch CLOCK. Clock • Touch the AM - Setting the Time: •...

Use & Care Manuals
Page 10
... FAHRENHEIT, then touch OK. CLOCK 12:25 PM ADDITIONAL SETTINGS SELECT AN OPTION TO ADJUST SETTINGS. Oven Setup Fahrenheit (°F)/Celsius (°C) • Your oven allows you want to change the temperature scale: • Touch ADDITIONAL SETTINGS. ▲ UPPER 12:25 PM ▼ LOWER BAKING ADDITIONAL SAVED ROASTING BROILING SETTINGS GUIDE MORE • Touch the CANCEL/SECURE key on the control panel to return to the home...
... FAHRENHEIT, then touch OK. CLOCK 12:25 PM ADDITIONAL SETTINGS SELECT AN OPTION TO ADJUST SETTINGS. Oven Setup Fahrenheit (°F)/Celsius (°C) • Your oven allows you want to change the temperature scale: • Touch ADDITIONAL SETTINGS. ▲ UPPER 12:25 PM ▼ LOWER BAKING ADDITIONAL SAVED ROASTING BROILING SETTINGS GUIDE MORE • Touch the CANCEL/SECURE key on the control panel to return to the home...
Use & Care Manuals
Page 13
... are on the control panel when the oven is reached, the oven will beep and "PREHEATING" will appear in the oven. Max Broil • Top heat source. Changing The Temperature • Touch EDIT (for example: BAKE). Bake • Bottom heat source, mode commonly used modes are using PURE CONVECTION™ SEAR or MAX BROIL, carefully place the food in the juices. Only the CANCEL/SECURE key will lock. For single ovens, go to disable...
... are on the control panel when the oven is reached, the oven will beep and "PREHEATING" will appear in the oven. Max Broil • Top heat source. Changing The Temperature • Touch EDIT (for example: BAKE). Bake • Bottom heat source, mode commonly used modes are using PURE CONVECTION™ SEAR or MAX BROIL, carefully place the food in the juices. Only the CANCEL/SECURE key will lock. For single ovens, go to disable...
Use & Care Manuals
Page 15
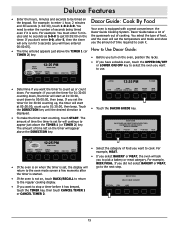
... amount of time required to cook it is not on the oven, position the racks. MEAT OPTIONS SELECT A MEAT CATEGORY • If you want to the regular cooking display. You select the type of food, and the oven will set the temperature and mode and show you the amount of time the timer is set the timer for will go to cook. BAKE PURE PURE MAX CONV/SEAR CONVECTION BROIL DACOR GUIDE MAIN...
... amount of time required to cook it is not on the oven, position the racks. MEAT OPTIONS SELECT A MEAT CATEGORY • If you want to the regular cooking display. You select the type of food, and the oven will set the temperature and mode and show you the amount of time the timer is set the timer for will go to cook. BAKE PURE PURE MAX CONV/SEAR CONVECTION BROIL DACOR GUIDE MAIN...
Use & Care Manuals
Page 16
... the control panel. • To turn off both ovens at the same time, touch CANCEL/SECURE. ◊ Single oven: Touch CANCEL/SECURE. or "SET TIMER FOR..." Touch the for doneness yourself. • If you will keep the food warm ▲ UPPER 350°F/155°F 12:25 PM SURR CONVECTION ROAST PRESS START BEEF TRI-TIP RPAST 2-5 LBS DELAY OPTIONS MEAT PROBE WEIGHT PLACE RACK 1 OR 2. you use the meat probe...
... the control panel. • To turn off both ovens at the same time, touch CANCEL/SECURE. ◊ Single oven: Touch CANCEL/SECURE. or "SET TIMER FOR..." Touch the for doneness yourself. • If you will keep the food warm ▲ UPPER 350°F/155°F 12:25 PM SURR CONVECTION ROAST PRESS START BEEF TRI-TIP RPAST 2-5 LBS DELAY OPTIONS MEAT PROBE WEIGHT PLACE RACK 1 OR 2. you use the meat probe...
Use & Care Manuals
Page 18
... 2 or 3 racks at a time until you to use the full capacity of baking whenever possible. • Use the oven timers to select correct baking mode. Use shiny, reflective cookie sheets. Food placed in the center. Reduce oven temperature. Reduce oven temperature. Level oven and rack as cooking time, AIR FLOW rack position or temperature) and repeat the convection test. Reduce oven temperature. Dark, heat absorbing pans used . Reduce number of Airflow Baking Tips • Do not open the oven door frequently during preheat. Solutions...
... 2 or 3 racks at a time until you to use the full capacity of baking whenever possible. • Use the oven timers to select correct baking mode. Use shiny, reflective cookie sheets. Food placed in the center. Reduce oven temperature. Reduce oven temperature. Level oven and rack as cooking time, AIR FLOW rack position or temperature) and repeat the convection test. Reduce oven temperature. Dark, heat absorbing pans used . Reduce number of Airflow Baking Tips • Do not open the oven door frequently during preheat. Solutions...

Use & Care Manuals
Page 27
... the control panel. The oven will turn off using one of day you have a double oven touch the EDIT key below the word UPPER or LOWER on the display. For single ovens, touch CANCEL/SECURE. • Enter the time of the cook settings, when the stop time is properly cooked. Meat Probe When you did not enter a start time, the oven will start time, touch the STOP TIME key. ▲ UPPER 10:00 AM DELAY START 12...
... the control panel. The oven will turn off using one of day you have a double oven touch the EDIT key below the word UPPER or LOWER on the display. For single ovens, touch CANCEL/SECURE. • Enter the time of the cook settings, when the stop time is properly cooked. Meat Probe When you did not enter a start time, the oven will start time, touch the STOP TIME key. ▲ UPPER 10:00 AM DELAY START 12...

Use & Care Manuals
Page 30
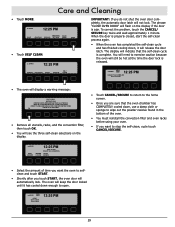
.../OFF keys to select the oven to be damaged. • The control panel automatically locks the oven door during self-cleaning. How to Use the Self-Cleaning Feature IMPORTANT: Remove the racks and broiler pan, convection filter, tray, and all exterior surfaces according the Cleaning the Surfaces of the Oven section on the surfaces of time for cleaning instructions. See page 30 for manual scrubbing of power consumed. You may clean heavily soiled areas with aluminum...
.../OFF keys to select the oven to be damaged. • The control panel automatically locks the oven door during self-cleaning. How to Use the Self-Cleaning Feature IMPORTANT: Remove the racks and broiler pan, convection filter, tray, and all exterior surfaces according the Cleaning the Surfaces of the Oven section on the surfaces of time for cleaning instructions. See page 30 for manual scrubbing of power consumed. You may clean heavily soiled areas with aluminum...
Use & Care Manuals
Page 31
... to exercise caution because the oven will not lock. You will need to open. ▲ UPPER ON HEAVY SELF CLEAN Door Locked 12:25 PM 29 The oven will display a warning message: SELF CLEAN INSTRUCTIONS REMOVE RACKS, BROILER PAN, TRAY, ALL UTENSILS WIPE UP ALL EXCESS SPILLAGE. SABBATH DEHYDRATE PROOF DEFROST SELF CLEAN ▲ UPPER ON 12:25 PM CLEAN CYCLE COMPLETE Door Unlocked • The oven will keep the door locked until it will release the...
... to exercise caution because the oven will not lock. You will need to open. ▲ UPPER ON HEAVY SELF CLEAN Door Locked 12:25 PM 29 The oven will display a warning message: SELF CLEAN INSTRUCTIONS REMOVE RACKS, BROILER PAN, TRAY, ALL UTENSILS WIPE UP ALL EXCESS SPILLAGE. SABBATH DEHYDRATE PROOF DEFROST SELF CLEAN ▲ UPPER ON 12:25 PM CLEAN CYCLE COMPLETE Door Unlocked • The oven will keep the door locked until it will release the...

Use & Care Manuals
Page 32
...-installing it according to clean the inside or outside , clean them with Dacor Cook Top Cleaning Creme (Part No. NOTE: If you don't, the spinning fan blades at back of the oven chamber. Cleaning the Convection Filter The convection filter is cool. • For your oven. Be careful not to cook. Filter: located at the back of the oven. Do not use Dacor Stainless Steel Cleaner (Part No. Touch the CANCEL/SECURE key for self-cleaning. Use...
...-installing it according to clean the inside or outside , clean them with Dacor Cook Top Cleaning Creme (Part No. NOTE: If you don't, the spinning fan blades at back of the oven chamber. Cleaning the Convection Filter The convection filter is cool. • For your oven. Be careful not to cook. Filter: located at the back of the oven. Do not use Dacor Stainless Steel Cleaner (Part No. Touch the CANCEL/SECURE key for self-cleaning. Use...
Use & Care Manuals
Page 35
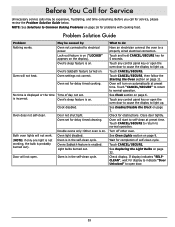
... electrical power. Turn off other oven. Problem Solution Guide Problem: Nothing works. Oven settings not correct. Oven light disabled. Check for 5 seconds. Touch CANCEL/SECURE. Door not shut tight. See Clock section on page 11. See Replacing the Light Bulbs on page 9. Oven set . Touch any control panel key or open the oven door to cause the display to light up . See Oven Lights section on page 32. May be expensive, frustrating, and time-consuming. Before you call for delay timed cleaning. No time...
... electrical power. Turn off other oven. Problem Solution Guide Problem: Nothing works. Oven settings not correct. Oven light disabled. Check for 5 seconds. Touch CANCEL/SECURE. Door not shut tight. See Clock section on page 11. See Replacing the Light Bulbs on page 9. Oven set . Touch any control panel key or open the oven door to cause the display to light up . See Oven Lights section on page 32. May be expensive, frustrating, and time-consuming. Before you call for delay timed cleaning. No time...


