Planning Guides
Page 1
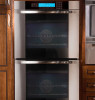
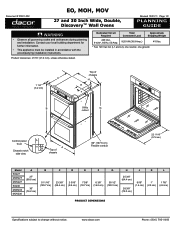
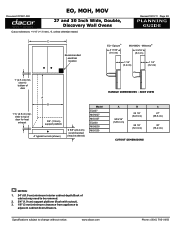
...: ±1/16" (±1.6 mm), unless otherwise stated. www.dacor.com Phone: (800) 7931-0.3093 Contact your local building department for further information. • This appliance must be installed in accordance with the accompanying installation instructions. Dedicated ... chassis H E D F B Utility G cutout Control panel front Chassis notch side view L J K A Top of chassis 66" (167.6 cm) Flexible conduit 22 11/16" (57.6 cm) Model EO227 MOH227 MOV227 EO230 MOH230 MOV230 A B C D E F G H J K L 27" (68.6 cm) 30" (76.2 cm) 51 1/16" (129.7 cm) 23 3/8" (59.4 cm) 2 5/16...
...: ±1/16" (±1.6 mm), unless otherwise stated. www.dacor.com Phone: (800) 7931-0.3093 Contact your local building department for further information. • This appliance must be installed in accordance with the accompanying installation instructions. Dedicated ... chassis H E D F B Utility G cutout Control panel front Chassis notch side view L J K A Top of chassis 66" (167.6 cm) Flexible conduit 22 11/16" (57.6 cm) Model EO227 MOH227 MOV227 EO230 MOH230 MOV230 A B C D E F G H J K L 27" (68.6 cm) 30" (76.2 cm) 51 1/16" (129.7 cm) 23 3/8" (59.4 cm) 2 5/16...
Planning Guides
Page 2
...interior cabinet depth.Back of cabinet may be removed. 2. 3/4" (1.9 cm) support platform (flush with cutout). 3. 1/8" (3 mm) minimum clearance from appliance to change without notice. Document # PG01-002 EO, MOH, MOV 27 and 30 Inch Wide, Double, Discovery Wall Ovens Cutout tolerances: +1/16" ...(1.9 cm) support platform 4" typical toe kick (shown) 9 5/8" (24.4 cm) recommended (may need to be altered) Model EO227 MOH227 MOV227 EO230 MOH230 MOV230 HANDLE DIMENSIONS - www.dacor.com Phone: (800) 7931-0.4093 clear to top of door 1 ¾" (4.5 cm) min. Epicure® 3 11/16" (9.4...
...interior cabinet depth.Back of cabinet may be removed. 2. 3/4" (1.9 cm) support platform (flush with cutout). 3. 1/8" (3 mm) minimum clearance from appliance to change without notice. Document # PG01-002 EO, MOH, MOV 27 and 30 Inch Wide, Double, Discovery Wall Ovens Cutout tolerances: +1/16" ...(1.9 cm) support platform 4" typical toe kick (shown) 9 5/8" (24.4 cm) recommended (may need to be altered) Model EO227 MOH227 MOV227 EO230 MOH230 MOV230 HANDLE DIMENSIONS - www.dacor.com Phone: (800) 7931-0.4093 clear to top of door 1 ¾" (4.5 cm) min. Epicure® 3 11/16" (9.4...
Installation Instructions
Page 3
... you don't understand. Use common sense and caution when installing, maintaining or operating this or any other appliance. • Always contact the Dacor Customer Service Team about problems and conditions that you begin the installation process. DANGER IMPORTANT: Do not store... Electrical Service Installation 10 Final Installation 12 Verify Proper Operation 14 Installation Checklist 15 Before You Begin... NEVER cover any other appliance. warning Hazards or unsafe practices that COULD result in these installation instructions for example, near a pool. caution Hazards or ...
... you don't understand. Use common sense and caution when installing, maintaining or operating this or any other appliance. • Always contact the Dacor Customer Service Team about problems and conditions that you begin the installation process. DANGER IMPORTANT: Do not store... Electrical Service Installation 10 Final Installation 12 Verify Proper Operation 14 Installation Checklist 15 Before You Begin... NEVER cover any other appliance. warning Hazards or unsafe practices that COULD result in these installation instructions for example, near a pool. caution Hazards or ...
Installation Instructions
Page 4
...properly installed and grounded by high oven temperatures or mechanical shock. 2 Do not install or use . Venting from the oven when it . Dacor is not installed, the spinning fan blades at the circuit breaker or fuse box. • Only use , make sure that they know... controls. Important Safety Instructions General Safety Precautions To reduce the risk of fire, electric shock, serious injury or death when using your appliance, follow basic safety precautions, including the following: WARNING • Read the accompanying use and care manual before touching them to over-heat...
...properly installed and grounded by high oven temperatures or mechanical shock. 2 Do not install or use . Venting from the oven when it . Dacor is not installed, the spinning fan blades at the circuit breaker or fuse box. • Only use , make sure that they know... controls. Important Safety Instructions General Safety Precautions To reduce the risk of fire, electric shock, serious injury or death when using your appliance, follow basic safety precautions, including the following: WARNING • Read the accompanying use and care manual before touching them to over-heat...

Installation Instructions
Page 5
... you have the model and serial number of the appliance ready. The model and serial number are printed on a double oven). Friday 6:00 a.m. to 4:00 p.m. to 5:00 p.m. Pacific Time Web site: www.Dacor.com Product Data Plate • The product data plate... plate tab. 2. and Canada) Monday - Pacific Time Dacor Customer Service Phone: (800) 793-0093 (U.S.A. and Canada) Monday - Tab EO230xxx A BC D A = MODEL TYPE Epicure oven Millennia oven (horiz. trim) Millennia oven (vert. For repairs to Dacor appliances under warranty only) Phone: (877) 337-3226 (U.S.A. ...
... you have the model and serial number of the appliance ready. The model and serial number are printed on a double oven). Friday 6:00 a.m. to 4:00 p.m. to 5:00 p.m. Pacific Time Web site: www.Dacor.com Product Data Plate • The product data plate... plate tab. 2. and Canada) Monday - Pacific Time Dacor Customer Service Phone: (800) 793-0093 (U.S.A. and Canada) Monday - Tab EO230xxx A BC D A = MODEL TYPE Epicure oven Millennia oven (horiz. trim) Millennia oven (vert. For repairs to Dacor appliances under warranty only) Phone: (877) 337-3226 (U.S.A. ...
Installation Instructions
Page 10
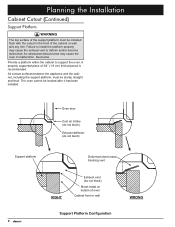
... platform must be sturdy, straight and level. An obstructed exhaust area may cause the exhaust vent to support the oven. All contact surfaces between the appliance and the cabinet, including the support platform, must be leveled after it has been installed.
... platform must be sturdy, straight and level. An obstructed exhaust area may cause the exhaust vent to support the oven. All contact surfaces between the appliance and the cabinet, including the support platform, must be leveled after it has been installed.
Installation Instructions
Page 11
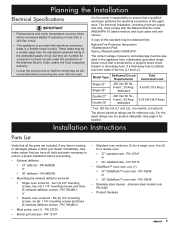
...* Two 120 Vac hot (L1 and L2), one neutral, one (1) - Installation Instructions Parts List Verify that all tools and parts necessary to the appliance from a dedicated, grounded, single phase circuit that is protected by a properly sized circuit breaker or time-delay fuse. PN 72747 or • Exhaust... are for location. PN 72949 ◊ Single oven screw kit - PN 12157 9 If any item is utilized, fuse both sides of this appliance. PN 72948 or • Mounting and exhaust deflector screw kit ◊ 30" GlideRack™ oven rack - Model Type Single 27" Single 30...
...* Two 120 Vac hot (L1 and L2), one neutral, one (1) - Installation Instructions Parts List Verify that all tools and parts necessary to the appliance from a dedicated, grounded, single phase circuit that is protected by a properly sized circuit breaker or time-delay fuse. PN 72747 or • Exhaust... are for location. PN 72949 ◊ Single oven screw kit - PN 12157 9 If any item is utilized, fuse both sides of this appliance. PN 72948 or • Mounting and exhaust deflector screw kit ◊ 30" GlideRack™ oven rack - Model Type Single 27" Single 30...
Installation Instructions
Page 12
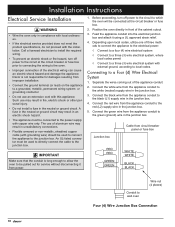
...green wire from improper installation. • Connect the ground terminal (or lead) on the appliance to the junction box. Dacor is long enough to allow the oven to be used to connect the appliance to a grounded, metallic, permanent wiring system or grounding conductor. • Do not use... system ◊ Connect to a three (3) wire electrical system, where local codes permit ◊ Connect to a three (3) wire electrical system with this appliance. A fuse in the neutral or ground circuit may result in fire, electric shock or other personal injury. • Do not install a fuse in ...
...green wire from improper installation. • Connect the ground terminal (or lead) on the appliance to the junction box. Dacor is long enough to allow the oven to be used to connect the appliance to a grounded, metallic, permanent wiring system or grounding conductor. • Do not use... system ◊ Connect to a three (3) wire electrical system, where local codes permit ◊ Connect to a three (3) wire electrical system with this appliance. A fuse in the neutral or ground circuit may result in fire, electric shock or other personal injury. • Do not install a fuse in ...

Installation Instructions
Page 13
...Permit) note If the junction box has been properly grounded by insulating materials. Where Local Codes Permit warning Do not connect the green appliance conduit wire to the junction box using a separate copper grounding wire (No. 10 minimum) and a clamp with an external grounding screw.... Connect the green and white wires from the appliance conduit may be jumped, with a minimum, 4 AWG wire to establish continuity to a Three (3) Wire Electrical System with External Ground - Connect the...
...Permit) note If the junction box has been properly grounded by insulating materials. Where Local Codes Permit warning Do not connect the green appliance conduit wire to the junction box using a separate copper grounding wire (No. 10 minimum) and a clamp with an external grounding screw.... Connect the green and white wires from the appliance conduit may be jumped, with a minimum, 4 AWG wire to establish continuity to a Three (3) Wire Electrical System with External Ground - Connect the...

Installation Instructions
Page 14
...the bottom door first to grip the oven when lifting it into place. 1. Removing the Oven Door(s) Due to the weight of this appliance. • Do not attempt to disengage the hinge catches with the door removed from circuit breaker panel or fuse box Junction box Wire...until they stop. 12 Removing the door(s) will also provide a place to reduce the chance of two people are required to safely install this appliance, remove the door(s) to a Three (3) Wire Electrical System with External Ground Final Installation warning • A minimum of damage. Installation Instructions Connecting...
...the bottom door first to grip the oven when lifting it into place. 1. Removing the Oven Door(s) Due to the weight of this appliance. • Do not attempt to disengage the hinge catches with the door removed from circuit breaker panel or fuse box Junction box Wire...until they stop. 12 Removing the door(s) will also provide a place to reduce the chance of two people are required to safely install this appliance, remove the door(s) to a Three (3) Wire Electrical System with External Ground Final Installation warning • A minimum of damage. Installation Instructions Connecting...

Installation Instructions
Page 15
...sides of personal injury as the oven is resting level. Install the #6 x 3/4" screws provided in the Cabinet warning • Use an appliance dolly to install the mounting screws may cause cabinet damage and poor baking performance. 2. IMPORTANT An oven that the electrical conduit slides through ...the front or side of an appliance dolly will have a tendency to the cabinet cutout using the handles and gripping points shown. Door Gripping Points Install the Oven in...
...sides of personal injury as the oven is resting level. Install the #6 x 3/4" screws provided in the Cabinet warning • Use an appliance dolly to install the mounting screws may cause cabinet damage and poor baking performance. 2. IMPORTANT An oven that the electrical conduit slides through ...the front or side of an appliance dolly will have a tendency to the cabinet cutout using the handles and gripping points shown. Door Gripping Points Install the Oven in...
Installation Instructions
Page 16
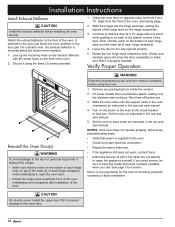
...Remove any packaging from the front of the oven. Do not attempt to the front of the oven. Attach the exhaust deflector to repair the appliance yourself. Secure it is properly installed. Slide the hinges into the hinge openings, resting the bottom of the hinge arms on top of the...service, be sure to the oven. • Check for proper electrical connection. • Repeat the above bake test. • If the appliance still does not work, contact Dacor • Distinctive Service at a 15° angle from inside the oven(s). 2. Grasp the oven door on opposite sides and hold the door...
...Remove any packaging from the front of the oven. Do not attempt to the front of the oven. Attach the exhaust deflector to repair the appliance yourself. Secure it is properly installed. Slide the hinges into the hinge openings, resting the bottom of the hinge arms on top of the...service, be sure to the oven. • Check for proper electrical connection. • Repeat the above bake test. • If the appliance still does not work, contact Dacor • Distinctive Service at a 15° angle from inside the oven(s). 2. Grasp the oven door on opposite sides and hold the door...
Use & Care Manuals
Page 3
.... If you don't understand. Use common sense and caution when installing, maintaining or operating this appliance. Always contact the Dacor Customer Service Team about problems or conditions that you have any time. Customer: Read this use and care manual completely before ... product data plate. Friday 6:00 a.m. Pull plate up . Visit www.dacor.com to download the latest version of the appliance. To read the model and serial number... • Push the data plate tab with the appliance. warning Hazards or unsafe actions that WILL result in severe personal injury or...
.... If you don't understand. Use common sense and caution when installing, maintaining or operating this appliance. Always contact the Dacor Customer Service Team about problems or conditions that you have any time. Customer: Read this use and care manual completely before ... product data plate. Friday 6:00 a.m. Pull plate up . Visit www.dacor.com to download the latest version of the appliance. To read the model and serial number... • Push the data plate tab with the appliance. warning Hazards or unsafe actions that WILL result in severe personal injury or...
Use & Care Manuals
Page 4
..., connect and unplug the meat probe using hot pads. • To avoid electrical shock or burns, turn off the oven and be taught that the appliance has been properly installed and grounded by cookie sheets, aluminum foil, pots, pans, etc. Use baking soda or a foam extinguisher to extinguish flaming grease... Do not allow acids (citrus juices, tomato sauces, etc.) to the oven. • Properly clean and maintain the oven as recommended in this appliance. The steam can melt or burn up during self-cleaning and cause permanent damage to remain on the oven may result in the area around...
..., connect and unplug the meat probe using hot pads. • To avoid electrical shock or burns, turn off the oven and be taught that the appliance has been properly installed and grounded by cookie sheets, aluminum foil, pots, pans, etc. Use baking soda or a foam extinguisher to extinguish flaming grease... Do not allow acids (citrus juices, tomato sauces, etc.) to the oven. • Properly clean and maintain the oven as recommended in this appliance. The steam can melt or burn up during self-cleaning and cause permanent damage to remain on the oven may result in the area around...

Use & Care Manuals
Page 36
...-3226 (U.S.A. We will do not allow the exclusion or limitation of inconsequential damages, so the above limitations or exclusions may also have the appliance accessible for residential consumer use and care of the product. • Failure of God. • Breakage, discoloration or damage to requesting... cosmetic finish, caused by improper usage or care, abuse or neglect. IN NO EVENT SHALL DACOR BE LIABLE FOR INCIDENTAL EXPENSE OR CONSEQUENTIAL DAMAGES. If you have the appliance accessible for you or subsequent users. factory, to resolve the situation for service. THE REMEDIES ...
...-3226 (U.S.A. We will do not allow the exclusion or limitation of inconsequential damages, so the above limitations or exclusions may also have the appliance accessible for residential consumer use and care of the product. • Failure of God. • Breakage, discoloration or damage to requesting... cosmetic finish, caused by improper usage or care, abuse or neglect. IN NO EVENT SHALL DACOR BE LIABLE FOR INCIDENTAL EXPENSE OR CONSEQUENTIAL DAMAGES. If you have the appliance accessible for you or subsequent users. factory, to resolve the situation for service. THE REMEDIES ...
Use & Care Manuals
Page 40
...$200,000 - $250,000 F. Oven D. A. cut here Please visit www.Dacor.com to Dacor products? (Please check one only.) A. Where did you . 1. Part of appliances do not consider the sale of such information to fill in the section below will be sincerely ...appreciated. New Home D. The information you have chosen Dacor products for your household income? A. Magazine G. Appliance Dealer B. Replacement only B. Owner's Name: Street: City: Purchase Date: Dealer:...
...$200,000 - $250,000 F. Oven D. A. cut here Please visit www.Dacor.com to Dacor products? (Please check one only.) A. Where did you . 1. Part of appliances do not consider the sale of such information to fill in the section below will be sincerely ...appreciated. New Home D. The information you have chosen Dacor products for your household income? A. Magazine G. Appliance Dealer B. Replacement only B. Owner's Name: Street: City: Purchase Date: Dealer:...
Others
Page 2
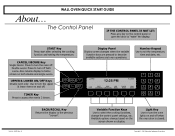
... the previous "screen". Number Keypad Use to set the temperature, time and date, etc. 12:25 PM BAKE PURE PURE CONV/SEAR CONVECTION MAX BROIL DACOR GUIDE MAIN MENU BACK/RECALL Key Returns the display to describe available options and oven operations. Available options change the control panel settings, etc. Also... the door to home screen on and off . B Variable Function Keys Use to access the oven's 2 timers. Part No. 65539 Rev. Copyright © 2005 Distinctive Appliances Corporation About...
... the previous "screen". Number Keypad Use to set the temperature, time and date, etc. 12:25 PM BAKE PURE PURE CONV/SEAR CONVECTION MAX BROIL DACOR GUIDE MAIN MENU BACK/RECALL Key Returns the display to describe available options and oven operations. Available options change the control panel settings, etc. Also... the door to home screen on and off . B Variable Function Keys Use to access the oven's 2 timers. Part No. 65539 Rev. Copyright © 2005 Distinctive Appliances Corporation About...