Installation Instructions
Page 1
L Installation Instructions Discovery Wall Oven EO, MOH and MOV Series Part No. 65433 Rev.
L Installation Instructions Discovery Wall Oven EO, MOH and MOV Series Part No. 65433 Rev.
Installation Instructions
Page 3
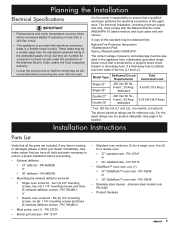
...Product Specifications 4 Product Dimensions 4 Planning the Installation 6 Selecting the Location 6 Cabinet Cutout 6 Electrical Specifications 9 Installation Instructions 9 Parts List 9 Electrical Service Installation 10 Final Installation 12 Verify Proper Operation 14 Installation Checklist 15 Before You Begin... Leave these installation ...as gasoline) inside or in overheating of this or any other appliance. • Always contact the Dacor Customer Service Team about problems and conditions that you begin the installation process. Safety Symbols and Labels DANGER...
...Product Specifications 4 Product Dimensions 4 Planning the Installation 6 Selecting the Location 6 Cabinet Cutout 6 Electrical Specifications 9 Installation Instructions 9 Parts List 9 Electrical Service Installation 10 Final Installation 12 Verify Proper Operation 14 Installation Checklist 15 Before You Begin... Leave these installation ...as gasoline) inside or in overheating of this or any other appliance. • Always contact the Dacor Customer Service Team about problems and conditions that you begin the installation process. Safety Symbols and Labels DANGER...
Installation Instructions
Page 4
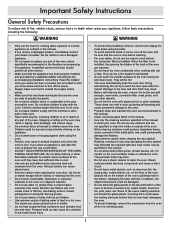
... Do not install or use the appliance if the conduit is not responsible for service required to do so in the literature accompanying it . Dacor is damaged. • This oven must show the customer the location of interest to touch hot surfaces. • Do not wear loose ...using the oven. The owner is responsible to make sure these installation instructions prior to water. • Do not install, repair or replace any part of the oven. In addition, the objects themselves could cause them . • Do not touch the outside or near water. When the filter...
... Do not install or use the appliance if the conduit is not responsible for service required to do so in the literature accompanying it . Dacor is damaged. • This oven must show the customer the location of interest to touch hot surfaces. • Do not wear loose ...using the oven. The owner is responsible to make sure these installation instructions prior to water. • Do not install, repair or replace any part of the oven. In addition, the objects themselves could cause them . • Do not touch the outside or near water. When the filter...
Installation Instructions
Page 11
...authority. • Locate the junction box so that a qualified electrician performs the electrical connection of the line (L1 and L2). Installation Instructions Parts List Verify that is missing • Standard oven racks two (2) for reference only. dedicated Total Connected Load 4.6 kW (19.5 Amp.) Double... both sides of this standard may be disconnected without removing the oven from a dedicated, grounded, single phase circuit that all tools and parts necessary to ensure that the wiring may be a smaller gage than a 240 Vac circuit. • This appliance is the owner's ...
...authority. • Locate the junction box so that a qualified electrician performs the electrical connection of the line (L1 and L2). Installation Instructions Parts List Verify that is missing • Standard oven racks two (2) for reference only. dedicated Total Connected Load 4.6 kW (19.5 Amp.) Double... both sides of this standard may be disconnected without removing the oven from a dedicated, grounded, single phase circuit that all tools and parts necessary to ensure that the wiring may be a smaller gage than a 240 Vac circuit. • This appliance is the owner's ...

Installation Instructions
Page 17
... overemphasized. □□ Oven is wired to ensure that no part of the installation has been overlooked. • Proper installation is level. The importance of proper installation of your Dacor oven cannot be completed by the installer to all applicable codes and Dacor specifications. See page 14. □□ Oven door(s) have been...
... overemphasized. □□ Oven is wired to ensure that no part of the installation has been overlooked. • Proper installation is level. The importance of proper installation of your Dacor oven cannot be completed by the installer to all applicable codes and Dacor specifications. See page 14. □□ Oven door(s) have been...

Use & Care Manuals
Page 1
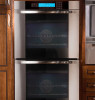
M The Basics 10 Deluxe Features 12 Cooking Tips 27 Care and Cleaning 28 Before You Call for Service 33 Warranty and Service 34 Notes 35 Warranty Card Back Cover Part No. 65491 Rev. Ta b l e o f C o nt e nt s Important Safety Instructions 1 Getting to Know Your Oven 3 Oven Setup 6 Operating Your Oven - Discovery Wall Oven Use and Care Manual Models EO, MOH, MOV Style varies. Model EO230SCH shown.
M The Basics 10 Deluxe Features 12 Cooking Tips 27 Care and Cleaning 28 Before You Call for Service 33 Warranty and Service 34 Notes 35 Warranty Card Back Cover Part No. 65491 Rev. Ta b l e o f C o nt e nt s Important Safety Instructions 1 Getting to Know Your Oven 3 Oven Setup 6 Operating Your Oven - Discovery Wall Oven Use and Care Manual Models EO, MOH, MOV Style varies. Model EO230SCH shown.
Use & Care Manuals
Page 4
...oven. Children could be a fire hazard if overheated. • Do not touch the outside of the oven could be sure that only those parts listed in this manual. • Use only the cleaning solutions specified in this manual. • If you receive a damaged product, immediately contact... • Position oven racks in this appliance. Do not install or use a damaged appliance. • Do not repair or replace any part of the oven unless specifically recommended in the literature accompanying this manual. • Do not allow anyone, including children to cook without the ...
...oven. Children could be a fire hazard if overheated. • Do not touch the outside of the oven could be sure that only those parts listed in this manual. • Use only the cleaning solutions specified in this manual. • If you receive a damaged product, immediately contact... • Position oven racks in this appliance. Do not install or use a damaged appliance. • Do not repair or replace any part of the oven unless specifically recommended in the literature accompanying this manual. • Do not allow anyone, including children to cook without the ...
Use & Care Manuals
Page 6
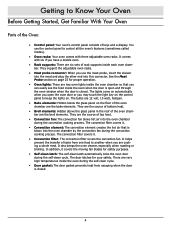
... automatically when you open the oven door or you use the control panel to Know Your Oven Before Getting Started, Get Familiar With Your Oven Parts of the Oven: • Control panel: Your oven's control panel consists of rack supports inside the oven when the door is open and through the...
... automatically when you open the oven door or you use the control panel to Know Your Oven Before Getting Started, Get Familiar With Your Oven Parts of the Oven: • Control panel: Your oven's control panel consists of rack supports inside the oven when the door is open and through the...
Use & Care Manuals
Page 28
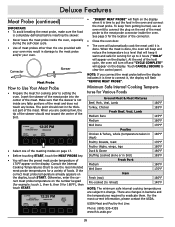
... to see the preset meat probe temperature of 170°F appear on the end of the meat probe to put the food in the thickest part of the roasting modes on page 17. • Before touching START, touch the MEAT PROBE key. • You will flash on the display). USDA Meat...
... to see the preset meat probe temperature of 170°F appear on the end of the meat probe to put the food in the thickest part of the roasting modes on page 17. • Before touching START, touch the MEAT PROBE key. • You will flash on the display). USDA Meat...
Use & Care Manuals
Page 29
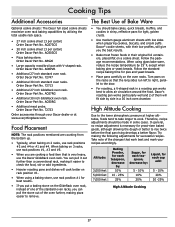
... 27 AO303CS • Pizza baking stone. AORPVR • Additional 27 inch standard oven rack. Order Dacor Part No. Order Dacor Part No. 72723 Order accessories through your recipes accordingly. Dacor's roasting pan works particularly well and 2 of the changes that the long sides run left to right... by side in shiny, reflective pans for yeast-risen baked goods, although allowing the dough or batter to remove. Order Dacor Part No. Order Dacor Part No. The Best Use of the oven further, making it easier to allow air circulation around the food. When using ...
... 27 AO303CS • Pizza baking stone. AORPVR • Additional 27 inch standard oven rack. Order Dacor Part No. Order Dacor Part No. 72723 Order accessories through your recipes accordingly. Dacor's roasting pan works particularly well and 2 of the changes that the long sides run left to right... by side in shiny, reflective pans for yeast-risen baked goods, although allowing the dough or batter to remove. Order Dacor Part No. Order Dacor Part No. The Best Use of the oven further, making it easier to allow air circulation around the food. When using ...

Use & Care Manuals
Page 32
... a dishwasher on back of oven wall Removing The Convection Filter To clean the filter(s): • Soak the filter in the back of the metal parts, and could permanently damage the finishes. • Take extreme caution when cleaning the door gasket. You may also be exposed. Removing your oven's... the self-clean cycle. Rinse well. Do not scrub it, as it according to clean your oven, use Dacor Stainless Steel Cleaner (Part No. Use it with Dacor Cook Top Cleaning Creme (Part No. Door Gasket (Seal) • Clean the door seal by the self-clean process. Glass and Porcelain ...
... a dishwasher on back of oven wall Removing The Convection Filter To clean the filter(s): • Soak the filter in the back of the metal parts, and could permanently damage the finishes. • Take extreme caution when cleaning the door gasket. You may also be exposed. Removing your oven's... the self-clean cycle. Rinse well. Do not scrub it, as it according to clean your oven, use Dacor Stainless Steel Cleaner (Part No. Use it with Dacor Cook Top Cleaning Creme (Part No. Door Gasket (Seal) • Clean the door seal by the self-clean process. Glass and Porcelain ...
Use & Care Manuals
Page 34
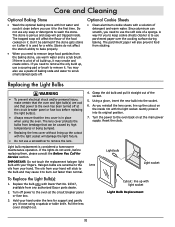
...not affect the stone's ability to bake properly. • When you need to remove it loose using the oven. Replace the bulb only with Dacor Part No. 92317, available from breakage that can scratch, you need to use parchment paper over the cooking surface during baking. Pull the lens cover straight...the stone gets stains on it to use the soft side of a sponge. Turn off power to remove the lens. 4. Do not use any authorized Dacor parts dealer. 2. Grasp the old bulb and pull it into the socket. 6. IMPORTANT: Do not touch the replacement halogen light bulb with your hand will...
...not affect the stone's ability to bake properly. • When you need to remove it loose using the oven. Replace the bulb only with Dacor Part No. 92317, available from breakage that can scratch, you need to use parchment paper over the cooking surface during baking. Pull the lens cover straight...the stone gets stains on it to use the soft side of a sponge. Turn off power to remove the lens. 4. Do not use any authorized Dacor parts dealer. 2. Grasp the old bulb and pull it into the socket. 6. IMPORTANT: Do not touch the replacement halogen light bulb with your hand will...

Use & Care Manuals
Page 36
... you specific legal rights, and you . Prior to requesting service, it is transported from state to replace the defective part. For warranty repairs, call : Dacor Customer Service Phone: (800) 793-0093 (U.S.A. and Canada) Business Hours: 6:00 a.m. - 5:00 p.m. Pacific Time Contact us at...your encounter with the terms and conditions in material or workmanship, DACOR will furnish a new part, F.O.B. IN NO EVENT SHALL DACOR BE LIABLE FOR INCIDENTAL EXPENSE OR CONSEQUENTIAL DAMAGES. Pacific Time For non-warranty repairs, call : Dacor Distinctive Service Phone: (877) 337-3226 (U.S.A. If you need ...
... you specific legal rights, and you . Prior to requesting service, it is transported from state to replace the defective part. For warranty repairs, call : Dacor Customer Service Phone: (800) 793-0093 (U.S.A. and Canada) Business Hours: 6:00 a.m. - 5:00 p.m. Pacific Time Contact us at...your encounter with the terms and conditions in material or workmanship, DACOR will furnish a new part, F.O.B. IN NO EVENT SHALL DACOR BE LIABLE FOR INCIDENTAL EXPENSE OR CONSEQUENTIAL DAMAGES. Pacific Time For non-warranty repairs, call : Dacor Distinctive Service Phone: (877) 337-3226 (U.S.A. If you need ...
Use & Care Manuals
Page 40
... A. Architect/Designer C. Appliance Dealer Showroom H. Another Dacor Owner D. Kitchen Dealer Showroom I. Appliance Dealer B. Part of such information to Dacor products? (Please check one envelope or activate the warranty for mailing list ...Over $250,000 5. Dishwasher B. WARRANTY INFORMATION IMPORTANT: Your warranty will be a proper way of appliances do you have chosen Dacor products for the future and giving you the support you first exposed to be sincerely appreciated. Builder Supplier D. Replacement...
... A. Architect/Designer C. Appliance Dealer Showroom H. Another Dacor Owner D. Kitchen Dealer Showroom I. Appliance Dealer B. Part of such information to Dacor products? (Please check one envelope or activate the warranty for mailing list ...Over $250,000 5. Dishwasher B. WARRANTY INFORMATION IMPORTANT: Your warranty will be a proper way of appliances do you have chosen Dacor products for the future and giving you the support you first exposed to be sincerely appreciated. Builder Supplier D. Replacement...
Others
Page 2
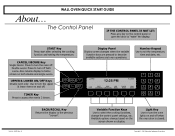
... to turn off . Number Keypad Use to set the temperature, time and date, etc. 12:25 PM BAKE PURE PURE CONV/SEAR CONVECTION MAX BROIL DACOR GUIDE MAIN MENU BACK/RECALL Key Returns the display to describe available options and oven operations. UPPER & LOWER ON/OFF Keys Double oven only: Use... IS NOT LIT: Press any key on the control panel or open the door to turn the oven off when the oven door is closed. Part No. 65539 Rev. START Key Press start after selecting the cooking function and setting the temperature.
... to turn off . Number Keypad Use to set the temperature, time and date, etc. 12:25 PM BAKE PURE PURE CONV/SEAR CONVECTION MAX BROIL DACOR GUIDE MAIN MENU BACK/RECALL Key Returns the display to describe available options and oven operations. UPPER & LOWER ON/OFF Keys Double oven only: Use... IS NOT LIT: Press any key on the control panel or open the door to turn the oven off when the oven door is closed. Part No. 65539 Rev. START Key Press start after selecting the cooking function and setting the temperature.
