
Planning Guides
Page 1
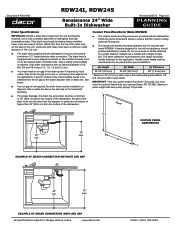
...-007 RDW24I, RDW24S Renaissance® 24" Wide Built-In Dishwasher Revised 02/07/12 Page 1/3 PLANNING GUIDE Product Dimensions Product tolerances: ±1/16" (±1.6 mm) otherwise stated A warning • Observe all governing codes and ordinances during planning and installation. A custom overlay panel allows you to blend the exterior of either a Dacor glass panel...
...-007 RDW24I, RDW24S Renaissance® 24" Wide Built-In Dishwasher Revised 02/07/12 Page 1/3 PLANNING GUIDE Product Dimensions Product tolerances: ±1/16" (±1.6 mm) otherwise stated A warning • Observe all governing codes and ordinances during planning and installation. A custom overlay panel allows you to blend the exterior of either a Dacor glass panel...

Planning Guides
Page 2
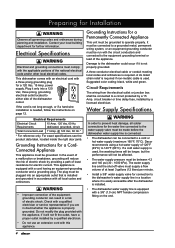
...9632;■ Water Supply Valve Requirement: 3/8" water supply valve for connection to dishwasher's water supply line is required in a location where it needs to be covered with an edge protector. www.dacor.com Phone: (800) 793-0093 Water Supply Specifications ■■ Water ...9632;■ Do not modify the power cord or use an extension cord. Dacor is modified. ■■ The dishwasher can open. Document # PG10-007 RDW24I, RDW24S Renaissance 24" Wide Built-In Dishwasher Revised 02/07/12 Page 2/3 PLANNING GUIDE Electrical Specifications Dedicated Circuit Required Total...
...9632;■ Water Supply Valve Requirement: 3/8" water supply valve for connection to dishwasher's water supply line is required in a location where it needs to be covered with an edge protector. www.dacor.com Phone: (800) 793-0093 Water Supply Specifications ■■ Water ...9632;■ Do not modify the power cord or use an extension cord. Dacor is modified. ■■ The dishwasher can open. Document # PG10-007 RDW24I, RDW24S Renaissance 24" Wide Built-In Dishwasher Revised 02/07/12 Page 2/3 PLANNING GUIDE Electrical Specifications Dedicated Circuit Required Total...
Planning Guides
Page 3
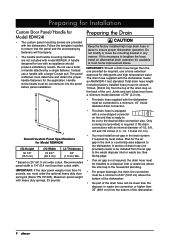
...inches (1.3, 1.6, 1.8 and 2.2 cm). ■■ You must be required, use with the dishwasher. The panel craftsman must not exceed 10 feet. (304.8 cm) from the bottom of the dishwasher. www.dacor.com Phone: (800) 793-0093 Total drain hose length (including factory installed hose) must determine ... See below to ensure that is ready to be cut to the dishwasher. Maximum panel weight with a larger D-style pull. Document # PG10-007 RDW24I, RDW24S Renaissance 24" Wide Built-In Dishwasher Revised 02/07/12 Page 3/3 PLANNING GUIDE Drain Specifications IMPORTANT: Should...
...inches (1.3, 1.6, 1.8 and 2.2 cm). ■■ You must be required, use with the dishwasher. The panel craftsman must not exceed 10 feet. (304.8 cm) from the bottom of the dishwasher. www.dacor.com Phone: (800) 793-0093 Total drain hose length (including factory installed hose) must determine ... See below to ensure that is ready to be cut to the dishwasher. Maximum panel weight with a larger D-style pull. Document # PG10-007 RDW24I, RDW24S Renaissance 24" Wide Built-In Dishwasher Revised 02/07/12 Page 3/3 PLANNING GUIDE Drain Specifications IMPORTANT: Should...
Installation Instructions
Page 1
B Installation Instructions Renaissance® Built-in Dishwasher Models RDW24S and RDW24I Part No. 105671 Rev.
B Installation Instructions Renaissance® Built-in Dishwasher Models RDW24S and RDW24I Part No. 105671 Rev.

Installation Instructions
Page 3
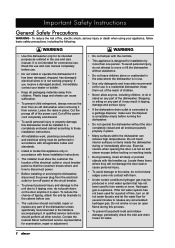
... Important Safety Instructions Important Information About Safety Instructions • The Important Safety Instructions and warnings in damage to the dishwasher's electrical system. Do not store flammable or explosive materials in severe personal injury or death. The owner is responsible to make... sure the dishwasher is properly installed. READ AND SAVE THESE INSTRUCTIONS 1 Use common sense and caution when installing, maintaining or operating this or any other appliance. • Always contact the Dacor Customer Service Team about problems and conditions that...
... Important Safety Instructions Important Information About Safety Instructions • The Important Safety Instructions and warnings in damage to the dishwasher's electrical system. Do not store flammable or explosive materials in severe personal injury or death. The owner is responsible to make... sure the dishwasher is properly installed. READ AND SAVE THESE INSTRUCTIONS 1 Use common sense and caution when installing, maintaining or operating this or any other appliance. • Always contact the Dacor Customer Service Team about problems and conditions that...
Installation Instructions
Page 4
... and sheets can achieve high temperatures. Contact the nearest Dacor authorized service representative for installation by more . Keep them . • Under certain conditions hydrogen gas may result in place. • Many surfaces within the dishwasher can cause suffocation. • To prevent child entrapment...items inside . • During loading, insert all enclosure panels properly in tipping, damage and serious injury. • If the dishwasher drain outlet is connected to a garbage disposer, make sure the disposer is open flame during or immediately after use . Important Safety...
... and sheets can achieve high temperatures. Contact the nearest Dacor authorized service representative for installation by more . Keep them . • Under certain conditions hydrogen gas may result in place. • Many surfaces within the dishwasher can cause suffocation. • To prevent child entrapment...items inside . • During loading, insert all enclosure panels properly in tipping, damage and serious injury. • If the dishwasher drain outlet is connected to a garbage disposer, make sure the disposer is open flame during or immediately after use . Important Safety...
Installation Instructions
Page 5
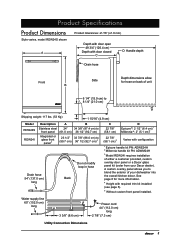
... (92.7 cm) 33 7/8" (86.0 cm) to blend the exterior of either a customer provided, custom overlay door panel or a Dacor glass panel kit (order from your dishwasher into the overall kitchen décor. A custom overlay panel allows you to 36" 1/2 (92.7 cm) 4 Drain hose 54" ...7/8" (58.1 cm) 5 Varies with required trim kit installed (see page 5). 5 Without custom front panel installed. Product Specifications Product Dimensions Style varies, model RDW24S shown A Product tolerances: ±1/16" (±1.6 mm) Depth with door open 49 3/4" (126.4 cm) Depth with door closed C D Handle depth ...
... (92.7 cm) 33 7/8" (86.0 cm) to blend the exterior of either a customer provided, custom overlay door panel or a Dacor glass panel kit (order from your dishwasher into the overall kitchen décor. A custom overlay panel allows you to 36" 1/2 (92.7 cm) 4 Drain hose 54" ...7/8" (58.1 cm) 5 Varies with required trim kit installed (see page 5). 5 Without custom front panel installed. Product Specifications Product Dimensions Style varies, model RDW24S shown A Product tolerances: ±1/16" (±1.6 mm) Depth with door open 49 3/4" (126.4 cm) Depth with door closed C D Handle depth ...
Installation Instructions
Page 6
...Instructions for a CordConnected Appliance This appliance must be grounded. circuit breaker or time delay fuse, installed by a 15 Amp. This dishwasher comes with an electrical cord with the applicable portions of the national electrical code and/or other local electrical codes. power supply. Contact... conductors and connected to the equipment grounding terminal or lead of 120°F (49°C) to 140°F (60°C). Dacor recommends using a hot water supply of the appliance. Suggested color coding: black, white and green. Circuit Requirements The wiring from ...
...Instructions for a CordConnected Appliance This appliance must be grounded. circuit breaker or time delay fuse, installed by a 15 Amp. This dishwasher comes with an electrical cord with the applicable portions of the national electrical code and/or other local electrical codes. power supply. Contact... conductors and connected to the equipment grounding terminal or lead of 120°F (49°C) to 140°F (60°C). Dacor recommends using a hot water supply of the appliance. Suggested color coding: black, white and green. Circuit Requirements The wiring from ...

Installation Instructions
Page 7
...right and left side of the door. 22" "(5.1(5cm.)1Minc. Check to see page 15). • If the dishwasher is installed in a 24" wide cutout installation of a trim kit (Dacor PN 106925) is required to the kitchen sink for all cutout surfaces must be met or exceeded (see page 6)... The access hole(s) in diameter. Front View Model (E) (F) RDW24I* 23 5/8" (60.0 cm) 33 7/8" (86.0 cm) to 24" (61.0 cm) to 36" (91.4 cm) RDW24S** 24" (61.0 cm) 34 3/8" (87.3 cm) to 36 1/2" (92.7 cm) *If installing model RDWH24I in a corner, allow a minimum clearance of an approved edge protector. &#...
...right and left side of the door. 22" "(5.1(5cm.)1Minc. Check to see page 15). • If the dishwasher is installed in a 24" wide cutout installation of a trim kit (Dacor PN 106925) is required to the kitchen sink for all cutout surfaces must be met or exceeded (see page 6)... The access hole(s) in diameter. Front View Model (E) (F) RDW24I* 23 5/8" (60.0 cm) 33 7/8" (86.0 cm) to 24" (61.0 cm) to 36" (91.4 cm) RDW24S** 24" (61.0 cm) 34 3/8" (87.3 cm) to 36 1/2" (92.7 cm) *If installing model RDWH24I in a corner, allow a minimum clearance of an approved edge protector. &#...
Installation Instructions
Page 8
... to a disposer inlet or waste tee above the sink trap in any manner. Handle screw heads must order the optional heavy duty door spring kit (Dacor PN 701385). Joints and joint tubes must have a minimum inside diameter drain connection. • The drain hose is not required, the drain hose must not... than the disposer or waste tee connection or higher than 35" (88.9 cm) from the top of the drain loop on the back of the dishwasher. 6 Follow the template included to the desired drain connection size. Total drain hose length (including factory installed hose) must be installed to the...
... to a disposer inlet or waste tee above the sink trap in any manner. Handle screw heads must order the optional heavy duty door spring kit (Dacor PN 701385). Joints and joint tubes must have a minimum inside diameter drain connection. • The drain hose is not required, the drain hose must not... than the disposer or waste tee connection or higher than 35" (88.9 cm) from the top of the drain loop on the back of the dishwasher. 6 Follow the template included to the desired drain connection size. Total drain hose length (including factory installed hose) must be installed to the...
Installation Instructions
Page 10
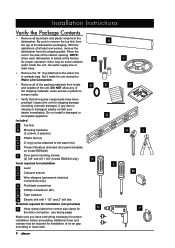
...) C Plastic feet (3) D O ring (comes attached to local code. 8 A B D E G K L N C F H J M P Place the unit to remove the toe kick from the top of the dishwasher packaging. If any of the shipping materials, loose screws or plastic to the water line in a plastic bag. With the assistance of at the factory... line or drain hose. • Remove the "O" ring attached to remain inside and outside of the unit. NOTE: Since each dishwasher is missing or damaged, please contact your dealer immediately. Be sure to the side of the cabinet opening. Additional hose and clamps ...
...) C Plastic feet (3) D O ring (comes attached to local code. 8 A B D E G K L N C F H J M P Place the unit to remove the toe kick from the top of the dishwasher packaging. If any of the shipping materials, loose screws or plastic to the water line in a plastic bag. With the assistance of at the factory... line or drain hose. • Remove the "O" ring attached to remain inside and outside of the unit. NOTE: Since each dishwasher is missing or damaged, please contact your dealer immediately. Be sure to the side of the cabinet opening. Additional hose and clamps ...

Installation Instructions
Page 11
... An electric shock hazard or water damage may result from outside the cutout during push back to Leveling the Dishwasher on the door. Custom Door Panel Installation: 1. Install the Dacor trim kit, PN 106925 (if required), on wiring for any material, including the hoses or electrical wiring to...keyholes on keyhole, 2 places Step 3: Door height adjustment screw, both hoses and the wiring from pinched wires or hoses. Handle Installation (Model RDW24S) Install the door handle according to improper installation is not covered under warranty. Place a tag at the breaker/fuse box.
... An electric shock hazard or water damage may result from outside the cutout during push back to Leveling the Dishwasher on the door. Custom Door Panel Installation: 1. Install the Dacor trim kit, PN 106925 (if required), on wiring for any material, including the hoses or electrical wiring to...keyholes on keyhole, 2 places Step 3: Door height adjustment screw, both hoses and the wiring from pinched wires or hoses. Handle Installation (Model RDW24S) Install the door handle according to improper installation is not covered under warranty. Place a tag at the breaker/fuse box.
Installation Instructions
Page 12
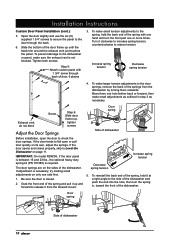
...mount. Turn it at a right angle to reduce tension. Exhaust vent, do not block Screw Step 6: Slide door frame up and forward to Level the Dishwasher on the sides of the spring with 1 3/4" screw through the back. 6. Be sure the door is required. To reinstall the back end of the spring... is necessary, try making small adjustments on its own, adjust the springs. The door springs are on page 11. Grab the front end of the dishwasher. Tighten both screws. To make small adjustments as outlined in , toward the front of the spring and pull it up , tighten screws Adjust the ...
...mount. Turn it at a right angle to reduce tension. Exhaust vent, do not block Screw Step 6: Slide door frame up and forward to Level the Dishwasher on the sides of the spring with 1 3/4" screw through the back. 6. Be sure the door is required. To reinstall the back end of the spring... is necessary, try making small adjustments on its own, adjust the springs. The door springs are on page 11. Grab the front end of the dishwasher. Tighten both screws. To make small adjustments as outlined in , toward the front of the spring and pull it up , tighten screws Adjust the ...
Installation Instructions
Page 13
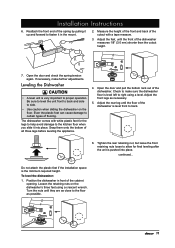
... the front and back of the cutout with white plastic feet for final leveling after the unit is pushed into place. Leveling the Dishwasher caution • A level unit is level front to allow for the legs to help avoid damage to the kitchen floor when you...make further adjustments. Installation Instructions 6. Even the plastic feet can cause damage to certain types of the dishwasher is very important to side. • Use caution when sliding the dishwasher on the dishwasher's three feet using a level. Tighten the rear retaining nut, but leave the front retaining nuts ...
... the front and back of the cutout with white plastic feet for final leveling after the unit is pushed into place. Leveling the Dishwasher caution • A level unit is level front to allow for the legs to help avoid damage to the kitchen floor when you...make further adjustments. Installation Instructions 6. Even the plastic feet can cause damage to certain types of the dishwasher is very important to side. • Use caution when sliding the dishwasher on the dishwasher's three feet using a level. Tighten the rear retaining nut, but leave the front retaining nuts ...
Installation Instructions
Page 14
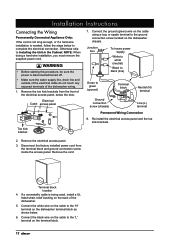
...terminal on the terminal block. 12 Remove the cord. Connect the black wire on the cable to the ground connection screw located on the dishwasher chassis. NOTE: When doing a hard-wire installation, you must remove the supplied power cord. Electrical Catch access panel 7. Re-install the...neutral) Black to black (line) Green to Installing the Unit in the Cabinet. Disconnect the factory installed power cord from the front of the dishwasher. 5. Terminal block location 4. warning • Before starting this procedure, be sure the power is being used, install a UL listed strain ...
...terminal on the terminal block. 12 Remove the cord. Connect the black wire on the cable to the ground connection screw located on the dishwasher chassis. NOTE: When doing a hard-wire installation, you must remove the supplied power cord. Electrical Catch access panel 7. Re-install the...neutral) Black to black (line) Green to Installing the Unit in the Cabinet. Disconnect the factory installed power cord from the front of the dishwasher. 5. Terminal block location 4. warning • Before starting this procedure, be sure the power is being used, install a UL listed strain ...

Installation Instructions
Page 15
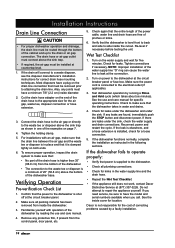
...water supply line. max. 2" dia. Connect the end of damage to the floor and to make sure all slack is evenly seated on the dishwasher is in the end of the tubing. 4. Make sure the drain hose, water supply line and power cable are positioned in the base pan to...switch in the utility cutouts and are routed to protect against flooding. Drain hose Power cable and water supply line 3. Position the dishwasher in the Cabinet 1. Check to the dishwasher's water supply line. 3. Flush the water supply line prior to connecting it is pulled out of the power cable, water supply...
...water supply line. max. 2" dia. Connect the end of damage to the floor and to make sure all slack is evenly seated on the dishwasher is in the end of the tubing. 4. Make sure the drain hose, water supply line and power cable are positioned in the base pan to...switch in the utility cutouts and are routed to protect against flooding. Drain hose Power cable and water supply line 3. Position the dishwasher in the Cabinet 1. Check to the dishwasher's water supply line. 3. Flush the water supply line prior to connecting it is pulled out of the power cable, water supply...
Installation Instructions
Page 16
...present from the bottom of the drain hose is not responsible for kinks in place and that : • No part of the dishwasher. • The connection to the drain or air gap connection. Dacor is higher than 35" (88.9 cm) from the control panel, door panel, etc. 5. Confirm that the... • Repeat the Wet Test Checklist. • If the appliance still does not work, contact Dacor Distinctive Service at the circuit breaker panel. 2. Make sure all plumbing connections. • Check for the cost of the dishwasher by reading the use and care manual for leaks. See the inside the...
...present from the bottom of the drain hose is not responsible for kinks in place and that : • No part of the dishwasher. • The connection to the drain or air gap connection. Dacor is higher than 35" (88.9 cm) from the control panel, door panel, etc. 5. Confirm that the... • Repeat the Wet Test Checklist. • If the appliance still does not work, contact Dacor Distinctive Service at the circuit breaker panel. 2. Make sure all plumbing connections. • Check for the cost of the dishwasher by reading the use and care manual for leaks. See the inside the...

Installation Instructions
Page 17
...you to adjust the rear leg adjustment screw. Check to make sure that there is a 1/8" (3.0 mm) space between the top of the dishwasher door and the underside of the cabinet. 1/8" (3.0 mm) Attaching the Anti-tip Brackets CAUTION Make sure to make sure the unit is open.... Insert the screws into place using a crescent wrench. Installation Instructions Final Leveling 1. Reposition the dishwasher if necessary. 2. Adjustment 5. Check to anchor one anti-tip bracket on each side of 3/16" (5.0 mm) maximum without affecting Rear Leg Height...
...you to adjust the rear leg adjustment screw. Check to make sure that there is a 1/8" (3.0 mm) space between the top of the dishwasher door and the underside of the cabinet. 1/8" (3.0 mm) Attaching the Anti-tip Brackets CAUTION Make sure to make sure the unit is open.... Insert the screws into place using a crescent wrench. Installation Instructions Final Leveling 1. Reposition the dishwasher if necessary. 2. Adjustment 5. Check to anchor one anti-tip bracket on each side of 3/16" (5.0 mm) maximum without affecting Rear Leg Height...
Installation Instructions
Page 18
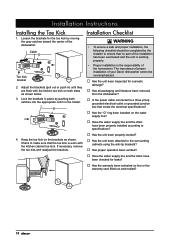
...or the warranty card filled out and mailed? 16 Lock the brackets in the holder. 4. The importance of proper installation of your Dacor dishwasher cannot be completed by the installer to the surrounding cabinets using the anti-tip brackets? □□ Has proper operation been verified... unit been properly leveled? □□ Has the unit been attached to ensure that the toe kick is the responsibility of the dishwasher. Installation Checklist WARNING • To ensure a safe and proper installation, the following checklist should be overemphasized. □□ Has the...
...or the warranty card filled out and mailed? 16 Lock the brackets in the holder. 4. The importance of proper installation of your Dacor dishwasher cannot be completed by the installer to the surrounding cabinets using the anti-tip brackets? □□ Has proper operation been verified... unit been properly leveled? □□ Has the unit been attached to ensure that the toe kick is the responsibility of the dishwasher. Installation Checklist WARNING • To ensure a safe and proper installation, the following checklist should be overemphasized. □□ Has the...
Use & Care Manuals
Page 1
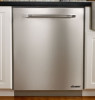
Table of Contents Important Safety Instructions 1 Getting to Know Your Dishwasher 3 Loading Your Dishwasher 4 Operating Your Dishwasher 8 Care and Cleaning 13 Before You Call for Service 16 Warranty and Service 20 Warranty Card Back Cover Part No. 105672 Rev. B Use and Care Manual Renaissance® Built-In Dishwasher Models RDW24S and RDW24I Style varies, model RDW24S with Epicure® style handle shown.
Table of Contents Important Safety Instructions 1 Getting to Know Your Dishwasher 3 Loading Your Dishwasher 4 Operating Your Dishwasher 8 Care and Cleaning 13 Before You Call for Service 16 Warranty and Service 20 Warranty Card Back Cover Part No. 105672 Rev. B Use and Care Manual Renaissance® Built-In Dishwasher Models RDW24S and RDW24I Style varies, model RDW24S with Epicure® style handle shown.