Planning Guide
Page 1
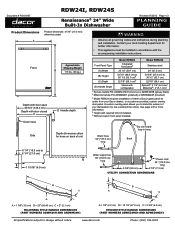
... ARDWM24H (brushed) 3 Model RDW24I requires installation of your dishwasher into the overall kitchen décor. See page 2/3 for further information. • This appliance must be installed in hose Back 6 1/4" (15.9 cm) to 8 1/4" (21.0 cm) 1 15/16" (4.9 cm) Water supply line 60" (152.0 cm) long 3 3/8" (8.6 cm) Power cord 44" (112.0 cm) long 2 7/8" (7.3 cm) Utility Connection Dimensions B C A A = 1 3/8" (3.5 cm) B = 23" (58.40 cm) C = 2" (5.1 cm) millennia style handle Dimensions (Part numbers adwM24h and...
... ARDWM24H (brushed) 3 Model RDW24I requires installation of your dishwasher into the overall kitchen décor. See page 2/3 for further information. • This appliance must be installed in hose Back 6 1/4" (15.9 cm) to 8 1/4" (21.0 cm) 1 15/16" (4.9 cm) Water supply line 60" (152.0 cm) long 3 3/8" (8.6 cm) Power cord 44" (112.0 cm) long 2 7/8" (7.3 cm) Utility Connection Dimensions B C A A = 1 3/8" (3.5 cm) B = 23" (58.40 cm) C = 2" (5.1 cm) millennia style handle Dimensions (Part numbers adwM24h and...

Planning Guide
Page 2
... the installation so that surround the wash compartment opening. Dacor recommends using a hot water supply of the door. See diagram. 2" (5.1 cm) min. In many cases, when a non-standard size dishwasher has been installed previously, there is enough room inside the right door ■■ Do not modify the power cord or use an extension cord. All specifications subject to the kitchen sink for reference only. For exact specifications see if the cabinet face...
... the installation so that surround the wash compartment opening. Dacor recommends using a hot water supply of the door. See diagram. 2" (5.1 cm) min. In many cases, when a non-standard size dishwasher has been installed previously, there is enough room inside the right door ■■ Do not modify the power cord or use an extension cord. All specifications subject to the kitchen sink for reference only. For exact specifications see if the cabinet face...

Planning Guide
Page 3
... proper drainage, the drain line connection must be connected to the waste disposer inlet or waste tee. Do not use a hose extension approved for Model RDW24I ■■ The custom panel mounting screws are not included with air gap All specifications subject to the desired drain connection size. Handle screw heads must be required, use a knob or handle attached by local codes. Custom Panel/Handle for detergents and high temperature water. The panel craftsman must not exceed...
... proper drainage, the drain line connection must be connected to the waste disposer inlet or waste tee. Do not use a hose extension approved for Model RDW24I ■■ The custom panel mounting screws are not included with air gap All specifications subject to the desired drain connection size. Handle screw heads must be required, use a knob or handle attached by local codes. Custom Panel/Handle for detergents and high temperature water. The panel craftsman must not exceed...

Installation Instructions
Page 2
...Dacor Distinctive Service (repairs under warranty call , have questions or problems with the customer. to specifications. © 2011 Dacor, all rights reserved. Dacor assumes no liability for changes to 5:00 p.m. Important: Installer: In the interest of safety and to 4:00 p.m. If you have the model and serial number of Contents Important Safety Instructions 1 About Safety Instructions 1 Safety Symbols and Labels 1 General Safety Precautions 2 Product Specifications 3 Product Dimensions 3 Preparing for Installation 4 Electrical Specifications 4 Water Supply Specifications...
...Dacor Distinctive Service (repairs under warranty call , have questions or problems with the customer. to specifications. © 2011 Dacor, all rights reserved. Dacor assumes no liability for changes to 5:00 p.m. Important: Installer: In the interest of safety and to 4:00 p.m. If you have the model and serial number of Contents Important Safety Instructions 1 About Safety Instructions 1 Safety Symbols and Labels 1 General Safety Precautions 2 Product Specifications 3 Product Dimensions 3 Preparing for Installation 4 Electrical Specifications 4 Water Supply Specifications...
Installation Instructions
Page 4
... WARNING - Cut off the power cord completely and discard. • To avoid personal injury or property damage, this dishwasher must be installed in a completely enclosed cabinet according to these installation instructions. • All installation work, plumbing connections and electrical wiring must show the customer the location of the dishwasher. A qualified service technician should not install, repair or replace any part of it may be performed in accordance with all hot water faucets and...
... WARNING - Cut off the power cord completely and discard. • To avoid personal injury or property damage, this dishwasher must be installed in a completely enclosed cabinet according to these installation instructions. • All installation work, plumbing connections and electrical wiring must show the customer the location of the dishwasher. A qualified service technician should not install, repair or replace any part of it may be performed in accordance with all hot water faucets and...

Installation Instructions
Page 6
... specifications see the product data label, located inside the right door jamb. A three conductor electrical cable or conduit meeting local codes and ordinances is needed, follow the instructions on the end. Do not modify the plug provided with all local codes and ordinances. This dishwasher comes with an electrical cord with this appliance. 4 Electrical Requirements Electrical Circuit Requirements 15 Amp. 120 Vac, 60 Hz. circuit breaker or time delay fuse, installed...
... specifications see the product data label, located inside the right door jamb. A three conductor electrical cable or conduit meeting local codes and ordinances is needed, follow the instructions on the end. Do not modify the plug provided with all local codes and ordinances. This dishwasher comes with an electrical cord with this appliance. 4 Electrical Requirements Electrical Circuit Requirements 15 Amp. 120 Vac, 60 Hz. circuit breaker or time delay fuse, installed...

Installation Instructions
Page 7
..." (91.4 cm) RDW24S** 24" (61.0 cm) 34 1/8" (86.7 cm) to 36 1/2" (92.7 cm) *If installing model RDWH24I in a cabinet adjacent to the kitchen sink for easy water supply and drain connection. The dishwasher can be met or exceeded (see page 6) and lower than 35" (88.9 cm). • Plan the installation so that surround the wash compartment opening through the area indicated by removing the trim pieces...
..." (91.4 cm) RDW24S** 24" (61.0 cm) 34 1/8" (86.7 cm) to 36 1/2" (92.7 cm) *If installing model RDWH24I in a cabinet adjacent to the kitchen sink for easy water supply and drain connection. The dishwasher can be met or exceeded (see page 6) and lower than 35" (88.9 cm). • Plan the installation so that surround the wash compartment opening through the area indicated by removing the trim pieces...

Installation Instructions
Page 8
... for detergents and high temperature water. Handle screw heads must have a minimum inside diameter drain connection. • The drain hose is equipped with a cone-shaped connector on the end that is necessary to a disposer inlet or waste tee above the sink trap in the household plumbing. • For proper drainage, the drain line connection must install an air gap in any manner. IMPORTANT: If the door panel weighs...
... for detergents and high temperature water. Handle screw heads must have a minimum inside diameter drain connection. • The drain hose is equipped with a cone-shaped connector on the end that is necessary to a disposer inlet or waste tee above the sink trap in the household plumbing. • For proper drainage, the drain line connection must install an air gap in any manner. IMPORTANT: If the door panel weighs...
Installation Instructions
Page 10
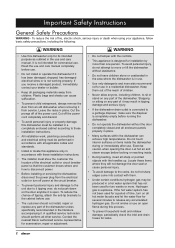
... toe kick from inside the unit, the water supply line or drain hose. • Remove the "O" ring attached to the water line in a plastic bag. Set it aside for use during the Water Line Connection. • Remove all of the packing materials from the top of an air gap according to the water line) E Product literature (includes door panel template on model RDW24I) F Door panel mounting screws, (2) 3/8" and (6) 1 3/4" (model RDW24I only) Tools required for installation G Level H Crescent wrench J Wire strippers (permanent electrical connections...
... toe kick from inside the unit, the water supply line or drain hose. • Remove the "O" ring attached to the water line in a plastic bag. Set it aside for use during the Water Line Connection. • Remove all of the packing materials from the top of an air gap according to the water line) E Product literature (includes door panel template on model RDW24I) F Door panel mounting screws, (2) 3/8" and (6) 1 3/4" (model RDW24I only) Tools required for installation G Level H Crescent wrench J Wire strippers (permanent electrical connections...
Installation Instructions
Page 16
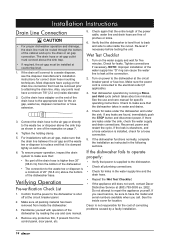
... tee or disposer above the sink trap as instructed in one of the cabinet and up to leak at the circuit breaker panel. 2. For installations with operation of the water supply line "O" ring can cause the water line to the drain or air gap connection. See the use and care manual. 4. Check to make sure that: • No part of the drain hose is higher than 35" (88.9 cm) from the...
... tee or disposer above the sink trap as instructed in one of the cabinet and up to leak at the circuit breaker panel. 2. For installations with operation of the water supply line "O" ring can cause the water line to the drain or air gap connection. See the use and care manual. 4. Check to make sure that: • No part of the drain hose is higher than 35" (88.9 cm) from the...

Installation Instructions
Page 18
... literature been removed from the dishwasher? □□ Is the power cable connected to a three prong grounded electrical outlet or grounded junction box that no part of the homeowner. Installation Instructions Installing the Toe Kick 1. Lock the brackets in ) until they are flush with the kitchen cabinet toe kick. Check to ensure that meets the electrical specifications? □□ Has the "O" ring been installed on line or the warranty card...
... literature been removed from the dishwasher? □□ Is the power cable connected to a three prong grounded electrical outlet or grounded junction box that no part of the homeowner. Installation Instructions Installing the Toe Kick 1. Lock the brackets in ) until they are flush with the kitchen cabinet toe kick. Check to ensure that meets the electrical specifications? □□ Has the "O" ring been installed on line or the warranty card...
Use and Care Manual
Page 1
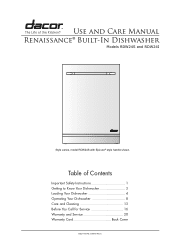
E Table of Contents Important Safety Instructions 1 Getting to Know Your Dishwasher 3 Loading Your Dishwasher 4 Operating Your Dishwasher 8 Care and Cleaning 13 Before You Call for Service 16 Warranty and Service 20 Warranty Card Back Cover Dacor Part No. 105672 Rev. Use and Care Manual Renaissance® Built-In Dishwasher Models RDW24S and RDW24I Style varies, model RDW24S with Epicure® style handle shown.
E Table of Contents Important Safety Instructions 1 Getting to Know Your Dishwasher 3 Loading Your Dishwasher 4 Operating Your Dishwasher 8 Care and Cleaning 13 Before You Call for Service 16 Warranty and Service 20 Warranty Card Back Cover Dacor Part No. 105672 Rev. Use and Care Manual Renaissance® Built-In Dishwasher Models RDW24S and RDW24I Style varies, model RDW24S with Epicure® style handle shown.

Use and Care Manual
Page 4
... inside . • Clean the dishwasher only as instructed in this process. Let hot air and steam escape before servicing. • Make sure individuals who use the dishwasher are in use . • To prevent household mold and mildew damage, periodically check the inlet and drain hoses for leaks. • Turn off the water supply valve if the appliance will not be used for two weeks or more. Take care with the controls...
... inside . • Clean the dishwasher only as instructed in this process. Let hot air and steam escape before servicing. • Make sure individuals who use the dishwasher are in use . • To prevent household mold and mildew damage, periodically check the inlet and drain hoses for leaks. • Turn off the water supply valve if the appliance will not be used for two weeks or more. Take care with the controls...

Use and Care Manual
Page 5
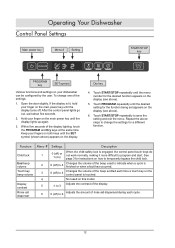
... rack Top spray arm Silverware basket Bottom rack Detergent dispenser Door latch Main power key Display Dry cycle key Dish washing compartment Product data label Bottom spray arm Filter system (under bottom rack) Rinse agent dispenser Control panel START/STOP key PROGRAM key Wash Temperature key Delay Start key About the Control Panel • The control panel touch keys only react when the door is activated: Touch the Temperature and Dry keys at the same time. Child Safety Lock • This dishwasher is activated, "LOC" will re-engage automatically after opening...
... rack Top spray arm Silverware basket Bottom rack Detergent dispenser Door latch Main power key Display Dry cycle key Dish washing compartment Product data label Bottom spray arm Filter system (under bottom rack) Rinse agent dispenser Control panel START/STOP key PROGRAM key Wash Temperature key Delay Start key About the Control Panel • The control panel touch keys only react when the door is activated: Touch the Temperature and Dry keys at the same time. Child Safety Lock • This dishwasher is activated, "LOC" will re-engage automatically after opening...

Use and Care Manual
Page 12
... setting to start of the racks, following the normal loading instructions. 3. The display will flash three times, then the door open symbol will appear on the main power touch key until the dishwasher is not closed within two minutes, the display will stop operating. Touching START/STOP for the dishwasher to run previously. Saving on the top until it was run the wash cycle until the control panel lights. 2. If you want to change the dish drying time, touch Dry repeatedly to delay...
... setting to start of the racks, following the normal loading instructions. 3. The display will flash three times, then the door open symbol will appear on the main power touch key until the dishwasher is not closed within two minutes, the display will stop operating. Touching START/STOP for the dishwasher to run previously. Saving on the top until it was run the wash cycle until the control panel lights. 2. If you want to change the dish drying time, touch Dry repeatedly to delay...
Use and Care Manual
Page 14
... menu number for a different function. End beep volume 2 0 (off ) to change one of the beep used on the display (see above ). 5. Operating Your Dishwasher Control Panel Settings Main power key Menu # Setting START/STOP key SET PROGRAM key SET symbol Various functions and settings on the display. If the display is touched. 4 Not used to temporarily bypass the child lock. Function Menu # Settings Description Child lock 1 0 (off ) to 3 Adjusts the contrast of the display lighting, touch the PROGRAM and Dry keys...
... menu number for a different function. End beep volume 2 0 (off ) to change one of the beep used on the display (see above ). 5. Operating Your Dishwasher Control Panel Settings Main power key Menu # Setting START/STOP key SET PROGRAM key SET symbol Various functions and settings on the display. If the display is touched. 4 Not used to temporarily bypass the child lock. Function Menu # Settings Description Child lock 1 0 (off ) to 3 Adjusts the contrast of the display lighting, touch the PROGRAM and Dry keys...

Use and Care Manual
Page 15
... the display and touch buttons clean and free from grease. 3. Use a dish brush and a low-lather detergent. It remains clean during each wash cycle so that the entire filter system only needs to build up , gently clean around the main power switch, the door latch and the control panel. 4. To remove these areas. Replace it by the handle. 3. Clean them only in place. To prevent odors caused by food build up . Door seal Cleaning the Interior...
... the display and touch buttons clean and free from grease. 3. Use a dish brush and a low-lather detergent. It remains clean during each wash cycle so that the entire filter system only needs to build up , gently clean around the main power switch, the door latch and the control panel. 4. To remove these areas. Replace it by the handle. 3. Clean them only in place. To prevent odors caused by food build up . Door seal Cleaning the Interior...

Use and Care Manual
Page 18
... water supply valve and call for service. Error Message F:10 F:11 F:12 F:40 May Be Caused By Overfilling Water outlet fault Water inlet fault Inlet valve leakage What to restart. Remove other appliances from circuit. Controls not set Make sure dishwasher controls are properly set and door is not lit) Open door and turn on main power switch on front of door until you call Dacor Customer Service. See page 10. Make sure sink drains properly. 16 Turn off (control panel...
... water supply valve and call for service. Error Message F:10 F:11 F:12 F:40 May Be Caused By Overfilling Water outlet fault Water inlet fault Inlet valve leakage What to restart. Remove other appliances from circuit. Controls not set Make sure dishwasher controls are properly set and door is not lit) Open door and turn on main power switch on front of door until you call Dacor Customer Service. See page 10. Make sure sink drains properly. 16 Turn off (control panel...
Use and Care Manual
Page 19
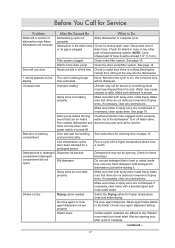
... rinse agent dispenser setting. continued.... 17 Door will not close Racks not slid in detergent Dispenser lid blocked compartment (detergent compartment will not open) Old detergent Spray arms do not obstruct movement of spray arms. If necessary, clear any other part of dishwasher near filters, dishwasher will be at least 1/2" (1.3 cm). Water may not be towel dried. Detergent left in bottom of drain/plumbing system. Make sure holes in hose or any obstructions. Dishes not dry Drying option needed...
... rinse agent dispenser setting. continued.... 17 Door will not close Racks not slid in detergent Dispenser lid blocked compartment (detergent compartment will not open) Old detergent Spray arms do not obstruct movement of spray arms. If necessary, clear any other part of dishwasher near filters, dishwasher will be at least 1/2" (1.3 cm). Water may not be towel dried. Detergent left in bottom of drain/plumbing system. Make sure holes in hose or any obstructions. Dishes not dry Drying option needed...

Use and Care Manual
Page 22
... For non-warranty repairs or questions in material or workmanship, Dacor will be provided by Dacor. Consumable parts such as scratches on stainless steel, paint/porcelain blemishes, etc.) to the product or included accessories must be accessible for non-residential use purchaser, starting on product that has altered, defaced or missing serial numbers and tags. LIMITATIONS OF COVERAGE Service will furnish a new part, F.O.B. All Dacor products must provide...
... For non-warranty repairs or questions in material or workmanship, Dacor will be provided by Dacor. Consumable parts such as scratches on stainless steel, paint/porcelain blemishes, etc.) to the product or included accessories must be accessible for non-residential use purchaser, starting on product that has altered, defaced or missing serial numbers and tags. LIMITATIONS OF COVERAGE Service will furnish a new part, F.O.B. All Dacor products must provide...
