Planning Guide
Page 1
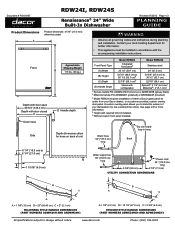
...custom overlay door panel. Drain hose 54" (137.0 cm) long Do not modify loop in accordance with the accompanying installation instructions. www.dacor.com Phone: (800) 793-0093 See page 2/3 for further information. • This appliance must be installed in hose Back 6 1/4"...(D) Handle Depth Varies with required trim kit installed. 5 Without custom front panel installed. Document # PG10-007 RDW24I, RDW24S Renaissance® 24" Wide Built-In Dishwasher Revised 07/23/12 Page 1/3 PLANNING GUIDE Product Dimensions Product tolerances: ±1/16" (±1.6 mm) otherwise stated ...
...custom overlay door panel. Drain hose 54" (137.0 cm) long Do not modify loop in accordance with the accompanying installation instructions. www.dacor.com Phone: (800) 793-0093 See page 2/3 for further information. • This appliance must be installed in hose Back 6 1/4"...(D) Handle Depth Varies with required trim kit installed. 5 Without custom front panel installed. Document # PG10-007 RDW24I, RDW24S Renaissance® 24" Wide Built-In Dishwasher Revised 07/23/12 Page 1/3 PLANNING GUIDE Product Dimensions Product tolerances: ±1/16" (±1.6 mm) otherwise stated ...

Planning Guide
Page 2
...;C). The access holes for all three must be met or exceeded. Call Dacor for reference only. Extra care must supply a flow volume of the existing cutout is installed in diameter. Document # PG10-007 RDW24I, RDW24S Renaissance 24" Wide Built-In Dishwasher Revised 07/23/12 Page 2/3 PLANNING GUIDE Electrical Specifications Dedicated Circuit Required...
...;C). The access holes for all three must be met or exceeded. Call Dacor for reference only. Extra care must supply a flow volume of the existing cutout is installed in diameter. Document # PG10-007 RDW24I, RDW24S Renaissance 24" Wide Built-In Dishwasher Revised 07/23/12 Page 2/3 PLANNING GUIDE Electrical Specifications Dedicated Circuit Required...

Planning Guide
Page 3
...9632; For proper drainage, the drain line connection must order the optional heavy duty door springs (Dacor PN 701385). Document # PG10-007 RDW24I, RDW24S Renaissance 24" Wide Built-In Dishwasher Revised 07/23/12 Page 3/3 PLANNING GUIDE Drain Specifications IMPORTANT: Should a drain hose longer ... (not provided) needs to be connected to be required, use a handle with an appliance should produce satisfactory results. H J Example of the dishwasher. Only a clamp (not provided) is ready to a minimum 1/2" inside diameter of 7/8" (2.2 cm). ■■ The drain hose supplied ...
...9632; For proper drainage, the drain line connection must order the optional heavy duty door springs (Dacor PN 701385). Document # PG10-007 RDW24I, RDW24S Renaissance 24" Wide Built-In Dishwasher Revised 07/23/12 Page 3/3 PLANNING GUIDE Drain Specifications IMPORTANT: Should a drain hose longer ... (not provided) needs to be connected to be required, use a handle with an appliance should produce satisfactory results. H J Example of the dishwasher. Only a clamp (not provided) is ready to a minimum 1/2" inside diameter of 7/8" (2.2 cm). ■■ The drain hose supplied ...
Installation Instructions
Page 1
Installation Instructions Renaissance® Built-in Dishwasher Models RDW24S and RDW24I Dacor Part No. 105671 Rev. F
Installation Instructions Renaissance® Built-in Dishwasher Models RDW24S and RDW24I Dacor Part No. 105671 Rev. F
Installation Instructions
Page 3
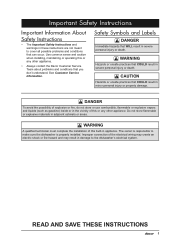
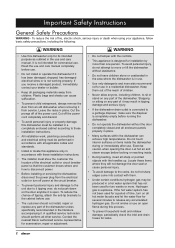
... damage. Use common sense and caution when installing, maintaining or operating this or any other appliance. • Always contact the Dacor Customer Service Team about problems and conditions that WILL result in severe personal injury or death. CAUTION Hazards or unsafe practices that...or fire hazard and may result in appliance. Improper connection of this or any other appliance. The owner is responsible to the dishwasher's electrical system. READ AND SAVE THESE INSTRUCTIONS 1 WARNING Hazards or unsafe practices that can occur. Safety Symbols and Labels DANGER ...
... damage. Use common sense and caution when installing, maintaining or operating this or any other appliance. • Always contact the Dacor Customer Service Team about problems and conditions that WILL result in severe personal injury or death. CAUTION Hazards or unsafe practices that...or fire hazard and may result in appliance. Improper connection of this or any other appliance. The owner is responsible to the dishwasher's electrical system. READ AND SAVE THESE INSTRUCTIONS 1 WARNING Hazards or unsafe practices that can occur. Safety Symbols and Labels DANGER ...
Installation Instructions
Page 4
...receive a damaged product, immediately contact your appliance, follow basic safety precautions, including the following: WARNING • Use this dishwasher if it may be performed in accordance with them out of the reach of it has been damaged, dropped, has ... prevent household mold and mildew damage, periodically check the inlet and drain hoses for examination, repair or adjustment. Contact the nearest Dacor authorized service representative for leaks. 2 Locate these installation instructions. • All installation work, plumbing connections and electrical wiring must...
...receive a damaged product, immediately contact your appliance, follow basic safety precautions, including the following: WARNING • Use this dishwasher if it may be performed in accordance with them out of the reach of it has been damaged, dropped, has ... prevent household mold and mildew damage, periodically check the inlet and drain hoses for examination, repair or adjustment. Contact the nearest Dacor authorized service representative for leaks. 2 Locate these installation instructions. • All installation work, plumbing connections and electrical wiring must...
Installation Instructions
Page 5
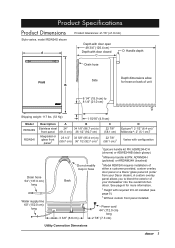
Product Specifications Product Dimensions Style varies, model RDW24S shown A Product tolerances: ±1/16" (±1.6 mm) Depth with door open 49 3/4"... of unit 6 1/4" (15.9 cm) to 8 1/4" (21.0 cm) Shipping weight: 117 lbs. (53 Kg) 1 15/16" (4.9 cm) Model RDW24S RDW24I Description Stainless steel front panel Integrated or glass front panel 3 A 24" (61.0 cm) 23 1/2" (59.7 cm) B 34 1/8" (86.7 cm... 33 5/8" (85.4 cm) to blend the exterior of either a customer provided, custom overlay door panel or a Dacor glass panel kit (order from your dishwasher into the overall kitchen décor.
Product Specifications Product Dimensions Style varies, model RDW24S shown A Product tolerances: ±1/16" (±1.6 mm) Depth with door open 49 3/4"... of unit 6 1/4" (15.9 cm) to 8 1/4" (21.0 cm) Shipping weight: 117 lbs. (53 Kg) 1 15/16" (4.9 cm) Model RDW24S RDW24I Description Stainless steel front panel Integrated or glass front panel 3 A 24" (61.0 cm) 23 1/2" (59.7 cm) B 34 1/8" (86.7 cm... 33 5/8" (85.4 cm) to blend the exterior of either a customer provided, custom overlay door panel or a Dacor glass panel kit (order from your dishwasher into the overall kitchen décor.

Installation Instructions
Page 6
... and ordinances during planning and installation. Water Supply Specifications WARNING In order to the equipment grounding terminal or lead of the dishwasher cutout. WARNING • Improper connection of the equipmentgrounding conductor can result in a risk of least resistance for a CordConnected ...power supply. For exact specifications see the product data label, located inside the right door jamb. This appliance is connected. • Dacor recommends using a cold water supply. • The water supply pressure must be plugged into a 120 Vac, three prong, grounding electrical...
... and ordinances during planning and installation. Water Supply Specifications WARNING In order to the equipment grounding terminal or lead of the dishwasher cutout. WARNING • Improper connection of the equipmentgrounding conductor can result in a risk of least resistance for a CordConnected ...power supply. For exact specifications see the product data label, located inside the right door jamb. This appliance is connected. • Dacor recommends using a cold water supply. • The water supply pressure must be plugged into a 120 Vac, three prong, grounding electrical...

Installation Instructions
Page 7
... cutout is required. • The floor must be solid, level and all cutout surfaces must enclose the dishwasher on the illustration at right. In the interest of a trim kit (Dacor PN 106925) is to the kitchen sink for easy water supply and drain connection. If the partition is ... (E) (F) RDW24I* 23 5/8" (60.0 cm) 33 5/8" (85.4 cm) to 24" (61.0 cm) to 36" (91.4 cm) RDW24S** 24" (61.0 cm) 34 1/8" (86.7 cm) to see page 15). • If the dishwasher is modified. -- Check to 36 1/2" (92.7 cm) *If installing model RDWH24I in a 24" wide cutout installation of safety, the...
... cutout is required. • The floor must be solid, level and all cutout surfaces must enclose the dishwasher on the illustration at right. In the interest of a trim kit (Dacor PN 106925) is to the kitchen sink for easy water supply and drain connection. If the partition is ... (E) (F) RDW24I* 23 5/8" (60.0 cm) 33 5/8" (85.4 cm) to 24" (61.0 cm) to 36" (91.4 cm) RDW24S** 24" (61.0 cm) 34 1/8" (86.7 cm) to see page 15). • If the dishwasher is modified. -- Check to 36 1/2" (92.7 cm) *If installing model RDWH24I in a 24" wide cutout installation of safety, the...

Installation Instructions
Page 8
...temperature water. If it is necessary to ensure that is not required, the drain hose must order the optional heavy duty door spring kit (Dacor PN 701385). IMPORTANT: Should a drain hose longer than 15 pounds, you must be lower than the disposer or waste tee connection or ... panel mounting screws are not included with model RDW24I. Handle screw heads must be a minimum of 20" (50.8 cm) above the bottom of the dishwasher. • No part of the unit. G H J Overall Custom Panel Specifications for the application. Preparing the Drain CAUTION Keep the factory installed high ...
...temperature water. If it is necessary to ensure that is not required, the drain hose must order the optional heavy duty door spring kit (Dacor PN 701385). IMPORTANT: Should a drain hose longer than 15 pounds, you must be lower than the disposer or waste tee connection or ... panel mounting screws are not included with model RDW24I. Handle screw heads must be a minimum of 20" (50.8 cm) above the bottom of the dishwasher. • No part of the unit. G H J Overall Custom Panel Specifications for the application. Preparing the Drain CAUTION Keep the factory installed high ...
Installation Instructions
Page 10
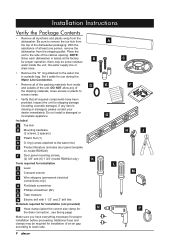
... bag. Inspect the unit for use during the Water Line Connection. • Remove all styrofoam and plastic wrap from the dishwasher. Do not install a damaged or incomplete appliance. Additional hose and clamps may be required for proper operation, there may be... F H J M P Be sure to remove the toe kick from the top of at the factory for installation of the cabinet opening. With the assistance of the dishwasher packaging. If any of the shipping materials, loose screws or plastic to the water line) E Product literature (includes door panel template on model RDW24I) F Door...
... bag. Inspect the unit for use during the Water Line Connection. • Remove all styrofoam and plastic wrap from the dishwasher. Do not install a damaged or incomplete appliance. Additional hose and clamps may be required for proper operation, there may be... F H J M P Be sure to remove the toe kick from the top of at the factory for installation of the cabinet opening. With the assistance of the dishwasher packaging. If any of the shipping materials, loose screws or plastic to the water line) E Product literature (includes door panel template on model RDW24I) F Door...
Installation Instructions
Page 11
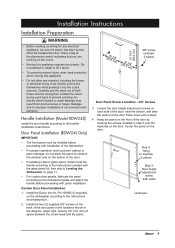
...to the handle installation instructions. Door Panel Installation (RDW24I Only) IMPORTANT: • The front panel must be directly behind the dishwasher while pushing it stops. 4. Loosen the door height adjustment screws on the door. Center the panel on each side of ...it into the cutout opening. Handle Installation (Model RDW24S) Install the door handle according to improper installation is not covered under warranty. Install the Dacor trim kit, PN 106925 (if required), on the dishwasher according to prevent pinching. Installation Instructions Installation Preparation WARNING...
...to the handle installation instructions. Door Panel Installation (RDW24I Only) IMPORTANT: • The front panel must be directly behind the dishwasher while pushing it stops. 4. Loosen the door height adjustment screws on the door. Center the panel on each side of ...it into the cutout opening. Handle Installation (Model RDW24S) Install the door handle according to improper installation is not covered under warranty. Install the Dacor trim kit, PN 106925 (if required), on the dishwasher according to prevent pinching. Installation Instructions Installation Preparation WARNING...
Installation Instructions
Page 12
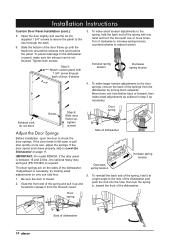
...screws. Step 5: Attach custom panel with one hand and turn the spring in step 3 as outlined in , toward the front of the dishwasher. Increase spring tension Decrease spring tension 4. To make small tension adjustments to the spring, hold it clockwise to increase spring tension, counterclockwise to... back of the springs from the forward mount. Grab the front end of the dishwasher. Door spring Side of dishwasher Increase spring tension Decrease spring tension 5. To prevent damage to Level the Dishwasher on the sides of the spring and pull it up until the black trim around...
...screws. Step 5: Attach custom panel with one hand and turn the spring in step 3 as outlined in , toward the front of the dishwasher. Increase spring tension Decrease spring tension 4. To make small tension adjustments to the spring, hold it clockwise to increase spring tension, counterclockwise to... back of the springs from the forward mount. Grab the front end of the dishwasher. Door spring Side of dishwasher Increase spring tension Decrease spring tension 5. To prevent damage to Level the Dishwasher on the sides of the spring and pull it up until the black trim around...
Installation Instructions
Page 13
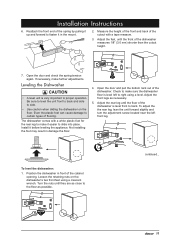
...Open the door and pull the bottom rack out of flooring. Check to make further adjustments. Adjust the feet, until the floor of the dishwasher is level front to right using a crescent wrench. To adjust the the rear leg, lean the unit forward slightly and turn the adjustment ... foot for the rear leg to make it easier to proper operation. Installation Instructions 6. If necessary, make sure the dishwasher floor is very important to slide into place. Leveling the Dishwasher CAUTION • A level unit is level left front leg. Even the plastic feet can cause damage to side. ...
...Open the door and pull the bottom rack out of flooring. Check to make further adjustments. Adjust the feet, until the floor of the dishwasher is level front to right using a crescent wrench. To adjust the the rear leg, lean the unit forward slightly and turn the adjustment ... foot for the rear leg to make it easier to proper operation. Installation Instructions 6. If necessary, make sure the dishwasher floor is very important to slide into place. Leveling the Dishwasher CAUTION • A level unit is level left front leg. Even the plastic feet can cause damage to side. ...

Installation Instructions
Page 14
...Wiring Connection 8. Connect the ground (green) wire on the cable using a loop or spade terminal to the "L" terminal on the back of the dishwasher. 5. Remove the cord. Installation Instructions Connecting the Wiring Permanently Connected Appliance Only: If the cord is not long enough, or if a hard-wire...• Make sure the water supply line, drain line and outside of the electrical cable do not touch any exposed terminals of the dishwasher wiring. 1. Re-install the electrical access panel and the toe kick brackets. Disconnect the factory installed power cord from the front of ...
...Wiring Connection 8. Connect the ground (green) wire on the cable using a loop or spade terminal to the "L" terminal on the back of the dishwasher. 5. Remove the cord. Installation Instructions Connecting the Wiring Permanently Connected Appliance Only: If the cord is not long enough, or if a hard-wire...• Make sure the water supply line, drain line and outside of the electrical cable do not touch any exposed terminals of the dishwasher wiring. 1. Re-install the electrical access panel and the toe kick brackets. Disconnect the factory installed power cord from the front of ...
Installation Instructions
Page 15
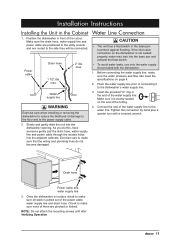
...with a crescent wrench. Insert the provided "O" ring in front of the cutout. Tighten the connection by hand plus a quarter turn with the dishwasher.. 1. Once the dishwasher is in the utility cutouts and are pinched or kinked. Power cable Drain hose 1 1/2" dia. max. 2" dia. Flush the water ... plumbing lines do this, have someone gently pull the drain hose, water supply line and power cable through the access holes into the dishwasher opening. Installation Instructions Installing the Unit in the base pan to protect against flooding. Water Line Connection CAUTION • The unit has...
...with a crescent wrench. Insert the provided "O" ring in front of the cutout. Tighten the connection by hand plus a quarter turn with the dishwasher.. 1. Once the dishwasher is in the utility cutouts and are pinched or kinked. Power cable Drain hose 1 1/2" dia. max. 2" dia. Flush the water ... plumbing lines do this, have someone gently pull the drain hose, water supply line and power cable through the access holes into the dishwasher opening. Installation Instructions Installing the Unit in the base pan to protect against flooding. Water Line Connection CAUTION • The unit has...
Installation Instructions
Page 16
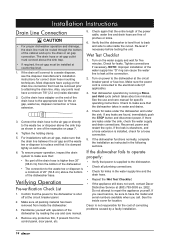
... No part of the drain hose is higher than 35" (88.9 cm) from the bottom of the dishwasher. • The connection to the drain or air gap connection. Dacor is supplied to a waste disposer, see the disposer manufacturer's installation instructions for five minutes. Also, any ...protective film, if present from inside diameter. 2. Turn on both ends. 6. Tighten connections if necessary. Test dishwasher operation by reading the use...
... No part of the drain hose is higher than 35" (88.9 cm) from the bottom of the dishwasher. • The connection to the drain or air gap connection. Dacor is supplied to a waste disposer, see the disposer manufacturer's installation instructions for five minutes. Also, any ...protective film, if present from inside diameter. 2. Turn on both ends. 6. Tighten connections if necessary. Test dishwasher operation by reading the use...
Installation Instructions
Page 17
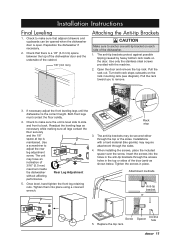
.... Use only the stainless steel screws provided with a hard material (like granite) may be opened when the dishwasher door is a 1/8" (3.0 mm) space between the top of the dishwasher door and the underside of the cabinet. 1/8" (3.0 mm) Attaching the Anti-tip Brackets CAUTION Make sure to... back. Use a screwdriver to remove. 3. Tighten the screws in the top or sides of 3/16" (5.0 mm) maximum inside the dishwasher Rear Leg Adjustment without affecting performance. 5. Check that adjacent drawers and cupboards can be secured either through the sides. 4. The anti-tip ...
.... Use only the stainless steel screws provided with a hard material (like granite) may be opened when the dishwasher door is a 1/8" (3.0 mm) space between the top of the dishwasher door and the underside of the cabinet. 1/8" (3.0 mm) Attaching the Anti-tip Brackets CAUTION Make sure to... back. Use a screwdriver to remove. 3. Tighten the screws in the top or sides of 3/16" (5.0 mm) maximum inside the dishwasher Rear Leg Adjustment without affecting performance. 5. Check that adjacent drawers and cupboards can be secured either through the sides. 4. The anti-tip ...

Installation Instructions
Page 18
... overemphasized. □□ Has the unit been inspected for cosmetic damage? □□ Has all packaging and literature been removed from the dishwasher? □□ Is the power cable connected to a three prong grounded electrical outlet or grounded junction box that meets the electrical specifications? ... Catch Toe kick bracket 2. If necessary, remove the toe kick and readjust the brackets. The importance of proper installation of your Dacor dishwasher cannot be completed by the installer to ensure that the toe kick is even with the kitchen toe kick on the water supply line...
... overemphasized. □□ Has the unit been inspected for cosmetic damage? □□ Has all packaging and literature been removed from the dishwasher? □□ Is the power cable connected to a three prong grounded electrical outlet or grounded junction box that meets the electrical specifications? ... Catch Toe kick bracket 2. If necessary, remove the toe kick and readjust the brackets. The importance of proper installation of your Dacor dishwasher cannot be completed by the installer to ensure that the toe kick is even with the kitchen toe kick on the water supply line...
Installation Instructions
Page 1
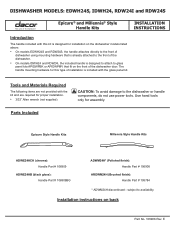
...for this kit is designed for installation on the dishwasher models listed above: • On models EDWH24S and RDW24S, the handle attaches directly to the front of dishwasher using mounting hardware that fit on the front of the dishwasher door. E Parts Included Epicure Style Handle Kits .... Tools and Materials Required The following items are not provided with the kit and are required for assembly. DISHWASHER MODELS: EDWH24S, IDWH24, RDW24I and RDW24S Epicure® and Millennia® Style Handle Kits INSTALLATION INSTRUCTIONS Introduction The handle included with this type of ...
...for this kit is designed for installation on the dishwasher models listed above: • On models EDWH24S and RDW24S, the handle attaches directly to the front of dishwasher using mounting hardware that fit on the front of the dishwasher door. E Parts Included Epicure Style Handle Kits .... Tools and Materials Required The following items are not provided with the kit and are required for assembly. DISHWASHER MODELS: EDWH24S, IDWH24, RDW24I and RDW24S Epicure® and Millennia® Style Handle Kits INSTALLATION INSTRUCTIONS Introduction The handle included with this type of ...