
Installation Instructions
Page 2
... Specifications 5 Dimensions 8 Preparation and Setup 10 Parts List 10 Necessary Tools and Hardware 10 Meeting Installation Requirements 11 Meeting Electrical Codes 12 Planning the Ductwork 13 Installation Instructions 14 Assembling the Filters 14 Installing the Hood Liner Kit RNIHL 15 Attaching the Dual to minimize problems, read these Installation Instructions completely and carefully before installing the unit. • User: Keep these installation instructions with installation, contact your Dacor dealer or the Dacor Customer Service Team. Remove the filters to change...
... Specifications 5 Dimensions 8 Preparation and Setup 10 Parts List 10 Necessary Tools and Hardware 10 Meeting Installation Requirements 11 Meeting Electrical Codes 12 Planning the Ductwork 13 Installation Instructions 14 Assembling the Filters 14 Installing the Hood Liner Kit RNIHL 15 Attaching the Dual to minimize problems, read these Installation Instructions completely and carefully before installing the unit. • User: Keep these installation instructions with installation, contact your Dacor dealer or the Dacor Customer Service Team. Remove the filters to change...
Installation Instructions
Page 4
... ventilating use to the outdoors. d) Ducted fans must be vented to exhaust hazardous or explosive materials and vapors. WARNING If the information in this manual is needed for Heating, Refrigeration and Air Conditioning Engineers (ASHRAE), and the local code authorities. If you have questions, contact the manufacturer. b) Before servicing or cleaning unit, switch power off at service panel and lock the service disconnecting means to prevent power from cooktop burners, ovens...
... ventilating use to the outdoors. d) Ducted fans must be vented to exhaust hazardous or explosive materials and vapors. WARNING If the information in this manual is needed for Heating, Refrigeration and Air Conditioning Engineers (ASHRAE), and the local code authorities. If you have questions, contact the manufacturer. b) Before servicing or cleaning unit, switch power off at service panel and lock the service disconnecting means to prevent power from cooktop burners, ovens...
Installation Instructions
Page 5
... turn the power on/off. • Before installing or servicing the RNIVS, switch the power OFF at www.dacor.com for examination, repair or adjustment. • Keep all other service. A qualified service technician should not install, repair, or replace any part of the unit unless specifically recommended in the Use and Care Manual. Contact the nearest Dacor authorized service representative at (800) 793-0093, or at the fuse box circuit breaker and lock the electrical panel...
... turn the power on/off. • Before installing or servicing the RNIVS, switch the power OFF at www.dacor.com for examination, repair or adjustment. • Keep all other service. A qualified service technician should not install, repair, or replace any part of the unit unless specifically recommended in the Use and Care Manual. Contact the nearest Dacor authorized service representative at (800) 793-0093, or at the fuse box circuit breaker and lock the electrical panel...
Installation Instructions
Page 6
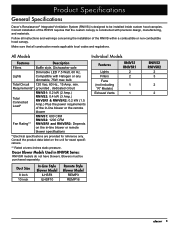
.... Dacor Blower Models Used in -line blower or remote blower specifications * Electrical specifications are provided for exact specifications. ** Rated at zero-inches static pressure. Follow all construction meets applicable local codes and regulations. Correct installation of the RNIVS requires that all instructions and warnings concerning the installation of the in-line blower or the remote blower Fan Rating** RNIVS1: 600 CFM RNIVS2: 1200 CFM RNIVSR1 and RNIVSR2: Depends on the unit for reference only. Blowers must be installed inside custom hood canopies...
.... Dacor Blower Models Used in -line blower or remote blower specifications * Electrical specifications are provided for exact specifications. ** Rated at zero-inches static pressure. Follow all construction meets applicable local codes and regulations. Correct installation of the RNIVS requires that all instructions and warnings concerning the installation of the in-line blower or the remote blower Fan Rating** RNIVS1: 600 CFM RNIVS2: 1200 CFM RNIVSR1 and RNIVSR2: Depends on the unit for reference only. Blowers must be installed inside custom hood canopies...
Installation Instructions
Page 11
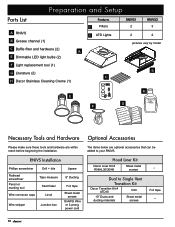
RNIVS Installation Phillips screwdriver Drill + bits Flathead screwdriver Pencil or marking tool Tape measure Stud finder Wire connector caps Level Wire stripper Junction box Jigsaw 8" Ducting Foil tape Sheet metal screws 18 AWG Wire or 3-prong power cord Hood Liner Kit Dacor Liner Kit # RNIHL30/36/48 Sheet metal screws Dual to your RNIVS. Preparation and Setup Parts List A RNIVS B Grease channel (1) C Baffle filter and hardware (2) E Dimmable LED light bulbs (2) Features C Filters E LED Lights A RNIVS1 2 RNIVS2 3 2 2 pictures vary by model F Light replacement tool ...
RNIVS Installation Phillips screwdriver Drill + bits Flathead screwdriver Pencil or marking tool Tape measure Stud finder Wire connector caps Level Wire stripper Junction box Jigsaw 8" Ducting Foil tape Sheet metal screws 18 AWG Wire or 3-prong power cord Hood Liner Kit Dacor Liner Kit # RNIHL30/36/48 Sheet metal screws Dual to your RNIVS. Preparation and Setup Parts List A RNIVS B Grease channel (1) C Baffle filter and hardware (2) E Dimmable LED light bulbs (2) Features C Filters E LED Lights A RNIVS1 2 RNIVS2 3 2 2 pictures vary by model F Light replacement tool ...
Installation Instructions
Page 12
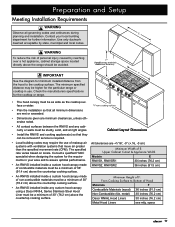
... surfaces between the RNIVS and any custom hood canopy using a Dacor RNIHL Series Stainless Steel Hood Liner must be as wide as the cooktop surface or wider. * From cooking surface • Plan the installation so that move air greater than the specified movement rate (CFM). Check the manufacturers specifications for minimum installed distance from the hood to assure optimal performance. • An RNIVS installed inside a custom hood canopy made of non-combustible materials...
... surfaces between the RNIVS and any custom hood canopy using a Dacor RNIHL Series Stainless Steel Hood Liner must be as wide as the cooktop surface or wider. * From cooking surface • Plan the installation so that move air greater than the specified movement rate (CFM). Check the manufacturers specifications for minimum installed distance from the hood to assure optimal performance. • An RNIVS installed inside a custom hood canopy made of non-combustible materials...

Installation Instructions
Page 14
..., remove it and replace it with ventilation systems that keep as much space between any bends as possible to the outside pass-through point. Ductwork Tips Wherever possible, reduce the number of roof and wall caps vary with Damper 5 feet 2 feet 4 feet * * The equivalent lengths of transitions, turns, and sharp angles. If multiple elbows are no obstructions that move air greater than one 10-inch duct using...
..., remove it and replace it with ventilation systems that keep as much space between any bends as possible to the outside pass-through point. Ductwork Tips Wherever possible, reduce the number of roof and wall caps vary with Damper 5 feet 2 feet 4 feet * * The equivalent lengths of transitions, turns, and sharp angles. If multiple elbows are no obstructions that move air greater than one 10-inch duct using...
Installation Instructions
Page 15
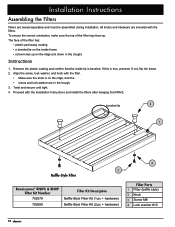
... assembled during installation. Align the screw, lock washer, and knob with the filter. • Make sure the knob is true, proceed. beveled lip 2 1 3 Baffle-Style Filter Renaissance® RNIVS & RNHP Filter Kit Number 702579 702580 Filter Kit Description Baffle-Style Filter Kit (1 pc + hardware) Baffle-Style Filter Kit (2 pc + hardware) 4 Filter Parts 1 Filter (baffle style) 2 Knob 3 Screw M8 4 Lock washer #10 14 Installation Instructions Assembling the Filters Filters are included with the Installation Instructions and install the filters after hanging the RNIVS. Remove...
... assembled during installation. Align the screw, lock washer, and knob with the filter. • Make sure the knob is true, proceed. beveled lip 2 1 3 Baffle-Style Filter Renaissance® RNIVS & RNHP Filter Kit Number 702579 702580 Filter Kit Description Baffle-Style Filter Kit (1 pc + hardware) Baffle-Style Filter Kit (2 pc + hardware) 4 Filter Parts 1 Filter (baffle style) 2 Knob 3 Screw M8 4 Lock washer #10 14 Installation Instructions Assembling the Filters Filters are included with the Installation Instructions and install the filters after hanging the RNIVS. Remove...
Installation Instructions
Page 16
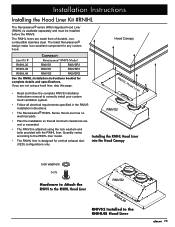
... the RNIVS. Hood Canopy Compatibility Liner Kit # Renaissance® RNIVS Model RNIHL30 RNIHL36 RNIHL48 RNIVS1 RNIVS1 RNIVS2 RNIVSR1 RNIVSR1 RNIVSR2 See the RNIHL Installation Instructions booklet for any custom hood. Quantity varies according to correctly install your custom hood ventilation system. • Follow all electrical requirements specified in the RNIVS Installation Instructions. • The Renaissance® RNIHL Series Hood Liner has no electrical parts. • Plan the installation so that all minimum clearances are made...
... the RNIVS. Hood Canopy Compatibility Liner Kit # Renaissance® RNIVS Model RNIHL30 RNIHL36 RNIHL48 RNIVS1 RNIVS1 RNIVS2 RNIVSR1 RNIVSR1 RNIVSR2 See the RNIHL Installation Instructions booklet for any custom hood. Quantity varies according to correctly install your custom hood ventilation system. • Follow all electrical requirements specified in the RNIVS Installation Instructions. • The Renaissance® RNIHL Series Hood Liner has no electrical parts. • Plan the installation so that all minimum clearances are made...
Installation Instructions
Page 20
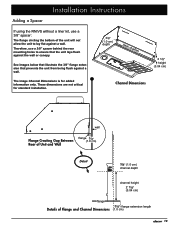
... channel height 2 1/8" (5.04 cm) flange Details of the unit will not allow the unit to ensure that prevents the unit from being flush against the wall or canopy. Adding a Spacer Installation Instructions If using the RNIVS without a liner kit, use a 3/8" spacer behind the rear mounting holes to lay flat against a wall. See images below that illustrate the 3/8" flange extension that the unit lays flush against a wall. These dimensions are...
... channel height 2 1/8" (5.04 cm) flange Details of the unit will not allow the unit to ensure that prevents the unit from being flush against the wall or canopy. Adding a Spacer Installation Instructions If using the RNIVS without a liner kit, use a 3/8" spacer behind the rear mounting holes to lay flat against a wall. See images below that illustrate the 3/8" flange extension that the unit lays flush against a wall. These dimensions are...
Installation Instructions
Page 21
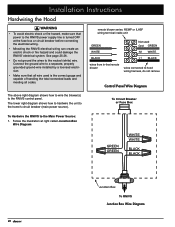
... lower right diagram shows how to hardwire the unit to the home's circuit breaker (main power source). Installation Instructions Hardwiring the Hood WARNING • To avoid electric shock or fire hazard, make sure that all wire used Gnd GREEN N1 WHITE BLACK L1 BLACK wires from in-line/remote blower wires connected to hood wiring harness, do not remove Control Panel Wire Diagram The above right diagram shows how to wire the blower(s) to the RNIVS control panel.
... lower right diagram shows how to hardwire the unit to the home's circuit breaker (main power source). Installation Instructions Hardwiring the Hood WARNING • To avoid electric shock or fire hazard, make sure that all wire used Gnd GREEN N1 WHITE BLACK L1 BLACK wires from in-line/remote blower wires connected to hood wiring harness, do not remove Control Panel Wire Diagram The above right diagram shows how to wire the blower(s) to the RNIVS control panel.
Installation Instructions
Page 23
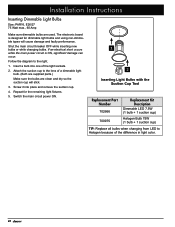
... supplied parts.) Make sure the bulbs are used. Switch the main circuit power ON. 1 2 Inserting Light Bulbs with the Suction Cup Tool Replacement Part Number 702666 Replacement Kit Description Dimmable LED 7.5W (1 bulb + 1 suction cup) 700975 Halogen Bulb 75W (1 bulb + 1 suction cup) TIP: Replace all bulbs when changing from LED to the right. 1. The electronic board is ON, significant damage can occur. Shut the main circuit breaker OFF while inserting new bulbs or while changing bulbs. Installation Instructions Inserting Dimmable Light Bulbs Size: PAR16...
... supplied parts.) Make sure the bulbs are used. Switch the main circuit power ON. 1 2 Inserting Light Bulbs with the Suction Cup Tool Replacement Part Number 702666 Replacement Kit Description Dimmable LED 7.5W (1 bulb + 1 suction cup) 700975 Halogen Bulb 75W (1 bulb + 1 suction cup) TIP: Replace all bulbs when changing from LED to the right. 1. The electronic board is ON, significant damage can occur. Shut the main circuit breaker OFF while inserting new bulbs or while changing bulbs. Installation Instructions Inserting Dimmable Light Bulbs Size: PAR16...

Installation Instructions
Page 24
... circuit panel or fuse box. 2. Make sure the electrical supply has not been disrupted by a blown fuse or problems in the opposite direction to the RNIVS via the outlet, circuit breaker, or another main power source. 2. Repeat the above the grease channel. Verify that the wiring installation has been completed correctly. 4. tension clip Inserting Filters: Front Edge FRONT Control Panel Filter Grease channel Inserting Filters: Rear Edge Dacor Replacement Parts Part Number 702579 702580 702666 700975 Description Baffle Style Filter Kit (1 Filter...
... circuit panel or fuse box. 2. Make sure the electrical supply has not been disrupted by a blown fuse or problems in the opposite direction to the RNIVS via the outlet, circuit breaker, or another main power source. 2. Repeat the above the grease channel. Verify that the wiring installation has been completed correctly. 4. tension clip Inserting Filters: Front Edge FRONT Control Panel Filter Grease channel Inserting Filters: Rear Edge Dacor Replacement Parts Part Number 702579 702580 702666 700975 Description Baffle Style Filter Kit (1 Filter...

Use and Care Manual
Page 3
... store or use and care information. Data Plate: Remove the filters to 5:00 p.m. b. Before servicing or cleaning unit, switch power off at service panel and lock the service disconnecting means to the State of your unit available. Always contact the Dacor Customer Service Team about problems or situations that COULD result in this manual are not meant to download the latest version of this appliance without updating these instructions with the...
... store or use and care information. Data Plate: Remove the filters to 5:00 p.m. b. Before servicing or cleaning unit, switch power off at service panel and lock the service disconnecting means to the State of your unit available. Always contact the Dacor Customer Service Team about problems or situations that COULD result in this manual are not meant to download the latest version of this appliance without updating these instructions with the...

Use and Care Manual
Page 4
... the size of the range hood unless specifically recommended in the literature accompanying it . ◊ The fire is small and contained in use. DO NOT use a damaged hood. • Make sure that you may be at least 30" (76.2 cm). • To reduce the risk of electric shock, before cleaning the range hood, turn the power ON/OFF. • Do not install, repair, or replace any parts. Avoid...
... the size of the range hood unless specifically recommended in the literature accompanying it . ◊ The fire is small and contained in use. DO NOT use a damaged hood. • Make sure that you may be at least 30" (76.2 cm). • To reduce the risk of electric shock, before cleaning the range hood, turn the power ON/OFF. • Do not install, repair, or replace any parts. Avoid...

Use and Care Manual
Page 5
... dials control the hood's lights and fan speeds. max. bulb. Size: PAR16, E26/27 (All replaceable bulbs must be dimmable and not exceed 75W max.) 3 Parts of the hood. This "range hood chassis" is without a canopy to fit inside custom designs. surge) Baffle style, Stainless steel, Dishwasher safe Dimmable LED 7.5W 120V, 60 Hz. Total Connected Load Filters Lights RNIVS Specifications 120V, 60 Hz, 9 Amp. E LIGHTS Dimmable LED bulbs in recessed fixtures that helps capture grease. B CONTROL PANEL Two...
... dials control the hood's lights and fan speeds. max. bulb. Size: PAR16, E26/27 (All replaceable bulbs must be dimmable and not exceed 75W max.) 3 Parts of the hood. This "range hood chassis" is without a canopy to fit inside custom designs. surge) Baffle style, Stainless steel, Dishwasher safe Dimmable LED 7.5W 120V, 60 Hz. Total Connected Load Filters Lights RNIVS Specifications 120V, 60 Hz, 9 Amp. E LIGHTS Dimmable LED bulbs in recessed fixtures that helps capture grease. B CONTROL PANEL Two...
Use and Care Manual
Page 6
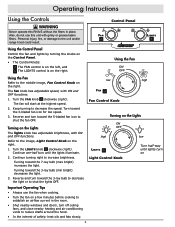
... range hood could result. Control Panel Fan A Lights B Using the Control Panel Control the fan and lights by turning the knobs on the Control Panel. • The Control Knobs: A The FAN control is on the left, and B The LIGHTS control is on Important Operating Tips • Always use this RNIVS without the filters in the room. • Shut nearby windows and doors, turn off ceiling fans, and close nearby heating and air conditioning vents to reduce drafts around the hood...
... range hood could result. Control Panel Fan A Lights B Using the Control Panel Control the fan and lights by turning the knobs on the Control Panel. • The Control Knobs: A The FAN control is on the left, and B The LIGHTS control is on Important Operating Tips • Always use this RNIVS without the filters in the room. • Shut nearby windows and doors, turn off ceiling fans, and close nearby heating and air conditioning vents to reduce drafts around the hood...

Use and Care Manual
Page 8
... occurs.) 2. Turn the power OFF at www.everythingdacor.com. Gently push the suction cup tool A (provided with a micro-fiber cloth or other lintfree cloth. B Make sure the lens is grease-free. 7. Dacor Replacement Parts To order replacement parts directly from Dacor, refer to the tables on the package Replacing the Light Bulbs Light bulb replacement is ON at the fuse box or circuit panel. B A C Removing the Bulb Inserting the Bulb Dacor Kit Number Light Bulb Kits Tip#1* Replace all bulbs if changing from the bulb. 9. Attach...
... occurs.) 2. Turn the power OFF at www.everythingdacor.com. Gently push the suction cup tool A (provided with a micro-fiber cloth or other lintfree cloth. B Make sure the lens is grease-free. 7. Dacor Replacement Parts To order replacement parts directly from Dacor, refer to the tables on the package Replacing the Light Bulbs Light bulb replacement is ON at the fuse box or circuit panel. B A C Removing the Bulb Inserting the Bulb Dacor Kit Number Light Bulb Kits Tip#1* Replace all bulbs if changing from the bulb. 9. Attach...
Use and Care Manual
Page 9
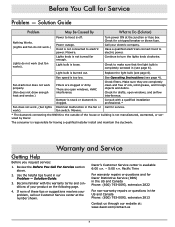
... Dacor. Power to electric power. Replace the light bulb (see page 4). Make sure they are clogged or dirty. Consult with the warranty terms and conditions of oils, solid grease, and foreign objects and debris. Warranty and Service Getting Help Before you request service: 1. Dacor's Customer Service center is off. Continue to electric power. Fan speed is burned out. Filters are completely clean and free of your electric company. See Operating Instructions (see page 6). Have a qualified electrician connect hood...
... Dacor. Power to electric power. Replace the light bulb (see page 4). Make sure they are clogged or dirty. Consult with the warranty terms and conditions of oils, solid grease, and foreign objects and debris. Warranty and Service Getting Help Before you request service: 1. Dacor's Customer Service center is off. Continue to electric power. Fan speed is burned out. Filters are completely clean and free of your electric company. See Operating Instructions (see page 6). Have a qualified electrician connect hood...
Use and Care Manual
Page 10
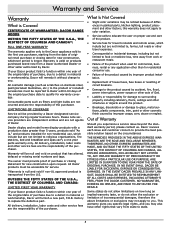
... have other service fees are the responsibility of the purchaser. Dacor reviews each issue and customer concern to replace the defective part. THEREFORE, NO OTHER EXPRESS WARRANTIES ARE MADE, AND OUTSIDE THE FIFTY STATES OF THE UNITED STATES, THE DISTRICT OF COLUMBIA AND CANADA, ALL IMPLIED WARRANTIES, INCLUDING BUT NOT LIMITED TO, ANY IMPLIED WARRANTY OF MERCHANTABILITY OR FITNESS FOR A PARTICULAR USE OR PURPOSE...
... have other service fees are the responsibility of the purchaser. Dacor reviews each issue and customer concern to replace the defective part. THEREFORE, NO OTHER EXPRESS WARRANTIES ARE MADE, AND OUTSIDE THE FIFTY STATES OF THE UNITED STATES, THE DISTRICT OF COLUMBIA AND CANADA, ALL IMPLIED WARRANTIES, INCLUDING BUT NOT LIMITED TO, ANY IMPLIED WARRANTY OF MERCHANTABILITY OR FITNESS FOR A PARTICULAR USE OR PURPOSE...


