Planning Guide
Page 1
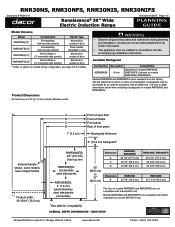
... as an optional accessory. Available Backguard Part Number Description Compatibility ADRB30E06 6 Inch Standard on models RNR30NS, RNR30NFS, Optional on models RNR30NIS, RNR30NIFS Models RNR30NIS and RNR30NIFS come equipped from the factory with a downdraft vent. Models RNR30NIS and RNR30NIFS are not compatible with flat stainless trim piece in (3" removable side panels) Mounted on outside of door * Order -C option for corded wiring configuration, see inside cover) Product width: 29 15...
... as an optional accessory. Available Backguard Part Number Description Compatibility ADRB30E06 6 Inch Standard on models RNR30NS, RNR30NFS, Optional on models RNR30NIS, RNR30NIFS Models RNR30NIS and RNR30NIFS come equipped from the factory with a downdraft vent. Models RNR30NIS and RNR30NIFS are not compatible with flat stainless trim piece in (3" removable side panels) Mounted on outside of door * Order -C option for corded wiring configuration, see inside cover) Product width: 29 15...
Planning Guide
Page 3
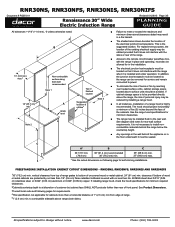
... range hood specifications for rear wall surface requirements. FREESTANDING INSTALLATION CABINET CUTOUT DIMENSIONS - See diagram and notes for minimum clearances. ■■ The range may be utilized provided that it does not interfere with the sides or rear of the range. ■■ Access to the remote circuit breaker panel/fuse box, with the range in place and operating, must also be allowed for in the installation. ■■ The electrical...
... range hood specifications for rear wall surface requirements. FREESTANDING INSTALLATION CABINET CUTOUT DIMENSIONS - See diagram and notes for minimum clearances. ■■ The range may be utilized provided that it does not interfere with the sides or rear of the range. ■■ Access to the remote circuit breaker panel/fuse box, with the range in place and operating, must also be allowed for in the installation. ■■ The electrical...
Planning Guide
Page 4
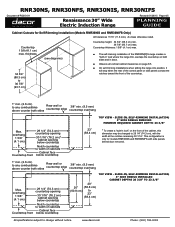
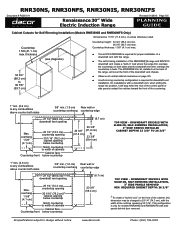
RNR30NS, RNR30NFS, RNR30NIS, RNR30NIFS Document # PG05-011 Renaissance 30" Wide Electric Induction Range Revised 01/28/15 Page 4/5 PLANNING GUIDE Cabinet Cutouts for models RNR30NIS and RNR30NIFS with the width at the notches remaining 30 1/16". SLIDE-IN, SELF-RIMMING INSTALLATION, 3" SIDE PANELS REMOVED MINIMUM REQUIRED CABINET DEPTH: 23 3/8" 23" (58.4 cm) 1 To create a "built-in back. ■■ Observe all vertical cabinet...
RNR30NS, RNR30NFS, RNR30NIS, RNR30NIFS Document # PG05-011 Renaissance 30" Wide Electric Induction Range Revised 01/28/15 Page 4/5 PLANNING GUIDE Cabinet Cutouts for models RNR30NIS and RNR30NIFS with the width at the notches remaining 30 1/16". SLIDE-IN, SELF-RIMMING INSTALLATION, 3" SIDE PANELS REMOVED MINIMUM REQUIRED CABINET DEPTH: 23 3/8" 23" (58.4 cm) 1 To create a "built-in back. ■■ Observe all vertical cabinet...
Planning Guide
Page 5
... countertop 23 3/8" (59.4 cm) TOP VIEW - On installations with a downdraft vent, when sliding the range into position, it will cover the front of the RNR30NI[F]S range and ERV3015 downdraft vent create a "built-in back. RNR30NS, RNR30NFS, RNR30NIS, RNR30NIFS Document # PG05-011 Renaissance 30" Wide Electric Induction Range Revised 01/28/15 Page 5/5 PLANNING GUIDE Cabinet Cutouts for models RNR30NIS and RNR30NIFS with side panels behind door removed.
... countertop 23 3/8" (59.4 cm) TOP VIEW - On installations with a downdraft vent, when sliding the range into position, it will cover the front of the RNR30NI[F]S range and ERV3015 downdraft vent create a "built-in back. RNR30NS, RNR30NFS, RNR30NIS, RNR30NIFS Document # PG05-011 Renaissance 30" Wide Electric Induction Range Revised 01/28/15 Page 5/5 PLANNING GUIDE Cabinet Cutouts for models RNR30NIS and RNR30NIFS with side panels behind door removed.

Installation Instructions
Page 2
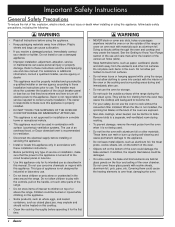
... Dimensions 4 Installation Specifications 5 Cabinet Layout 5 Installation Instructions 8 Verify the Package Contents 8 Installing the Anti-Tip Bracket 8 Backguard Installation 10 Downdraft Vent Installation 10 Removing the Oven Door 10 Electrical Connection 10 Side Panel Removal 16 Installing the Range 16 Re-installing the Oven Door 17 Verifying Proper Operation 17 Installation Checklist 18 IMPORTANT: • Installer: In the interest of safety and to minimize problems, read these installation instructions for future reference and the local building inspector's use. Dacor...
... Dimensions 4 Installation Specifications 5 Cabinet Layout 5 Installation Instructions 8 Verify the Package Contents 8 Installing the Anti-Tip Bracket 8 Backguard Installation 10 Downdraft Vent Installation 10 Removing the Oven Door 10 Electrical Connection 10 Side Panel Removal 16 Installing the Range 16 Re-installing the Oven Door 17 Verifying Proper Operation 17 Installation Checklist 18 IMPORTANT: • Installer: In the interest of safety and to minimize problems, read these installation instructions for future reference and the local building inspector's use. Dacor...
Installation Instructions
Page 4
... this cooktop. • Clean the cooktop thoroughly before using the range. Do not install or use a damaged appliance. • Improper installation, adjustment, alteration, service or maintenance can cause suffocation. • If you receive a damaged product, immediately contact your safety, do not use and care manual. They will be harmful to cook without the convection filter installed. Remove birds to children on top of or above the range. The owner...
... this cooktop. • Clean the cooktop thoroughly before using the range. Do not install or use a damaged appliance. • Improper installation, adjustment, alteration, service or maintenance can cause suffocation. • If you receive a damaged product, immediately contact your safety, do not use and care manual. They will be harmful to cook without the convection filter installed. Remove birds to children on top of or above the range. The owner...

Installation Instructions
Page 7
... clearance from edge of the existing electrical supply may be provided directly above the range and up to the rear wall. If installing a range hood, also check hood specifications for in the installation. • The electrical junction box/receptacle must be located so that the electrical service meets local building codes. • Access to reduce accumulated smoke in place and operating, must be met or exceeded. •...
... clearance from edge of the existing electrical supply may be provided directly above the range and up to the rear wall. If installing a range hood, also check hood specifications for in the installation. • The electrical junction box/receptacle must be located so that the electrical service meets local building codes. • Access to reduce accumulated smoke in place and operating, must be met or exceeded. •...

Installation Instructions
Page 12
... directions for damages resulting from improper installation. • This range must be connected at the circuit breaker panel or fuse box. • If the electric service provided does not meet the product specifications, do so. Alternatively, a grounding conductor should be connected to the grounding terminal or lead on the appliance. • Do not use a 3-wire connection unless local building codes permit. • Do not turn off power...
... directions for damages resulting from improper installation. • This range must be connected at the circuit breaker panel or fuse box. • If the electric service provided does not meet the product specifications, do so. Alternatively, a grounding conductor should be connected to the grounding terminal or lead on the appliance. • Do not use a 3-wire connection unless local building codes permit. • Do not turn off power...
Installation Instructions
Page 19
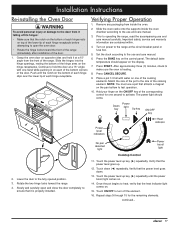
... each hinge receptacle. Push until the power boost light comes on the hinge receptacles. Turn on opposite sides and hold the door at the circuit breaker panel or fuse box. 5. Place a pot 1/4 full with one second to operating the range, read the accompanying use and care manual. 3. No pan detected light Power boost light Cooktop Control 11. Prior to activate. Set the clock according to the range at a 15° angle with...
... each hinge receptacle. Push until the power boost light comes on the hinge receptacles. Turn on opposite sides and hold the door at the circuit breaker panel or fuse box. 5. Place a pot 1/4 full with one second to operating the range, read the accompanying use and care manual. 3. No pan detected light Power boost light Cooktop Control 11. Prior to activate. Set the clock according to the range at a 15° angle with...
Installation Instructions
Page 20
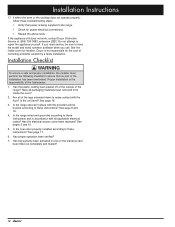
... the model and serial numbers available when you need service, be sure to make contact with the floor? Is the oven door properly installed according to these instructions? Have all applicable electrical codes? See page 16. 3. Is the range secured in accordance with the provided anti-tip bracket according to these instructions? See pages 3 and 10. 5. Has proper operation been verified? 7. Has the warranty been activated on-line...
... the model and serial numbers available when you need service, be sure to make contact with the floor? Is the oven door properly installed according to these instructions? Have all applicable electrical codes? See page 16. 3. Is the range secured in accordance with the provided anti-tip bracket according to these instructions? See pages 3 and 10. 5. Has proper operation been verified? 7. Has the warranty been activated on-line...
Use Care Manual
Page 3
... not operate the range without the rear leg engaged with the appliance. NEVER cover any questions call: Dacor Customer Service Phone: (800) 793-0093 (U.S.A. Consumer: Read this use this manual are not meant to cover all possible problems and situations that WILL result in severe personal injury or death. Aluminum foil linings may affect operation of the appliance. Important Safety Instructions Installer: Leave these instructions with the anti-tip bracket...
... not operate the range without the rear leg engaged with the appliance. NEVER cover any questions call: Dacor Customer Service Phone: (800) 793-0093 (U.S.A. Consumer: Read this use this manual are not meant to cover all possible problems and situations that WILL result in severe personal injury or death. Aluminum foil linings may affect operation of the appliance. Important Safety Instructions Installer: Leave these instructions with the anti-tip bracket...
Use Care Manual
Page 4
... installation instructions. Personal injury or damage may be seriously injured. • Do not tamper with heating elements of different sizes. The use of undersized utensils will expose a portion of the heating element to element will also improve efficiency. • Exercise caution when opening the oven door. Have the installer show you the location of the circuit breaker panel or fuse box so that could blow over the cooktop...
... installation instructions. Personal injury or damage may be seriously injured. • Do not tamper with heating elements of different sizes. The use of undersized utensils will expose a portion of the heating element to element will also improve efficiency. • Exercise caution when opening the oven door. Have the installer show you the location of the circuit breaker panel or fuse box so that could blow over the cooktop...

Use Care Manual
Page 5
... to become covered up by high oven temperatures or mechanical shock. Doing so may need to make changes to operate it properly. • Clean the range thoroughly before or after cooking. It protects the light bulb from the cooktop or oven. The steam can fight the fire with the controls, pull on a hot cooktop or in the oven. BE CAREFUL TO PREVENT BURNS. NEVER PICK UP A FLAMING PAN - a violent...
... to become covered up by high oven temperatures or mechanical shock. Doing so may need to make changes to operate it properly. • Clean the range thoroughly before or after cooking. It protects the light bulb from the cooktop or oven. The steam can fight the fire with the controls, pull on a hot cooktop or in the oven. BE CAREFUL TO PREVENT BURNS. NEVER PICK UP A FLAMING PAN - a violent...
Use Care Manual
Page 14
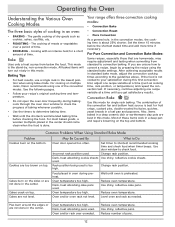
.... The cooking of time. • BROILING - Your range offers three convection cooking modes: • Convection Bake • Convection Roast • Pure Convection As a general rule, in the center should come clean when the food is about 25% shorter. Incorrect rack position used . Cakes are too brown on multiple racks, Dacor recommends using bake mode. Reduce oven temperature. Level oven and rack as cookies, cakes, soufflés, etc. • ROASTING - Use shiny, reflective pans. Bake Uses only a heat source from standard to convert...
.... The cooking of time. • BROILING - Your range offers three convection cooking modes: • Convection Bake • Convection Roast • Pure Convection As a general rule, in the center should come clean when the food is about 25% shorter. Incorrect rack position used . Cakes are too brown on multiple racks, Dacor recommends using bake mode. Reduce oven temperature. Level oven and rack as cookies, cakes, soufflés, etc. • ROASTING - Use shiny, reflective pans. Bake Uses only a heat source from standard to convert...

Use Care Manual
Page 20
...°F Dacor recommends that fits inside 4 quart saucepan. You can be used to dehydrate or defrost foods at low heat settings in the Pure Convection mode. Operating the Oven Important Details About Meat Probe Use • You must select the specific cooking mode (BAKE, CONV BAKE, PURE CONV or CONV ROAST) before dehydrating. 2. The meat probe symbol will automatically cancel after defrosting them . There are changes in...
...°F Dacor recommends that fits inside 4 quart saucepan. You can be used to dehydrate or defrost foods at low heat settings in the Pure Convection mode. Operating the Oven Important Details About Meat Probe Use • You must select the specific cooking mode (BAKE, CONV BAKE, PURE CONV or CONV ROAST) before dehydrating. 2. The meat probe symbol will automatically cancel after defrosting them . There are changes in...

Use Care Manual
Page 22
.... Therefore, recipe adjustments should bake cakes, quick breads, muffins and cookies in their low profiles, will cook better on two racks, use rack positions #1, #3 and #5 with their original foil containers, placed flat on high altitude cooking for light, golden crusts. Cooking Tips Food Placement • For roasting, Dacor's optional "V" shaped rack and broil/roast pan works best to Pure Convection mode. • Turn pans on the racks so that work best and...
.... Therefore, recipe adjustments should bake cakes, quick breads, muffins and cookies in their low profiles, will cook better on two racks, use rack positions #1, #3 and #5 with their original foil containers, placed flat on high altitude cooking for light, golden crusts. Cooking Tips Food Placement • For roasting, Dacor's optional "V" shaped rack and broil/roast pan works best to Pure Convection mode. • Turn pans on the racks so that work best and...

Use Care Manual
Page 23
... cleaning solutions specified in use a steam cleaner to remove heavy spills with a solution of the oven during the first few self clean cycles. Care and Cleaning WARNING Your Oven's Self Clean Feature • Clean only the parts of interior surfaces. Anti-tip bracket Rear leg About the Self Clean Cycle • The oven will minimize smoke and increase efficiency. During self cleaning, the oven is heated to very high temperatures which burn off any part of the range unless instructed...
... cleaning solutions specified in use a steam cleaner to remove heavy spills with a solution of the oven during the first few self clean cycles. Care and Cleaning WARNING Your Oven's Self Clean Feature • Clean only the parts of interior surfaces. Anti-tip bracket Rear leg About the Self Clean Cycle • The oven will minimize smoke and increase efficiency. During self cleaning, the oven is heated to very high temperatures which burn off any part of the range unless instructed...

Use Care Manual
Page 25
... to use Dacor Cooktop Cleaning Creme • Regular use of Dacor Cooktop Cleaning Creme*, to the directions on the control panel. To prevent scratching, do not use abrasive cleaners or scrubbers on the package. • You may scrub the oven light lens with Dacor Cooktop Cleaning Creme. Use it according to the ceramic glass surface with a lightly dampened clean cloth. Cleaning the Oven Interior WARNING To avoid electrical shock or burns, turn off the oven and be removed. Use it...
... to use Dacor Cooktop Cleaning Creme • Regular use of Dacor Cooktop Cleaning Creme*, to the directions on the control panel. To prevent scratching, do not use abrasive cleaners or scrubbers on the package. • You may scrub the oven light lens with Dacor Cooktop Cleaning Creme. Use it according to the ceramic glass surface with a lightly dampened clean cloth. Cleaning the Oven Interior WARNING To avoid electrical shock or burns, turn off the oven and be removed. Use it...

Use Care Manual
Page 28
... is poor heat conductor. Turn power on control panel can cause the cooktop to shut down (safety feature). Contact power company. Cooktop turns on and/or Fluids, food or cleaning solutions Spills/cleaning solutions on at circuit breaker panel or fuse box. Dry area with baking. Supply voltage too low. Problem Solution Guide - May Be Caused By Range not connected to boil dry. Contact power company. 26 Reset controls to resume operation. The utensil/pan is only...
... is poor heat conductor. Turn power on control panel can cause the cooktop to shut down (safety feature). Contact power company. Cooktop turns on and/or Fluids, food or cleaning solutions Spills/cleaning solutions on at circuit breaker panel or fuse box. Dry area with baking. Supply voltage too low. Problem Solution Guide - May Be Caused By Range not connected to boil dry. Contact power company. 26 Reset controls to resume operation. The utensil/pan is only...

Use Care Manual
Page 29
... and "C33" error to broil with meat probe connected. Meat probe connected. Oven light will not heat. Attempting to reset. Power failure or power was turned Reset time. Call for long periods during cooking and keep door shut during self clean process. Touch CANCEL · SECURE. Broil and convection broil settings will unlock once oven has cooled. Oven is set while oven is turned off 12 hour timer. Do not leave door open for service. 27 Cooling fan continues to normal operation. Replace light bulb. Wait for Service Problem Solution Guide - Before...
... and "C33" error to broil with meat probe connected. Meat probe connected. Oven light will not heat. Attempting to reset. Power failure or power was turned Reset time. Call for long periods during cooking and keep door shut during self clean process. Touch CANCEL · SECURE. Broil and convection broil settings will unlock once oven has cooled. Oven is set while oven is turned off 12 hour timer. Do not leave door open for service. 27 Cooling fan continues to normal operation. Replace light bulb. Wait for Service Problem Solution Guide - Before...


