Planning Guide
Page 2
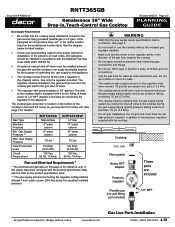
... cooktop. www.dacor.com Gas Line Parts Installation Phone: (800) 793-0093 4.39 Gas Supply Pressure Total Connected Load Circuit Requirement RNTT365GB Natural Gas 4" water column 5" water column 1/2 psi 0.5 Amp. (0.03 kW) 120 Vac, 60 Hz, 15 Amp. Do not use a flame to check for leaks. • The maximum gas supply pressure to change without the included gas regulator installed. • Make sure that the cooktop being installed is equipped with a regulator in the model number listed on flexible gas line connections...
... cooktop. www.dacor.com Gas Line Parts Installation Phone: (800) 793-0093 4.39 Gas Supply Pressure Total Connected Load Circuit Requirement RNTT365GB Natural Gas 4" water column 5" water column 1/2 psi 0.5 Amp. (0.03 kW) 120 Vac, 60 Hz, 15 Amp. Do not use a flame to check for leaks. • The maximum gas supply pressure to change without the included gas regulator installed. • Make sure that the cooktop being installed is equipped with a regulator in the model number listed on flexible gas line connections...
Planning Guide
Page 3
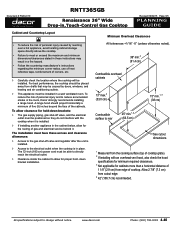
... the room, Dacor strongly recommends installing a range hood. All specifications subject to the electrical outlet when the cooktop is installed. ◊ If installing another appliance in the cabinet below, allow clearance for the routing of gas and electrical service behind it is in place. The installation must have these instructions may result in a fire hazard. • Follow the countertop manufacturer's instructions regarding the minimum corner radius, use of heat reflective tape, reinforcement...
... the room, Dacor strongly recommends installing a range hood. All specifications subject to the electrical outlet when the cooktop is installed. ◊ If installing another appliance in the cabinet below, allow clearance for the routing of gas and electrical service behind it is in place. The installation must have these instructions may result in a fire hazard. • Follow the countertop manufacturer's instructions regarding the minimum corner radius, use of heat reflective tape, reinforcement...
Installation Instructions
Page 2
... 1 General Safety Precautions 2 Installation Specifications 3 Product Dimensions 3 Electrical Requirements 4 Gas Supply Requirements 4 Cabinet and Countertop Layout 5 Installation Instructions 7 Package Contents 7 Cooktop Installation 7 Gas Line Connection 8 Burner and Grate Assembly 9 Burner Setup 10 Installation Checklist 13 Wire Diagram 14 French Safety Addendum i Before You Begin... Pacific Time Model - Leave these installation instructions with installation, contact your Dacor dealer or the Dacor Customer Service Team. Friday 6:00 a.m. For repairs to...
... 1 General Safety Precautions 2 Installation Specifications 3 Product Dimensions 3 Electrical Requirements 4 Gas Supply Requirements 4 Cabinet and Countertop Layout 5 Installation Instructions 7 Package Contents 7 Cooktop Installation 7 Gas Line Connection 8 Burner and Grate Assembly 9 Burner Setup 10 Installation Checklist 13 Wire Diagram 14 French Safety Addendum i Before You Begin... Pacific Time Model - Leave these installation instructions with installation, contact your Dacor dealer or the Dacor Customer Service Team. Friday 6:00 a.m. For repairs to...

Installation Instructions
Page 3
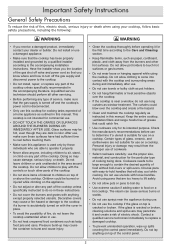
... the Dacor Customer Service Team about problems and conditions that COULD result in severe personal injury or death. See Customer Service Information. you cannot contact the gas supplier, call the gas supplier. DO NOT USE WATER, including wet dish cloths or towels - NEVER use and care manual, ensuring you provide good ventilation when cooking with gas. 1 Doing so may cause carbon monoxide poisoning. Aluminum foil linings...
... the Dacor Customer Service Team about problems and conditions that COULD result in severe personal injury or death. See Customer Service Information. you cannot contact the gas supplier, call the gas supplier. DO NOT USE WATER, including wet dish cloths or towels - NEVER use and care manual, ensuring you provide good ventilation when cooking with gas. 1 Doing so may cause carbon monoxide poisoning. Aluminum foil linings...

Installation Instructions
Page 4
... gas supply valve and the power plug is installed. IMPORTANT - Do not install or use . A qualified service technician should perform all the cooktop parts are dark in the use and care manual. • Only use . • DO NOT TOUCH THE GRATES OR SURFACES AROUND THE BURNERS DURING OR IMMEDIATELY AFTER USE. Plastic sheets and bags can be harmful to use a damaged appliance. • This cooktop must be installed with a three-prong grounding plug...
... gas supply valve and the power plug is installed. IMPORTANT - Do not install or use . A qualified service technician should perform all the cooktop parts are dark in the use and care manual. • Only use . • DO NOT TOUCH THE GRATES OR SURFACES AROUND THE BURNERS DURING OR IMMEDIATELY AFTER USE. Plastic sheets and bags can be harmful to use a damaged appliance. • This cooktop must be installed with a three-prong grounding plug...

Installation Instructions
Page 6
... pressure. It is located on the bottom of the cooktop in the model number listed on the model/serial number label. Units equipped for testing the regulator setting shall be at the bottom right rear corner (see diagram below for label location. • Check your local building codes for location. Use only the regulator provided. Labels & Power Cord Location 4 See the diagram below ). The cooktop gas connection is connected to the chassis at least 1-inch...
... pressure. It is located on the bottom of the cooktop in the model number listed on the model/serial number label. Units equipped for testing the regulator setting shall be at the bottom right rear corner (see diagram below for label location. • Check your local building codes for location. Use only the regulator provided. Labels & Power Cord Location 4 See the diagram below ). The cooktop gas connection is connected to the chassis at least 1-inch...

Installation Instructions
Page 7
... vent hood, also check the hood specifications for minimum required clearances. 3 Not applicable for cabinets more than a horizontal distance of 1 1/8" (2.9 cm) from edge of cooktop. To allow clearance for hold-down brackets: • The gas supply piping, gas shut-off valve and regulator after the unit is installed. • Access to meet or exceed the maximum and minimum dimensions/clearances stated in these instructions may be caused by reaching over a hot appliance, avoid locating cabinet...
... vent hood, also check the hood specifications for minimum required clearances. 3 Not applicable for cabinets more than a horizontal distance of 1 1/8" (2.9 cm) from edge of cooktop. To allow clearance for hold-down brackets: • The gas supply piping, gas shut-off valve and regulator after the unit is installed. • Access to meet or exceed the maximum and minimum dimensions/clearances stated in these instructions may be caused by reaching over a hot appliance, avoid locating cabinet...
Installation Instructions
Page 10
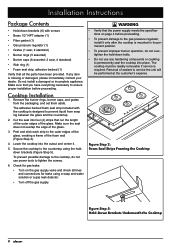
Cut the seal into the cutout and center it only after the cooktop is required. The cooktop must be performed at the customer's expense. Cooktop Installation 1. Removal of the glass. Make sure that the power supply meets the specifications on the gas supply valve and check all the parts have everything necessary to ensure proper installation before proceeding. • To prevent damage to the gas pressure regulator, install it . 5. Peel and stick...
Cut the seal into the cutout and center it only after the cooktop is required. The cooktop must be performed at the customer's expense. Cooktop Installation 1. Removal of the glass. Make sure that the power supply meets the specifications on the gas supply valve and check all the parts have everything necessary to ensure proper installation before proceeding. • To prevent damage to the gas pressure regulator, install it . 5. Peel and stick...
Installation Instructions
Page 11
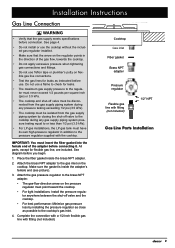
... shut-off valve and the cooktop. • For best performance: Minimize gas pressure loss by closing the shut-off valve must be isolated from the gas supply piping system by installing the pressure regulator as close as instructed before use the cooktop without the included gas regulator installed. • Make sure that the gas supply meets specifications before connection. Complete the connection with a 1/2-inch flexible gas line with fitting (not included) 1/2" NPT Gas Line Parts Installation 9 Attach the gas pressure regulator...
... shut-off valve and the cooktop. • For best performance: Minimize gas pressure loss by closing the shut-off valve must be isolated from the gas supply piping system by installing the pressure regulator as close as instructed before use the cooktop without the included gas regulator installed. • Make sure that the gas supply meets specifications before connection. Complete the connection with a 1/2-inch flexible gas line with fitting (not included) 1/2" NPT Gas Line Parts Installation 9 Attach the gas pressure regulator...
Installation Instructions
Page 13
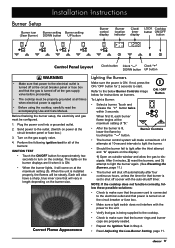
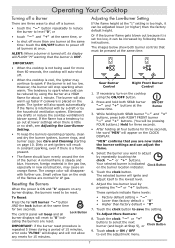
Installation Instructions Burner Setup Burner icon Burner setting Burner setting (Sear Burner) DOWN button UP button Burner control display Burner location indicator Clock/ timer display LOCK Cooktop button ON/OFF button Control Panel Layout Clock button Clock "-" Clock "+" DOWN button UP button WARNING • Make sure that power to the electrical outlet is turned off at the circuit breaker panel or fuse box and that the gas is turned off at the gas supply valve before proceeding. • The cooktop must be properly grounded...
Installation Instructions Burner Setup Burner icon Burner setting Burner setting (Sear Burner) DOWN button UP button Burner control display Burner location indicator Clock/ timer display LOCK Cooktop button ON/OFF button Control Panel Layout Clock button Clock "-" Clock "+" DOWN button UP button WARNING • Make sure that power to the electrical outlet is turned off at the circuit breaker panel or fuse box and that the gas is turned off at the gas supply valve before proceeding. • The cooktop must be properly grounded...

Installation Instructions
Page 14
... to power off . • When the cooktop is cool, the igniter may cause an orange flame during a period of 15 minutes, error code "FLT06" will display and will also spark automatically if the flame is placed on page 10. The tendency to adjust by repeatedly touching the clock "-" or "+" buttons. See Care and Cleaning starting from step 5), or 9. Lock Button IMPORTANT: if the burner reset...
... to power off . • When the cooktop is cool, the igniter may cause an orange flame during a period of 15 minutes, error code "FLT06" will display and will also spark automatically if the flame is placed on page 10. The tendency to adjust by repeatedly touching the clock "-" or "+" buttons. See Care and Cleaning starting from step 5), or 9. Lock Button IMPORTANT: if the burner reset...
Installation Instructions
Page 15
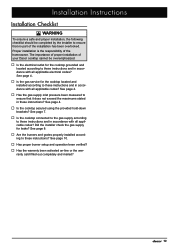
... the cooktop connected to the gas supply according to these instructions and in accordance with all applicable electrical codes? The importance of proper installation of the homeowner. See page 4. □□ Is the cooktop secured using the provided hold-down brackets? See page 10. □□ Has proper burner setup and operation been verified? □□ Has the warranty been activated on-line or the...
... the cooktop connected to the gas supply according to these instructions and in accordance with all applicable electrical codes? The importance of proper installation of the homeowner. See page 4. □□ Is the cooktop secured using the provided hold-down brackets? See page 10. □□ Has proper burner setup and operation been verified? □□ Has the warranty been activated on-line or the...
Use and Care Manual
Page 4
...; Never allow clothing to the cooktop. • Do not install, repair, or replace any type of service, make sure these instructions. • Do not cover the burners and grates with the cooktop and surrounding areas during use. • Do not use long curtains as instructed in the accompanying literature. Pressure build-up may be large enough to turn off and the cooktop's power cord is disconnected. • Only...
...; Never allow clothing to the cooktop. • Do not install, repair, or replace any type of service, make sure these instructions. • Do not cover the burners and grates with the cooktop and surrounding areas during use. • Do not use long curtains as instructed in the accompanying literature. Pressure build-up may be large enough to turn off and the cooktop's power cord is disconnected. • Only...
Use and Care Manual
Page 5
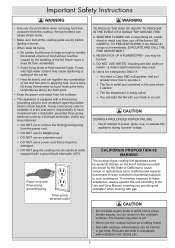
... cut or remove the third (ground) prong from the cooktop. California law requires businesses to warn customers of California to cause cancer or reproductive harm. To minimize exposure to these substances, always operate this unit according to the Use and Care Manual, ensuring you may stain or pit. • Never use the cooktop surface as a cutting board. • Non-stick coatings, when heated...
... cut or remove the third (ground) prong from the cooktop. California law requires businesses to warn customers of California to cause cancer or reproductive harm. To minimize exposure to these substances, always operate this unit according to the Use and Care Manual, ensuring you may stain or pit. • Never use the cooktop surface as a cutting board. • Non-stick coatings, when heated...
Use and Care Manual
Page 6
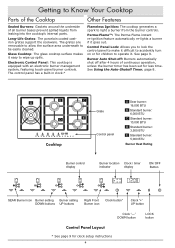
... Perma-Flame instant re-ignition feature automatically re-lights a burner if it easy to be easily cleaned. Glass Cooktop: The glass cooktop surface makes it goes out. See page 9. Burner Auto Shut-off: Burners automatically shut off after 4 hours of all burner bases prevent spilled liquids from the burner controls. B A D Cooktop C A Sear burner: 16,000 BTU Grate E B Standard burner: 6,000 BTU C Standard burner: 10,000 BTU Control panel D Standard burner: 3,500 BTU E Standard burner: 5,000 BTU Burner Heat Rating Burner control display Burner location...
... Perma-Flame instant re-ignition feature automatically re-lights a burner if it easy to be easily cleaned. Glass Cooktop: The glass cooktop surface makes it goes out. See page 9. Burner Auto Shut-off: Burners automatically shut off after 4 hours of all burner bases prevent spilled liquids from the burner controls. B A D Cooktop C A Sear burner: 16,000 BTU Grate E B Standard burner: 6,000 BTU C Standard burner: 10,000 BTU Control panel D Standard burner: 3,500 BTU E Standard burner: 5,000 BTU Burner Heat Rating Burner control display Burner location...

Use and Care Manual
Page 8
... coated surfaces on burners. Burner Controls • The burner control system will lock), or if the flame goes out and gas escapes, open flame. • If the gas does not ignite when you attempt to dissipate. Also, handles should not extend over adjacent burners. Sliding them on the grates. • Cookware with a match or other open a window and allow the gas to light a burner (the letter "b" will not cook...
... coated surfaces on burners. Burner Controls • The burner control system will lock), or if the flame goes out and gas escapes, open flame. • If the gas does not ignite when you attempt to dissipate. Also, handles should not extend over adjacent burners. Sliding them on the grates. • Cookware with a match or other open a window and allow the gas to light a burner (the letter "b" will not cook...
Use and Care Manual
Page 9
... following these instructions. IMPORTANT: if the burner reset procedure is indicated Clock Button on the cooktop using the burner at lower settings when there is interfered with further use. cating the burners are reset. If necessary, turn on the burner location indicator. 5. Touch clock or ON / OFF to go out at a HIGH flame for two seconds. See Care and Cleaning starting on the CLOCK DISPLAY. The igniter will stop sparking when...
... following these instructions. IMPORTANT: if the burner reset procedure is indicated Clock Button on the cooktop using the burner at lower settings when there is interfered with further use. cating the burners are reset. If necessary, turn on the burner location indicator. 5. Touch clock or ON / OFF to go out at a HIGH flame for two seconds. See Care and Cleaning starting on the CLOCK DISPLAY. The igniter will stop sparking when...
Use and Care Manual
Page 12
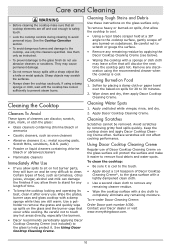
... clean. Wipe the grates, burner caps and glass cooktop with a sponge or dish cloth may scratch the surfaces. • Always clean the cooktop cautiously. Apply undiluted white vinegar, rinse, and dry. 2. Keep the cooktop clean and apply Dacor Cooktop Cleaning Creme often. Use them to stand for 20 to scratch or gouge the surface. • Remove any remaining residue by removing gritty food spills quickly. Care and Cleaning WARNING • Before cleaning the cooktop...
... clean. Wipe the grates, burner caps and glass cooktop with a sponge or dish cloth may scratch the surfaces. • Always clean the cooktop cautiously. Apply undiluted white vinegar, rinse, and dry. 2. Keep the cooktop clean and apply Dacor Cooktop Cleaning Creme often. Use them to stand for 20 to scratch or gouge the surface. • Remove any remaining residue by removing gritty food spills quickly. Care and Cleaning WARNING • Before cleaning the cooktop...
Use and Care Manual
Page 16
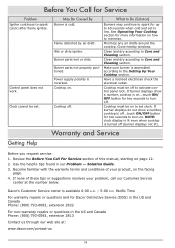
... number below. Dacor's Customer Service center is on . May Be Caused By Burner is turned off to turn on ...touch ON/ OFF button for two seconds to activate control panel lock. Burner parts not properly positioned. What to Do (Solution) Burners may continue to spark for up to low. Clean and dry according to Care and Cleaning section. Cooktop must be on to set clock. Solution Guide. 3. Wet or dirty igniter...
... number below. Dacor's Customer Service center is on . May Be Caused By Burner is turned off to turn on ...touch ON/ OFF button for two seconds to activate control panel lock. Burner parts not properly positioned. What to Do (Solution) Burners may continue to spark for up to low. Clean and dry according to Care and Cleaning section. Cooktop must be on to set clock. Solution Guide. 3. Wet or dirty igniter...

Use and Care Manual
Page 17
..., FROM THE DACOR CUSTOMER. Warranty and Service Warranty What Is Covered CERTIFICATE OF WARRANTIES DACOR GAS COOKTOPS WITHIN THE FIFTY STATES OF THE U.S.A., THE DISTRICT OF COLUMBIA AND CANADA: FULL ONE-YEAR WARRANTY The warranty applies only to the Dacor appliance sold "As Is," and products installed for non-residential use . • Failure of the product caused by improper product installation. • Replacement of house fuses, fuse boxes or resetting of circuit breakers. •...
..., FROM THE DACOR CUSTOMER. Warranty and Service Warranty What Is Covered CERTIFICATE OF WARRANTIES DACOR GAS COOKTOPS WITHIN THE FIFTY STATES OF THE U.S.A., THE DISTRICT OF COLUMBIA AND CANADA: FULL ONE-YEAR WARRANTY The warranty applies only to the Dacor appliance sold "As Is," and products installed for non-residential use . • Failure of the product caused by improper product installation. • Replacement of house fuses, fuse boxes or resetting of circuit breakers. •...

