Planning Guides
Page 1
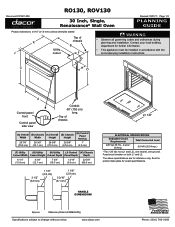
...Connected Load 6.0 kW (25.0 Amp.) * Two 120 Vac hot (L1 and L2), one neutral, one ground. RO130, ROV130 Document # PG01-009 30 Inch, Single, Renaissance® Wall Oven Revised 10/01/11 Page 1/2 PLANNING GUIDE... Specifications subject to change without notice. See the product data plate for further information. • This appliance must be installed in accordance with the accompanying installation instructions. Fuse/circuit breaker on both L1 and L2...8226; Observe all governing codes and ordinances during planning and installation. www.dacor.com Phone: (800) 7913-.010393
...Connected Load 6.0 kW (25.0 Amp.) * Two 120 Vac hot (L1 and L2), one neutral, one ground. RO130, ROV130 Document # PG01-009 30 Inch, Single, Renaissance® Wall Oven Revised 10/01/11 Page 1/2 PLANNING GUIDE... Specifications subject to change without notice. See the product data plate for further information. • This appliance must be installed in accordance with the accompanying installation instructions. Fuse/circuit breaker on both L1 and L2...8226; Observe all governing codes and ordinances during planning and installation. www.dacor.com Phone: (800) 7913-.010393
Installation Instructions
Page 3
... sense and caution when installing, maintaining or operating this or any other appliance. • Always contact the Dacor Customer Service Team about problems and conditions that COULD result in minor personal...1 Important Information About Safety Instructions 1 Safety Symbols and Labels 1 General Safety Precautions 2 Customer Service Information 3 If You Need Help 3 Appliance Data Plate 3 Model Identification 3 Product Specifications 4 Electrical Specifications 4 Product Dimensions 4 Installation Specifications 6 Installation Planning 6 Installation Instructions 8 Verify ...
... sense and caution when installing, maintaining or operating this or any other appliance. • Always contact the Dacor Customer Service Team about problems and conditions that COULD result in minor personal...1 Important Information About Safety Instructions 1 Safety Symbols and Labels 1 General Safety Precautions 2 Customer Service Information 3 If You Need Help 3 Appliance Data Plate 3 Model Identification 3 Product Specifications 4 Electrical Specifications 4 Product Dimensions 4 Installation Specifications 6 Installation Planning 6 Installation Instructions 8 Verify ...
Installation Instructions
Page 4
...come into contact with aluminum foil or other parts of the oven. • Do not store items of interest to children above the oven. Dacor is turned off electric power to the oven. Do not allow pot holders to touch hot surfaces. • Do not wear loose or ...installed. Children could be properly installed and grounded by a qualified installer according to these surfaces have had sufficient time to cool before operating this appliance outside surfaces of the oven during use. Objects left on the bottom of the oven. Do not allow heating elements in the oven. Important...
...come into contact with aluminum foil or other parts of the oven. • Do not store items of interest to children above the oven. Dacor is turned off electric power to the oven. Do not allow pot holders to touch hot surfaces. • Do not wear loose or ...installed. Children could be properly installed and grounded by a qualified installer according to these surfaces have had sufficient time to cool before operating this appliance outside surfaces of the oven during use. Objects left on the bottom of the oven. Do not allow heating elements in the oven. Important...
Installation Instructions
Page 5
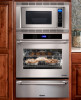
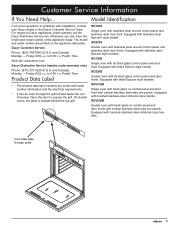
... or the Dacor Customer Service Team. RO230B Double oven with all black glass control panel and door front. Equipped with black Epicure style handle. Whenever you have the model and serial number of the appliance ready. Equipped with brushed stainless steel ...Service Information If You Need Help... Open the door to 5:00 p.m. RO130S Single oven with stainless steel Epicure style handles. Dacor Customer Service Phone: (800) 793-0093 (U.S.A. Friday 6:00 a.m. and Canada) Monday - to Dacor appliances under warranty only) Phone: (877) 337-3226 (U.S.A. Pacific Time Product ...
... or the Dacor Customer Service Team. RO230B Double oven with all black glass control panel and door front. Equipped with black Epicure style handle. Whenever you have the model and serial number of the appliance ready. Equipped with brushed stainless steel ...Service Information If You Need Help... Open the door to 5:00 p.m. RO130S Single oven with stainless steel Epicure style handles. Dacor Customer Service Phone: (800) 793-0093 (U.S.A. Friday 6:00 a.m. and Canada) Monday - to Dacor appliances under warranty only) Phone: (877) 337-3226 (U.S.A. Pacific Time Product ...
Installation Instructions
Page 6
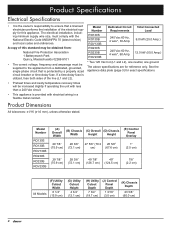
...120 Vac hot (L1 and L2), one neutral, one ground. The above specifications are for exact specifications. See the appliance data plate (page 3) for reference only. Model Number RO130S RO130B ROV130B RO230S RO230B ROV230B (A) Overall Width (B) Chassis (C) Overall (D) Chassis Width Height Height 29 7/8" 28 3/8" 27...supply wire size, must be increased slightly if operating the unit with less than a 240 Vac circuit. • This appliance is provided with the National Electric Code ANSI/NFPA 70 (latest revision) and local codes and ordinances. Product Dimensions All tolerances...
...120 Vac hot (L1 and L2), one neutral, one ground. The above specifications are for exact specifications. See the appliance data plate (page 3) for reference only. Model Number RO130S RO130B ROV130B RO230S RO230B ROV230B (A) Overall Width (B) Chassis (C) Overall (D) Chassis Width Height Height 29 7/8" 28 3/8" 27...supply wire size, must be increased slightly if operating the unit with less than a 240 Vac circuit. • This appliance is provided with the National Electric Code ANSI/NFPA 70 (latest revision) and local codes and ordinances. Product Dimensions All tolerances...
Installation Instructions
Page 8
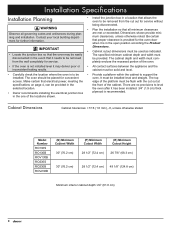
... may deliver poor or inconsistent baking results. • All contact surfaces between the appliance and the cabinet must be removed from the cut out at specifications on page 4,... local building department for convenient oven. The top access. in the the front of the cabinet. Model Number RO130S RO130B ROV130B RO230S RO230B ROV230B (N) Minimum Cabinet Width 30" (76.2 cm) 30" (76.2 cm) ... junction box in the event that it has been installed. 3/4" (1.9 cm) thick • Dacor recommends installing the electrical junction box plywood is to be • Provide a platform within the...
... may deliver poor or inconsistent baking results. • All contact surfaces between the appliance and the cabinet must be removed from the cut out at specifications on page 4,... local building department for convenient oven. The top access. in the the front of the cabinet. Model Number RO130S RO130B ROV130B RO230S RO230B ROV230B (N) Minimum Cabinet Width 30" (76.2 cm) 30" (76.2 cm) ... junction box in the event that it has been installed. 3/4" (1.9 cm) thick • Dacor recommends installing the electrical junction box plywood is to be • Provide a platform within the...
Installation Instructions
Page 10
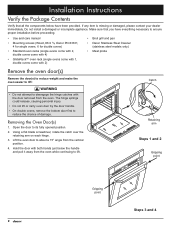
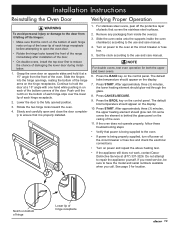
... components below have everything necessary to ensure proper installation before proceeding. • Use and care manual • Mounting screws (Wood, #6 X ¾, Dacor PN 83331, 4 for single ovens, 6 for double ovens) • Standard oven racks (single ovens come with 2, double ovens come with 4) •... each hinge. 3. Installation Instructions Verify the Package Contents Verify that you have been provided. Do not install a damaged or incomplete appliance. Lift the oven door to about a 15° angle from the oven while continuing to disengage the hinge catches with both ...
... components below have everything necessary to ensure proper installation before proceeding. • Use and care manual • Mounting screws (Wood, #6 X ¾, Dacor PN 83331, 4 for single ovens, 6 for double ovens) • Standard oven racks (single ovens come with 2, double ovens come with 4) •... each hinge. 3. Installation Instructions Verify the Package Contents Verify that you have been provided. Do not install a damaged or incomplete appliance. Lift the oven door to about a 15° angle from the oven while continuing to disengage the hinge catches with both ...
Installation Instructions
Page 11
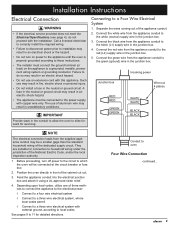
...must be a smaller gage than the standard household wiring of the National Electric Code, and/or the local inspection authority. 1. Feed the appliance conduit into the electrical junction box and attach it using a UL approved strain relief. 4. Failure to the red (L2) supply wire ...result in the junction box. 5. Connecting to oven Four Wire Connection continued... 9 IMPORTANT Provide slack in front of three methods to connect the appliance to the electrical power: ◊ Connect to a four wire electrical system ◊ Connect to a three wire electrical system, where local ...
...must be a smaller gage than the standard household wiring of the National Electric Code, and/or the local inspection authority. 1. Feed the appliance conduit into the electrical junction box and attach it using a UL approved strain relief. 4. Failure to the red (L2) supply wire ...result in the junction box. 5. Connecting to oven Four Wire Connection continued... 9 IMPORTANT Provide slack in front of three methods to connect the appliance to the electrical power: ◊ Connect to a four wire electrical system ◊ Connect to a three wire electrical system, where local ...

Installation Instructions
Page 12
...BLACK BLACK Wire nut, 3 places Connecting to a Three Wire Electrical System with an external grounding screw. Separate the wires coming out of the appliance conduit. 2. Conduit to a grounded cold water pipe as shown above with a minimum, 4 AWG wire to establish continuity to the junction box... the wires coming out of No. 4 copper wire. Any insulating materials must be connected to ground. Connect the green wire from the appliance conduit to a grounded cold water pipe, connect using a loop terminal. Securely clamp the wire to the neutral (white) junction box wire...
...BLACK BLACK Wire nut, 3 places Connecting to a Three Wire Electrical System with an external grounding screw. Separate the wires coming out of the appliance conduit. 2. Conduit to a grounded cold water pipe as shown above with a minimum, 4 AWG wire to establish continuity to the junction box... the wires coming out of No. 4 copper wire. Any insulating materials must be connected to ground. Connect the green wire from the appliance conduit to a grounded cold water pipe, connect using a loop terminal. Securely clamp the wire to the neutral (white) junction box wire...

Installation Instructions
Page 14
... point Do not grip here! Resting the oven on each side, for single oven models and six (6) holes for double oven Do not trap the appliance cable between the oven case back and the rear wall. 12 Mounting Screws: Four (4) for single oven Six (6) for double oven models. 4. Lift ... the oven chassis. Ensure that the electrical conduit slides through the oven trim into the recessed area located along the rear vertical edge of the appliance. 3. There are four (4) holes, two (2) on the cabinet-mounting platform, slide the oven into place. Do not overtighten the screws. Damage to the exhaust...
... point Do not grip here! Resting the oven on each side, for single oven models and six (6) holes for double oven Do not trap the appliance cable between the oven case back and the rear wall. 12 Mounting Screws: Four (4) for single oven Six (6) for double oven models. 4. Lift ... the oven chassis. Ensure that the electrical conduit slides through the oven trim into the recessed area located along the rear vertical edge of the appliance. 3. There are four (4) holes, two (2) on the cabinet-mounting platform, slide the oven into place. Do not overtighten the screws. Damage to the exhaust...
Installation Instructions
Page 15
... or fuse box and check the electrical connections. • Turn on power and repeat the above heating test. • If the appliance still does not work, contact Dacor Distinctive Service at a 15° angle with one hand while pushing in on top of the lower lip of each of the bottom... at a 15° angle from inside the oven chamber(s) according to the fully opened position. 3. Push until the notch on power to repair the appliance yourself. Press START. Remove any packaging from the front of each hinge slips over the lower lip of the oven. Press START. Press the BROIL...
... or fuse box and check the electrical connections. • Turn on power and repeat the above heating test. • If the appliance still does not work, contact Dacor Distinctive Service at a 15° angle with one hand while pushing in on top of the lower lip of each of the bottom... at a 15° angle from inside the oven chamber(s) according to the fully opened position. 3. Push until the notch on power to repair the appliance yourself. Press START. Remove any packaging from the front of each hinge slips over the lower lip of the oven. Press START. Press the BROIL...
Use & Care Manuals
Page 3
...flammable or explosive materials in this manual cannot cover all possible problems and conditions that you have any questions, other appliance. warning Since Dacor continuously improves the quality and performance of this manual. READ AND SAVE THESE INSTRUCTIONS 1 to heat or warm ...store or use and care manual completely before using this appliance. Important Information About Safety Instructions The Important Safety Instructions and warnings in adjacent cabinets or areas. warning WARNING - Always contact the Dacor Customer Service Team about problems or conditions that can ...
...flammable or explosive materials in this manual cannot cover all possible problems and conditions that you have any questions, other appliance. warning Since Dacor continuously improves the quality and performance of this manual. READ AND SAVE THESE INSTRUCTIONS 1 to heat or warm ...store or use and care manual completely before using this appliance. Important Information About Safety Instructions The Important Safety Instructions and warnings in adjacent cabinets or areas. warning WARNING - Always contact the Dacor Customer Service Team about problems or conditions that can ...
Use & Care Manuals
Page 4
...safety precautions, including the following: warning warning • If you receive a damaged product, immediately contact your safety, do not use a damaged appliance. • Make sure that you the location of the fuse or junction box so that the oven has been properly installed and grounded by...allow clothing to provide a stable installation, make sure that could be hot. • Use cookware only for cooking tasks expected of a home appliance as baby food jars and cans. Use baking soda or a foam extinguisher to a separate, well-ventilated room during the self clean cycle. Wet...
...safety precautions, including the following: warning warning • If you receive a damaged product, immediately contact your safety, do not use a damaged appliance. • Make sure that you the location of the fuse or junction box so that the oven has been properly installed and grounded by...allow clothing to provide a stable installation, make sure that could be hot. • Use cookware only for cooking tasks expected of a home appliance as baby food jars and cans. Use baking soda or a foam extinguisher to a separate, well-ventilated room during the self clean cycle. Wet...
Use & Care Manuals
Page 34
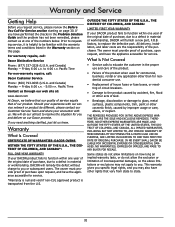
...transported from state to you need anything clarified, just let us at : www.dacor.com At Dacor, we believe that our quality of inconsequential damages, so the above limitations or exclusions may also have the appliance accessible for service. *Warranty is null and void if non-CUL approved product ...is helpful to be familiar with our service network or product be different, please contact our Customer Service Team and share your DACOR product fails to function within...
...transported from state to you need anything clarified, just let us at : www.dacor.com At Dacor, we believe that our quality of inconsequential damages, so the above limitations or exclusions may also have the appliance accessible for service. *Warranty is null and void if non-CUL approved product ...is helpful to be familiar with our service network or product be different, please contact our Customer Service Team and share your DACOR product fails to function within...
Use & Care Manuals
Page 36
... you activate it online or return this form for your home and do you deserve. T.V. Appliance Dealer Showroom H. Where did you . 1. Appliance Dealer B. Builder Supplier D. The information you have in helping us plan for your Dacor appliances? A. Oven D. Kitchen Dealer Showroom I. Builder E. What other brands of expressing our...
... you activate it online or return this form for your home and do you deserve. T.V. Appliance Dealer Showroom H. Where did you . 1. Appliance Dealer B. Builder Supplier D. The information you have in helping us plan for your Dacor appliances? A. Oven D. Kitchen Dealer Showroom I. Builder E. What other brands of expressing our...