Installation Instructions
Page 1
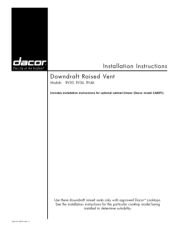
H Use these downdraft raised vents only with approved Dacor ® cooktops. Installation Instructions Downdraft Raised Vent Models: RV30, RV36, RV46 Includes installation instructions for the particular cooktop model being installed to determine suitability. See the installation instructions for optional cabinet blower (Dacor model CABP3) Part No. 85515 Rev.
H Use these downdraft raised vents only with approved Dacor ® cooktops. Installation Instructions Downdraft Raised Vent Models: RV30, RV36, RV46 Includes installation instructions for the particular cooktop model being installed to determine suitability. See the installation instructions for optional cabinet blower (Dacor model CABP3) Part No. 85515 Rev.

Installation Instructions
Page 2
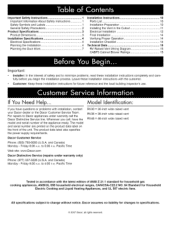
...Pacific Time Web site: www.Dacor.com Dacor Distinctive Service (repairs under warranty call , have questions or problems with the latest edition of the unit. Pacific Time RV30 = 30-inch wide raised vent RV36 = 36-inch wide raised vent RV46 = 46-inch wide raised... Specifications 4 Planning the Installation 4 Planning the Duct Work 7 Installation Instructions 10 Parts List 10 Installation Preparation 10 Installing the Vent in accordance with installation, contact your Dacor dealer or the Dacor Customer Service Team. For repairs to 5:00 p.m. The product data label also ...
...Pacific Time Web site: www.Dacor.com Dacor Distinctive Service (repairs under warranty call , have questions or problems with the latest edition of the unit. Pacific Time RV30 = 30-inch wide raised vent RV36 = 36-inch wide raised vent RV46 = 46-inch wide raised... Specifications 4 Planning the Installation 4 Planning the Duct Work 7 Installation Instructions 10 Parts List 10 Installation Preparation 10 Installing the Vent in accordance with installation, contact your Dacor dealer or the Dacor Customer Service Team. For repairs to 5:00 p.m. The product data label also ...
Installation Instructions
Page 4
.... • Before installing or servicing the raised vent, disconnect the power plug from children. Do not interfere with these installation instructions the Dacor cooktop installation instructions and the remote or in use and care manual. • The customer should perform all governing codes and ordinances during ...appliance. This appliance is not working properly. • Observe all other service. A qualified service technician should not install, repair or replace any part of this appliance only in accordance with the movement of the vent intake in the use .
.... • Before installing or servicing the raised vent, disconnect the power plug from children. Do not interfere with these installation instructions the Dacor cooktop installation instructions and the remote or in use and care manual. • The customer should perform all governing codes and ordinances during ...appliance. This appliance is not working properly. • Observe all other service. A qualified service technician should not install, repair or replace any part of this appliance only in accordance with the movement of the vent intake in the use .

Installation Instructions
Page 12
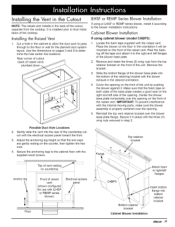
... circuit that will be used (bottom or side). Adjustable anchor legs Installation Preparation for Raised Vent with the internal moving parts, make sure the cover is properly centered over the exhaust that meets the specifications. • Install the vent only ...in noise and decrease performance. • Loosely attach the anchoring legs to the open exhaust hole using the two (2) screws removed in step 4. Installation Instructions Parts List • Product literature • Vent cover • Anchoring legs • 2 wood screws, #14 x 2 1/2 (PN 83047) • 3 wire nuts ...
... circuit that will be used (bottom or side). Adjustable anchor legs Installation Preparation for Raised Vent with the internal moving parts, make sure the cover is properly centered over the exhaust that meets the specifications. • Install the vent only ...in noise and decrease performance. • Loosely attach the anchoring legs to the open exhaust hole using the two (2) screws removed in step 4. Installation Instructions Parts List • Product literature • Vent cover • Anchoring legs • 2 wood screws, #14 x 2 1/2 (PN 83047) • 3 wire nuts ...

Installation Instructions
Page 13
... top vent retainer bracket over the opening on the front of the unit by pushing the blower against it in place with the internal moving parts, make sure the blower assembly is installed prior to determine the hole center line locations. Installation Instructions Installing the Vent in the Cutout NOTE: The...
... top vent retainer bracket over the opening on the front of the unit by pushing the blower against it in place with the internal moving parts, make sure the blower assembly is installed prior to determine the hole center line locations. Installation Instructions Installing the Vent in the Cutout NOTE: The...

Use & Care Manuals
Page 1
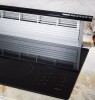
Model RV30 shown. G Use and Care Manual Downdraft Raised Vent Models: RV30, RV36, RV46 Style varies. Ta b l e o f C o n t e n t s Important Safety Instructions 1-2 Operating Your Raised Vent 3 Care and Cleaning 4-5 Before You Call for Service 5 Warranty and Service 6 Notes 7-8 Part No. 85516 Rev.
Model RV30 shown. G Use and Care Manual Downdraft Raised Vent Models: RV30, RV36, RV46 Style varies. Ta b l e o f C o n t e n t s Important Safety Instructions 1-2 Operating Your Raised Vent 3 Care and Cleaning 4-5 Before You Call for Service 5 Warranty and Service 6 Notes 7-8 Part No. 85516 Rev.
Use & Care Manuals
Page 4
...section of this unit unless specifically recommended in place. • Do not operate the blower if a flame or flare-up develops. Contact the Dacor Customer Service Team for commercial use an appropriate class dry chemical or foam-type fire extinguisher. • Do not set or rest any way.... the vent moves to the "up all applicable codes and standards, including fire-rated construction. • Do not install, repair or replace any part of this manual. • Never operate the vent without the filters in the literature accompanying it started. ◊ The fire department is not...
...section of this unit unless specifically recommended in place. • Do not operate the blower if a flame or flare-up develops. Contact the Dacor Customer Service Team for commercial use an appropriate class dry chemical or foam-type fire extinguisher. • Do not set or rest any way.... the vent moves to the "up all applicable codes and standards, including fire-rated construction. • Do not install, repair or replace any part of this manual. • Never operate the vent without the filters in the literature accompanying it started. ◊ The fire department is not...
Use & Care Manuals
Page 5
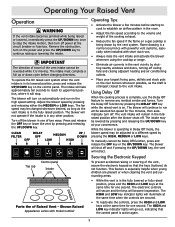
...: • Activate the blower a few minutes before changing directions. CLEAN FILTER DELAY OFF MEDIUM UP / DOWN OFF LOW HIGH Top cap Control panel Intake grill Parts the of the vent intake cannot be changed whenever desired, as long as the draft is being raised or lowered, immediately press the UP/DOWN...
...: • Activate the blower a few minutes before changing directions. CLEAN FILTER DELAY OFF MEDIUM UP / DOWN OFF LOW HIGH Top cap Control panel Intake grill Parts the of the vent intake cannot be changed whenever desired, as long as the draft is being raised or lowered, immediately press the UP/DOWN...
Use & Care Manuals
Page 8
... numbers below. For warranty repairs, call : Dacor Customer Service Phone: (800) 793-0093 (U.S.A. Friday 6:00 a.m. Warranty is null and void if non-CSA approved product is helpful to you. to replace the defective part. Should your experience with our service network or... All delivery, installation, and labor costs are the responsibility of circuit breakers. • Damage to a defect in material or workmanship, DACOR will furnish a new part, F.O.B. and Canada) Business Hours: 6:00 a.m. - 5:00 p.m. THE REMEDIES PROVIDED FOR IN THE ABOVE EXPRESS WARRANTIES ARE THE SOLE ...
... numbers below. For warranty repairs, call : Dacor Customer Service Phone: (800) 793-0093 (U.S.A. Friday 6:00 a.m. Warranty is null and void if non-CSA approved product is helpful to you. to replace the defective part. Should your experience with our service network or... All delivery, installation, and labor costs are the responsibility of circuit breakers. • Damage to a defect in material or workmanship, DACOR will furnish a new part, F.O.B. and Canada) Business Hours: 6:00 a.m. - 5:00 p.m. THE REMEDIES PROVIDED FOR IN THE ABOVE EXPRESS WARRANTIES ARE THE SOLE ...
Use & Care Manuals
Page 12
... your home and do you have purchased more than one Dacor product, please return all forms in your kitchen? T.V. Another Dacor Owner D. Kitchen Dealer Showroom I. Model Home E. Builder E. Part of the information on this form to Dacor. Under $75,000 B. $75,000 - $100,000 C. $100,000 - $150,000...
... your home and do you have purchased more than one Dacor product, please return all forms in your kitchen? T.V. Another Dacor Owner D. Kitchen Dealer Showroom I. Model Home E. Builder E. Part of the information on this form to Dacor. Under $75,000 B. $75,000 - $100,000 C. $100,000 - $150,000...
Installation Guide
Page 1
Installation Downdraft Raised Vent Models: RV30, RV36, RV46 Instructions Includes installation instructions for the particular cooktop model being installed to determine suitability. See the installation instructions for optional cabinet blower (Dacor model CABP3) Part No. 85515 Rev. H Use these downdraft raised vents only with approved Dacor ® cooktops.
Installation Downdraft Raised Vent Models: RV30, RV36, RV46 Instructions Includes installation instructions for the particular cooktop model being installed to determine suitability. See the installation instructions for optional cabinet blower (Dacor model CABP3) Part No. 85515 Rev. H Use these downdraft raised vents only with approved Dacor ® cooktops.
Installation Guide
Page 2
...have the model and serial number of the appliance ready. Dacor Customer Service RV30 = 30-inch wide raised vent RV36 = 36-inch wide raised vent RV46 = 46-inch wide raised vent Phone: (800) 793...-0093 (U.S.A. Important Safety Instructions 1 Important Information About Safety Instructions 1 Safety Symbols and Labels 1 General Safety Precautions 2 Product Specifications 3 Product Dimensions 3 Installation Specifications 4 Electrical Specifications 4 Planning the Installation 4 Planning the Duct Work 7 Installation Instructions 10 Parts...
...have the model and serial number of the appliance ready. Dacor Customer Service RV30 = 30-inch wide raised vent RV36 = 36-inch wide raised vent RV46 = 46-inch wide raised vent Phone: (800) 793...-0093 (U.S.A. Important Safety Instructions 1 Important Information About Safety Instructions 1 Safety Symbols and Labels 1 General Safety Precautions 2 Product Specifications 3 Product Dimensions 3 Installation Specifications 4 Electrical Specifications 4 Planning the Installation 4 Planning the Duct Work 7 Installation Instructions 10 Parts...
Installation Guide
Page 4
...filters or vent openings to prevent grease fires and maintain performance. i' For general ventilating use onlYl DO not use and care manual. Contact the Dacor Customer Service Team for €ommercial usel ' Keep all packaging mater dis away from the electrical outleL • To reduce the risk of ... Never allow foreign objects, such as cigarettes or napkins, to children above or around the cooktop. • Do not set or rest any part of this raised Vent 0nly for further information. ' InStall or 0cate this appliance only as outlined in the use to sit or stand on ...
...filters or vent openings to prevent grease fires and maintain performance. i' For general ventilating use onlYl DO not use and care manual. Contact the Dacor Customer Service Team for €ommercial usel ' Keep all packaging mater dis away from the electrical outleL • To reduce the risk of ... Never allow foreign objects, such as cigarettes or napkins, to children above or around the cooktop. • Do not set or rest any part of this raised Vent 0nly for further information. ' InStall or 0cate this appliance only as outlined in the use to sit or stand on ...

Installation Guide
Page 12
...provided keps nuts and washers. raisedv_n _ Adj_strlb_JeJsJ_" I Front of the vent cover into the bottom retainer bracket with the internal moving parts, make sure the cover is properly centered over the opening . Discard the cover plate that was removed, but leave the two other... sides of the opening . , Reinstall the top retainer bracket over the exhaust that will be used (bottom or side). Also locate the supplied foam tape. Parts List • Product literature • Vent cover • Anchoring legs • 2 wood screws, #14 x 2 1/2 (PN 83047) • 3 wire nuts • 2 sheet...
...provided keps nuts and washers. raisedv_n _ Adj_strlb_JeJsJ_" I Front of the vent cover into the bottom retainer bracket with the internal moving parts, make sure the cover is properly centered over the opening . Discard the cover plate that was removed, but leave the two other... sides of the opening . , Reinstall the top retainer bracket over the exhaust that will be used (bottom or side). Also locate the supplied foam tape. Parts List • Product literature • Vent cover • Anchoring legs • 2 wood screws, #14 x 2 1/2 (PN 83047) • 3 wire nuts • 2 sheet...
Installation Guide
Page 13
... the Raised Vent 1. It is properly centered over the blower base plate flange. Place the blower on the floor in place with the internal moving parts, make sure the blower assembly is installed prior to the blower installation instructions. Center the blower base plate horizontally over the opening . , Reinstall the top...
... the Raised Vent 1. It is properly centered over the blower base plate flange. Place the blower on the floor in place with the internal moving parts, make sure the blower assembly is installed prior to the blower installation instructions. Center the blower base plate horizontally over the opening . , Reinstall the top...
