Planning Guides
Page 1
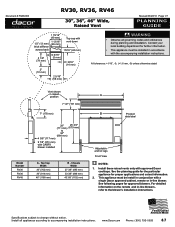
... mm) 36" (914 mm) 46" (1168 mm) B - Install these raised vents only with a single Dacor approved cabinet, remote or in conjunction with approved Dacor cooktops. See following pages for proper applications and cutout information. 2. This appliance must be install in -line blower. Document... # PG08-003 RV30, RV36, RV46 30", 36", 46" Wide, Raised Vent Revised 03/29/10 Page 1/7 ...
... mm) 36" (914 mm) 46" (1168 mm) B - Install these raised vents only with a single Dacor approved cabinet, remote or in conjunction with approved Dacor cooktops. See following pages for proper applications and cutout information. 2. This appliance must be install in -line blower. Document... # PG08-003 RV30, RV36, RV46 30", 36", 46" Wide, Raised Vent Revised 03/29/10 Page 1/7 ...
Planning Guides
Page 2
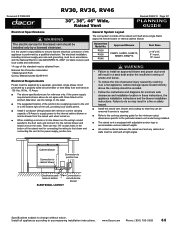
... Quincy, Massachusetts 02269-9101 Electrical Requirements Power must be installed only by a licensed electrician. If the power supply requirements shown above the cooktop should be solid and at 120 Vac, 60 Hz, 15 Amps. ■■ The above specifications are two 7/8" access holes in...the insufficient venting of smoke and fumes. • To reduce the risk of the raised vent itself and a single Dacor approved remote blower or internal cabinet blower. RV30 RV36 RV46 Approved Blowers CABP3, ILHSF8, ILHSF10, REMP3, REMP16 Duct Sizes 3 1/4"x10", 8" round, 10" round WARNING •...
... Quincy, Massachusetts 02269-9101 Electrical Requirements Power must be installed only by a licensed electrician. If the power supply requirements shown above the cooktop should be solid and at 120 Vac, 60 Hz, 15 Amps. ■■ The above specifications are two 7/8" access holes in...the insufficient venting of smoke and fumes. • To reduce the risk of the raised vent itself and a single Dacor approved remote blower or internal cabinet blower. RV30 RV36 RV46 Approved Blowers CABP3, ILHSF8, ILHSF10, REMP3, REMP16 Duct Sizes 3 1/4"x10", 8" round, 10" round WARNING •...
Planning Guides
Page 3
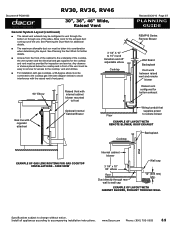
www.Dacor.com Phone: (800) 793-0093 8.9 See Planning the Duct Work for further details. ■■ Access from the front of the cabinet to the underside of the cooktop, the vent system and the electrical and gas supplies for the cooktop and vent must be taken into consideration when...° Elbow Raised Vent with internal cabinet blower mounted to front Raised vent configured for inspection and service. Document # PG08-003 RV30, RV36, RV46 30", 36", 46" Wide, Raised Vent General System Layout (continued) ■■ The raised vent exhaust may be configured to vent through...
www.Dacor.com Phone: (800) 793-0093 8.9 See Planning the Duct Work for further details. ■■ Access from the front of the cabinet to the underside of the cooktop, the vent system and the electrical and gas supplies for the cooktop and vent must be taken into consideration when...° Elbow Raised Vent with internal cabinet blower mounted to front Raised vent configured for inspection and service. Document # PG08-003 RV30, RV36, RV46 30", 36", 46" Wide, Raised Vent General System Layout (continued) ■■ The raised vent exhaust may be configured to vent through...
Planning Guides
Page 4
Install all appliances according to change without notice. www.Dacor.com Phone: (800) 793-0093 8.10 RV30, RV36, RV46 Document # PG08-003 30", 36", 46" Wide, Raised Vent General System Layout (continued) Revised 03/29/10 Page 4/7 PLANNING GUIDE Cooktop Cabinet back Raised vent Raised vent configured for bottom exhaust 3 1/4" X 10" to round transition...
Install all appliances according to change without notice. www.Dacor.com Phone: (800) 793-0093 8.10 RV30, RV36, RV46 Document # PG08-003 30", 36", 46" Wide, Raised Vent General System Layout (continued) Revised 03/29/10 Page 4/7 PLANNING GUIDE Cooktop Cabinet back Raised vent Raised vent configured for bottom exhaust 3 1/4" X 10" to round transition...

Planning Guides
Page 6
www.Dacor.com B 6" (152 mm) 9" (229 mm) C 12" (205 mm) 9" (229 mm) Phone: (800) 793-0093 8.12 Bottom Exhaust Raised vent Countertop center line B 11 5/8" (295 mm) 3 1/4 X 10 Duct connection Duct connection center line Cooktop CABP3 CL 8 3/8" (213 mm) from back of RV cutout ...to center line of chassis Internal cabinet blower mounting location Exhaust Locations and Dimensions for CABP3 Internal Cabinet Blower Model RV30 RV36 RV46 A 2" (51 mm) 5" (127 mm) ...
www.Dacor.com B 6" (152 mm) 9" (229 mm) C 12" (205 mm) 9" (229 mm) Phone: (800) 793-0093 8.12 Bottom Exhaust Raised vent Countertop center line B 11 5/8" (295 mm) 3 1/4 X 10 Duct connection Duct connection center line Cooktop CABP3 CL 8 3/8" (213 mm) from back of RV cutout ...to center line of chassis Internal cabinet blower mounting location Exhaust Locations and Dimensions for CABP3 Internal Cabinet Blower Model RV30 RV36 RV46 A 2" (51 mm) 5" (127 mm) ...
Installation Instructions
Page 1
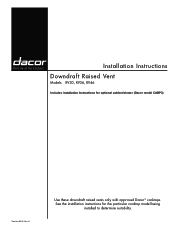
See the installation instructions for optional cabinet blower (Dacor model CABP3) Part No. 85515 Rev. H Use these downdraft raised vents only with approved Dacor ® cooktops. Installation Instructions Downdraft Raised Vent Models: RV30, RV36, RV46 Includes installation instructions for the particular cooktop model being installed to determine suitability.
See the installation instructions for optional cabinet blower (Dacor model CABP3) Part No. 85515 Rev. H Use these downdraft raised vents only with approved Dacor ® cooktops. Installation Instructions Downdraft Raised Vent Models: RV30, RV36, RV46 Includes installation instructions for the particular cooktop model being installed to determine suitability.
Installation Instructions
Page 3
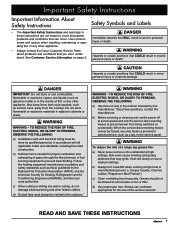
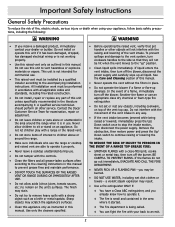
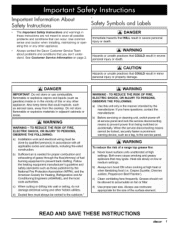
.... c) When cutting or drilling into wall or ceiling, do not damage electrical wiring and other appliance. • Always contact the Dacor Customer Service Team about problems and conditions that could explode, such as gasoline) inside or in the vicinity of fuel burning equipment to...or filter. b) Always turn hood ON when cooking at service panel and lock the service disconnecting means to prevent power from the cooktop. Important Safety Instructions Important Information About Safety Instructions • The Important Safety Instructions and warnings in these instructions are not meant ...
.... c) When cutting or drilling into wall or ceiling, do not damage electrical wiring and other appliance. • Always contact the Dacor Customer Service Team about problems and conditions that could explode, such as gasoline) inside or in the vicinity of fuel burning equipment to...or filter. b) Always turn hood ON when cooking at service panel and lock the service disconnecting means to prevent power from the cooktop. Important Safety Instructions Important Information About Safety Instructions • The Important Safety Instructions and warnings in these instructions are not meant ...
Installation Instructions
Page 4
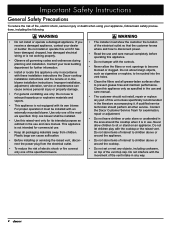
...install or operate this unit unless specifically recommended in the literature accompanying it is not equipped with these installation instructions the Dacor cooktop installation instructions and the remote or in accordance with its intended purpose as cigarettes or napkins, to be installed with the... personal injury or property damage. • For general ventilating use . Do not store items of interest to children above or around the cooktop. • Do not set or rest any way. 2 If you receive a damaged appliance, contact your appliance, follow basic safety precautions...
...install or operate this unit unless specifically recommended in the literature accompanying it is not equipped with these installation instructions the Dacor cooktop installation instructions and the remote or in accordance with its intended purpose as cigarettes or napkins, to be installed with the... personal injury or property damage. • For general ventilating use . Do not store items of interest to children above or around the cooktop. • Do not set or rest any way. 2 If you receive a damaged appliance, contact your appliance, follow basic safety precautions...

Installation Instructions
Page 6
...of smoke and fumes. • To reduce the risk of the raised vent itself and a single, Dacor approved, externally mounted blower (see cooktop installation instructions See the cooktop installation instructions for connecting the wiring to the blower and connecting the vent to accommodate various cabinet heights. ...by a properly sized circuit breaker or time delay fuse and rated at right angles. If the power supply requirements shown above the cooktop should be supplied by a separate, grounded, single phase circuit protected by a qualified electrician. Failure to do not agree with ...
...of smoke and fumes. • To reduce the risk of the raised vent itself and a single, Dacor approved, externally mounted blower (see cooktop installation instructions See the cooktop installation instructions for connecting the wiring to the blower and connecting the vent to accommodate various cabinet heights. ...by a properly sized circuit breaker or time delay fuse and rated at right angles. If the power supply requirements shown above the cooktop should be supplied by a separate, grounded, single phase circuit protected by a qualified electrician. Failure to do not agree with ...
Installation Instructions
Page 7
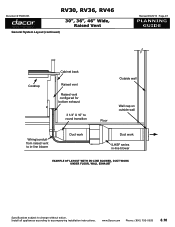
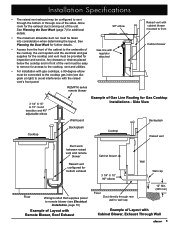
...be configured to 10" round transition and 45° adjustable elbow Example of Gas Line Routing for Gas Cooktop Installations - Side View Wall board Backsplash Cooktop Backsplash Cooktop Raised vent Duct work between raised vent and remote blower Raised vent configured for bottom exhaust Floor Wiring/...conduit that supplies power to remote blower (see diagram at right) to the underside of the cooktop, the vent system and the electrical and gas supplies for the cooktop and vent must be taken into consideration when determining the layout. Allow room for additional details. ...
...be configured to 10" round transition and 45° adjustable elbow Example of Gas Line Routing for Gas Cooktop Installations - Side View Wall board Backsplash Cooktop Backsplash Cooktop Raised vent Duct work between raised vent and remote blower Raised vent configured for bottom exhaust Floor Wiring/...conduit that supplies power to remote blower (see diagram at right) to the underside of the cooktop, the vent system and the electrical and gas supplies for the cooktop and vent must be taken into consideration when determining the layout. Allow room for additional details. ...

Installation Instructions
Page 8
Installation Specifications General System Layout (Continued) Cooktop Cabinet back Raised vent Raised vent configured for bottom exhaust 3 1/4" X 10" to round transition Outside wall Floor Wall cap on outside wall Wiring/conduit from raised vent to in-line blower Duct work Duct work ILHSF series in-line blower Example of Layout with In-line Blower, Duct Work Under Floor, Wall Exhaust 6
Installation Specifications General System Layout (Continued) Cooktop Cabinet back Raised vent Raised vent configured for bottom exhaust 3 1/4" X 10" to round transition Outside wall Floor Wall cap on outside wall Wiring/conduit from raised vent to in-line blower Duct work Duct work ILHSF series in-line blower Example of Layout with In-line Blower, Duct Work Under Floor, Wall Exhaust 6
Installation Instructions
Page 10
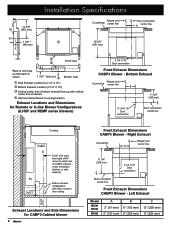
Left Exhaust Model RV30 RV36 RV46 A B 2" (51 mm) 6" (152 mm) 5" (127 mm) 9" (229 mm) C 12" (205 mm) 9" (229 mm) Right Exhaust Countertop Raised vent center line C 11 3/4" (298 mm) 3 1/4 X 10 Duct ... connection center line Front Exhaust Dimensions CABP3 Blower - Bottom Exhaust Raised vent Countertop center line B 11 5/8" (295 mm) 3 1/4 X 10 Duct connection Duct connection center line Cooktop CABP3 CL RV DUCT 8 3/8" (213 mm) from back of RV cutout to center line of chassis Internal cabinet blower mounting location Exhaust Locations and...
Left Exhaust Model RV30 RV36 RV46 A B 2" (51 mm) 6" (152 mm) 5" (127 mm) 9" (229 mm) C 12" (205 mm) 9" (229 mm) Right Exhaust Countertop Raised vent center line C 11 3/4" (298 mm) 3 1/4 X 10 Duct ... connection center line Front Exhaust Dimensions CABP3 Blower - Bottom Exhaust Raised vent Countertop center line B 11 5/8" (295 mm) 3 1/4 X 10 Duct connection Duct connection center line Cooktop CABP3 CL RV DUCT 8 3/8" (213 mm) from back of RV cutout to center line of chassis Internal cabinet blower mounting location Exhaust Locations and...

Installation Instructions
Page 13
... blower, install it in place with the three (3) wing nuts removed in step 2. Remove and retain the three (3) wing nuts from the cooktop. Use the dimensions on the front of raised vent) plumbed down ILHSF or REMP Series Blower Installation If using cabinet blower (model CABP3): 1....raised vent installs in the desired orientation. 4. Peel the backing off the tape and attach it will be mounted on countertop Front of the cooktop. IMPORTANT: To prevent interference with the electrical access panel toward the front. 3. Cover the opening . Make sure that the end caps are...
... blower, install it in place with the three (3) wing nuts removed in step 2. Remove and retain the three (3) wing nuts from the cooktop. Use the dimensions on the front of raised vent) plumbed down ILHSF or REMP Series Blower Installation If using cabinet blower (model CABP3): 1....raised vent installs in the desired orientation. 4. Peel the backing off the tape and attach it will be mounted on countertop Front of the cooktop. IMPORTANT: To prevent interference with the electrical access panel toward the front. 3. Cover the opening . Make sure that the end caps are...
Installation Instructions
Page 16
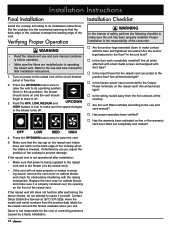
... for filter installation instructions. 1. Make sure that the back edge of the cooktop overlaps the leading edge of the consumer. □□ Are the anchor legs extended down to prevent damage. Dacor is properly centered over the opening so that the top cap on the raised... vent intake does not catch on the raised vent? Once in air. 3. Installation Instructions Final Installation Install the cooktop according to lower the vent. 5. Have...
... for filter installation instructions. 1. Make sure that the back edge of the cooktop overlaps the leading edge of the consumer. □□ Are the anchor legs extended down to prevent damage. Dacor is properly centered over the opening so that the top cap on the raised... vent intake does not catch on the raised vent? Once in air. 3. Installation Instructions Final Installation Install the cooktop according to lower the vent. 5. Have...
Use & Care Manuals
Page 4
...not go out immediately, EVACUATE AND CALL THE FIRE DEPARTMENT. • NEVER PICK UP A FLAMING PAN - Do not use this manual. Contact the Dacor Customer Service Team for commercial use an appropriate class dry chemical or foam-type fire extinguisher. • Do not set or rest any part of... the vent intake in the area around the range. • Make sure individuals who use the range or cooktop and raised vent are able to operate it properly. • Never leave a cooktop unattended during use . This unit is not intended for examination, repair or adjustment. • Do not leave...
...not go out immediately, EVACUATE AND CALL THE FIRE DEPARTMENT. • NEVER PICK UP A FLAMING PAN - Do not use this manual. Contact the Dacor Customer Service Team for commercial use an appropriate class dry chemical or foam-type fire extinguisher. • Do not set or rest any part of... the vent intake in the area around the range. • Make sure individuals who use the range or cooktop and raised vent are able to operate it properly. • Never leave a cooktop unattended during use . This unit is not intended for examination, repair or adjustment. • Do not leave...
Use & Care Manuals
Page 5
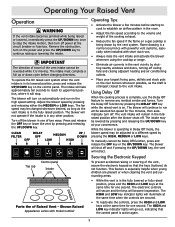
.... • To reactivate the controls, press the HIGH and LOW keys at your largest frying pans, skillets and stock pots on a gas cooktop is operating in its uppermost position, where it is in one second. The blower will remain in any residual smoke and fumes. The blower ... become inoperative. Shown Raised Appearance varies with short duct runs. • Always raise the vent intake and activate the blower whenever using the cooktop or range. • Eliminate air currents in the vent vicinity by shutting nearby windows and doors, turning off power at the circuit breaker ...
.... • To reactivate the controls, press the HIGH and LOW keys at your largest frying pans, skillets and stock pots on a gas cooktop is operating in its uppermost position, where it is in one second. The blower will remain in any residual smoke and fumes. The blower ... become inoperative. Shown Raised Appearance varies with short duct runs. • Always raise the vent intake and activate the blower whenever using the cooktop or range. • Eliminate air currents in the vent vicinity by shutting nearby windows and doors, turning off power at the circuit breaker ...
Use & Care Manuals
Page 12
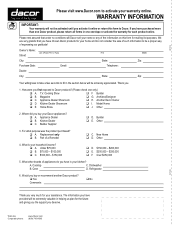
...Dealer Showroom I. Replacement only B. What is your warranty online. WARRANTY INFORMATION IMPORTANT: Your warranty will Dacor sell your kitchen? How were you deserve. Cooktop C. A. Appliance Dealer B. Part of the information on this form to be activated until you have chosen... Dacor products for your home and do you activate it online or return this ...
...Dealer Showroom I. Replacement only B. What is your warranty online. WARRANTY INFORMATION IMPORTANT: Your warranty will Dacor sell your kitchen? How were you deserve. Cooktop C. A. Appliance Dealer B. Part of the information on this form to be activated until you have chosen... Dacor products for your home and do you activate it online or return this ...
Installation Guide
Page 1
H Use these downdraft raised vents only with approved Dacor ® cooktops. See the installation instructions for optional cabinet blower (Dacor model CABP3) Part No. 85515 Rev. Installation Downdraft Raised Vent Models: RV30, RV36, RV46 Instructions Includes installation instructions for the particular cooktop model being installed to determine suitability.
H Use these downdraft raised vents only with approved Dacor ® cooktops. See the installation instructions for optional cabinet blower (Dacor model CABP3) Part No. 85515 Rev. Installation Downdraft Raised Vent Models: RV30, RV36, RV46 Instructions Includes installation instructions for the particular cooktop model being installed to determine suitability.
Installation Guide
Page 3
..._mCD_ 1 C) When cutting or drilling into Wall or ceilingl don0t damage electrical wiring and other appliance. • Always contact the Dacor Customer Service Team about problems and conditions that could explode, such as those published by the manufacturer. When the service disconnecting means... cannot be allowed to prevent power from the cooktop. Grease should not be locked, securely fasten a prominent warning device, such as gasoline) inside or in the vicinity of a range ...
..._mCD_ 1 C) When cutting or drilling into Wall or ceilingl don0t damage electrical wiring and other appliance. • Always contact the Dacor Customer Service Team about problems and conditions that could explode, such as those published by the manufacturer. When the service disconnecting means... cannot be allowed to prevent power from the cooktop. Grease should not be locked, securely fasten a prominent warning device, such as gasoline) inside or in the vicinity of a range ...
Installation Guide
Page 4
Contact the Dacor Customer Service Team for examination, repair or adjustment. • Do not leave children or pets alone or unattended in the area around the cooktop. • Do not set or rest any objects, including cookware, on top of the vent top cap. General Safety Precautions To ... must be sucked into the vent holes. • Clean the filters and all grease-laden surfaces often to children above or around the cooktop when it is not intended for €ommercial usel ' Keep all governing codes and ordinances during planning and insta!lation, Contact your local...
Contact the Dacor Customer Service Team for examination, repair or adjustment. • Do not leave children or pets alone or unattended in the area around the cooktop. • Do not set or rest any objects, including cookware, on top of the vent top cap. General Safety Precautions To ... must be sucked into the vent holes. • Clean the filters and all grease-laden surfaces often to children above or around the cooktop when it is not intended for €ommercial usel ' Keep all governing codes and ordinances during planning and insta!lation, Contact your local...
