Planning Guides
Page 1
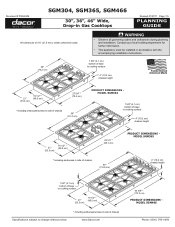
Document # PG04-004 SGM304, SGM365, SGM466 30", 36", 46" Wide, Drop-in side of chassis Specifications subject to change without notice. Contact your local building department for further information. • This appliance must be installed in accordance with the accompanying installation instructions. 30" (76.2 cm) 1... 01/27/11 Page 1/5 PLANNING GUIDE All tolerances ±1/16" (±1.6 mm), unless otherwise noted. www.Dacor.com 44 5/8" * (113.3 cm) Product dimensions model sgm466 Phone: (800) 7934-0.5093 warning • Observe all governing codes and ordinances during planning and...
Document # PG04-004 SGM304, SGM365, SGM466 30", 36", 46" Wide, Drop-in side of chassis Specifications subject to change without notice. Contact your local building department for further information. • This appliance must be installed in accordance with the accompanying installation instructions. 30" (76.2 cm) 1... 01/27/11 Page 1/5 PLANNING GUIDE All tolerances ±1/16" (±1.6 mm), unless otherwise noted. www.Dacor.com 44 5/8" * (113.3 cm) Product dimensions model sgm466 Phone: (800) 7934-0.5093 warning • Observe all governing codes and ordinances during planning and...
Planning Guides
Page 2
...reference only. It must be connected to the gas shut off valve must be easily disconnected if the unit needs service. www.Dacor.com Phone: (800) 7934-0.6093 It is for testing the regulator setting shall be supplied to the electrical outlet according to...be installed in accordance with the National Fuel Gas Code ANSI Z223.1/NFPA 54. ◊ An external manual shut-off valve. ◊ Models SGM304 and SGM365 come with a 3/4" regulator, approved for the gas service being provided (natural gas or LP gas). gas supply pressure 1/2 p.s.i. 1/2 p.s.i. Model SGM466 comes ...
...reference only. It must be connected to the gas shut off valve must be easily disconnected if the unit needs service. www.Dacor.com Phone: (800) 7934-0.6093 It is for testing the regulator setting shall be supplied to the electrical outlet according to...be installed in accordance with the National Fuel Gas Code ANSI Z223.1/NFPA 54. ◊ An external manual shut-off valve. ◊ Models SGM304 and SGM365 come with a 3/4" regulator, approved for the gas service being provided (natural gas or LP gas). gas supply pressure 1/2 p.s.i. 1/2 p.s.i. Model SGM466 comes ...
Planning Guides
Page 3
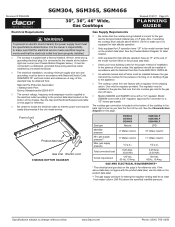
...both sides 1 Measured from cooking surface (top of cooktop grate). 2 If installing with a raised vent, install only the approved Dacor model numbers specified below the cooktop. 1/4" (6 mm) min. clearance to ...combustible B surfaces Under Cabinet Clearances Model (B) Minimum* SGM304 29" (73.7 cm) SGM365 35 ¼" (89.5 cm) SGM466 46" (116.8 cm) * To allow for cabinets more than a horizontal distance of 6" (15.2 cm) from edge of cutout. The installation...
...both sides 1 Measured from cooking surface (top of cooktop grate). 2 If installing with a raised vent, install only the approved Dacor model numbers specified below the cooktop. 1/4" (6 mm) min. clearance to ...combustible B surfaces Under Cabinet Clearances Model (B) Minimum* SGM304 29" (73.7 cm) SGM365 35 ¼" (89.5 cm) SGM466 46" (116.8 cm) * To allow for cabinets more than a horizontal distance of 6" (15.2 cm) from edge of cutout. The installation...

Planning Guides
Page 4
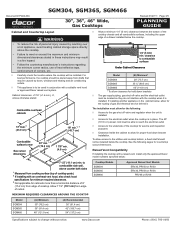
...Installation Type Cutout Diagram (C) Min. (D) (E) (F) SGM304 without raised vent Figure 1 (Square) 2 7/8" (7.3 cm) 19 3/4" (50.2 cm) 27 3/4" (68.6 cm) NA SGM304 with ERV30 or PRV30 SGM304 with RV30 SGM365 without raised vent SGM365 with ERV36 or PRV36 SGM365 with RV36 SGM466 without notice. Document # PG04-004 SGM304, SGM365, SGM466... both the cooktop and raised vent ** IMPORTANT: Notch depth is included in total cutout depth (D). www.Dacor.com Phone: (800) 7934-0.8093 Carefully double check all dimensions against the table below and the correct diagram before cutting the...
...Installation Type Cutout Diagram (C) Min. (D) (E) (F) SGM304 without raised vent Figure 1 (Square) 2 7/8" (7.3 cm) 19 3/4" (50.2 cm) 27 3/4" (68.6 cm) NA SGM304 with ERV30 or PRV30 SGM304 with RV30 SGM365 without raised vent SGM365 with ERV36 or PRV36 SGM365 with RV36 SGM466 without notice. Document # PG04-004 SGM304, SGM365, SGM466... both the cooktop and raised vent ** IMPORTANT: Notch depth is included in total cutout depth (D). www.Dacor.com Phone: (800) 7934-0.8093 Carefully double check all dimensions against the table below and the correct diagram before cutting the...

Installation Instructions
Page 2
...-3226 (U.S.A. Customer Service Information If You Need Help... For repairs to the chassis on the product data label. Friday 6:00 a.m. Leave these installation instructions with installation, contact your Dacor dealer or the Dacor Customer Service Team. to 4:00 p.m. and Canada) Monday - Pacific Time Product Data Label • The product data label contains the model...
...-3226 (U.S.A. Customer Service Information If You Need Help... For repairs to the chassis on the product data label. Friday 6:00 a.m. Leave these installation instructions with installation, contact your Dacor dealer or the Dacor Customer Service Team. to 4:00 p.m. and Canada) Monday - Pacific Time Product Data Label • The product data label contains the model...

Installation Instructions
Page 3
... instructions. • If you don't understand. DANGER IMPORTANT: Do not store or use this or any other appliance. • Always contact the Dacor Customer Service Team about problems and conditions that can fight the fire with your building. • From a neighbor's phone, immediately call the fire ... or passages on the list of grease and grime. warning WARNING - Doing so may be burned. Use common sense and caution when installing, maintaining or operating this unit according to the use any electrical switch or use and care manual, ensuring you may result in your ...
... instructions. • If you don't understand. DANGER IMPORTANT: Do not store or use this or any other appliance. • Always contact the Dacor Customer Service Team about problems and conditions that can fight the fire with your building. • From a neighbor's phone, immediately call the fire ... or passages on the list of grease and grime. warning WARNING - Doing so may be burned. Use common sense and caution when installing, maintaining or operating this unit according to the use any electrical switch or use and care manual, ensuring you may result in your ...

Installation Instructions
Page 4
... Turn the knobs to the OFF position prior to an electrical outlet with the controls or touch other parts of the cooktop. Dacor strongly recommends the installation of a range hood in the area around the cooktop. This cooktop is the responsibility of the customer to children on the ... • Non-stick coatings, when heated, can cause suffocation. • If you receive a damaged product, immediately contact your dealer or builder. The installer should perform all the cooktop parts are dry before lighting a burner. • Keep flammable items, such as pot holders. • Do not use ...
... Turn the knobs to the OFF position prior to an electrical outlet with the controls or touch other parts of the cooktop. Dacor strongly recommends the installation of a range hood in the area around the cooktop. This cooktop is the responsibility of the customer to children on the ... • Non-stick coatings, when heated, can cause suffocation. • If you receive a damaged product, immediately contact your dealer or builder. The installer should perform all the cooktop parts are dry before lighting a burner. • Keep flammable items, such as pot holders. • Do not use ...
Installation Instructions
Page 5
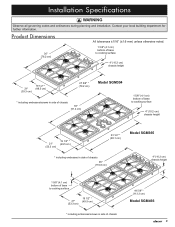
... height 1 5/8" (4.1 cm) bottom of base to cooking surface 21" (53.3 cm) 19 1/2" * (49.5 cm) * including embosses/screws in side of chassis 44 5/8" * (113.3 cm) Model SGM466 3 Installation Specifications warning Observe all governing codes and ordinances during planning and...
... height 1 5/8" (4.1 cm) bottom of base to cooking surface 21" (53.3 cm) 19 1/2" * (49.5 cm) * including embosses/screws in side of chassis 44 5/8" * (113.3 cm) Model SGM466 3 Installation Specifications warning Observe all governing codes and ordinances during planning and...

Installation Instructions
Page 6
.... A copy of the unit. Front of the cooktop in the gas line that the cooktop being installed is for the gas service being provided (natural gas or LP gas). Model SGM466 comes with National Electric Code ANSI/NFPA 70* and local codes and ordinances. See the Chassis Bottom ... 10" Water column 11" Water column 1/2 p.s.i. 0.25 Amp. (0.03 kW) 120 Vac, 60 Hz, 15 Amp. Gas type Manifold pressure Min. Installation Specifications Electrical Requirements Gas Supply Requirements warning To prevent an electric shock hazard, the power supply must meet the specifications stated below ). It is the...
.... A copy of the unit. Front of the cooktop in the gas line that the cooktop being installed is for the gas service being provided (natural gas or LP gas). Model SGM466 comes with National Electric Code ANSI/NFPA 70* and local codes and ordinances. See the Chassis Bottom ... 10" Water column 11" Water column 1/2 p.s.i. 0.25 Amp. (0.03 kW) 120 Vac, 60 Hz, 15 Amp. Gas type Manifold pressure Min. Installation Specifications Electrical Requirements Gas Supply Requirements warning To prevent an electric shock hazard, the power supply must meet the specifications stated below ). It is the...

Installation Instructions
Page 7
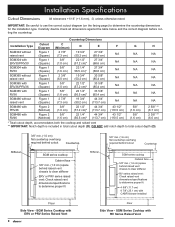
... counter both sides 1 Measured from cooking surface (top of cooktop grate). 2 If installing with a raised vent, install only the approved Dacor model numbers specified below: Cooktop Models SGM304 SGM365 SGM466 Approved Raised Vent Models ERV30, PRV30 or RV30 ERV36, PRV36 or RV36 PRV46 or... RV46 Model SGM304 SGM365 SGM466 A: Minimum 30" (76.2 cm) 36" (91.4 cm) 48" (121.9 cm) A: Recommended 36" (...
... counter both sides 1 Measured from cooking surface (top of cooktop grate). 2 If installing with a raised vent, install only the approved Dacor model numbers specified below: Cooktop Models SGM304 SGM365 SGM466 Approved Raised Vent Models ERV30, PRV30 or RV30 ERV36, PRV36 or RV36 PRV46 or... RV46 Model SGM304 SGM365 SGM466 A: Minimum 30" (76.2 cm) 36" (91.4 cm) 48" (121.9 cm) A: Recommended 36" (...
Installation Instructions
Page 8
... tolerances +1/16" (+1.6 mm), -0, unless otherwise noted. Countertop Dimensions Installation Type SGM304 without raised vent SGM304 with ERV30/PRV30 SGM304 with RV30 SGM365 without raised vent SGM365 with ERV36/PRV36 SGM365 with RV36 SGM466 without raised vent SGM466 with PRV46 Cutout Diagram Figure 1 (Square) Figure 1 (Square) ...G NA NA NA NA NA NA NA 5/8" (1.6 cm) H NA NA NA NA NA NA NA 2 5/8" ** (6.7 cm) SGM466 with CABP3 blower installed Floor Side View - IMPORTANT: Be careful to use the correct cutout diagram (on the facing page) to determine the countertop dimensions for the...
... tolerances +1/16" (+1.6 mm), -0, unless otherwise noted. Countertop Dimensions Installation Type SGM304 without raised vent SGM304 with ERV30/PRV30 SGM304 with RV30 SGM365 without raised vent SGM365 with ERV36/PRV36 SGM365 with RV36 SGM466 without raised vent SGM466 with PRV46 Cutout Diagram Figure 1 (Square) Figure 1 (Square) ...G NA NA NA NA NA NA NA 5/8" (1.6 cm) H NA NA NA NA NA NA NA 2 5/8" ** (6.7 cm) SGM466 with CABP3 blower installed Floor Side View - IMPORTANT: Be careful to use the correct cutout diagram (on the facing page) to determine the countertop dimensions for the...
Installation Instructions
Page 9
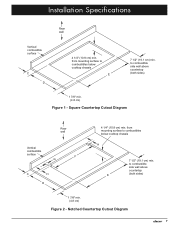
...) 1 7/8" min. (4.8 cm) Figure 1 - from mounting surface to combustibles below cooktop chassis H 7 1/2" (19.1 cm) min. to combustible side wall above countertop (both sides) 1 7/8" min. (4.8 cm) Figure 2 - Installation Specifications Rear wall Vertical combustible surface C D 4 1/4" (10.8 cm) min.
...) 1 7/8" min. (4.8 cm) Figure 1 - from mounting surface to combustibles below cooktop chassis H 7 1/2" (19.1 cm) min. to combustible side wall above countertop (both sides) 1 7/8" min. (4.8 cm) Figure 2 - Installation Specifications Rear wall Vertical combustible surface C D 4 1/4" (10.8 cm) min.
Installation Instructions
Page 10
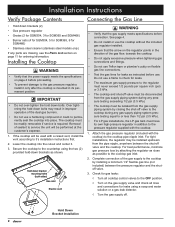
...installed upstream from the gas supply piping system by attaching the regulator as close as possible to the cooktop gas inlet. 2. Lower the cooktop into place. important • Do not over-tighten the hold -down brackets (2) • Gas pressure regulator • Grates (2 for SGM304, 3 for SGM365 and SGM466... piping system during any pressure testing exceeding 1/2 psi (3.5 kPa). • The cooktop must have its permanent position. Installation Instructions Verify Package Contents Connecting the Gas Line • Hold down brackets as instructed before use a hardening compound or ...
...installed upstream from the gas supply piping system by attaching the regulator as close as possible to the cooktop gas inlet. 2. Lower the cooktop into place. important • Do not over-tighten the hold -down brackets (2) • Gas pressure regulator • Grates (2 for SGM304, 3 for SGM365 and SGM466... piping system during any pressure testing exceeding 1/2 psi (3.5 kPa). • The cooktop must have its permanent position. Installation Instructions Verify Package Contents Connecting the Gas Line • Hold down brackets as instructed before use a hardening compound or ...
Installation Instructions
Page 11
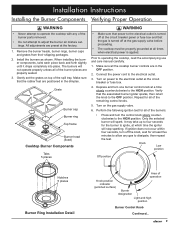
... minutes to allow any of the burner parts removed. • Do not attempt to adjust the burner air mixture settings. Installation Instructions Installing the Burner Components Verifying Proper Operation warning • Never attempt to operate the cooktop with any gas to dissipate, then repeat...the associated burner igniter sparks, then return the knob to the electrical outlet. 3. Knob Low position Off position Notches 5 places Burner Ring Installation Detail Area of the spill tray. Gently set the grates on the gas supply valve. 6. Depress and turn off at the factory....
... minutes to allow any of the burner parts removed. • Do not attempt to adjust the burner air mixture settings. Installation Instructions Installing the Burner Components Verifying Proper Operation warning • Never attempt to operate the cooktop with any gas to dissipate, then repeat...the associated burner igniter sparks, then return the knob to the electrical outlet. 3. Knob Low position Off position Notches 5 places Burner Ring Installation Detail Area of the spill tray. Gently set the grates on the gas supply valve. 6. Depress and turn off at the factory....
Installation Instructions
Page 12
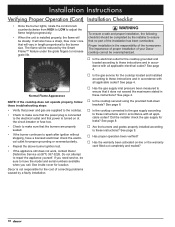
...all applicable codes? See inside cover for leaks? Proper installation is installed properly, the flame will be reduced by a faulty installation. See page 4. □□ Has the gas supply inlet pressure been measured to the burner size. Dacor is turned on -line or the warranty card filled...; Repeat the above burner ignition test. • If the appliance still does not work, contact Dacor Distinctive Service at (877) 337-3226. The importance of proper installation of your Dacor cooktop cannot be sure to adjust the flame height progressively. • When the unit is the ...
...all applicable codes? See inside cover for leaks? Proper installation is installed properly, the flame will be reduced by a faulty installation. See page 4. □□ Has the gas supply inlet pressure been measured to the burner size. Dacor is turned on -line or the warranty card filled...; Repeat the above burner ignition test. • If the appliance still does not work, contact Dacor Distinctive Service at (877) 337-3226. The importance of proper installation of your Dacor cooktop cannot be sure to adjust the flame height progressively. • When the unit is the ...
Installation Instructions
Page 13
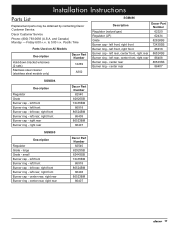
...center front, right rear Burner ring - small Burner cap - Installation Instructions Parts List Replacement parts may be obtained by contacting Dacor Customer Service. left rear, right front Burner cap - center rear Dacor Part Number 62320 62434 82926SB 72435SB 86918 86524SB 86408 86523SB 86407...Time Parts Used on All Models Description Hold down bracket w/screws (2 sets) Stainless steel cleaner (stainless steel models only) Dacor Part Number 12269 A302 SGM466 Description Regulator (natural gas) Regulator (LP) Grate Burner cap - left front Burner cap - left rear, right front...
...center front, right rear Burner ring - small Burner cap - Installation Instructions Parts List Replacement parts may be obtained by contacting Dacor Customer Service. left rear, right front Burner cap - center rear Dacor Part Number 62320 62434 82926SB 72435SB 86918 86524SB 86408 86523SB 86407...Time Parts Used on All Models Description Hold down bracket w/screws (2 sets) Stainless steel cleaner (stainless steel models only) Dacor Part Number 12269 A302 SGM466 Description Regulator (natural gas) Regulator (LP) Grate Burner cap - left front Burner cap - left rear, right front...
Use & Care Manuals
Page 3
... harm. Consumer: Read this appliance. Friday 6:00 a.m. to such substances. Use common sense and caution when installing, maintaining or operating this manual. Always contact the Dacor Customer Service Team about problems or situations that are on the list of your sales receipt or canceled check in... Canada) Monday - The numbers are known by the State of this appliance as aerosol cans away from the cooktop. Visit www.Dacor.com to download the latest version of this manual are not meant to the appliance without updating this or any electrical devices including ...
... harm. Consumer: Read this appliance. Friday 6:00 a.m. to such substances. Use common sense and caution when installing, maintaining or operating this manual. Always contact the Dacor Customer Service Team about problems or situations that are on the list of your sales receipt or canceled check in... Canada) Monday - The numbers are known by the State of this appliance as aerosol cans away from the cooktop. Visit www.Dacor.com to download the latest version of this manual are not meant to the appliance without updating this or any electrical devices including ...
Use & Care Manuals
Page 4
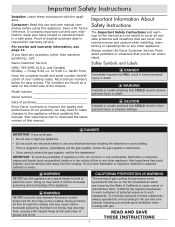
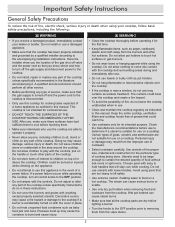
... recommended in the area around the cooktop. Important Safety Instructions General Safety Precautions To reduce the risk of cooking being done. Have the installer show you know where and how to turn all other service. • Before performing any part of cookware. • Select cookware carefully...all the cooktop parts are not suitable for use a damaged appliance. • Make sure that the cooktop has been properly installed and grounded by a qualified installer according to hold handles that could blow over the cooktop. • If the cooktop is turned off the gas supply ...
... recommended in the area around the cooktop. Important Safety Instructions General Safety Precautions To reduce the risk of cooking being done. Have the installer show you know where and how to turn all other service. • Before performing any part of cookware. • Select cookware carefully...all the cooktop parts are not suitable for use a damaged appliance. • Make sure that the cooktop has been properly installed and grounded by a qualified installer according to hold handles that could blow over the cooktop. • If the cooktop is turned off the gas supply ...
Use & Care Manuals
Page 12
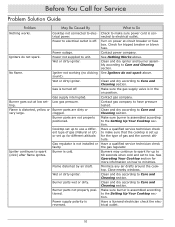
... wet or dirty. Have a qualified service technician check the gas regulator. Burners may continue to spark for up to minimize. Power supply polarity is not installed or faulty. Power to make sure power cord is assembled according to Care and Cleaning section. Check to make sure that the cooktop is assembled...
... wet or dirty. Have a qualified service technician check the gas regulator. Burners may continue to spark for up to minimize. Power supply polarity is not installed or faulty. Power to make sure power cord is assembled according to Care and Cleaning section. Check to make sure that the cooktop is assembled...
Use & Care Manuals
Page 13
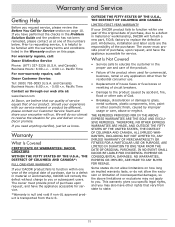
... OF THE U.S.A., THE DISTRICT OF COLUMBIA AND CANADA*: FULL ONE-YEAR WARRANTY If your DACOR product fails to resolve the situation for you and deliver on our Dacor promise. and Canada) Business Hours: 6:00 a.m. - 4:00 p.m. All delivery, installation and labor costs are the responsibility of our product. Some states do not allow the...
... OF THE U.S.A., THE DISTRICT OF COLUMBIA AND CANADA*: FULL ONE-YEAR WARRANTY If your DACOR product fails to resolve the situation for you and deliver on our Dacor promise. and Canada) Business Hours: 6:00 a.m. - 4:00 p.m. All delivery, installation and labor costs are the responsibility of our product. Some states do not allow the...
