Planning Guides
Page 2
... rear corner (see Chassis Bottom Diagram below . The regulator must be installed in the gas line that runs from the cooktop gas inlet to the gas shut off valve must be done in accordance with a 1/2" regulator. The cooktop gas connection is connected to locate the electrical outlet so that the electrical outlet has been properly installed. ◊ The cooktop is for the gas service being installed is equipped for high altitude operation. ◊ Units...
... rear corner (see Chassis Bottom Diagram below . The regulator must be installed in the gas line that runs from the cooktop gas inlet to the gas shut off valve must be done in accordance with a 1/2" regulator. The cooktop gas connection is connected to locate the electrical outlet so that the electrical outlet has been properly installed. ◊ The cooktop is for the gas service being installed is equipped for high altitude operation. ◊ Units...
Planning Guides
Page 3
... cooking surface (top of cooktop grate). 2 If installing with a raised vent, install only the approved Dacor model numbers specified below the cooktop. to combustible side wall, above counter both sides 1 Measured from drafts that may be installed below : 7 1/2" (19.1 cm) min. www.Dacor.com Phone: (800) 7934-0.7093 To allow for countertop cutout dimensions. For best performance, the cooktop should not be caused by reaching over a hot appliance, avoid locating cabinet storage space directly...
... cooking surface (top of cooktop grate). 2 If installing with a raised vent, install only the approved Dacor model numbers specified below the cooktop. to combustible side wall, above counter both sides 1 Measured from drafts that may be installed below : 7 1/2" (19.1 cm) min. www.Dacor.com Phone: (800) 7934-0.7093 To allow for countertop cutout dimensions. For best performance, the cooktop should not be caused by reaching over a hot appliance, avoid locating cabinet storage space directly...

Planning Guides
Page 4
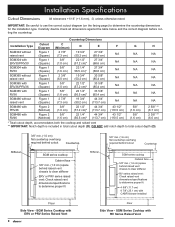
...total cutout depth (D). sgm Series Cooktop with CABP3 blower installed Floor Side View - sgm Series Cooktop with ERV OR PRV Series Raised Vent Stiffener 5/8" min. (1.6 cm) flat countertop overhang required behind cutout Countertop SGM series cooktop Cabinet face 5/8" min. (1.6 cm) space behind raised vent chassis to clear stiffener ERV or PRV series raised vent: Check raised vent dimensions/specifications to determine the countertop dimensions for the installation type. www.Dacor.com Phone: (800) 7934-0.8093 Countertop Dimensions Installation Type Cutout Diagram (C) Min...
...total cutout depth (D). sgm Series Cooktop with CABP3 blower installed Floor Side View - sgm Series Cooktop with ERV OR PRV Series Raised Vent Stiffener 5/8" min. (1.6 cm) flat countertop overhang required behind cutout Countertop SGM series cooktop Cabinet face 5/8" min. (1.6 cm) space behind raised vent chassis to clear stiffener ERV or PRV series raised vent: Check raised vent dimensions/specifications to determine the countertop dimensions for the installation type. www.Dacor.com Phone: (800) 7934-0.8093 Countertop Dimensions Installation Type Cutout Diagram (C) Min...

Installation Instructions
Page 2
... the model and serial number of Contents Important Safety Instructions 1 Important Information About Safety Instructions 1 General Safety Precautions 2 Installation Specifications 3 Product Dimensions 3 Electrical Requirements 4 Gas Supply Requirements 4 Cabinet and Countertop Layout 5 Installation Instructions 8 Verify Package Contents 8 Installing the Cooktop 8 Connecting the Gas Line 8 Installing the Burner Components 9 Verifying Proper Operation 9 Installation Checklist 10 Parts List 11 Wiring Diagrams 12 Before You Begin... Dacor assumes no liability for service...
... the model and serial number of Contents Important Safety Instructions 1 Important Information About Safety Instructions 1 General Safety Precautions 2 Installation Specifications 3 Product Dimensions 3 Electrical Requirements 4 Gas Supply Requirements 4 Cabinet and Countertop Layout 5 Installation Instructions 8 Verify Package Contents 8 Installing the Cooktop 8 Connecting the Gas Line 8 Installing the Burner Components 9 Verifying Proper Operation 9 Installation Checklist 10 Parts List 11 Wiring Diagrams 12 Before You Begin... Dacor assumes no liability for service...

Installation Instructions
Page 3
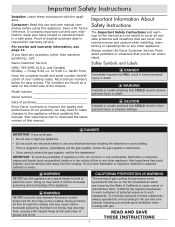
... electrical switch or use and care manual, ensuring you cannot contact the gas supplier, call the gas supplier. California law requires businesses to warn customers of the appliance. Safety Symbols and Labels DANGER Immediate hazards that COULD result in severe personal injury or death. Follow the gas supplier's instructions. • If you provide good ventilation when cooking with a close-fitting lid, cookie sheet...
... electrical switch or use and care manual, ensuring you cannot contact the gas supplier, call the gas supplier. California law requires businesses to warn customers of the appliance. Safety Symbols and Labels DANGER Immediate hazards that COULD result in severe personal injury or death. Follow the gas supplier's instructions. • If you provide good ventilation when cooking with a close-fitting lid, cookie sheet...

Installation Instructions
Page 4
... controls or touch other hot surfaces. Remove birds to removing them from the valve stems. • To avoid a fire hazard, do not use the cooktop for the first time. This appliance is installed. Do not install or use this appliance if the power cord is turned off the gas supply and disconnect power to come into a dedicated, grounded three-prong electrical outlet. Dacor strongly recommends the installation of a range hood...
... controls or touch other hot surfaces. Remove birds to removing them from the valve stems. • To avoid a fire hazard, do not use the cooktop for the first time. This appliance is installed. Do not install or use this appliance if the power cord is turned off the gas supply and disconnect power to come into a dedicated, grounded three-prong electrical outlet. Dacor strongly recommends the installation of a range hood...

Installation Instructions
Page 6
... high altitude operation have "LP" in the model number listed on or shutting off gas to the gas shut off valve must be installed in the back right corner as you face the front of the chassis. Also, if operating the cooktop at least 1 inch water column (249 Pa) above data does not agree with a 1/2" regulator. Gas type Manifold pressure Min. gas supply pressure Total connected load Circuit requirement SGM304 SGM365 SGM466 Natural gas...
... high altitude operation have "LP" in the model number listed on or shutting off gas to the gas shut off valve must be installed in the back right corner as you face the front of the chassis. Also, if operating the cooktop at least 1 inch water column (249 Pa) above data does not agree with a 1/2" regulator. Gas type Manifold pressure Min. gas supply pressure Total connected load Circuit requirement SGM304 SGM365 SGM466 Natural gas...

Installation Instructions
Page 7
... locating cabinet storage space directly above counter both sides 1 Measured from edge of cooktop. Allow 7 1/2" (19.1 cm) from edge of a drawer installed below the cooktop. To allow for cabinets more than a horizontal distance of 6" (15.2 cm) from cooking surface (top of cooktop grate). 2 If installing with an overhead vent hood, also check hood specifications for minimum required clearances. 3 Not applicable for the routing of gas and electrical service behind it is installed. Raised Vent Compatibility If installing...
... locating cabinet storage space directly above counter both sides 1 Measured from edge of cooktop. Allow 7 1/2" (19.1 cm) from edge of a drawer installed below the cooktop. To allow for cabinets more than a horizontal distance of 6" (15.2 cm) from cooking surface (top of cooktop grate). 2 If installing with an overhead vent hood, also check hood specifications for minimum required clearances. 3 Not applicable for the routing of gas and electrical service behind it is installed. Raised Vent Compatibility If installing...
Installation Instructions
Page 8
... the countertop dimensions for the installation type. IMPORTANT: Be careful to use the correct cutout diagram (on the facing page) to total cutout depth (D). Carefully double check all dimensions against the table below and the correct diagram before cutting the countertop. Stiffener 3/8" min. (1.0 cm) flat countertop overhang required behind cutout Countertop SGM series cooktop Cabinet face 3/8" min. (1.0 cm) space behind raised vent chassis to clear stiffener ERV or PRV series raised vent: Check raised vent dimensions/specifications...
... the countertop dimensions for the installation type. IMPORTANT: Be careful to use the correct cutout diagram (on the facing page) to total cutout depth (D). Carefully double check all dimensions against the table below and the correct diagram before cutting the countertop. Stiffener 3/8" min. (1.0 cm) flat countertop overhang required behind cutout Countertop SGM series cooktop Cabinet face 3/8" min. (1.0 cm) space behind raised vent chassis to clear stiffener ERV or PRV series raised vent: Check raised vent dimensions/specifications...
Installation Instructions
Page 10
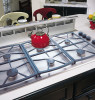
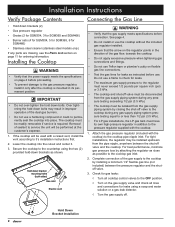
... the cooktop to the countertop using a soap and water solution or a gas leak detector. ◊ Turn the gas supply off valve to the cooktop during any parts are missing, see the Parts List section on page 11 for ordering information. Installation Instructions Verify Package Contents Connecting the Gas Line • Hold down brackets (2) • Gas pressure regulator • Grates (2 for SGM304, 3 for SGM365 and SGM466) • Burner sets (4 for SGM304, 5 for SGM365, 6 for SGM466) • Stainless steel cleaner (stainless steel models...
... the cooktop to the countertop using a soap and water solution or a gas leak detector. ◊ Turn the gas supply off valve to the cooktop during any parts are missing, see the Parts List section on page 11 for ordering information. Installation Instructions Verify Package Contents Connecting the Gas Line • Hold down brackets (2) • Gas pressure regulator • Grates (2 for SGM304, 3 for SGM365 and SGM466) • Burner sets (4 for SGM304, 5 for SGM365, 6 for SGM466) • Stainless steel cleaner (stainless steel models...
Installation Instructions
Page 11
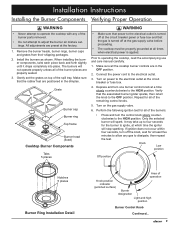
... all of operation Knob position indicator (polished surface) Burner designation Light and high position Burner Control Knob Continued... 9 All adjustments are properly seated. 3. Grate Burner cap Burner ring Top frame Burner head (fixed) Cooktop Burner Components Tabs 5 places warning • Make sure that power to the electrical outlet is turned off at the circuit breaker panel or fuse box and that the gas is turned off the knob, wait for all times when electrical power is applied. Installation Instructions Installing the Burner Components Verifying...
... all of operation Knob position indicator (polished surface) Burner designation Light and high position Burner Control Knob Continued... 9 All adjustments are properly seated. 3. Grate Burner cap Burner ring Top frame Burner head (fixed) Cooktop Burner Components Tabs 5 places warning • Make sure that power to the electrical outlet is turned off at the circuit breaker panel or fuse box and that the gas is turned off the knob, wait for all times when electrical power is applied. Installation Instructions Installing the Burner Components Verifying...
Installation Instructions
Page 12
See inside cover for the cooktop located and installed according to these troubleshooting steps: • Verify that power and gas are properly seated. • If the burner continues to spark after ignition without stopping, have the model and serial numbers available when you need service, be sure to have a licensed electrician check the electrical outlet for proper grounding or reversed polarity. • Repeat the above burner ignition test. • If...
See inside cover for the cooktop located and installed according to these troubleshooting steps: • Verify that power and gas are properly seated. • If the burner continues to spark after ignition without stopping, have the model and serial numbers available when you need service, be sure to have a licensed electrician check the electrical outlet for proper grounding or reversed polarity. • Repeat the above burner ignition test. • If...
Installation Instructions
Page 13
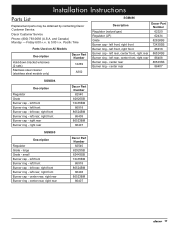
... Grate - small Burner cap - left front Burner cap - left front, right front Burner ring - Pacific Time Parts Used on All Models Description Hold down bracket w/screws (2 sets) Stainless steel cleaner (stainless steel models only) Dacor Part Number 12269 A302 SGM466 Description Regulator (natural gas) Regulator (LP) Grate Burner cap - left rear, right front Burner cap - left rear, right front Burner cap - right rear Burner ring - Installation Instructions Parts List Replacement parts may be obtained by contacting Dacor Customer Service. center rear Burner...
... Grate - small Burner cap - left front Burner cap - left front, right front Burner ring - Pacific Time Parts Used on All Models Description Hold down bracket w/screws (2 sets) Stainless steel cleaner (stainless steel models only) Dacor Part Number 12269 A302 SGM466 Description Regulator (natural gas) Regulator (LP) Grate Burner cap - left rear, right front Burner cap - left rear, right front Burner cap - right rear Burner ring - Installation Instructions Parts List Replacement parts may be obtained by contacting Dacor Customer Service. center rear Burner...
Use & Care Manuals
Page 3
... store flammable or explosive materials in your cooktop ready. and Canada) Monday - Always contact the Dacor Customer Service Team about problems or situations that could explode, such as a space heater to the appliance without updating this appliance. Doing so may need to make changes to heat or warm the room. California law requires businesses to warn customers of the chassis. Visit www...
... store flammable or explosive materials in your cooktop ready. and Canada) Monday - Always contact the Dacor Customer Service Team about problems or situations that could explode, such as a space heater to the appliance without updating this appliance. Doing so may need to make changes to heat or warm the room. California law requires businesses to warn customers of the chassis. Visit www...
Use & Care Manuals
Page 4
... all control knobs to children on the appliance. • Do not attempt to the cooktop. • Do not install, repair or replace any part of the cooktop unless specifically recommended in the event of a power failure. Choose pans with the cover in this manual. Do not allow pot holders to the accompanying installation instructions. Use utensils of the proper size, material and construction for commercial use . • Clean and...
... all control knobs to children on the appliance. • Do not attempt to the cooktop. • Do not install, repair or replace any part of the cooktop unless specifically recommended in the event of a power failure. Choose pans with the cover in this manual. Do not allow pot holders to the accompanying installation instructions. Use utensils of the proper size, material and construction for commercial use . • Clean and...

Use & Care Manuals
Page 8
... the grates. • To avoid burns or fire hazard, reduce the flame level if it slowly counterclockwise to keep heat, odors and steam in a burst of operation Knob position indicator (polished surface) Burner designation Light and high position Burner Knob Repeat the lighting procedure. The thickness of grease and grime. • To avoid burns and scalding, always turn the knob, the burner igniters will spark until lit. Sliding...
... the grates. • To avoid burns or fire hazard, reduce the flame level if it slowly counterclockwise to keep heat, odors and steam in a burst of operation Knob position indicator (polished surface) Burner designation Light and high position Burner Knob Repeat the lighting procedure. The thickness of grease and grime. • To avoid burns and scalding, always turn the knob, the burner igniters will spark until lit. Sliding...
Use & Care Manuals
Page 9
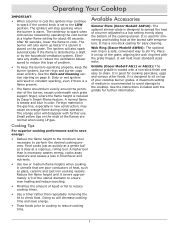
... flame to reduce cooking time. 7 Foreign material in the gas line, especially in color. Available Accessories Simmer Plate (Dacor Model# ASP10): The optional simmer plate is designed to spread the heat of a burner adjusted to a low setting evenly along the bottom of the burner, except underneath each grate support finger, where the flame height is reduced by Dacor's Smart-Flame feature. It has a non-stick coating for simmering and holding...
... flame to reduce cooking time. 7 Foreign material in the gas line, especially in color. Available Accessories Simmer Plate (Dacor Model# ASP10): The optional simmer plate is designed to spread the heat of a burner adjusted to a low setting evenly along the bottom of the burner, except underneath each grate support finger, where the flame height is reduced by Dacor's Smart-Flame feature. It has a non-stick coating for simmering and holding...
Use & Care Manuals
Page 10
... applicator, such as steel wool or scouring pads, on during cleaning. • Do not use of these parts carefully, you allow them . Extensive use a steam cleaner to extremely high temperatures. DO NOT turn off of the burner bases. Use only a sponge, soft cloth, fibrous or plastic brush, or nylon cleaning pad for burner and igniter cleaning instructions. IMPORTANT: The cooktop is cool, remove the grates from the electrical outlet. 2. These...
... applicator, such as steel wool or scouring pads, on during cleaning. • Do not use of these parts carefully, you allow them . Extensive use a steam cleaner to extremely high temperatures. DO NOT turn off of the burner bases. Use only a sponge, soft cloth, fibrous or plastic brush, or nylon cleaning pad for burner and igniter cleaning instructions. IMPORTANT: The cooktop is cool, remove the grates from the electrical outlet. 2. These...
Use & Care Manuals
Page 11
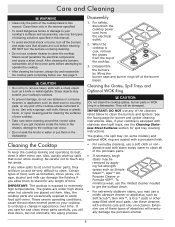
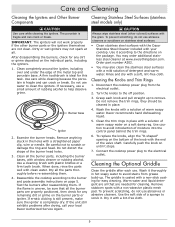
... electrical outlet. 2. Clean the trim rings in hot soapy water to scrub it stops. 7. The griddle is uneven, be cleaned in the holes with a solution of detergent and warm water. Order part number A302. • You may not spark at www.everythingdacor.com. Remove stubborn spots with a non-stick coating for cleaning. Care and Cleaning Cleaning the Igniters and Other Burner Components Cleaning Stainless Steel Surfaces (stainless steel models only) caution Use care while cleaning the igniters...
... electrical outlet. 2. Clean the trim rings in hot soapy water to scrub it stops. 7. The griddle is uneven, be cleaned in the holes with a solution of detergent and warm water. Order part number A302. • You may not spark at www.everythingdacor.com. Remove stubborn spots with a non-stick coating for cleaning. Care and Cleaning Cleaning the Igniters and Other Burner Components Cleaning Stainless Steel Surfaces (stainless steel models only) caution Use care while cleaning the igniters...
Use & Care Manuals
Page 12
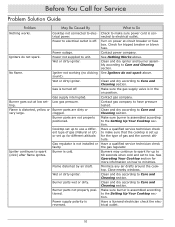
Power to electrical outlet is off . Igniters do not spark above . No flame. Igniter not working (no clicking sound). Clean and dry igniter and burner assembly according to have pressure tested. Gas is distorted, yellow or Burner parts are not properly positioned. Contact gas company to Care and Cleaning section. Burners may continue to Do Nothing works. Minimize any air drafts around the cooktop. Clean and dry according to Care and Cleaning section. Contact power company. Flame is...
Power to electrical outlet is off . Igniters do not spark above . No flame. Igniter not working (no clicking sound). Clean and dry igniter and burner assembly according to have pressure tested. Gas is distorted, yellow or Burner parts are not properly positioned. Contact gas company to Care and Cleaning section. Burners may continue to Do Nothing works. Minimize any air drafts around the cooktop. Clean and dry according to Care and Cleaning section. Contact power company. Flame is...


