
Product Manual
Page 1
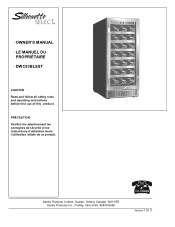
Danby Products Limited, Guelph, Ontario Canada N1H 6Z9 Danby Products Inc., Findlay, Ohio USA 45839-0669 VersVieornsi1o.10.60.11.1 PRÉCAUTION Veuillez lire attentivement les consignes de sécurité et les instructions d'utilisation avant l'utilisation initiale de ce produit. OWNER'S MANUAL LE MANUEL DU PROPRIÉTAIRE DWC93BLSST CAUTION Read and follow all safety rules and operating instructions before first use of this product.
Danby Products Limited, Guelph, Ontario Canada N1H 6Z9 Danby Products Inc., Findlay, Ohio USA 45839-0669 VersVieornsi1o.10.60.11.1 PRÉCAUTION Veuillez lire attentivement les consignes de sécurité et les instructions d'utilisation avant l'utilisation initiale de ce produit. OWNER'S MANUAL LE MANUEL DU PROPRIÉTAIRE DWC93BLSST CAUTION Read and follow all safety rules and operating instructions before first use of this product.
Product Manual
Page 2
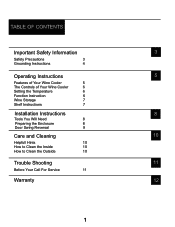
TABLE OF CONTENTS Important Safety Information 3 Safety Precautions 3 Grounding Instructions 4 Operating Instructions 5 Features of Your Wine Cooler 5 The Controls of Your Wine Cooler 6 Setting the Temperature 6 Function Instruction 6 Wine Storage 7 Shelf Instructions 7 Installation Instructions 8 Tools You Will Need 8 Preparing the Enclosure 8 Door Swing Reversal 9 Care and Cleaning 10 Helpfull Hints 10 How to Clean the Inside 10 How to Clean the Outside 10 Trouble Shooting 11 Before Your Call For Service 11 Warranty 12 1
TABLE OF CONTENTS Important Safety Information 3 Safety Precautions 3 Grounding Instructions 4 Operating Instructions 5 Features of Your Wine Cooler 5 The Controls of Your Wine Cooler 6 Setting the Temperature 6 Function Instruction 6 Wine Storage 7 Shelf Instructions 7 Installation Instructions 8 Tools You Will Need 8 Preparing the Enclosure 8 Door Swing Reversal 9 Care and Cleaning 10 Helpfull Hints 10 How to Clean the Inside 10 How to Clean the Outside 10 Trouble Shooting 11 Before Your Call For Service 11 Warranty 12 1
Product Manual
Page 3
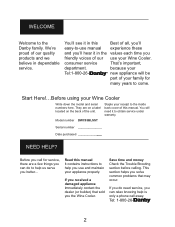
... back cover of the unit. Model number DWC93BLSST Serial number Date purchased NEED HELP? WELCOME Welcome to help us serve you better... They are a few things you can relax knowing help is only a phone call for many years to come. Staple your Wine Cooler. Start Here!...Before using your Tel:1-800-26- This section helps you solve common problems that sold you...
... back cover of the unit. Model number DWC93BLSST Serial number Date purchased NEED HELP? WELCOME Welcome to help us serve you better... They are a few things you can relax knowing help is only a phone call for many years to come. Staple your Wine Cooler. Start Here!...Before using your Tel:1-800-26- This section helps you solve common problems that sold you...
Product Manual
Page 4
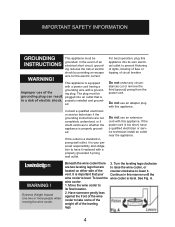
... nearest authorized service facility for household use , as described in this manual. • Do not store perishable food items such as (but not limited to children. Remove either the gasket, latches, lids, lock and/or doors from heated surfaces. • Do not immerse power cord, plug or the appliance itself in water. • Do not use this product near a sink...
... nearest authorized service facility for household use , as described in this manual. • Do not store perishable food items such as (but not limited to children. Remove either the gasket, latches, lids, lock and/or doors from heated surfaces. • Do not immerse power cord, plug or the appliance itself in water. • Do not use this product near a sink...
Product Manual
Page 5
... installed and ground- For best operation, plug this manner until the wine cooler is level. Do not use of the leveling legs. 4 If the power cord is level. The plug must be grounding plug can result plugged into its final location. 2. If the outlet is a standard 2prong wall outlet, it . A. wire for the electric current. Do not under any circum- Turn...
... installed and ground- For best operation, plug this manner until the wine cooler is level. Do not use of the leveling legs. 4 If the power cord is level. The plug must be grounding plug can result plugged into its final location. 2. If the outlet is a standard 2prong wall outlet, it . A. wire for the electric current. Do not under any circum- Turn...
Product Manual
Page 6
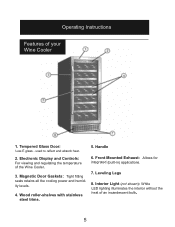
Operating Instructions Features of the Wine Cooler. 3. Electronic Display and Controls: For viewing and regulating the temperature of your Wine Cooler 1. Magnetic Door Gaskets: Tight fitting seals retains all the cooling power and humidity levels. 4. Handle 6. Interior Light (not shown): White LED lighting illuminates the interior without the heat of an incandescent bulb. 5 Wood roller-shelves with stainless steel trims. 5. Front Mounted Exhaust: Allows for integrated (built-in...
Operating Instructions Features of the Wine Cooler. 3. Electronic Display and Controls: For viewing and regulating the temperature of your Wine Cooler 1. Magnetic Door Gaskets: Tight fitting seals retains all the cooling power and humidity levels. 4. Handle 6. Interior Light (not shown): White LED lighting illuminates the interior without the heat of an incandescent bulb. 5 Wood roller-shelves with stainless steel trims. 5. Front Mounted Exhaust: Allows for integrated (built-in...
Product Manual
Page 7
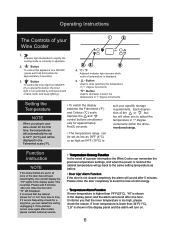
... than 34°F(1°C), "LO" is shown in the display panel and the alarm will turn on. 6 If the problem occurs once again after one hour. Operating Instructions The Controls of your specific storage requirements. Setting the Temperature NOTE When you plug in your wine cooler for approximately five(5) seconds. • The temperature range can be set as low as 39°F (4°C) or as high...
... than 34°F(1°C), "LO" is shown in the display panel and the alarm will turn on. 6 If the problem occurs once again after one hour. Operating Instructions The Controls of your specific storage requirements. Setting the Temperature NOTE When you plug in your wine cooler for approximately five(5) seconds. • The temperature range can be set as low as 39°F (4°C) or as high...
Product Manual
Page 8
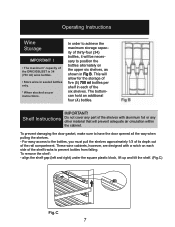
... adequate air circulation within the cabinet. Shelf Instructions IMPORTANT! To remove the shelf : - To prevent damaging the door gasket, make sure to the bottles, you must pull the shelves approximately 1/3 of its depth out of five (5) 750 ml bottles per instructions. align the shelf gap (left and right) under the square plastic block, lift up and tilt the shelf. (Fig.C) Fig.C 7 Operating Instructions Wine Storage IMPORTANT...
... adequate air circulation within the cabinet. Shelf Instructions IMPORTANT! To remove the shelf : - To prevent damaging the door gasket, make sure to the bottles, you must pull the shelves approximately 1/3 of its depth out of five (5) 750 ml bottles per instructions. align the shelf gap (left and right) under the square plastic block, lift up and tilt the shelf. (Fig.C) Fig.C 7 Operating Instructions Wine Storage IMPORTANT...
Product Manual
Page 9
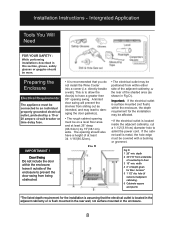
... rear of countertop to damaging the door gasket(s). • The rough cabinet opening should be covered with a bushing or grommet. leave it outside of the enclosure to admit the power cord. Fig D • The electrical outlet may lead to floor. 3 15" min. Access* 5 1 1/2" dia. Installation Instructions - IMPORTMANT ! Important˖ If the electrical outlet is surface mounted (not flush...
... rear of countertop to damaging the door gasket(s). • The rough cabinet opening should be covered with a bushing or grommet. leave it outside of the enclosure to admit the power cord. Fig D • The electrical outlet may lead to floor. 3 15" min. Access* 5 1 1/2" dia. Installation Instructions - IMPORTMANT ! Important˖ If the electrical outlet is surface mounted (not flush...
Product Manual
Page 10
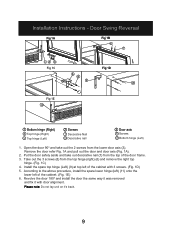
... the 3 screws (8) from the lower door axis (3). Please note: Do not lay unit on it with 3 screws. (Fig. 1D) 5ˊAccording to the above procedure, install the spare lower hinge (left) (11) onto the lower left of the cabinet. (Fig. 1E) 6ˊRevolve the door 180° and install the door the same way it was removed and fix it 's back. 9 Remove the...
... the 3 screws (8) from the lower door axis (3). Please note: Do not lay unit on it with 3 screws. (Fig. 1D) 5ˊAccording to the above procedure, install the spare lower hinge (left) (11) onto the lower left of the cabinet. (Fig. 1E) 6ˊRevolve the door 180° and install the door the same way it was removed and fix it 's back. 9 Remove the...
Product Manual
Page 11
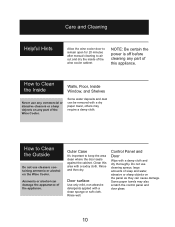
...the wine cooler door to remain open for 20 minutes after manual cleaning to air out and dry the inside of the wine cooler cabinet NOTE: Be certain the power is off before cleaning any part of this area with a dry paper towel, others may also scratch the control panel and door ... Control Panel and Door Wipe with a clean sponge or soft cloth. Rinse and then dry. Door surface Use only mild, non-abrasive detergents applied with a damp cloth and dry thoroughly. Some water deposits and dust can damage the appearance of soap and water, abrasive or sharp objects on the Wine Cooler...
...the wine cooler door to remain open for 20 minutes after manual cleaning to air out and dry the inside of the wine cooler cabinet NOTE: Be certain the power is off before cleaning any part of this area with a dry paper towel, others may also scratch the control panel and door ... Control Panel and Door Wipe with a clean sponge or soft cloth. Rinse and then dry. Door surface Use only mild, non-abrasive detergents applied with a damp cloth and dry thoroughly. Some water deposits and dust can damage the appearance of soap and water, abrasive or sharp objects on the Wine Cooler...
Product Manual
Page 12
... into wall outlet Replace fuse or reset circuit breaker Unplug the Wine Cooler, wait a few seconds and then plug it back in the home Door not shut properly or opened excessively Ensure that the door is fully closed and that the gasket is minor and a service call an authorized service depot or Danby's Toll Free Number 1-800-263-2629. Open the door only as needed...
... into wall outlet Replace fuse or reset circuit breaker Unplug the Wine Cooler, wait a few seconds and then plug it back in the home Door not shut properly or opened excessively Ensure that the door is fully closed and that the gasket is minor and a service call an authorized service depot or Danby's Toll Free Number 1-800-263-2629. Open the door only as needed...
Product Manual
Page 13
... the service location are warranted for outdoor application). If the appliance is non-transferable. In the event warranty service is used under the normal operating conditions intended by this document to and from purchase date, with no charge to the ORIGINAL purchaser. Transportation charges to our AUTHORIZED SERVICE DEPOT. Proof of Danby, and is not installed in a domestic residence). 6) Fire, water damage...
... the service location are warranted for outdoor application). If the appliance is non-transferable. In the event warranty service is used under the normal operating conditions intended by this document to and from purchase date, with no charge to the ORIGINAL purchaser. Transportation charges to our AUTHORIZED SERVICE DEPOT. Proof of Danby, and is not installed in a domestic residence). 6) Fire, water damage...

Product Manual
Page 26
...;ce requise Printed in your nearest service depot. Danby (1-800-263-2629) pour localiser le dépositaire de votre région Wine Cooler The model number can be found on the serial plate located on the back panel of the service depot nearest you visit your area. Model • Modèle DWC93BLSST For service, contact your nearest service depot or call the TOLL FREE NUMBER.
...;ce requise Printed in your nearest service depot. Danby (1-800-263-2629) pour localiser le dépositaire de votre région Wine Cooler The model number can be found on the serial plate located on the back panel of the service depot nearest you visit your area. Model • Modèle DWC93BLSST For service, contact your nearest service depot or call the TOLL FREE NUMBER.

