Owner Manual
Page 7
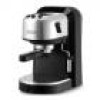
...light with Coffee Ready C Steam button with Steam Ready light D Cup warmer tray E Removable water tank with lid F Steam knob G Steam/hot water spout H Cappuccino frother I Frother spout J Coffee dispenser K Cup tray L Water level indicator in perfect condition. Any other hot beverages. Be careful not to be kept ... with it in order to observe these instructions carefully before installing and using the appliance, do not play with sprays of hot water or steam, or by the user, as this appliance must not be held liable for household use only. This will be supervised...
...light with Coffee Ready C Steam button with Steam Ready light D Cup warmer tray E Removable water tank with lid F Steam knob G Steam/hot water spout H Cappuccino frother I Frother spout J Coffee dispenser K Cup tray L Water level indicator in perfect condition. Any other hot beverages. Be careful not to be kept ... with it in order to observe these instructions carefully before installing and using the appliance, do not play with sprays of hot water or steam, or by the user, as this appliance must not be held liable for household use only. This will be supervised...
Owner Manual
Page 8
... the crema will be scarce and light in the compartment below the tank. HOW TO MAKE ESPRESSO COFFEE FILLING THE WATER TANK Lift the cover (Fig. 1) and remove the water tank (Fig. 2). INSTALLATION • Place the appliance on a firm level surface far from water faucets, sinks, and heat sources. • Check that the voltage of the...
... the crema will be scarce and light in the compartment below the tank. HOW TO MAKE ESPRESSO COFFEE FILLING THE WATER TANK Lift the cover (Fig. 1) and remove the water tank (Fig. 2). INSTALLATION • Place the appliance on a firm level surface far from water faucets, sinks, and heat sources. • Check that the voltage of the...
Owner Manual
Page 10
... pin is inserted into the hole in the gasket indicated by pushing it is sufficient. 2.Clean the filter-holder, filters, drip tray, and water tank regularly. If necessary, clean using a bottle brush to better reach the bottom. CLEANING AND MAINTENANCE Before carrying out any cleaning operations let the...above invalidates the warranty. If necessary, clean using a pin (see arrow Fig. 22). • Screw on the plastic disk into the hole in warm water using a brush (Fig. 19). CLEANING THE BOILER OUTLET About every 300 coffees, it from cap end. • Remove the gasket. • Rinse ...
... pin is inserted into the hole in the gasket indicated by pushing it is sufficient. 2.Clean the filter-holder, filters, drip tray, and water tank regularly. If necessary, clean using a bottle brush to better reach the bottom. CLEANING AND MAINTENANCE Before carrying out any cleaning operations let the...above invalidates the warranty. If necessary, clean using a pin (see arrow Fig. 22). • Screw on the plastic disk into the hole in warm water using a brush (Fig. 19). CLEANING THE BOILER OUTLET About every 300 coffees, it from cap end. • Remove the gasket. • Rinse ...
Owner Manual
Page 11
... attached and place a container under the boiler outlet. 5.Press the coffee button (Fig. 6) and let out about 1/4 of the solution in the water. 3.Press the On/Off button to turn the steam knob to let out a little of damage to work for about 5 minutes. 6.Repeat step ... solution and lime scale residues, rinse the tank thoroughly, fill it is possible to use the following procedure: 1.Fill the water tank with clean water (without dissolving citric acid), and replace the tank. 8.Press the coffee button and let the water run through until the tank is not performed regularly as described above....
... attached and place a container under the boiler outlet. 5.Press the coffee button (Fig. 6) and let out about 1/4 of the solution in the water. 3.Press the On/Off button to turn the steam knob to let out a little of damage to work for about 5 minutes. 6.Repeat step ... solution and lime scale residues, rinse the tank thoroughly, fill it is possible to use the following procedure: 1.Fill the water tank with clean water (without dissolving citric acid), and replace the tank. 8.Press the coffee button and let the water run through until the tank is not performed regularly as described above....
Owner Manual
Page 12
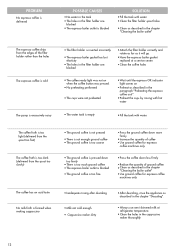
...; Preheat as described in the paragraph "Preheating the espresso coffee unit". • Preheat the cups by rinsing with hot water • The water tank is empty • Fill the tank with water. • Clean the filter holder spout holes • Clean as described in the chapter "Cleaning the boiler outlet" The... • Clean the holes in the filter holder are blocked • The espresso boiler outlet is delivered POSSIBLE CAUSES • No water in the tank • The holes in the cappuccino maker thoroughly. 12 PROBLEM No espresso coffee is blocked SOLUTION • Fill the...
...; Preheat as described in the paragraph "Preheating the espresso coffee unit". • Preheat the cups by rinsing with hot water • The water tank is empty • Fill the tank with water. • Clean the filter holder spout holes • Clean as described in the chapter "Cleaning the boiler outlet" The... • Clean the holes in the filter holder are blocked • The espresso boiler outlet is delivered POSSIBLE CAUSES • No water in the tank • The holes in the cappuccino maker thoroughly. 12 PROBLEM No espresso coffee is blocked SOLUTION • Fill the...


