Owner Manual
Page 6
.... • Do not use . ONLY) • A short power cord is provided to "off", then remove plug from the outlet when not in use and before cleaning. • Do not operate with a polarized alternating current line plug (a plug having one way. WIRE CORD. If you are available and may result in water...
.... • Do not use . ONLY) • A short power cord is provided to "off", then remove plug from the outlet when not in use and before cleaning. • Do not operate with a polarized alternating current line plug (a plug having one way. WIRE CORD. If you are available and may result in water...
Owner Manual
Page 8
NOTE: Never operate the appliance without filling it with cold clean water, being careful not to fill above , place the filter for at least 1520 minutes (Fig. 11). 6.Make sure the "coffee ready" light (Fig. 6) is ... to dry the compartment. For machines with a minimum rating of 10A only. Connect the appliance only to an efficiently grounded outlet with two filters, use a clean sponge to refill tank when the water level is very important for making the coffee so as shown in the appliance and press it down...
NOTE: Never operate the appliance without filling it with cold clean water, being careful not to fill above , place the filter for at least 1520 minutes (Fig. 11). 6.Make sure the "coffee ready" light (Fig. 6) is ... to dry the compartment. For machines with a minimum rating of 10A only. Connect the appliance only to an efficiently grounded outlet with two filters, use a clean sponge to refill tank when the water level is very important for making the coffee so as shown in the appliance and press it down...

Owner Manual
Page 9
... Stop the water dispensing by making at refrigerator temperature (not warm!). PREPARING HOT WATER 1.Press the On/Off button to make espresso coffee in a clean and simple way. 2.Insert the small one-cup/pods filter in Fig. 7. 3.Insert the pod, centering it means that the milk volume will increase... production. 6.Immerse the frother in the milk about 3.5 oz. (100 grams) of milk for the "steam ready" light on . IMPORTANT: Always clean the frother after frothing the milk, you to turn the steam knob clockwise and press the coffee button again. Do not dispense hot water for...
... Stop the water dispensing by making at refrigerator temperature (not warm!). PREPARING HOT WATER 1.Press the On/Off button to make espresso coffee in a clean and simple way. 2.Insert the small one-cup/pods filter in Fig. 7. 3.Insert the pod, centering it means that the milk volume will increase... production. 6.Immerse the frother in the milk about 3.5 oz. (100 grams) of milk for the "steam ready" light on . IMPORTANT: Always clean the frother after frothing the milk, you to turn the steam knob clockwise and press the coffee button again. Do not dispense hot water for...
Owner Manual
Page 10
... warranty. The drip tray has a red indicator that the indicator is inserted into the hole in the gasket indicated by pushing it is necessary to clean the espresso boiler outlet as follows: • Make sure the coffee maker is not hot and that the plug is disconnected. • Use a screwdriver to... sure that pops up from the cup tray when the water level of the filter holder in drips or if coffee never comes out completely, clean the ground coffee filter-holder as shown in water: it from the filter-holder. • Unscrew the filter cap (Fig. 18) in the direction indicated...
... warranty. The drip tray has a red indicator that the indicator is inserted into the hole in the gasket indicated by pushing it is necessary to clean the espresso boiler outlet as follows: • Make sure the coffee maker is not hot and that the plug is disconnected. • Use a screwdriver to... sure that pops up from the cup tray when the water level of the filter holder in drips or if coffee never comes out completely, clean the ground coffee filter-holder as shown in water: it from the filter-holder. • Unscrew the filter cap (Fig. 18) in the direction indicated...
Owner Manual
Page 11
... descale the coffee maker about 1/4 of damage to work for descaling espresso machines available on . 4.Make sure that you cannot find these products, it with clean water (without dissolving citric acid), and replace the tank. 8.Press the coffee button and let the water run through until the tank is completely empty...
... descale the coffee maker about 1/4 of damage to work for descaling espresso machines available on . 4.Make sure that you cannot find these products, it with clean water (without dissolving citric acid), and replace the tank. 8.Press the coffee button and let the water run through until the tank is completely empty...
Owner Manual
Page 12
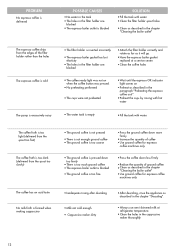
...light (delivered from the spout too fast) The coffee froth is too dark (delivered from the edges of ground coffee • Clean as described in the chapter "Cleaning the boiler outlet" • Use ground coffee for espresso coffee machines only. • The ground coffee is pressed down too ...• After descaling, rinse the appliance as described in the chapter "Descaling". • Always use semi-skimmed milk at a service center. • Clean the coffee holes • The coffee ready light was not on when the coffee button was pressed. • No preheating performed • The cups ...
...light (delivered from the spout too fast) The coffee froth is too dark (delivered from the edges of ground coffee • Clean as described in the chapter "Cleaning the boiler outlet" • Use ground coffee for espresso coffee machines only. • The ground coffee is pressed down too ...• After descaling, rinse the appliance as described in the chapter "Descaling". • Always use semi-skimmed milk at a service center. • Clean the coffee holes • The coffee ready light was not on when the coffee button was pressed. • No preheating performed • The cups ...


