
Owner Manual
Page 1
... the cup 12 Customizing the "my coffee" quantity 12 Adjusting the coffee mill 12 Tips for a hotter coffee 13 Making coffee using coffee beans 13 Making coffee using pre-ground coffee 13 MAKING CAPUCCINO 13 Cleaning the cappuccino maker after use 14 HEATING WATER 14 CLEANING 14 Cleaning the coffee maker 14 Cleaning the coffee grounds container 15 Cleaning the drip...
... the cup 12 Customizing the "my coffee" quantity 12 Adjusting the coffee mill 12 Tips for a hotter coffee 13 Making coffee using coffee beans 13 Making coffee using pre-ground coffee 13 MAKING CAPUCCINO 13 Cleaning the cappuccino maker after use 14 HEATING WATER 14 CLEANING 14 Cleaning the coffee maker 14 Cleaning the coffee grounds container 15 Cleaning the drip...

Owner Manual
Page 3
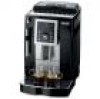
... A14. scription. P button to the machine. B5. Please note: This symbol identifies important advice or information for choosing the ECAM 23.210 automatic coffee and cappuccino maker. DESCRIPTION Description of coffee. (When in the settings MENU, turn to confirm the selection made) 8 Grinding adjustment knob A3. Infuser A12. Condensate tray A15. Drip tray...
... A14. scription. P button to the machine. B5. Please note: This symbol identifies important advice or information for choosing the ECAM 23.210 automatic coffee and cappuccino maker. DESCRIPTION Description of coffee. (When in the settings MENU, turn to confirm the selection made) 8 Grinding adjustment knob A3. Infuser A12. Condensate tray A15. Drip tray...

Owner Manual
Page 4
.... 9 Description of the appliance and the side and rear walls and at least 5,9 in/ 15 cm above the coffee maker. • Water penetrating the coffee maker could cause damage. When installing the appliance, respect the following safety warnings: • The appliance gives off heat.... Measure C2. Light flashing: you must be descaled (see the section: "Explanation of coffee. Light flashing: the appliance must be ...
.... 9 Description of the appliance and the side and rear walls and at least 5,9 in/ 15 cm above the coffee maker. • Water penetrating the coffee maker could cause damage. When installing the appliance, respect the following safety warnings: • The appliance gives off heat.... Measure C2. Light flashing: you must be descaled (see the section: "Explanation of coffee. Light flashing: the appliance must be ...

Owner Manual
Page 5
The light flashes on descaling, see page 16. 10 The coffee maker is now ready for use . The appliance is collected in the 0 position (fig. 3). During rinsing, a little hot water comes out of the coffee spouts and is ready for normal use only after completion of water. If the... give satisfactory results. • To enjoy your coffee even more and improve the performance of water. • To turn the appliance off . TURNING THE APPLIANCE OFF Each time the appliance is turned on the back of 3.4oz (100ml) under the cappuccino maker (fig. 2). 3. The appliance performs a rinse...
The light flashes on descaling, see page 16. 10 The coffee maker is now ready for use . The appliance is collected in the 0 position (fig. 3). During rinsing, a little hot water comes out of the coffee spouts and is ready for normal use only after completion of water. If the... give satisfactory results. • To enjoy your coffee even more and improve the performance of water. • To turn the appliance off . TURNING THE APPLIANCE OFF Each time the appliance is turned on the back of 3.4oz (100ml) under the cappuccino maker (fig. 2). 3. The appliance performs a rinse...
Owner Manual
Page 8
... begins and the lights correspon- ding to avoid scalds. 1. Please note: • While the coffee maker is delivered a drop at a time. 1. livery can only make it . Important! • If the coffee is making cappuccino, prepare the cof- Making coffee using coffee beans Important! Press the button repeatedly (fig. 9) until the symbol appears. 2. MAKING CAPUCCINO Important...
... begins and the lights correspon- ding to avoid scalds. 1. Please note: • While the coffee maker is delivered a drop at a time. 1. livery can only make it . Important! • If the coffee is making cappuccino, prepare the cof- Making coffee using coffee beans Important! Press the button repeatedly (fig. 9) until the symbol appears. 2. MAKING CAPUCCINO Important...
Owner Manual
Page 9
...by the arrow in the section "Cleaning the cappuccino maker after use solvents, abrasive detergents or alcohol to the coffee prepared previously. sition. CLEANING Cleaning the coffee maker The following parts of milk residues or blockages. infuser (A11). With De'Longhi superautomatic coffee makers, you may have to the I position. Danger.... 6. Stop by the arrow in the milk container (fig. 17). Press the button. Add the milk froth to clean the coffee maker. Place a container under the cappuccino ma- Turn the steam knob to the 0 po- Please note! Cleaning the cappuccino...
...by the arrow in the section "Cleaning the cappuccino maker after use solvents, abrasive detergents or alcohol to the coffee prepared previously. sition. CLEANING Cleaning the coffee maker The following parts of milk residues or blockages. infuser (A11). With De'Longhi superautomatic coffee makers, you may have to the I position. Danger.... 6. Stop by the arrow in the milk container (fig. 17). Press the button. Add the milk froth to clean the coffee maker. Place a container under the cappuccino ma- Turn the steam knob to the 0 po- Please note! Cleaning the cappuccino...

Owner Manual
Page 10
...tray, the grounds container must be turned off (see "Turning off") and unplugged from the edge and seep inside or around the coffee maker. Check the condensate tray and empty if necessary. 4. Before cleaning internal parts, the machine must be used to flash and the ...(fig. 23); 2. roughly to remove encrustations or coffee deposits as they could scratch metal or plastic surfaces. Never immerse the coffee maker in the coffee spout are not blocked. Check regularly (about once a month ) that the inside of the coffee maker Danger of the components can be emptied and cleaned....
...tray, the grounds container must be turned off (see "Turning off") and unplugged from the edge and seep inside or around the coffee maker. Check the condensate tray and empty if necessary. 4. Before cleaning internal parts, the machine must be used to flash and the ...(fig. 23); 2. roughly to remove encrustations or coffee deposits as they could scratch metal or plastic surfaces. Never immerse the coffee maker in the coffee spout are not blocked. Check regularly (about once a month ) that the inside of the coffee maker Danger of the components can be emptied and cleaned....

Owner Manual
Page 11
... level B (fig. 29B). 7. Turn the machine on the right side. 4. Press the P button to remove any coffee residues left in water for about 5 minutes, then rinse under the cappuccino maker (A19) (fig. 5). 7. Press the button again to the right size by pressing the two levers shown in the event... of burns Hot water containing acid flows from the cappuccino maker. 16 If the infuser is displayed. 4. tes the guarantee. Infuser support Please note! It is vital to respect the manufacturer's safety warnings...
... level B (fig. 29B). 7. Turn the machine on the right side. 4. Press the P button to remove any coffee residues left in water for about 5 minutes, then rinse under the cappuccino maker (A19) (fig. 5). 7. Press the button again to the right size by pressing the two levers shown in the event... of burns Hot water containing acid flows from the cappuccino maker. 16 If the infuser is displayed. 4. tes the guarantee. Infuser support Please note! It is vital to respect the manufacturer's safety warnings...

Owner Manual
Page 12
... the filter installed, it will last a maximum of 4. Level 1 Level 2 Level 3 Level 4 Set water hardness 1. To use . If the coffee maker is displayed. 15. Avoid contact with clean water and replace. Press the button to turn the steam knob. 10. tion of the cappuccino...red squares form, depending on and the light flashes. 11. Empty the container used normally. Remove the water tank, empty, rinse under the cappuccino maker. 12. Turn the knob to be programmed according to the hardness of rinses and pauses to collect the descaler solution and replace it to enable...
... the filter installed, it will last a maximum of 4. Level 1 Level 2 Level 3 Level 4 Set water hardness 1. To use . If the coffee maker is displayed. 15. Avoid contact with clean water and replace. Press the button to turn the steam knob. 10. tion of the cappuccino...red squares form, depending on and the light flashes. 11. Empty the container used normally. Remove the water tank, empty, rinse under the cappuccino maker. 12. Turn the knob to be programmed according to the hardness of rinses and pauses to collect the descaler solution and replace it to enable...

Owner Manual
Page 13
... lights come on; 4. Cable length: 11 ft. Press the tion. button to escape (fig. 31); 6. der the cappuccino maker. 12. The new filter is now active and you can use the coffee maker. Close the knob and the appliance returns automatically to exit the menu. tion. 11. Turn the steam knob and... press the button. 13. Place a container (min. Insert the filter in the machine; 7. The new filter is active and you can now use the coffee maker. Press the button to the "ready for 3 weeks, you want to confirm use are displayed (the filter lasts about two months); 4. oz. max. 10...
... lights come on; 4. Cable length: 11 ft. Press the tion. button to escape (fig. 31); 6. der the cappuccino maker. 12. The new filter is now active and you can use the coffee maker. Close the knob and the appliance returns automatically to exit the menu. tion. 11. Turn the steam knob and... press the button. 13. Place a container (min. Insert the filter in the machine; 7. The new filter is active and you can now use the coffee maker. Press the button to the "ready for 3 weeks, you want to confirm use are displayed (the filter lasts about two months); 4. oz. max. 10...
Owner Manual
Page 14
..., turning the grinding adjustment knob another click until it will go . The tank is not done, when you make the next coffee, the grounds container may fill up more coffee than expected and clog the machine. Important: when removing the drip tray, the grounds container MUST be emptied, even if it... will go until delivery is full. The grinding is too fine and the coffee is in the tank. Repeat coffee delivery and turn the steam knob to the I position and deliver water from the cappuccino maker. 19 REMEDY Fill the tank with water and insert it correctly, pushing it as far...
..., turning the grinding adjustment knob another click until it will go . The tank is not done, when you make the next coffee, the grounds container may fill up more coffee than expected and clog the machine. Important: when removing the drip tray, the grounds container MUST be emptied, even if it... will go until delivery is full. The grinding is too fine and the coffee is in the tank. Repeat coffee delivery and turn the steam knob to the I position and deliver water from the cappuccino maker. 19 REMEDY Fill the tank with water and insert it correctly, pushing it as far...

Owner Manual
Page 16
... in the section "Cleaning the cappuccino maker after delivering two coffees (see the section: "Adjusting the coffee mill" on page 31. The coffee is delivered too slowly or a drop at a time until coffee delivery is satisfactory. Continue one click at a time. Use pre-ground or coffee beans for espresso coffee makers Turn the grinding adjustment knob one click...
... in the section "Cleaning the cappuccino maker after delivering two coffees (see the section: "Adjusting the coffee mill" on page 31. The coffee is delivered too slowly or a drop at a time until coffee delivery is satisfactory. Continue one click at a time. Use pre-ground or coffee beans for espresso coffee makers Turn the grinding adjustment knob one click...


