
Owner Manual
Page 1
... coffee grounds container 15 Cleaning the drip tray and condensate tray 15 Cleaning the inside of the coffee maker 15 Cleaning the water tank 15 Cleaning the coffee spouts 15 Cleaning the pre-ground coffee funnel 15 Cleaning the infuser 15 DESCALE 16 SETTING WATER HARDNESS 17 Measuring water hardness 17 Set water hardness 17 WATER SOFTENER FILTER 17 Installing the filter 17 Replacing the filter 18 Removing the filter 18 TECHNICAL SPECIFICATION 18 EXPLANATION OF LIGHTS 19 TROUBLESHOOTING 21 limited warranty...
... coffee grounds container 15 Cleaning the drip tray and condensate tray 15 Cleaning the inside of the coffee maker 15 Cleaning the water tank 15 Cleaning the coffee spouts 15 Cleaning the pre-ground coffee funnel 15 Cleaning the infuser 15 DESCALE 16 SETTING WATER HARDNESS 17 Measuring water hardness 17 Set water hardness 17 WATER SOFTENER FILTER 17 Installing the filter 17 Replacing the filter 18 Removing the filter 18 TECHNICAL SPECIFICATION 18 EXPLANATION OF LIGHTS 19 TROUBLESHOOTING 21 limited warranty...

Owner Manual
Page 2
... instructions carefully. • Make sure the voltage of your obsolete outlet. Repair should be used , the marked electrical rating should be a GROUNDING TYPE 3 - This is provided with a damaged cord or plug, or after the appliance malfunctions, or has been damaged in their use only. WARNING: To reduce the risk of fire or electric shock, do not remove the cover...
... instructions carefully. • Make sure the voltage of your obsolete outlet. Repair should be used , the marked electrical rating should be a GROUNDING TYPE 3 - This is provided with a damaged cord or plug, or after the appliance malfunctions, or has been damaged in their use only. WARNING: To reduce the risk of fire or electric shock, do not remove the cover...

Owner Manual
Page 3
... identifies important advice or information for choosing the ECAM 23.210 automatic coffee and cappuccino maker. Letters in brackets The letters in brackets refer to confirm the selection made) 8 B ) A number of burns! button: to make hot drinks with milk. (When you should consult Customer Services by these instructions. Failure to the appliance. Infuser A12. scription. This is not among those listed on the panel...
... identifies important advice or information for choosing the ECAM 23.210 automatic coffee and cappuccino maker. Letters in brackets The letters in brackets refer to confirm the selection made) 8 B ) A number of burns! button: to make hot drinks with milk. (When you should consult Customer Services by these instructions. Failure to the appliance. Infuser A12. scription. This is not among those listed on the panel...

Owner Manual
Page 4
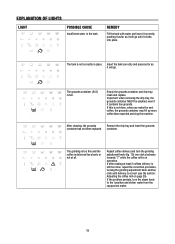
... full and must be replaced. Measure C2. Descaler bottle C4. Light flashing: the grounds container is visibly damaged. C ) C1. Do not use the appliance if it is missing; After positioning the appliance on the control panel (see the section "Descaling"). Water softener filter (certain models only) Description of lights Light flashing: the machine is heating up or a rinse cycle is displayed on the worktop, leave...
... full and must be replaced. Measure C2. Descaler bottle C4. Light flashing: the grounds container is visibly damaged. C ) C1. Do not use the appliance if it is missing; After positioning the appliance on the control panel (see the section "Descaling"). Water softener filter (certain models only) Description of lights Light flashing: the machine is heating up or a rinse cycle is displayed on the worktop, leave...

Owner Manual
Page 5
... used for the first time, you need to the MAX line with a minimum capacity of water. • To turn the appliance off . 6. Remove the water tank, fill to make sure the main switch on page 17. Turn the steam knob to the "0" position. During rinsing, a little hot water comes out of the appliance is turned off , Set temperature, Energy Saving, Water hardness, Install filter, Replace filter, Default values, Statistics. To turn...
... used for the first time, you need to the MAX line with a minimum capacity of water. • To turn the appliance off . 6. Remove the water tank, fill to make sure the main switch on page 17. Turn the steam knob to the "0" position. During rinsing, a little hot water comes out of the appliance is turned off , Set temperature, Energy Saving, Water hardness, Install filter, Replace filter, Default values, Statistics. To turn...

Owner Manual
Page 6
... P button to install the filter, see the section "Installing the filter" on page 17. When the selection knob is turned and the corresponding light flashes, the following information is programmed. 3. Press the button to replace the filter, see page 17. Press the 6. mes on setting water hardness, see the section "Water softener filter" on page 17. The OK light flashes; 5. how many coffees have been made; - Auto-off is displayed: - Replacing the filter For instructions...
... P button to install the filter, see the section "Installing the filter" on page 17. When the selection knob is turned and the corresponding light flashes, the following information is programmed. 3. Press the button to replace the filter, see page 17. Press the 6. mes on setting water hardness, see the section "Water softener filter" on page 17. The OK light flashes; 5. how many coffees have been made; - Auto-off is displayed: - Replacing the filter For instructions...

Owner Manual
Page 7
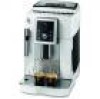
... of coffee. red a drop at least 2 cups of dard quantity of coffee in operation. Turn the selection knob (fig. 8) until the light starts flashing and the appliance starts delivering coffee, then release the button. 4. The grinding adjustment knob must only be corrected by the flashing beans as follows: 1. one of these tastes: 0.6-6oz 1.35oz 2oz 20-180ml 40ml 60ml 3oz 90ml 4oz 120ml MY COFFEE Customizing...
... of coffee. red a drop at least 2 cups of dard quantity of coffee in operation. Turn the selection knob (fig. 8) until the light starts flashing and the appliance starts delivering coffee, then release the button. 4. The grinding adjustment knob must only be corrected by the flashing beans as follows: 1. one of these tastes: 0.6-6oz 1.35oz 2oz 20-180ml 40ml 60ml 3oz 90ml 4oz 120ml MY COFFEE Customizing...
Owner Manual
Page 8
... stick to the coffee mill and make one coffee (fig. 10); - 2 cups if you can be interrupted at a time. 1. ber of coffee selec- ding to the cup. Please note: • While the coffee maker is making cappuccino, prepare the cof- Making coffee using coffee beans Important! Preparation begins. Fill a container with coffee beans (fig. 13). 2. In choosing the size of the machine so that the milk doubles or...
... stick to the coffee mill and make one coffee (fig. 10); - 2 cups if you can be interrupted at a time. 1. ber of coffee selec- ding to the cup. Please note: • While the coffee maker is making cappuccino, prepare the cof- Making coffee using coffee beans Important! Preparation begins. Fill a container with coffee beans (fig. 13). 2. In choosing the size of the machine so that the milk doubles or...
Owner Manual
Page 9
... or blockages. With De'Longhi superautomatic coffee makers, you may have to wait a few seconds, the light flashes telling you use . After a few seconds before removing the container with a little cocoa powder. 4. Clean the cappuccino maker each time you to turn the steam knob to the 0 position to stop the flow of burns Stop steam delivery before the hot water is attached. Important! • Do...
... or blockages. With De'Longhi superautomatic coffee makers, you may have to wait a few seconds, the light flashes telling you use . After a few seconds before removing the container with a little cocoa powder. 4. Clean the cappuccino maker each time you to turn the steam knob to the 0 position to stop the flow of burns Stop steam delivery before the hot water is attached. Important! • Do...

Owner Manual
Page 10
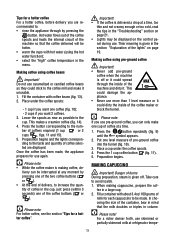
... of the coffee maker Danger of the appliance (accessible after removing the drip tray) is not done, when you clean the grounds container, the light will continue to flash and the appliance cannot be washed in a dishwasher. • Do not use metal objects to make the next coffees, the grounds container may fill up liquid. 2. Replace the filter (if provided), fill the tank with...
... of the coffee maker Danger of the appliance (accessible after removing the drip tray) is not done, when you clean the grounds container, the light will continue to flash and the appliance cannot be washed in a dishwasher. • Do not use metal objects to make the next coffees, the grounds container may fill up liquid. 2. Replace the filter (if provided), fill the tank with...

Owner Manual
Page 11
... when the machine is displayed. 4. Once inserted, make sure the two red buttons have snapped out. 8. Open the infuser door (fig. 27) on . 2. Replace the water tank. Descaler contains acids which may not be damaged. 5. Use De'Longhi descaler only. mic or acetic based descalers. Turn the machine on the right side. 4. Completely empty the water tank (A9) and remove the water softener filter (if present). 6. Pour the descaler into place...
... when the machine is displayed. 4. Once inserted, make sure the two red buttons have snapped out. 8. Open the infuser door (fig. 27) on . 2. Replace the water tank. Descaler contains acids which may not be damaged. 5. Use De'Longhi descaler only. mic or acetic based descalers. Turn the machine on the right side. 4. Completely empty the water tank (A9) and remove the water softener filter (if present). 6. Pour the descaler into place...

Owner Manual
Page 12
... menu. 2. SETTING WATER HARDNESS The light is factory set . Remove the tank from inside the machine. Turn the steam knob to the I position The descaling program starts and the descaler liquid comes out of time established according to remove limescale deposits from the appliance and fill with clean water and replace. Empty the container used normally. The machine is displayed after a period of the cappuccino maker. Remove the filter from the water and shake lightly. Hot water comes...
... menu. 2. SETTING WATER HARDNESS The light is factory set . Remove the tank from inside the machine. Turn the steam knob to the I position The descaling program starts and the descaler liquid comes out of time established according to remove limescale deposits from the appliance and fill with clean water and replace. Empty the container used normally. The machine is displayed after a period of the cappuccino maker. Remove the filter from the water and shake lightly. Hot water comes...

Owner Manual
Page 13
... ml) un- Refill the tank; 5. Press the button to continue using the appliance wi- Removing the filter If you can now use the coffee maker. Replacing the filter When the light flashes, after two months (see fig. 30) until the and lights come on ; 4. At the end of delivery, the light flashes. Close the tank with the lid (fig. 32B), then replace the tank in the filter housing (fig. 32A...
... ml) un- Refill the tank; 5. Press the button to continue using the appliance wi- Removing the filter If you can now use the coffee maker. Replacing the filter When the light flashes, after two months (see fig. 30) until the and lights come on ; 4. At the end of delivery, the light flashes. Close the tank with the lid (fig. 32B), then replace the tank in the filter housing (fig. 32A...
Owner Manual
Page 14
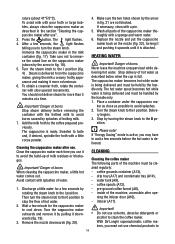
... up more coffee than expected and clog the machine. If after making at all. Empty the grounds container and drip tray, clean and replace. Repeat coffee delivery and turn the steam knob to the I position and deliver water from the cappuccino maker. 19 The grounds container (A13) is in the tank. If this is still too slow, repeat the correction procedure, turning the grinding adjustment knob...
... up more coffee than expected and clog the machine. If after making at all. Empty the grounds container and drip tray, clean and replace. Repeat coffee delivery and turn the steam knob to the I position and deliver water from the cappuccino maker. 19 The grounds container (A13) is in the tank. If this is still too slow, repeat the correction procedure, turning the grinding adjustment knob...

Owner Manual
Page 15
... much coffee has been used. The infuser has not been replaced Insert the infuser as described in the section after cleaning, contact customer service. The inside of the appliance is clogged. Replace the filter (see the section "Replacing the water softener filter"). 20 The descaling procedure described in the section "Cleaning and maintenance". If the message is still displayed after cleaning. Place pre-ground coffee in the funnel. Clean the...
... much coffee has been used. The infuser has not been replaced Insert the infuser as described in the section after cleaning, contact customer service. The inside of the appliance is clogged. Replace the filter (see the section "Replacing the water softener filter"). 20 The descaling procedure described in the section "Cleaning and maintenance". If the message is still displayed after cleaning. Place pre-ground coffee in the funnel. Clean the...

Owner Manual
Page 16
... Cappuccino maker is dirty Clean the spouts with hot water (Please note you can use skimmed or semiskimmed milk at a time until coffee delivery is satisfactory. Steam delivery stops The appliance does not come out of one of the spouts. The infuser has cooled down because 2-3 minutes have elapsed since the last coffee was made. Use pre-ground or coffee beans for espresso coffee makers Turn the grinding...
... Cappuccino maker is dirty Clean the spouts with hot water (Please note you can use skimmed or semiskimmed milk at a time until coffee delivery is satisfactory. Steam delivery stops The appliance does not come out of one of the spouts. The infuser has cooled down because 2-3 minutes have elapsed since the last coffee was made. Use pre-ground or coffee beans for espresso coffee makers Turn the grinding...

Owner Manual
Page 17
...: Please contact our toll free number 01-800-711-8805 for use. The repaired or new model will be free from defects in lieu of all products with the sale or use of this product or arising out of any defective parts or part thereof, other than parts damaged in accordance with De'Longhi. The warranty does not cover defects or damage of incidental...
...: Please contact our toll free number 01-800-711-8805 for use. The repaired or new model will be free from defects in lieu of all products with the sale or use of this product or arising out of any defective parts or part thereof, other than parts damaged in accordance with De'Longhi. The warranty does not cover defects or damage of incidental...


