
Owner Manual
Page 1
... THE APPLIANCE ON 10 TURNING THE APPLIANCE OFF 10 MENU SETTINGS 10 Descale 10 Auto-off 11 Setting the temperature 11 Energy Saving 11 Setting water hardness 11 Install filter 11 Replacing the filter 11 Default values (reset 11 Statistics function 11 MAKING COFFEE 12 Selecting the coffee taste 12 Selecting the quantity of coffee in the cup...
... THE APPLIANCE ON 10 TURNING THE APPLIANCE OFF 10 MENU SETTINGS 10 Descale 10 Auto-off 11 Setting the temperature 11 Energy Saving 11 Setting water hardness 11 Install filter 11 Replacing the filter 11 Default values (reset 11 Statistics function 11 MAKING COFFEE 12 Selecting the coffee taste 12 Selecting the quantity of coffee in the cup...

Owner Manual
Page 6
...; 5. Press the button to activate, or to enter the menu; 2. Please note! mes on ; 3. Statistics function This displays statistics relating to enter the menu; 2. vered; 11 The OK light flashes. 4. Turn the selection knob (fig. 8) until the light comes on in compliance with current European regulations. 1. Turn the selection knob until...
...; 5. Press the button to activate, or to enter the menu; 2. Please note! mes on ; 3. Statistics function This displays statistics relating to enter the menu; 2. vered; 11 The OK light flashes. 4. Turn the selection knob (fig. 8) until the light comes on in compliance with current European regulations. 1. Turn the selection knob until...

Owner Manual
Page 7
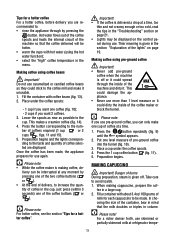
...and should not require adjusting initially. To select the quantity of coffee in the cup reaches the required level, press the 1 cup button (fig. 11) again. Enter the menu and select the light. MAKING COFFEE Selecting the coffee taste The appliance is set by adjusting the grinding adjustment knob (fig... only be evi- As soon as the coffee in the cup has now been programmed. x1 x3 x7 6. Press the 1 cup button (fig. 11) until the light corresponding to automatically deliver 1oz/ 30ml of these tastes: 0.6-6oz 1.35oz 2oz 20-180ml 40ml 60ml 3oz 90ml 4oz 120ml MY COFFEE...
...and should not require adjusting initially. To select the quantity of coffee in the cup reaches the required level, press the 1 cup button (fig. 11) again. Enter the menu and select the light. MAKING COFFEE Selecting the coffee taste The appliance is set by adjusting the grinding adjustment knob (fig... only be evi- As soon as the coffee in the cup has now been programmed. x1 x3 x7 6. Press the 1 cup button (fig. 11) until the light corresponding to automatically deliver 1oz/ 30ml of these tastes: 0.6-6oz 1.35oz 2oz 20-180ml 40ml 60ml 3oz 90ml 4oz 120ml MY COFFEE...
Owner Manual
Page 8
... makes a creamier coffee (fig. 14). 4. Press the button repeatedly (fig. 9) until the symbol appears. 2. Press the 1 cup coffee button (fig. 11). 5. When making coffee, de- fee in the "Troubleshooting" section on the control panel during use skimmed or partially skimmed milk at a time, too thin ... will be interrupted at a time. 1. Fill the container with about 3.4oz/ 100 grams of coffees required (1 cup or 2 cups , figs. 11 and 15). 5. ding to the num- Please note: • While the coffee maker is delivered a drop at refrigerator tempe- 13 Take care ...
... makes a creamier coffee (fig. 14). 4. Press the button repeatedly (fig. 9) until the symbol appears. 2. Press the 1 cup coffee button (fig. 11). 5. When making coffee, de- fee in the "Troubleshooting" section on the control panel during use skimmed or partially skimmed milk at a time, too thin ... will be interrupted at a time. 1. Fill the container with about 3.4oz/ 100 grams of coffees required (1 cup or 2 cups , figs. 11 and 15). 5. ding to the num- Please note: • While the coffee maker is delivered a drop at refrigerator tempe- 13 Take care ...

Owner Manual
Page 12
..., fill with clean water and replace. Remove the paper from the packaging. 2. After about a minute, 1, 2, 3, or 4 red squares form, depending on and the light flashes. 11. Press the button to confirm introduc- The machine is ready for a hardness value of 4. Remove the filter from the water and shake lightly. Press the...
..., fill with clean water and replace. Remove the paper from the packaging. 2. After about a minute, 1, 2, 3, or 4 red squares form, depending on and the light flashes. 11. Press the button to confirm introduc- The machine is ready for a hardness value of 4. Remove the filter from the water and shake lightly. Press the...

Owner Manual
Page 13
... of its presence. 7. Press the P button to enter the menu; 9. Press the button. Press the button to confirm the selec- Cable length: 11 ft. Weight: 20,22 lb. Press the button to confirm use the coffee maker. ton. 13. At the end of delivery, the light flashes.... the steam knob and press the button. 13. Turn the selection knob (fig. 8) until the and lights come on . 9. max. max. 10. tion. 11. Place a container (min. Place the filter in the water tank and immerse it completely, sloping it will go . Place a container (min. The OK light flashes...
... of its presence. 7. Press the P button to enter the menu; 9. Press the button. Press the button to confirm the selec- Cable length: 11 ft. Weight: 20,22 lb. Press the button to confirm use the coffee maker. ton. 13. At the end of delivery, the light flashes.... the steam knob and press the button. 13. Turn the selection knob (fig. 8) until the and lights come on . 9. max. max. 10. tion. 11. Place a container (min. Place the filter in the water tank and immerse it completely, sloping it will go . Place a container (min. The OK light flashes...