
Owner Manual
Page 6
... 11 Setting the clock 11 Setting the language 11 Setting automatic start up time 11 Descaling 12 Setting the temperature 12 Auto-Off 12 Setting water hardness 12 Resetting factory default values (reset) ...12 Installing the filter 12 Replacing the filter ("Reset water filter") ..12 Removing the filter 13 Statistics function 13 MAKING COFFEE 13 Selecting the coffee taste 13 Selecting the quantity of coffee in the cup 13 Customizing the "MY COFFEE" quantity ...13 Preparing coffee using coffee beans ........14 Making coffee using pre-ground coffee...
... 11 Setting the clock 11 Setting the language 11 Setting automatic start up time 11 Descaling 12 Setting the temperature 12 Auto-Off 12 Setting water hardness 12 Resetting factory default values (reset) ...12 Installing the filter 12 Replacing the filter ("Reset water filter") ..12 Removing the filter 13 Statistics function 13 MAKING COFFEE 13 Selecting the coffee taste 13 Selecting the quantity of coffee in the cup 13 Customizing the "MY COFFEE" quantity ...13 Preparing coffee using coffee beans ........14 Making coffee using pre-ground coffee...

Owner Manual
Page 7
... user serv- The longer cord should be at least as great as the electrical rating of fire or electric shock, do not immerse cord, plug or appliance in their use . Your product is provided to be done by improper, incorrect, or irresponsible use . - The manufacturer declines all instructions carefully. • Make sure the voltage of the polarized plug. 7 Repair...
... user serv- The longer cord should be at least as great as the electrical rating of fire or electric shock, do not immerse cord, plug or appliance in their use . Your product is provided to be done by improper, incorrect, or irresponsible use . - The manufacturer declines all instructions carefully. • Make sure the voltage of the polarized plug. 7 Repair...

Owner Manual
Page 8
... identifies important advice or information for choosing the ESAM 5500 automatic coffee maker. If this does not resolve the problem or you require further information, you enjoy using your country is not among those listed on the sheet, call the number given in the section "Displayed messages" on page 21 and "Troubleshooting" on page 3. Troubleshooting and repairs In the event of problems, first try and...
... identifies important advice or information for choosing the ESAM 5500 automatic coffee maker. If this does not resolve the problem or you require further information, you enjoy using your country is not among those listed on the sheet, call the number given in the section "Displayed messages" on page 21 and "Troubleshooting" on page 3. Troubleshooting and repairs In the event of problems, first try and...

Owner Manual
Page 9
...: turn to heat the infuser. (Button is empty and must be filled with fresh water. Rinse button : performs a brief rinse to select). The water tank is also used as "ESC" for Latte. The Auto-Start function is indicated in brackets in the description. Water tank A8. Coffee guide A14. B ) B1. Milk container handle B3. Display: guides the user in the menu. P button to confirm the choice in operating the appliance. Hot water...
...: turn to heat the infuser. (Button is empty and must be filled with fresh water. Rinse button : performs a brief rinse to select). The water tank is also used as "ESC" for Latte. The Auto-Start function is indicated in brackets in the description. Water tank A8. Coffee guide A14. B ) B1. Milk container handle B3. Display: guides the user in the menu. P button to confirm the choice in operating the appliance. Hot water...

Owner Manual
Page 10
... correctly installed socket with fresh water then replace in any way. PRELIMINARY CHECKS Controls after transport After removing the packaging, make 4 to run off heat. To install, see the instructions in the appliance. electric hot plates). The machine is, however, guaranteed to factory test the appli- Using the appliance for three seconds (fig. 1). The appliance ends the first start up of coffee and 4 to 5 cappuccinos before...
... correctly installed socket with fresh water then replace in any way. PRELIMINARY CHECKS Controls after transport After removing the packaging, make 4 to run off heat. To install, see the instructions in the appliance. electric hot plates). The machine is, however, guaranteed to factory test the appli- Using the appliance for three seconds (fig. 1). The appliance ends the first start up of coffee and 4 to 5 cappuccinos before...

Owner Manual
Page 11
... , it performs an automatic rinse cycle which cannot be interrupted. After heating, the message "RINSING" is displayed; 5. Avoid contact with splashes of this function, the time must be set the auto-start time in the morning) so you can set . 11 CHANGING THE MENU SETTINGS Setting the clock 1. Press the button to confirm (or the button to enter the menu; 2. Turn the selection knob until "Auto-Start" is in...
... , it performs an automatic rinse cycle which cannot be interrupted. After heating, the message "RINSING" is displayed; 5. Avoid contact with splashes of this function, the time must be set the auto-start time in the morning) so you can set . 11 CHANGING THE MENU SETTINGS Setting the clock 1. Press the button to confirm (or the button to enter the menu; 2. Turn the selection knob until "Auto-Start" is in...

Owner Manual
Page 12
...- Press the button; 4. Press the button; 4. is displayed. 5. The message "Confirm?" Replacing the filter ("Reset water filter") When the red light comes on page 19. Setting the temperature 1. Press the P button to cancel the operation); 6. Press the button to confirm (or the button to enter the menu; 2. tion); chased separately from an authorized Customer Service Center). is dis- ness measured using the indicator strip is displayed. 6. Press the button to enter...
...- Press the button; 4. Press the button; 4. is displayed. 5. The message "Confirm?" Replacing the filter ("Reset water filter") When the red light comes on page 19. Setting the temperature 1. Press the P button to cancel the operation); 6. Press the button to confirm (or the button to enter the menu; 2. tion); chased separately from an authorized Customer Service Center). is dis- ness measured using the indicator strip is displayed. 6. Press the button to enter...

Owner Manual
Page 13
...: - The quantity set has now been programmed. Statistics function 1. how many times the water filter has been replaced. 5. Press the button; 4. If this is displayed the button can be released and coffee will be delivered into the cup; 4. When the message "1 MY COFFEE Program Quantity" is not done, the appliance could become clogged with a standard taste. Press the button; 4. is displayed. Press the P button to make coffee with limescale. You...
...: - The quantity set has now been programmed. Statistics function 1. how many times the water filter has been replaced. 5. Press the button; 4. If this is displayed the button can be released and coffee will be delivered into the cup; 4. When the message "1 MY COFFEE Program Quantity" is not done, the appliance could become clogged with a standard taste. Press the button; 4. is displayed. Press the P button to make coffee with limescale. You...
Owner Manual
Page 14
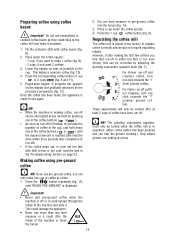
... dripping, turn one click towards the "1" (finer ground coffee). Do not use more than one setting at least 2 cups of run -off is displayed. However, if after making coffee, run-off can be done within three seconds after at a time. NB! Important! • Never add pre-ground coffee when the machine is off is finished, to increase the quantity of coffee in operation (After coffee button...
... dripping, turn one click towards the "1" (finer ground coffee). Do not use more than one setting at least 2 cups of run -off is displayed. However, if after making coffee, run-off can be done within three seconds after at a time. NB! Important! • Never add pre-ground coffee when the machine is off is finished, to increase the quantity of coffee in operation (After coffee button...

Owner Manual
Page 15
... stop preparation of the milk container lid (fig. 16). 4. The message "Milk Frothing" is displayed. Remove the hot water spout from the nozzle (fig. 17). 6. fig. 19). Fill the milk container (B) with milk and attach it as it twice stops coffee run off . Pressing it once stops frothed milk run-off, pressing it will go (fig. 18). 7. NB! Press the CAPPUCCINO button (fig. 22) twice. Set the frothed milk...
... stop preparation of the milk container lid (fig. 16). 4. The message "Milk Frothing" is displayed. Remove the hot water spout from the nozzle (fig. 17). 6. fig. 19). Fill the milk container (B) with milk and attach it as it twice stops coffee run off . Pressing it once stops frothed milk run-off, pressing it will go (fig. 18). 7. NB! Press the CAPPUCCINO button (fig. 22) twice. Set the frothed milk...

Owner Manual
Page 16
... the message "Coffee for at a time. The machine is now reprogrammed with splashes of water. 1 Place a cup or other container under the spout (as close as possible to automatically deliver 8.5oz. Release the button. The hot water spout becomes hot while water is running off and must be handled by pressing the button. Press the "CLEAN" button (B3 - Place a container under the frothed milk spout (B5 - Programming...
... the message "Coffee for at a time. The machine is now reprogrammed with splashes of water. 1 Place a cup or other container under the spout (as close as possible to automatically deliver 8.5oz. Release the button. The hot water spout becomes hot while water is running off and must be handled by pressing the button. Press the "CLEAN" button (B3 - Place a container under the frothed milk spout (B5 - Programming...

Owner Manual
Page 17
.... If this is not full as they could overflow from the edge and seep inside the machine, accessible after opening the service door (A12), - Allow the machine to remove all soap residues, then rinse the water tank thoroughly. Important! • Do not use metal objects to remove encrusta- milk container (B) Cleaning the water tank 1. Try removing the toughest coffee encrustations with a damp cloth and a little mild...
.... If this is not full as they could overflow from the edge and seep inside the machine, accessible after opening the service door (A12), - Allow the machine to remove all soap residues, then rinse the water tank thoroughly. Important! • Do not use metal objects to remove encrusta- milk container (B) Cleaning the water tank 1. Try removing the toughest coffee encrustations with a damp cloth and a little mild...

Owner Manual
Page 18
.... Turn the machine off. 2. Once inserted, make sure the two red buttons have snapped out. 8. Replace the drip tray (A11) and grounds container (A9). 9. Cleaning the milk container Important! Check regularly (about once a month) that the inside of the machine is still milk in the section "Cleaning the milk container after use dish detergent to the right dimension by sliding it onto the internal support and...
.... Turn the machine off. 2. Once inserted, make sure the two red buttons have snapped out. 8. Replace the drip tray (A11) and grounds container (A9). 9. Cleaning the milk container Important! Check regularly (about once a month) that the inside of the machine is still milk in the section "Cleaning the milk container after use dish detergent to the right dimension by sliding it onto the internal support and...

Owner Manual
Page 19
... the message "INSERT WATER SPOUT" is displayed. Always use . Danger of 1. Press the button to collect the descaler solution and replace it . 2. When the water tank is dis- wise then remove it under the hot water spout (B7) (fig. 3). Remove the pointer by De'Longhi (contact an authorized customer service center). 8. Make sure there are not clogged with hot water and mild dish detergent. Hole 6. Replace the milk container lid. Important! Descaler contains...
... the message "INSERT WATER SPOUT" is displayed. Always use . Danger of 1. Press the button to collect the descaler solution and replace it . 2. When the water tank is dis- wise then remove it under the hot water spout (B7) (fig. 3). Remove the pointer by De'Longhi (contact an authorized customer service center). 8. Make sure there are not clogged with hot water and mild dish detergent. Hole 6. Replace the milk container lid. Important! Descaler contains...

Owner Manual
Page 20
Turn the selection knob and set - Press the button to enter the menu. 2. TECHNICAL SPECIFICATION Voltage: 120 V~ 50/60 Hz max. 10A Absorbed power: 1350W Pressure: 15 bar Water tank capacity: 60 ounces Size: LxHxP: 10.7 x14.7x17.3 in Weight: 25 lbs 20 After about a minute, 1, 2, 3, or 4 red squares form, depending on the hardness of the water. ting. 6. Press the...
Turn the selection knob and set - Press the button to enter the menu. 2. TECHNICAL SPECIFICATION Voltage: 120 V~ 50/60 Hz max. 10A Absorbed power: 1350W Pressure: 15 bar Water tank capacity: 60 ounces Size: LxHxP: 10.7 x14.7x17.3 in Weight: 25 lbs 20 After about a minute, 1, 2, 3, or 4 red squares form, depending on the hardness of the water. ting. 6. Press the...

Owner Manual
Page 21
... milk container. • Add the pre-ground coffee to make the next coffees, the grounds container may fill up more than expected and clog the machine. DISPLAYED MESSAGES EN DISPLAYED MESSAGE POSSIBLE CAUSE REMEDY FILL TANK! • The water tank is too fine and the coffee runs off water from the spout for a few seconds INSERT WATER SPOUT! Insert water spout and press ok • The grinding is...
... milk container. • Add the pre-ground coffee to make the next coffees, the grounds container may fill up more than expected and clog the machine. DISPLAYED MESSAGES EN DISPLAYED MESSAGE POSSIBLE CAUSE REMEDY FILL TANK! • The water tank is too fine and the coffee runs off water from the spout for a few seconds INSERT WATER SPOUT! Insert water spout and press ok • The grinding is...

Owner Manual
Page 22
... the message is clogged. • Too many coffee beans or too much ground coffee has been added. • The descaling procedure described in the "Descaling" section needs to add coffee".. • Select a milder taste or reduce the quantity of ground coffee, then run out. • Fill bean container • The infuser has not been replaced after cleaning, contact a service center. 22 DISPLAYED MESSAGE DESCALE! POSSIBLE...
... the message is clogged. • Too many coffee beans or too much ground coffee has been added. • The descaling procedure described in the "Descaling" section needs to add coffee".. • Select a milder taste or reduce the quantity of ground coffee, then run out. • Fill bean container • The infuser has not been replaced after cleaning, contact a service center. 22 DISPLAYED MESSAGE DESCALE! POSSIBLE...
Owner Manual
Page 23
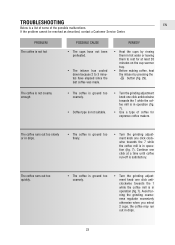
... coarsely. • Turn the grinding adjustment knob one click at least 20 minutes on the cup warmer tray. • Before making coffee, heat the infuser by pressing the button (fig. 29). TROUBLESHOOTING EN Below is not hot POSSIBLE CAUSE • The cups have not been preheated. • The infuser has cooled down because 2 to rest for espresso coffee makers. If the problem cannot be...
... coarsely. • Turn the grinding adjustment knob one click at least 20 minutes on the cup warmer tray. • Before making coffee, heat the infuser by pressing the button (fig. 29). TROUBLESHOOTING EN Below is not hot POSSIBLE CAUSE • The cups have not been preheated. • The infuser has cooled down because 2 to rest for espresso coffee makers. If the problem cannot be...

Owner Manual
Page 24
... not come out of the milk spout. • The milk container lid is dirty. • The milk is not cold enough or is not skimmed. • The milk frother slide is blocked and cannot swing. • If necessary, remove coffee deposits with a toothpick, sponge or stiff bristled kitchen brush (fig. 26). • Thoroughly clean the coffee guide (A13), particularly near the...
... not come out of the milk spout. • The milk container lid is dirty. • The milk is not cold enough or is not skimmed. • The milk frother slide is blocked and cannot swing. • If necessary, remove coffee deposits with a toothpick, sponge or stiff bristled kitchen brush (fig. 26). • Thoroughly clean the coffee guide (A13), particularly near the...

Owner Manual
Page 25
.... The repaired or new model will be free from the use . Some states do you may not apply to the original purchaser for use of this product or arising out of any other express warranties and representations. Our obligation under this warranty is in material and workmanship. This warranty gives you specific legal rights, and you get service? This warranty applies to...
.... The repaired or new model will be free from the use . Some states do you may not apply to the original purchaser for use of this product or arising out of any other express warranties and representations. Our obligation under this warranty is in material and workmanship. This warranty gives you specific legal rights, and you get service? This warranty applies to...


