
Owner Manual
Page 1
...CHANGING THE QUANTITY OF HOT WATER 13 12 PREPARING CAPPUCCINO (FROTHED MILK AND COFFEE 13 13 PREPARING LATTE OR ITALIAN MACCHIATO 14 14 PREPARING FROTHED OR STEAMED MILK (WITHOUT COFFEE 14 15 CHANGING THE QUANTITY OF COFFEE AND MILK FOR LATTE/ CAPPUCCINO / ITALIAN MACCHIATO 15 16 CLEANING AND MAINTENANCE... 15 16.1 CLEANING THE COFFEE MAKER 15 16.2 CLEANING THE INFUSER 15 16.3 CLEANING THE MILK CONTAINER 17 17 CHANGING AND SETTING THE MENU PARAMETERS 17 17.1 SETTING THE CLOCK 17 17.2 SETTING AUTO-START TIME 17 17.3 DESCALING 18...
...CHANGING THE QUANTITY OF HOT WATER 13 12 PREPARING CAPPUCCINO (FROTHED MILK AND COFFEE 13 13 PREPARING LATTE OR ITALIAN MACCHIATO 14 14 PREPARING FROTHED OR STEAMED MILK (WITHOUT COFFEE 14 15 CHANGING THE QUANTITY OF COFFEE AND MILK FOR LATTE/ CAPPUCCINO / ITALIAN MACCHIATO 15 16 CLEANING AND MAINTENANCE... 15 16.1 CLEANING THE COFFEE MAKER 15 16.2 CLEANING THE INFUSER 15 16.3 CLEANING THE MILK CONTAINER 17 17 CHANGING AND SETTING THE MENU PARAMETERS 17 17.1 SETTING THE CLOCK 17 17.2 SETTING AUTO-START TIME 17 17.3 DESCALING 18...
Owner Manual
Page 3
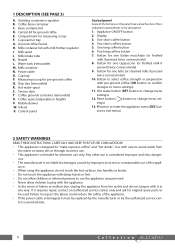
... in the description. 1. Failure to select coffee strength or preparation with milk frother regulator I. Grinding coarseness regulator B. Compartment for one latte (or steamed milk, if pressed twice consecutively) 10. Milk spout J. Milk container N. Appliance ON/OFF button 2. Two short coffees button 5. Hot...; Do not allow children to play with care to avoid scalds from the outlet and do not touch the hot surfaces. Milk intake tube K. Coffee grounds container (removable) U. Mobile drawer W. Control panel Control panel Some of failure or malfunction, unplug...
... in the description. 1. Failure to select coffee strength or preparation with milk frother regulator I. Grinding coarseness regulator B. Compartment for one latte (or steamed milk, if pressed twice consecutively) 10. Milk spout J. Milk container N. Appliance ON/OFF button 2. Two short coffees button 5. Hot...; Do not allow children to play with care to avoid scalds from the outlet and do not touch the hot surfaces. Milk intake tube K. Coffee grounds container (removable) U. Mobile drawer W. Control panel Control panel Some of failure or malfunction, unplug...
Owner Manual
Page 8
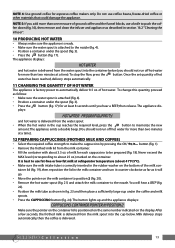
...the infuser". 10 PRODUCING HOT WATER • Always make the cappuccino by pressing the OK/ button (fig. 1). • Remove the frothed milk lid from the milk container. • Fill the container with about 25 oz.) marked on the container. plays: HOT WATER PROGRAM QUANTITY and hot water is ...delivered from the water spout into the cup below (you add more than one measure of the milk con- Milk delivery stops automatically, then the coffee is positioned on the same number indicated on the bottom of ground coffee and the funnel blocks...
...the infuser". 10 PRODUCING HOT WATER • Always make the cappuccino by pressing the OK/ button (fig. 1). • Remove the frothed milk lid from the milk container. • Fill the container with about 25 oz.) marked on the container. plays: HOT WATER PROGRAM QUANTITY and hot water is ...delivered from the water spout into the cup below (you add more than one measure of the milk con- Milk delivery stops automatically, then the coffee is positioned on the same number indicated on the bottom of ground coffee and the funnel blocks...
Owner Manual
Page 9
... cleaning is absolutely clean and hygienic, after making cappuccinos, clean the channels inside the milk container lid: • Place a cup under the milk spout. • Press the CLEAN button on the milk container lid and hold down for more than 15 minutes. The button lights up and...request a cappuccino again. Then put it . NOTE 1: While preparing the cappuccino, milk or coffee delivery can be interrupted by pressing the CAPPUCCINO button. NOTE 3: To ensure the milk frother is complete, remove the milk container and place in section 15. 13 PREPARING LATTE OR ITALIAN MACCHIATO •...
... cleaning is absolutely clean and hygienic, after making cappuccinos, clean the channels inside the milk container lid: • Place a cup under the milk spout. • Press the CLEAN button on the milk container lid and hold down for more than 15 minutes. The button lights up and...request a cappuccino again. Then put it . NOTE 1: While preparing the cappuccino, milk or coffee delivery can be interrupted by pressing the CAPPUCCINO button. NOTE 3: To ensure the milk frother is complete, remove the milk container and place in section 15. 13 PREPARING LATTE OR ITALIAN MACCHIATO •...
Owner Manual
Page 10
... products or alcohol to become visible (a few seconds, the appliance delivers coffee into place. PROGRAM QUANTITY • Once the required quantity of milk has been delivered, press the button selected previously again. A double BEEP confirms that the holes in water. A soft damp cloth will suffice... encrustations which could cause malfunction. Coffee delivery stops and the quantity is an electrical appliance. The appliance is now re-programmed with milk up to the maximum level indicated on the infuser and pull it out (fig. 31). • IMPORTANT:THE INFUSER CAN ONLY...
... products or alcohol to become visible (a few seconds, the appliance delivers coffee into place. PROGRAM QUANTITY • Once the required quantity of milk has been delivered, press the button selected previously again. A double BEEP confirms that the holes in water. A soft damp cloth will suffice... encrustations which could cause malfunction. Coffee delivery stops and the quantity is an electrical appliance. The appliance is now re-programmed with milk up to the maximum level indicated on the infuser and pull it out (fig. 31). • IMPORTANT:THE INFUSER CAN ONLY...
Owner Manual
Page 12
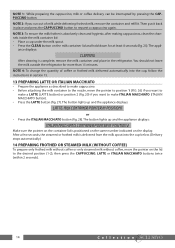
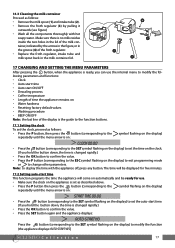
... regulator (3) by the arrows in the figure,or in the groove (4) of the froth regulator. • Replace the froth regulator, intake tube and milk spout back in the milk container lid. 4 3 1 2 17 CHANGING AND SETTING THE MENU PARAMETERS After pressing the button, when the appliance is ready, you can use ....symbol flashing on the display) to exit programming mode or to change other parameters. Make sure there is no milk residue inside the two holes in the lid of the milk container,indicated by pulling it outwards (see figure) • Wash all the components thoroughly with the appliance off,...
... regulator (3) by the arrows in the figure,or in the groove (4) of the froth regulator. • Replace the froth regulator, intake tube and milk spout back in the milk container lid. 4 3 1 2 17 CHANGING AND SETTING THE MENU PARAMETERS After pressing the button, when the appliance is ready, you can use ....symbol flashing on the display) to exit programming mode or to change other parameters. Make sure there is no milk residue inside the two holes in the lid of the milk container,indicated by pulling it outwards (see figure) • Wash all the components thoroughly with the appliance off,...
Owner Manual
Page 18
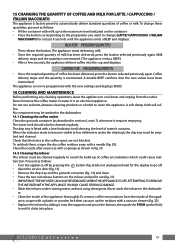
...not • low-fat/fat-free. Thoroughly clean the mobile drawer, particularly near the hinges to swing smoothly. tainer lid (fig. 19). • The milk container lid is • Insert the intake tube in the rubber washer in the spouts are clogged • with a needle (see section 16.1, fig. 29...). We recommend using fat-free or low-fat milk at refrigerator temperature (about 41°F/5°C). If you are free to ensure they are still not getting the required results, try changing the brand...
...not • low-fat/fat-free. Thoroughly clean the mobile drawer, particularly near the hinges to swing smoothly. tainer lid (fig. 19). • The milk container lid is • Insert the intake tube in the rubber washer in the spouts are clogged • with a needle (see section 16.1, fig. 29...). We recommend using fat-free or low-fat milk at refrigerator temperature (about 41°F/5°C). If you are free to ensure they are still not getting the required results, try changing the brand...

