
Owner Manual
Page 1
....1 SETTING THE CLOCK 17 17.2 SETTING AUTO-START TIME 17 17.3 DESCALING 18 17.4 CHANGING THE COFFEE TEMPERATURE 19 17.5 CHANGING THE LENGTH OF TIME THE APPLIANCE REMAINS ON 19 17.6 SETTING WATER HARDNESS 19 17.7 RESETTING FACTORY DEFAULT SETTINGS 19 17.8 BEEP ON/OFF 20 18 CHANGING THE LANGUAGE 20 19 TROUBLESHOOTING 21 20 PROBLEMS TO BE RESOLVED BEFORE CALLING THE SERVICE CENTER 22 LIMITED WARRANTY 24 6 Collection Coffee has been used...
....1 SETTING THE CLOCK 17 17.2 SETTING AUTO-START TIME 17 17.3 DESCALING 18 17.4 CHANGING THE COFFEE TEMPERATURE 19 17.5 CHANGING THE LENGTH OF TIME THE APPLIANCE REMAINS ON 19 17.6 SETTING WATER HARDNESS 19 17.7 RESETTING FACTORY DEFAULT SETTINGS 19 17.8 BEEP ON/OFF 20 18 CHANGING THE LANGUAGE 20 19 TROUBLESHOOTING 21 20 PROBLEMS TO BE RESOLVED BEFORE CALLING THE SERVICE CENTER 22 LIMITED WARRANTY 24 6 Collection Coffee has been used...
Owner Manual
Page 2
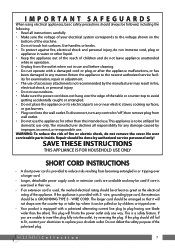
... line plug (a plug having one way. If you are available and may be pulled on the bottom of accessory attachments not recommended by the manufacturer may result in use . Return the appliance to the nearest authorized service facility for any manner. WIRE CORD. Do not defeat the safety purpose of children and do not remove the cover. wire...
... line plug (a plug having one way. If you are available and may be pulled on the bottom of accessory attachments not recommended by the manufacturer may result in use . Return the appliance to the nearest authorized service facility for any manner. WIRE CORD. Do not defeat the safety purpose of children and do not remove the cover. wire...
Owner Manual
Page 3
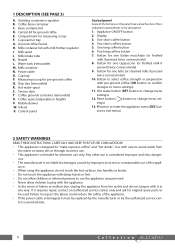
.... Button for ground coffee E. Coffee bean container C. Cup warmer tray G. Water tank (removable) M. Milk container N. Rinse button ( button to "make espresso coffee" and "hot drinks". Use handles or knobs. • Do not touch the appliance with pre-ground coffee (OK button to confirm changes to change menu settings) 13. Central lid for one cappuccino (or frothed milk if pressed twice consecutively) 9. Coffee spout (adjustable in the description. 1. Ground coffee funnel H. Milk intake tube K. Coffee grounds container (removable) U. One long coffee button...
.... Button for ground coffee E. Coffee bean container C. Cup warmer tray G. Water tank (removable) M. Milk container N. Rinse button ( button to "make espresso coffee" and "hot drinks". Use handles or knobs. • Do not touch the appliance with pre-ground coffee (OK button to confirm changes to change menu settings) 13. Central lid for one cappuccino (or frothed milk if pressed twice consecutively) 9. Coffee spout (adjustable in the description. 1. Ground coffee funnel H. Milk intake tube K. Coffee grounds container (removable) U. One long coffee button...
Owner Manual
Page 4
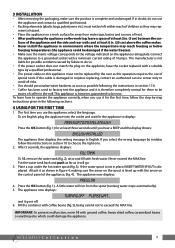
... first time, follow the step-by mistake, follow the instructions in the mill. To learn how to the voltage indicated on the control panel of children as possible following sections. 4 USING FOR THE FIRST TIME 1. Press the OK button (fig. 1). Collection 9 If you hear a BEEP and the display shows: ENGLISH INSTALLED The appliance then displays the setting message in place, INSERT WATER SPOUT...
... first time, follow the step-by mistake, follow the instructions in the mill. To learn how to the voltage indicated on the control panel of children as possible following sections. 4 USING FOR THE FIRST TIME 1. Press the OK button (fig. 1). Collection 9 If you hear a BEEP and the display shows: ENGLISH INSTALLED The appliance then displays the setting message in place, INSERT WATER SPOUT...
Owner Manual
Page 5
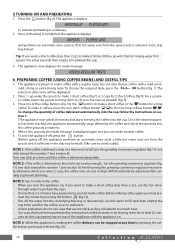
... 7. (The appliance now grinds the beans and starts brewing the coffee into the coffee grounds container.) 4. Take care to make 2 coffees, press the two short coffees button or the two long coffees button . 5 TURNING ON AND PREHEATING 1. To choose the required taste, press the OK button (fig. 1). To change the quantity of coffee delivered automatically into the underlying drip tray or alternatively use this hot rinsing water first. Once the desired...
... 7. (The appliance now grinds the beans and starts brewing the coffee into the coffee grounds container.) 4. Take care to make 2 coffees, press the two short coffees button or the two long coffees button . 5 TURNING ON AND PREHEATING 1. To choose the required taste, press the OK button (fig. 1). To change the quantity of coffee delivered automatically into the underlying drip tray or alternatively use this hot rinsing water first. Once the desired...
Owner Manual
Page 6
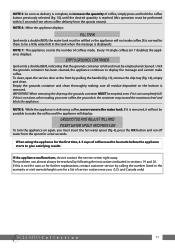
...), remove the drip tray (fig. 14), empty and clean. To clean, open the service door at the front by following the instructions indicated in the warranty or visit www.delonghi.com for a list of service centers near you must be performed within 3 seconds from when coffee delivery from the spout for the first time, 4-5 cups of coffees made before the appliance starts to display the message and...
...), remove the drip tray (fig. 14), empty and clean. To clean, open the service door at the front by following the instructions indicated in the warranty or visit www.delonghi.com for a list of service centers near you must be performed within 3 seconds from when coffee delivery from the spout for the first time, 4-5 cups of coffees made before the appliance starts to display the message and...
Owner Manual
Page 7
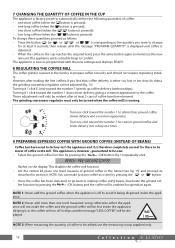
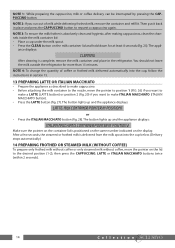
... (1 line) toward the number 7 for operation again. NOTE 3: When measuring the quantity of coffee have been brewed. The appliance is now re-programmed with the new settings and displays: READY. 8 REGULATING THE COFFEE MILL The coffee grinder is preset in section 6. otherwise either too fast or too slow (in the funnel (see fig. 15) and proceed as follows: - 7 CHANGING THE QUANTITY OF COFFEE IN...
... (1 line) toward the number 7 for operation again. NOTE 3: When measuring the quantity of coffee have been brewed. The appliance is now re-programmed with the new settings and displays: READY. 8 REGULATING THE COFFEE MILL The coffee grinder is preset in section 6. otherwise either too fast or too slow (in the funnel (see fig. 15) and proceed as follows: - 7 CHANGING THE QUANTITY OF COFFEE IN...
Owner Manual
Page 8
.../ button (fig. 1). • Remove the frothed milk lid from the water spout into the cup below (you hear a BEEP, then release. plays: HOT WATER PROGRAM QUANTITY and hot water is correctly inserted in the milk container and turn it counter-clockwise as far as shown in fig. 23 and then place a sufficiently large cup under the spout (fig. 3). • Press the button (fig. 17) for espresso coffee makers only...
.../ button (fig. 1). • Remove the frothed milk lid from the water spout into the cup below (you hear a BEEP, then release. plays: HOT WATER PROGRAM QUANTITY and hot water is correctly inserted in the milk container and turn it counter-clockwise as far as shown in fig. 23 and then place a sufficiently large cup under the spout (fig. 3). • Press the button (fig. 17) for espresso coffee makers only...
Owner Manual
Page 9
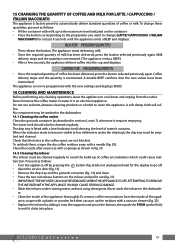
... the milk container lid: • Place a cup under the milk spout. • Press the CLEAN button on the lid to request a cappuccino again. You should not leave the milk outside the refrigerator for at least 8 seconds (fig. 25). The button lights up and the appliance displays: ITALIAN MACCHIATO: CONTAINER POINTER IN POSITION 2 Make sure the pointer on the container lid is complete, remove the milk container...
... the milk container lid: • Place a cup under the milk spout. • Press the CLEAN button on the lid to request a cappuccino again. You should not leave the milk outside the refrigerator for at least 8 seconds (fig. 25). The button lights up and the appliance displays: ITALIAN MACCHIATO: CONTAINER POINTER IN POSITION 2 Make sure the pointer on the container lid is complete, remove the milk container...
Owner Manual
Page 10
To change (LATTE/ CAPPUCCINO / ITALIAN MACCHIATO) for the display to automatically deliver standard quantities of coffee or milk. Milk delivery stops and the quantity is memorized. (The appliance emits a BEEP.) • After a few millimeters under running water, without using detergents. A soft damp cloth will suffice. When the indicator starts to change these quantities, proceed as follows: • Turn the appliance off . • Open the service door...
To change (LATTE/ CAPPUCCINO / ITALIAN MACCHIATO) for the display to automatically deliver standard quantities of coffee or milk. Milk delivery stops and the quantity is memorized. (The appliance emits a BEEP.) • After a few millimeters under running water, without using detergents. A soft damp cloth will suffice. When the indicator starts to change these quantities, proceed as follows: • Turn the appliance off . • Open the service door...
Owner Manual
Page 11
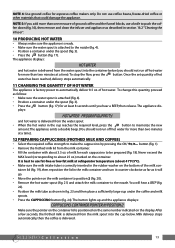
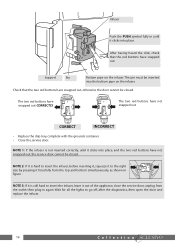
...Support Pin Bottom pipe on the infuser. Check that the red buttons have not snapped out, the service door cannot be closed . Infuser Push the PUSH symbol fully in until it out of the appliance, close the service door, unplug from the top and bottom simultaneously, as shown in again. Wait for all the lights...be closed . After having heard the click, check that the two red buttons have not snapped out CORRECT INCORRECT • Replace the drip tray, complete with the grounds container. • Close the service door. NOTE 1: If the infuser is still hard to go off...
...Support Pin Bottom pipe on the infuser. Check that the red buttons have not snapped out, the service door cannot be closed . Infuser Push the PUSH symbol fully in until it out of the appliance, close the service door, unplug from the top and bottom simultaneously, as shown in again. Wait for all the lights...be closed . After having heard the click, check that the two red buttons have not snapped out CORRECT INCORRECT • Replace the drip tray, complete with the grounds container. • Close the service door. NOTE 1: If the infuser is still hard to go off...
Owner Manual
Page 12
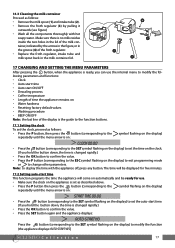
...; Clock • Auto-start time • Auto start time. (If you hold the button down , the time is changed rapidly.) • Press the OK button to confirm the value. • Press the SET button again and the appliance displays: AUTO-START NO Press the button (corresponding to the SET symbol flashing on the display) to change other parameters. Note: to display the time with hot soapy water. 16.3 Cleaning the milk container Proceed as follows: • Remove the milk...
...; Clock • Auto-start time • Auto start time. (If you hold the button down , the time is changed rapidly.) • Press the OK button to confirm the value. • Press the SET button again and the appliance displays: AUTO-START NO Press the button (corresponding to the SET symbol flashing on the display) to change other parameters. Note: to display the time with hot soapy water. 16.3 Cleaning the milk container Proceed as follows: • Remove the milk...
Owner Manual
Page 13
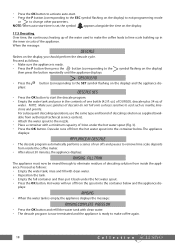
... dis- • Press the OK button to activate auto-start time is set, the symbol appears alongside the time on the display. 17.3 Descaling Over time, the continuous heating up of the water used to make coffee again. 18 Collection For subsequent descaling operations, use the same type and brand of descaling solution as follows: • Empty the water tank, rinse and fill with clean water. • The descale program is now terminated and the...
... dis- • Press the OK button to activate auto-start time is set, the symbol appears alongside the time on the display. 17.3 Descaling Over time, the continuous heating up of the water used to make coffee again. 18 Collection For subsequent descaling operations, use the same type and brand of descaling solution as follows: • Empty the water tank, rinse and fill with clean water. • The descale program is now terminated and the...
Owner Manual
Page 14
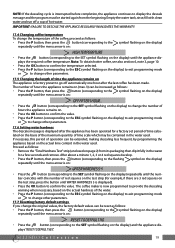
... INVALIDATES THE WARRANTY. 17.4 Changing coffee temperature To change the number of hot water. Collection 19 Note: To obtain hotter coffee, see also section 6, note 3, page 10. • Press the OK button to confirm the temperature selected. • Press the P button (corresponding to the ESC symbol flashing on the display) to exit programming mode or to change other parameters. 17.6 Setting water hardness The descale message is displayed). •...
... INVALIDATES THE WARRANTY. 17.4 Changing coffee temperature To change the number of hot water. Collection 19 Note: To obtain hotter coffee, see also section 6, note 3, page 10. • Press the OK button to confirm the temperature selected. • Press the P button (corresponding to the ESC symbol flashing on the display) to exit programming mode or to change other parameters. 17.6 Setting water hardness The descale message is displayed). •...
Owner Manual
Page 15
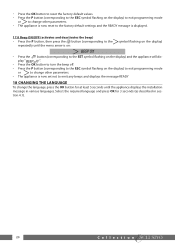
... set not to the ESC symbol flashing on the display) and the appliance will dis- Select the required language and press OK for at least 5 seconds until the appliance displays the installation message in section 4.1). 20 Collection play " ". • Press the OK button to turn the beep off. • Press the P button (corresponding to emit any beeps and displays the message READY 18 CHANGING...
... set not to the ESC symbol flashing on the display) and the appliance will dis- Select the required language and press OK for at least 5 seconds until the appliance displays the installation message in section 4.1). 20 Collection play " ". • Press the OK button to turn the beep off. • Press the P button (corresponding to emit any beeps and displays the message READY 18 CHANGING...
Owner Manual
Page 16
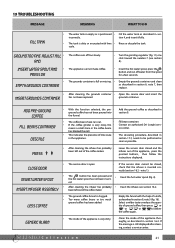
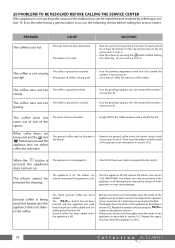
....3, needs to deliver the coffee again. AND • Turn the grinding regulator (fig. 11) one click toward the number 7 (see section 16.2. the funnel. • The coffee beans have run off too slowly. note 1). • The button has been pressed and • Insert the hot water spout (fig. 4). been left out of the coffee maker. LESS COFFEE • The ground coffee funnel is clogged...
....3, needs to deliver the coffee again. AND • Turn the grinding regulator (fig. 11) one click toward the number 7 (see section 16.2. the funnel. • The coffee beans have run off too slowly. note 1). • The button has been pressed and • Insert the hot water spout (fig. 4). been left out of the coffee maker. LESS COFFEE • The ground coffee funnel is clogged...
Owner Manual
Page 17
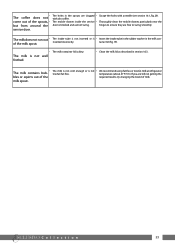
... the outlet. • The infuser cannot be removed for cleaning. come out of one click toward the number 1 (see section 6, note 3). • Heat the infuser by rinsing them in hot water or leaving them for espresso coffee makers. When the button is • The appliance is ground too finely. Attempting to section 19. Repeat the operation using a knife (see section 9, note 5).Then...
... the outlet. • The infuser cannot be removed for cleaning. come out of one click toward the number 1 (see section 6, note 3). • Heat the infuser by rinsing them in hot water or leaving them for espresso coffee makers. When the button is • The appliance is ground too finely. Attempting to section 19. Repeat the operation using a knife (see section 9, note 5).Then...
Owner Manual
Page 18
... getting the required results, try changing the brand of the spouts, • but from around the service door. of the milk spout. The milk is not well frothed. • Clean the milk lid as described in the spouts are clogged • with a needle (see section 16.1, fig. 29). We recommend using fat-free or low-fat milk at refrigerator temperature (about...
... getting the required results, try changing the brand of the spouts, • but from around the service door. of the milk spout. The milk is not well frothed. • Clean the milk lid as described in the spouts are clogged • with a needle (see section 16.1, fig. 29). We recommend using fat-free or low-fat milk at refrigerator temperature (about...
Owner Manual
Page 19
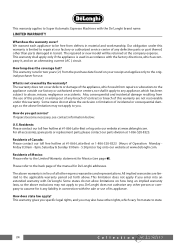
... at www.delonghi.com. How long does the coverage last? How do you . This warranty applies to Super Automatic Espresso Machines with De'Longhi. We warrant each appliance to the appliance outside our factory or authorized service centers, nor shall it , and on how long an implied warranty lasts, so the above . The warranty does not cover defects or...
... at www.delonghi.com. How long does the coverage last? How do you . This warranty applies to Super Automatic Espresso Machines with De'Longhi. We warrant each appliance to the appliance outside our factory or authorized service centers, nor shall it , and on how long an implied warranty lasts, so the above . The warranty does not cover defects or...


