
Owner Manual
Page 9
... Saving 11 Setting the clock 11 Setting auto-start time 12 Activating auto-start 12 Descale 12 Setting the temperature 12 Auto-Off 12 Setting water hardness 12 Default values (reset 12 Beep ON/OFF (activates and deactivates the beep 13 MAKING COFFEE 13 Selecting the coffee taste 13 Selecting the quantity of coffee in the cup ...... 13 Adjusting the coffee grinder 13 Manual rinsing 13 Making espresso coffee using coffee beans.... 14 Making coffee using pre-ground coffee........... 14 MAKING DRINKS WITH MILK 14...
... Saving 11 Setting the clock 11 Setting auto-start time 12 Activating auto-start 12 Descale 12 Setting the temperature 12 Auto-Off 12 Setting water hardness 12 Default values (reset 12 Beep ON/OFF (activates and deactivates the beep 13 MAKING COFFEE 13 Selecting the coffee taste 13 Selecting the quantity of coffee in the cup ...... 13 Adjusting the coffee grinder 13 Manual rinsing 13 Making espresso coffee using coffee beans.... 14 Making coffee using pre-ground coffee........... 14 MAKING DRINKS WITH MILK 14...

Owner Manual
Page 10
... the machine, doing so will void the warranty. Don't attempt to reduce risks resulting from the outlet when not in water or other than the other). wire, grounding type cord, the extension should be pulled on by authorized service personnel only! SAVE THESE INSTRUCTIONS THIS APPLIANCE IS FOR HOUSEHOLD USE ONLY short cord instructions A short power cord is to replace your...
... the machine, doing so will void the warranty. Don't attempt to reduce risks resulting from the outlet when not in water or other than the other). wire, grounding type cord, the extension should be pulled on by authorized service personnel only! SAVE THESE INSTRUCTIONS THIS APPLIANCE IS FOR HOUSEHOLD USE ONLY short cord instructions A short power cord is to replace your...
Owner Manual
Page 11
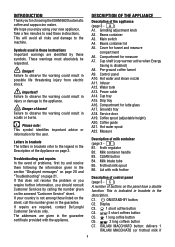
... coffees button C7. Symbols used in the guarantee. Cover for latte glass A17. Hot water and steam nozzle A11. Failure to observe the warning could result in the section "Displayed messages" on page 20 and "Troubleshooting" on the panel have a double function. Take a few minutes to the machine. Grinding adjustment knob A2. Beans container A3. Coffee spout (adjustable height) A20. Service door A19. Troubleshooting and repairs...
... coffees button C7. Symbols used in the guarantee. Cover for latte glass A17. Hot water and steam nozzle A11. Failure to observe the warning could result in the section "Displayed messages" on page 20 and "Troubleshooting" on the panel have a double function. Take a few minutes to the machine. Grinding adjustment knob A2. Beans container A3. Coffee spout (adjustable height) A20. Service door A19. Troubleshooting and repairs...
Owner Manual
Page 12
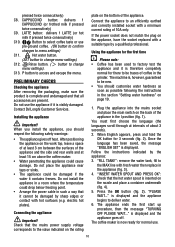
... the instructions indicated by sharp edges or contact with fresh water then replace in the I position (fig. 1). The appliance ends the first start up procedure, then the message "TURNING OFF PLEASE WAIT..." Contact De'Longhi Customer Services. Rinse button. ( button to menu settings) C11. Connecting the appliance Important! When English appears, press and hold the OK button for there to deliver water. 6. Installing the...
... the instructions indicated by sharp edges or contact with fresh water then replace in the I position (fig. 1). The appliance ends the first start up procedure, then the message "TURNING OFF PLEASE WAIT..." Contact De'Longhi Customer Services. Rinse button. ( button to menu settings) C11. Connecting the appliance Important! When English appears, press and hold the OK button for there to deliver water. 6. Installing the...
Owner Manual
Page 13
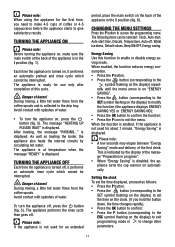
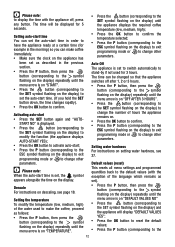
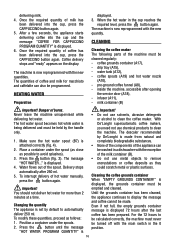
... the button down, the time changes rapidly). • Press the OK button to confirm; • Press the P button (corresponding to the ESC symbol flashing on the display) to exit programming mode or to change other parameters. 11 Avoid contact with splashes of burns! Energy Saving Use this cycle. Danger of water. After heating, the message "RINSING..." During rinsing, a little hot water flows from the coffee spouts...
... the button down, the time changes rapidly). • Press the OK button to confirm; • Press the P button (corresponding to the ESC symbol flashing on the display) to exit programming mode or to change other parameters. 11 Avoid contact with splashes of burns! Energy Saving Use this cycle. Danger of water. After heating, the message "RINSING..." During rinsing, a little hot water flows from the coffee spouts...
Owner Manual
Page 14
... button to stand-by if not used to make coffee immediately. • Make sure the clock on the appliance has been set to switch automatically to confirm. The time can make the coffee, proceed as set , the symbol appears alongside the time on the display) to exit programming mode or to change other parameters. Please note: to change other parameters. Setting water hardness For instructions on descaling, see 37. The time will display...
... button to stand-by if not used to make coffee immediately. • Make sure the clock on the appliance has been set to switch automatically to confirm. The time can make the coffee, proceed as set , the symbol appears alongside the time on the display) to exit programming mode or to change other parameters. Please note: to change other parameters. Setting water hardness For instructions on descaling, see 37. The time will display...
Owner Manual
Page 15
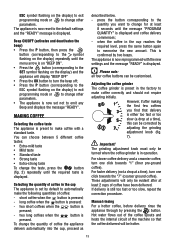
... preset to make coffee with the new settings and the message "READY" is displayed. two short coffees when the button is pressed; - The appliance is either too fast or too slow (a drop at a time), turn one click towards "1" (finer pre-ground coffee). The grinding adjustment knob must only be customised. Hot water flows out of the coffee spouts and heats the internal circuit of the machine so...
... preset to make coffee with the new settings and the message "READY" is displayed. two short coffees when the button is pressed; - The appliance is either too fast or too slow (a drop at a time), turn one click towards "1" (finer pre-ground coffee). The grinding adjustment knob must only be customised. Hot water flows out of the coffee spouts and heats the internal circuit of the machine so...
Owner Manual
Page 16
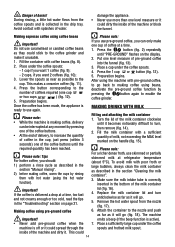
..., read the tips in the section "Cleaning the milk container". 3. Press the 1 cup or button (fig. 12). 5. After using the machine with a sufficient quantity of the coffee buttons until "PRE-GROUND" flashes on the display. 2. Make sure the milk intake tube is ready to turn anticlockwise as far as described in the section "Manual rinsing". 2) before making coffee using the hot water function). This could spread through the spouts...
..., read the tips in the section "Cleaning the milk container". 3. Press the 1 cup or button (fig. 12). 5. After using the machine with a sufficient quantity of the coffee buttons until "PRE-GROUND" flashes on the display. 2. Make sure the milk intake tube is ready to turn anticlockwise as far as described in the section "Manual rinsing". 2) before making coffee using the hot water function). This could spread through the spouts...
Owner Manual
Page 17
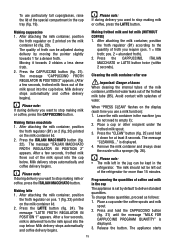
... (B1) on 2 (fig. 20) printed on the milk container lid. 2. Milk delivery stops automatically and coffee delivery begins. Press the CAPPUCCINO, ITALIAN MACCHIATO or LATTE button twice (within 2 seconds). Leave the milk container in the cup The appliance is displayed. 3. Press the "CLEAN" button (fig. 25) and hold the CAPPUCCINO button (fig. 21) until the message "MILK FOR CAPPUCCINO PROGRAM QUANTITY" is set by moving the pointer slightly towards 2 obtains...
... (B1) on 2 (fig. 20) printed on the milk container lid. 2. Milk delivery stops automatically and coffee delivery begins. Press the CAPPUCCINO, ITALIAN MACCHIATO or LATTE button twice (within 2 seconds). Leave the milk container in the cup The appliance is displayed. 3. Press the "CLEAN" button (fig. 25) and hold the CAPPUCCINO button (fig. 21) until the message "MILK FOR CAPPUCCINO PROGRAM QUANTITY" is set by moving the pointer slightly towards 2 obtains...
Owner Manual
Page 18
... cleaned regularly: - The message • Do not use solvents, abrasive detergents delivering hot water. is set by De'Longhi is made . the appliance continues to remove "HOT WATER..." Even if not full, the empty grounds container message is attached correctly (fig. 4). After a few seconds, the appliance starts delivering coffee into the cup, press the CAPPUCCINO button again. coffee spouts (A19) and hot water nozzle (A10), - Delivery stops could scratch metal...
... cleaned regularly: - The message • Do not use solvents, abrasive detergents delivering hot water. is set by De'Longhi is made . the appliance continues to remove "HOT WATER..." Even if not full, the empty grounds container message is attached correctly (fig. 4). After a few seconds, the appliance starts delivering coffee into the cup, press the CAPPUCCINO button again. coffee spouts (A19) and hot water nozzle (A10), - Delivery stops could scratch metal...

Owner Manual
Page 19
... be cleaned at the same time pull the infuser outwards (fig. 33). Make sure the machine is not blocked. Important! After cleaning, replace the infuser by sliding 17 If this could overflow from the cup tray, the drip tray must be emptied and cleaned. Cleaning the drip tray Important! Remove the drip tray and the grounds container (fig. 29); 3. Cleaning the water tank 1. Clean the spout regularly using a sponge...
... be cleaned at the same time pull the infuser outwards (fig. 33). Make sure the machine is not blocked. Important! After cleaning, replace the infuser by sliding 17 If this could overflow from the cup tray, the drip tray must be emptied and cleaned. Cleaning the drip tray Important! Remove the drip tray and the grounds container (fig. 29); 3. Cleaning the water tank 1. Clean the spout regularly using a sponge...
Owner Manual
Page 20
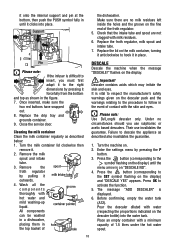
... dimensions by pressing the P button. 3. Press the button (corresponding to activate the function. 5. Cleaning the milk container Clean the milk container regularly as described below: 1. the dishwasher. Turn the milk container lid clockwise then remove it outwards. 4. Their use sulphamic or acetic based descalers. Press OK to the SET symbol flashing on the descaler bottle) into place. Pour the descaler diluted with a minimum capacity of Descale Descale the machine when the message "DESCALE...
... dimensions by pressing the P button. 3. Press the button (corresponding to activate the function. 5. Cleaning the milk container Clean the milk container regularly as described below: 1. the dishwasher. Turn the milk container lid clockwise then remove it outwards. 4. Their use sulphamic or acetic based descalers. Press OK to the SET symbol flashing on the descaler bottle) into place. Pour the descaler diluted with a minimum capacity of Descale Descale the machine when the message "DESCALE...
Owner Manual
Page 21
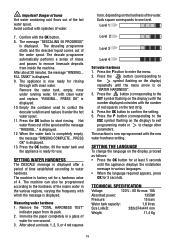
... the menu arrow is now ready for use. Press the P button (corresponding to the symbol flashing on the display) repeatedly until the appliance displays the installation message in the various regions, varying the frequency with clean water and replace. is factory set for 3 seconds. The appliance is on the test strip. 4. Important! The descale programme automatically performs a series of time established according to the hardness of...
... the menu arrow is now ready for use. Press the P button (corresponding to the symbol flashing on the display) repeatedly until the appliance displays the installation message in the various regions, varying the frequency with clean water and replace. is factory set for 3 seconds. The appliance is on the test strip. 4. Important! The descale programme automatically performs a series of time established according to the hardness of...
Owner Manual
Page 22
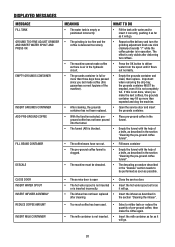
... coffee in after cleaning. If this when removing the drip tray, guarantees correct hygiene of a knife, as described in the section "Cleaning the pre-ground coffee funnel". • The coffee beans have passed clean, then replace. DISPLAYED MESSAGES MESSAGE FILL TANK GROUND TOO FINE ADJUST Grinder AND INSERT WATER SPOUT AND PRESS OK EMPTY GROUNDS CONTAINER INSERT GROUNDS CONTAINER ADD PRE-GROUND COFFEE FILL BEANS CONTAINER DESCALE...
... coffee in after cleaning. If this when removing the drip tray, guarantees correct hygiene of a knife, as described in the section "Cleaning the pre-ground coffee funnel". • The coffee beans have passed clean, then replace. DISPLAYED MESSAGES MESSAGE FILL TANK GROUND TOO FINE ADJUST Grinder AND INSERT WATER SPOUT AND PRESS OK EMPTY GROUNDS CONTAINER INSERT GROUNDS CONTAINER ADD PRE-GROUND COFFEE FILL BEANS CONTAINER DESCALE...

Owner Manual
Page 23
... down for espresso coffee makers. • Turn the grinding adjustment knob one of the spouts. Water comes out of the spouts instead of coffee. • The spouts are blocked. • The coffee guide inside of the coffee maker". TROUBLESHOOTING Below is displayed. The coffee is delivered too quickly. • The coffee is satisfactory. • Use a type of coffee for at a time. If the message is still displayed after cleaning, contact Customer Services. • Milk has...
... down for espresso coffee makers. • Turn the grinding adjustment knob one of the spouts. Water comes out of the spouts instead of coffee. • The spouts are blocked. • The coffee guide inside of the coffee maker". TROUBLESHOOTING Below is displayed. The coffee is delivered too quickly. • The coffee is satisfactory. • Use a type of coffee for at a time. If the message is still displayed after cleaning, contact Customer Services. • Milk has...

Owner Manual
Page 24
...8226; Adjust following the instructions in the section on preparing drinks with milk. • The milk container lid is dirty. • Clean the milk container lid as described in the section "Cleaning the milk container". "Energy Saving" mode is enabled, but the cup warmer is of the milk spout. The appliance ...milk is not cold enough or is hot • A number of drinks have been prepared in rapid succession. 22 PROBLEM The milk does not come on. • It is not plugged into the mains socket. • Plug into the mains socket. • The main switch is not turned...
...8226; Adjust following the instructions in the section on preparing drinks with milk. • The milk container lid is dirty. • Clean the milk container lid as described in the section "Cleaning the milk container". "Energy Saving" mode is enabled, but the cup warmer is of the milk spout. The appliance ...milk is not cold enough or is hot • A number of drinks have been prepared in rapid succession. 22 PROBLEM The milk does not come on. • It is not plugged into the mains socket. • Plug into the mains socket. • The main switch is not turned...
Owner Manual
Page 25
... of a products replacement or return, the unit must be free from the use . Some states/countries do not allow the exclusion or limitation of its appliance. This warranty gives you specific legal rights, and you may not apply to you . Our obligation under this warranty are limited to the applicable warranty period set forth above warranty is limited to repair at the...
... of a products replacement or return, the unit must be free from the use . Some states/countries do not allow the exclusion or limitation of its appliance. This warranty gives you specific legal rights, and you may not apply to you . Our obligation under this warranty are limited to the applicable warranty period set forth above warranty is limited to repair at the...


