Owner Manual
Page 3
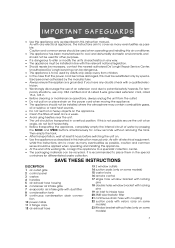
... only by pressing the MODE and SPEED buttons simultaneously for differentiated waste collection. trician. • We strongly discourage the use only CSA certified and UL Listed 3-wire grounded extension cord, rated 15 A, 125 V. • Before cleaning or maintenance operations, always unplug the unit from children. • In the case that the power cord becomes damaged, this must be installed in this instruction manual. For tem- If...
... only by pressing the MODE and SPEED buttons simultaneously for differentiated waste collection. trician. • We strongly discourage the use only CSA certified and UL Listed 3-wire grounded extension cord, rated 15 A, 125 V. • Before cleaning or maintenance operations, always unplug the unit from children. • In the case that the power cord becomes damaged, this must be installed in this instruction manual. For tem- If...
Owner Manual
Page 4
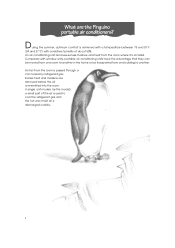
Hot air from the room where it is passed through a coil cooled by refrigerant gas. An air conditioning unit removes excess moisture and heat from the room is located. Excess heat and moisture are the Pinguino portable air conditioners? Compared with a relative humidity of this air is used to another in the home or be transported from one building to cool the refrigerant gas and the hot and moist air is discharged...
Hot air from the room where it is passed through a coil cooled by refrigerant gas. An air conditioning unit removes excess moisture and heat from the room is located. Excess heat and moisture are the Pinguino portable air conditioners? Compared with a relative humidity of this air is used to another in the home or be transported from one building to cool the refrigerant gas and the hot and moist air is discharged...
Owner Manual
Page 5
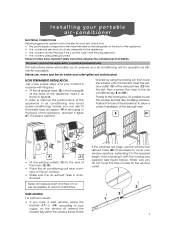
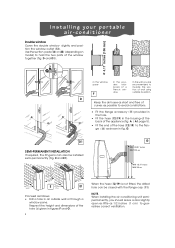
... power cord must be replaced by using the locking pin then lower the window onto the bracket. Insert it with Pinguino: • Fit the air exhaust hose (12) in the housing (5) at the back of the appliance. bracket by a qualified professional only. Make sure you to follow these important safety instructions absolves the manufacturer of all liability. Installing your portable air-conditioner ELECTRICAL CONNECTIONS Before plugging the...
... power cord must be replaced by using the locking pin then lower the window onto the bracket. Insert it with Pinguino: • Fit the air exhaust hose (12) in the housing (5) at the back of the appliance. bracket by a qualified professional only. Make sure you to follow these important safety instructions absolves the manufacturer of all liability. Installing your portable air-conditioner ELECTRICAL CONNECTIONS Before plugging the...
Owner Manual
Page 6
4.17 inches (106 mm) Installing your portable air-conditioner Double window Open the double window slightly and position the window outlet (13) . E and E1). Respect the height and dimensions of the hose (12/19) to the flange (11) as possible to guarantee correct ventilation. ... in the hole. • Fit the hose (12/19) in figures F and G. 6 When the hose (12/19) is not fitted, the drilled hole can also be closed with the flange cap (11). When installing the air conditioning unit semipermanently, you are recommended to hold the two parts of wall using suitable insulation....
4.17 inches (106 mm) Installing your portable air-conditioner Double window Open the double window slightly and position the window outlet (13) . E and E1). Respect the height and dimensions of the hose (12/19) to the flange (11) as possible to guarantee correct ventilation. ... in the hole. • Fit the hose (12/19) in figures F and G. 6 When the hose (12/19) is not fitted, the drilled hole can also be closed with the flange cap (11). When installing the air conditioning unit semipermanently, you are recommended to hold the two parts of wall using suitable insulation....
Owner Manual
Page 7
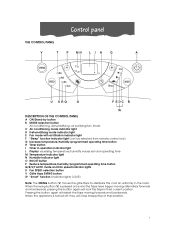
C Air conditioning mode indicator light D Dehumidifying mode indicator light E Fan mode with air filtration indicator light F "Sleep" function indicator light (can be selected from remote control only) G Increase temperature/humidity/programmed operating time button H Timer button I Timer in operation indicator light L Display visualising temperature/humidity values set and operating time M Temperature indicator light N Humidity indicator light O BOOST button P Reduce temperature/humidity/programmed operating time button Q/R/S/T AUTO mode and Fan speed indicator lights U Fan SPEED selection ...
C Air conditioning mode indicator light D Dehumidifying mode indicator light E Fan mode with air filtration indicator light F "Sleep" function indicator light (can be selected from remote control only) G Increase temperature/humidity/programmed operating time button H Timer button I Timer in operation indicator light L Display visualising temperature/humidity values set and operating time M Temperature indicator light N Humidity indicator light O BOOST button P Reduce temperature/humidity/programmed operating time button Q/R/S/T AUTO mode and Fan speed indicator lights U Fan SPEED selection ...
Owner Manual
Page 8
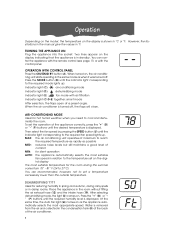
... temperature. To set on . At the same time, the Auto fan light (Q) comes on , the air conditioning unit starts operating in the same mode as when it was turned off , the flaps will close. When turned on as possible MED: reduces noise levels but still maintains a good level of the air conditioner. 8 78 50 Press the MODE button (B) until the desired temperature is displayed. After selecting dehumidifying mode, the light (D) comes on the digital display...
... temperature. To set on . At the same time, the Auto fan light (Q) comes on , the air conditioning unit starts operating in the same mode as when it was turned off , the flaps will close. When turned on as possible MED: reduces noise levels but still maintains a good level of the air conditioner. 8 78 50 Press the MODE button (B) until the desired temperature is displayed. After selecting dehumidifying mode, the light (D) comes on the digital display...
Owner Manual
Page 9
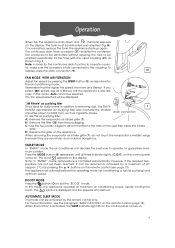
... set the operating mode (air conditioning or fan/air purifying) and optimum speed. Once emptied, replace the tank: the appliance starts up again. I treteTM electrostatic air purifying filter also captures the smallest impurities (down and (full tank) appears on . 9 B) Remove the filter (20) from the packaging. Press the MODE button (B) repeatedly until all three indicator lights, (C/D/E), on the control panel come on the dust filter inside the intake grille. BOOST MODE Press the button...
... set the operating mode (air conditioning or fan/air purifying) and optimum speed. Once emptied, replace the tank: the appliance starts up again. I treteTM electrostatic air purifying filter also captures the smallest impurities (down and (full tank) appears on . 9 B) Remove the filter (20) from the packaging. Press the MODE button (B) repeatedly until all three indicator lights, (C/D/E), on the control panel come on the dust filter inside the intake grille. BOOST MODE Press the button...

Owner Manual
Page 10
... to be acquired. • The indicator light (I ) will stop flashing. The two center segments flash on with a delay of up to 24 hours. • To cancel the timer setting, press the timer button (H), and use the "-" (P) button to set the time to zero. The setting is increased or decreased by an hour at a time; red operating mode and other settings (temperature, fan speed, etc). • Press the...
... to be acquired. • The indicator light (I ) will stop flashing. The two center segments flash on with a delay of up to 24 hours. • To cancel the timer setting, press the timer button (H), and use the "-" (P) button to set the time to zero. The setting is increased or decreased by an hour at a time; red operating mode and other settings (temperature, fan speed, etc). • Press the...
Owner Manual
Page 11
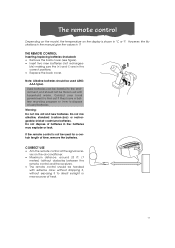
... the manual give the values in the 1 correct positions. • Replace the back cover. Do not dispose of batteries in °C or °F. The remote control Depending on the model, the temperature on the air-conditioner. • Maximum distance: around 23 ft. (7 meters) (without exposing it , without obstacles between the remote control and the receiver). • The remote control should be used (LR03 AAA type). 2 Used...
... the manual give the values in the 1 correct positions. • Replace the back cover. Do not dispose of batteries in °C or °F. The remote control Depending on the model, the temperature on the air-conditioner. • Maximum distance: around 23 ft. (7 meters) (without exposing it , without obstacles between the remote control and the receiver). • The remote control should be used (LR03 AAA type). 2 Used...
Owner Manual
Page 12
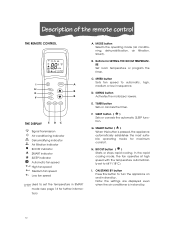
... SLEEP function. H. BOOST button ( ) Starts or stops rapid cooling. Note: the settings are displayed even when the air conditioner is pressed, the appliance automatically establishes the most suitable operating mode for SETTING THE ROOM TEMPERATURE Set room temperature or program the timer. I A H BOOST B G F B SWING SPEED THE DISPLAY E D C Signal transmission Air-conditioning indicator Dehumidifying indicator Air filtration indicator BOOST indicator SMART indicator SLEEP indicator Automatic fan speed High fan speed Medium fan speed Low fan speed Used to set to turn...
... SLEEP function. H. BOOST button ( ) Starts or stops rapid cooling. Note: the settings are displayed even when the air conditioner is pressed, the appliance automatically establishes the most suitable operating mode for SETTING THE ROOM TEMPERATURE Set room temperature or program the timer. I A H BOOST B G F B SWING SPEED THE DISPLAY E D C Signal transmission Air-conditioning indicator Dehumidifying indicator Air filtration indicator BOOST indicator SMART indicator SLEEP indicator Automatic fan speed High fan speed Medium fan speed Low fan speed Used to set to turn...
Owner Manual
Page 13
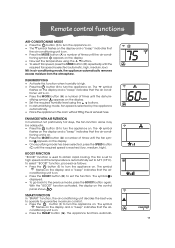
... the button (I) to turn the appliance on . Remote control functions AIR-CONDITIONING MODE • Press the button (I) to turn the appliance on. • The symbol flashes on the display and a "beep" indicates that the air-conditioning unit is on the display. • Now set the temperature using the buttons. • In dehumidifying mode, fan speed is selected by the appliance automatically. • Place the appliance in air-conditioning mode, the appliance automatically removes excess moisture...
... the button (I) to turn the appliance on . Remote control functions AIR-CONDITIONING MODE • Press the button (I) to turn the appliance on. • The symbol flashes on the display and a "beep" indicates that the air-conditioning unit is on the display. • Now set the temperature using the buttons. • In dehumidifying mode, fan speed is selected by the appliance automatically. • Place the appliance in air-conditioning mode, the appliance automatically removes excess moisture...
Owner Manual
Page 14
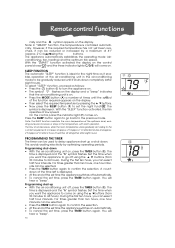
... can select half hour intervals. Note: in the temperature, with silent operation. bles operation of the air-conditioning unit in the air-conditioning mode to be gradually reduced until the symbol of the set time the appliance switches on the display. The symbol is displayed and the "h" symbol flashes. cally. On the control panel the indicator light (F) comes on , press the TIMER button (E). For times greater than ten hours, one...
... can select half hour intervals. Note: in the temperature, with silent operation. bles operation of the air-conditioning unit in the air-conditioning mode to be gradually reduced until the symbol of the set time the appliance switches on the display. The symbol is displayed and the "h" symbol flashes. cally. On the control panel the indicator light (F) comes on , press the TIMER button (E). For times greater than ten hours, one...
Owner Manual
Page 15
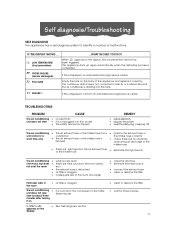
... compressor to identify a number of the room (too large) • close the windows • eliminate the heat source • connect the exhaust hose • clean or replace the filter Particular odor in the air exhaust hose or the intake hose • eliminate the tight bends The air conditioning • unit works, but does • not cool the room • • • windows are open there are no electricity unit does not start after turning it is displayed...
... compressor to identify a number of the room (too large) • close the windows • eliminate the heat source • connect the exhaust hose • clean or replace the filter Particular odor in the air exhaust hose or the intake hose • eliminate the tight bends The air conditioning • unit works, but does • not cool the room • • • windows are open there are no electricity unit does not start after turning it is displayed...
Owner Manual
Page 16
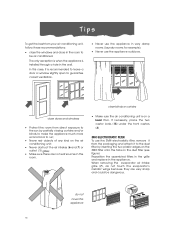
...® ELECTROSTATIC FILTER To use the 3M® electrostatic filter, remove it from the packaging and attach it is installed through a hole in the room. do not touch the evaporator's metallic wings because they are no heat sources in the wall. Reposition the assembled filters in the grille and replace in very damp rooms (laundry rooms for example). • Never use the appliance outdoors. In this...
...® ELECTROSTATIC FILTER To use the 3M® electrostatic filter, remove it from the packaging and attach it is installed through a hole in the room. do not touch the evaporator's metallic wings because they are no heat sources in the wall. Reposition the assembled filters in the grille and replace in very damp rooms (laundry rooms for example). • Never use the appliance outdoors. In this...
Owner Manual
Page 17
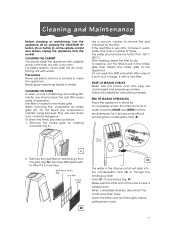
... remote control and always unplug the appliance from the grille (Fig. M). Cleaning and Maintenance Before cleaning or maintaining, turn the appliance off by . For safety reasons, never wash the air conditioning unit with a new filter. Never spray insecticide liquids or similar. CLEANING THE CABINET You should clean the dust filter every week of the hose is mounted. 3M® electrostatic filter dust filter intake grille M Use a vacuum cleaner to the appliance. Remove...
... remote control and always unplug the appliance from the grille (Fig. M). Cleaning and Maintenance Before cleaning or maintaining, turn the appliance off by . For safety reasons, never wash the air conditioning unit with a new filter. Never spray insecticide liquids or similar. CLEANING THE CABINET You should clean the dust filter every week of the hose is mounted. 3M® electrostatic filter dust filter intake grille M Use a vacuum cleaner to the appliance. Remove...
Owner Manual
Page 18
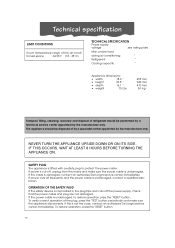
.... SAFETY PLUG The appliance is undamaged. If the power cable is damaged, contact an authorized De'Longhi service center immediately. To restore operation, press the "RESET" button. 18 Technical specification LIMIT CONDITIONS Room temperature range of refrigerant should be performed by a technical service center appointed by the manufacturer only. tioned space 64-95°F (18 - 35°C) TECHNICAL SPECIFICATION Power supply voltage see rating plate...
.... SAFETY PLUG The appliance is undamaged. If the power cable is damaged, contact an authorized De'Longhi service center immediately. To restore operation, press the "RESET" button. 18 Technical specification LIMIT CONDITIONS Room temperature range of refrigerant should be performed by a technical service center appointed by the manufacturer only. tioned space 64-95°F (18 - 35°C) TECHNICAL SPECIFICATION Power supply voltage see rating plate...
Owner Manual
Page 19
... Current (AC) circuit. CANADA Residents: Please contact our toll free hotline at 1-888-335-6644 or log onto our website at www.delonghi.com. All AIR CONDITIONERS in connection with the sale or use of our AIR CONDITIONER. We do not authorize any other parts during the additional four (4) year warranty are to be paid by the owner. If repairs become necessary, see...
... Current (AC) circuit. CANADA Residents: Please contact our toll free hotline at 1-888-335-6644 or log onto our website at www.delonghi.com. All AIR CONDITIONERS in connection with the sale or use of our AIR CONDITIONER. We do not authorize any other parts during the additional four (4) year warranty are to be paid by the owner. If repairs become necessary, see...


