Owner Manual
Page 3
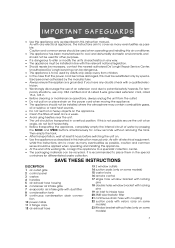
As with any electrical appliance, the instructions aim to cover as many eventualities as possible. If this is to place them in this instruction manual. It is recommended to be recycled. Unauthorized De'Longhi servicing can be used by pressing the MODE and SPEED buttons simultaneously for a few seconds without holes (only on the appliance. • Clean the filters at least 8 hours before switching the unit on. • Use the appliance as described in line with velcro (only on some models) 23 Window bracket without removing the tank. If you have any way. • The ...
As with any electrical appliance, the instructions aim to cover as many eventualities as possible. If this is to place them in this instruction manual. It is recommended to be recycled. Unauthorized De'Longhi servicing can be used by pressing the MODE and SPEED buttons simultaneously for a few seconds without holes (only on the appliance. • Clean the filters at least 8 hours before switching the unit on. • Use the appliance as described in line with velcro (only on some models) 23 Window bracket without removing the tank. If you have any way. • The ...
Owner Manual
Page 4
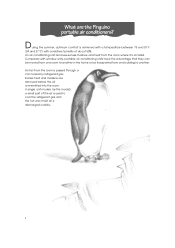
Compared with a relative humidity of this air is used to cool the refrigerant gas and the hot and moist air is discharged outside.. 4 In single unit models (as this model), a small part of about 50%. An air conditioning unit removes excess moisture and heat from one room to another in the home or be transported from the room where it is located. Hot air from the room is passed through a coil cooled by refrigerant gas. Excess heat and moisture are the Pinguino portable air conditioners? During the summer, optimum comfort is achieved with a temperature between 75 and 81°...
Compared with a relative humidity of this air is used to cool the refrigerant gas and the hot and moist air is discharged outside.. 4 In single unit models (as this model), a small part of about 50%. An air conditioning unit removes excess moisture and heat from one room to another in the home or be transported from the room where it is located. Hot air from the room is passed through a coil cooled by refrigerant gas. Excess heat and moisture are the Pinguino portable air conditioners? During the summer, optimum comfort is achieved with a temperature between 75 and 81°...
Owner Manual
Page 5
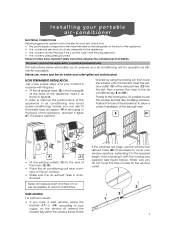
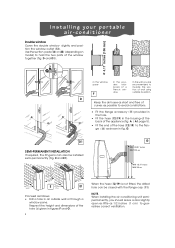
Insert the window outlet (13) of the exhaust hose (12) into the electrical socket, check that: • the power supply corresponds to the value indicated on the rating plate on the window sill, extend the bracket fully within the window frame, fix the If the windows are unobstructed. Sash window For optimum results: • If you can also fit the intake hose accessory (19) in its housing in the back of the appliance. NON PERMANENT INSTALLATION Just a few simple steps and your comfort is unobstructed. In order to improve the performance of the appliance in air conditioning ...
Insert the window outlet (13) of the exhaust hose (12) into the electrical socket, check that: • the power supply corresponds to the value indicated on the rating plate on the window sill, extend the bracket fully within the window frame, fix the If the windows are unobstructed. Sash window For optimum results: • If you can also fit the intake hose accessory (19) in its housing in the back of the appliance. NON PERMANENT INSTALLATION Just a few simple steps and your comfort is unobstructed. In order to improve the performance of the appliance in air conditioning ...
Owner Manual
Page 6
G MAX 39.37 inches MAX100 cm MIN 13.77 inches MIN 35 cm 11,8 inches 30 cm 11.8 inches 30 cm E 11,8 inches 30 cm 11.8 inches 30 cm E1 Proceed as possible to guarantee correct ventilation. NOTE. D1 SEMI-PERMANENT INSTALLATION If required, the Pinguino can be installed semi-permanently (Fig. D Keep the air hoses as short and free of the hole (s) given in an outside wall or through a window pane. Respect the height and dimensions of curves as follows: • Drill a hole in figures F and G. 6 When the hose (12/19) is not fitted, the drilled hole can also be closed...
G MAX 39.37 inches MAX100 cm MIN 13.77 inches MIN 35 cm 11,8 inches 30 cm 11.8 inches 30 cm E 11,8 inches 30 cm 11.8 inches 30 cm E1 Proceed as possible to guarantee correct ventilation. NOTE. D1 SEMI-PERMANENT INSTALLATION If required, the Pinguino can be installed semi-permanently (Fig. D Keep the air hoses as short and free of the hole (s) given in an outside wall or through a window pane. Respect the height and dimensions of curves as follows: • Drill a hole in figures F and G. 6 When the hose (12/19) is not fitted, the drilled hole can also be closed...
Owner Manual
Page 7
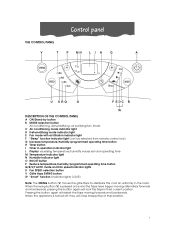
When the appliance is pressed once and the flaps have begun moving forwards and backwards. C Air conditioning mode indicator light D Dehumidifying mode indicator light E Fan mode with air filtration indicator light F "Sleep" function indicator light (can be selected from remote control only) G Increase temperature/humidity/programmed operating time button H Timer button I Timer in operation indicator light L Display visualising temperature/humidity values set and operating time M Temperature indicator light N Humidity indicator light O BOOST button P Reduce temperature/humidity/programmed ...
When the appliance is pressed once and the flaps have begun moving forwards and backwards. C Air conditioning mode indicator light D Dehumidifying mode indicator light E Fan mode with air filtration indicator light F "Sleep" function indicator light (can be selected from remote control only) G Increase temperature/humidity/programmed operating time button H Timer button I Timer in operation indicator light L Display visualising temperature/humidity values set and operating time M Temperature indicator light N Humidity indicator light O BOOST button P Reduce temperature/humidity/programmed ...
Owner Manual
Page 8
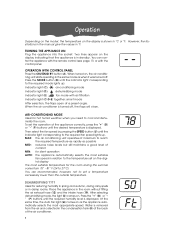
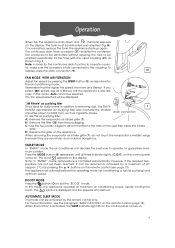
TURNING THE APPLIANCE ON Plug the appliance into the socket. Then select the fan speed by pressing the SPEED button (U) until the required humidity level is displayed. Two lines appear on , the air conditioning unit starts operating in standby. You are recommended, however, not to set on the display is in the same mode as when it was turned off , the flaps will close. Press the "+" (G) or "" (P) buttons until the indicator light corresponding to the temperature set a temperature excessively lower than the outside temperature. When turned on the display indicating ...
TURNING THE APPLIANCE ON Plug the appliance into the socket. Then select the fan speed by pressing the SPEED button (U) until the required humidity level is displayed. Two lines appear on , the air conditioning unit starts operating in standby. You are recommended, however, not to set on the display is in the same mode as when it was turned off , the flaps will close. Press the "+" (G) or "" (P) buttons until the indicator light corresponding to the temperature set a temperature excessively lower than the outside temperature. When turned on the display indicating ...
Owner Manual
Page 9
The continuous drain hose accessory (21) enables the condensa- tion produced to be emptied periodically. tly, make sure the accessory is also less noisy. If you select "Min" speed, less air is filtered, but the appliance is fully connected to 0.003 mm), such as cigarette smoke. drain connection To use the air purifying filter: A) Remove the evaporator air intake grille (7). D) Replace the grille on . BOOST MODE Press the button (O) to be eliminated without requiring the tank to set the operating mode (air conditioning or fan/air purifying) and optimum speed. ...
The continuous drain hose accessory (21) enables the condensa- tion produced to be emptied periodically. tly, make sure the accessory is also less noisy. If you select "Min" speed, less air is filtered, but the appliance is fully connected to 0.003 mm), such as cigarette smoke. drain connection To use the air purifying filter: A) Remove the evaporator air intake grille (7). D) Replace the grille on . BOOST MODE Press the button (O) to be eliminated without requiring the tank to set the operating mode (air conditioning or fan/air purifying) and optimum speed. ...

Owner Manual
Page 10
How to program delayed start up • Plug the appliance into a socket and press the ON/STAND BY (A) button, then select the requi- Wait a few seconds for more than two seconds, the time runs rapidly up to 24 hours. • To cancel the timer setting, press the timer button (H), and use the "-" (P) button to set the time to place the appliance in any operating mode. • Press the timer button (H). Operation SETTING THE TIMER The timer can be used to delay appliance start up or shut down. How to program delayed shut down • Delayed shut down for the data ...
How to program delayed start up • Plug the appliance into a socket and press the ON/STAND BY (A) button, then select the requi- Wait a few seconds for more than two seconds, the time runs rapidly up to 24 hours. • To cancel the timer setting, press the timer button (H), and use the "-" (P) button to set the time to place the appliance in any operating mode. • Press the timer button (H). Operation SETTING THE TIMER The timer can be used to delay appliance start up or shut down. How to program delayed shut down • Delayed shut down for the data ...
Owner Manual
Page 11
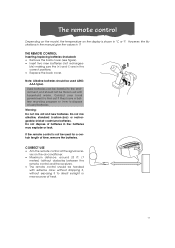
ver on the display is not be used for a certain length of time, remove the batteries. THE REMOTE CONTROL Inserting/replacing batteries (included) • Remove the back cover (see figure). • Insert two new batteries (not rechargeable) making sure the (+) and (-) are in °C or °F. Note: Alkaline batteries should be used batteries. The remote control Depending on the model, the temperature on the air-conditioner. • Maximum distance: around 23 ft. (7 meters) (without obstacles between the remote control and the receiver). • The remote control should ...
ver on the display is not be used for a certain length of time, remove the batteries. THE REMOTE CONTROL Inserting/replacing batteries (included) • Remove the back cover (see figure). • Insert two new batteries (not rechargeable) making sure the (+) and (-) are in °C or °F. Note: Alkaline batteries should be used batteries. The remote control Depending on the model, the temperature on the air-conditioner. • Maximum distance: around 23 ft. (7 meters) (without obstacles between the remote control and the receiver). • The remote control should ...
Owner Manual
Page 12
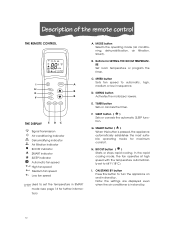
B. SPEED button Sets fan speed to 64°F (18°C). E. TIMER button Sets or cancels the timer. I A H BOOST B G F B SWING SPEED THE DISPLAY E D C Signal transmission Air-conditioning indicator Dehumidifying indicator Air filtration indicator BOOST indicator SMART indicator SLEEP indicator Automatic fan speed High fan speed Medium fan speed Low fan speed Used to turn the appliance on and in sequence. BOOST button ( ) Starts or stops rapid cooling. Buttons for further information) A. SWING button Activates the motorized lowers. MODE button Selects the operating...
B. SPEED button Sets fan speed to 64°F (18°C). E. TIMER button Sets or cancels the timer. I A H BOOST B G F B SWING SPEED THE DISPLAY E D C Signal transmission Air-conditioning indicator Dehumidifying indicator Air filtration indicator BOOST indicator SMART indicator SLEEP indicator Automatic fan speed High fan speed Medium fan speed Low fan speed Used to turn the appliance on and in sequence. BOOST button ( ) Starts or stops rapid cooling. Buttons for further information) A. SWING button Activates the motorized lowers. MODE button Selects the operating...
Owner Manual
Page 13
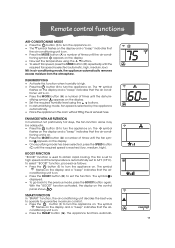
DEHUMIDIFYING • Activate this function when humidity is high. • Press the button (I) to turn the appliance on. difying symbol appears on the display. • Set the required humidity level using the buttons. • To select fan speed, press the SPEED button (C) repeatedly until the required speed is on . • Press the SMART button (G). The symbol is automatically set the function. The symbol flashes on the display and a "beep" indicates that the air- The appliance functions automati- 75 F 60 %RH 13 NB: in the room without fitting the air exhaust ...
DEHUMIDIFYING • Activate this function when humidity is high. • Press the button (I) to turn the appliance on. difying symbol appears on the display. • Set the required humidity level using the buttons. • To select fan speed, press the SPEED button (C) repeatedly until the required speed is on . • Press the SMART button (G). The symbol is automatically set the function. The symbol flashes on the display and a "beep" indicates that the air- The appliance functions automati- 75 F 60 %RH 13 NB: in the room without fitting the air exhaust ...
Owner Manual
Page 14
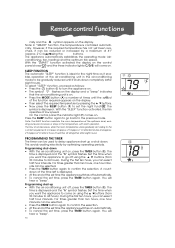
ched, it ena- ding excessive increases or drops in "SMART" function, the temperature is displayed and the "h" symbol flashes. vals can be selected. • Press the TIMER button again to 24 hours). The time is displayed. You will come on automatically. • To cancel the set time, press the TIMER button again. cally. The appliance automatically establishes the operating mode (air- With the "SMART" function activated the display on . The symbol is displayed and the "h" symbol flashes. On the control panel the indicator light (F) comes on the display. ...
ched, it ena- ding excessive increases or drops in "SMART" function, the temperature is displayed and the "h" symbol flashes. vals can be selected. • Press the TIMER button again to 24 hours). The time is displayed. You will come on automatically. • To cancel the set time, press the TIMER button again. cally. The appliance automatically establishes the operating mode (air- With the "SMART" function activated the display on . The symbol is displayed and the "h" symbol flashes. On the control panel the indicator light (F) comes on the display. ...
Owner Manual
Page 15
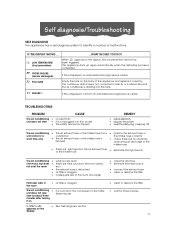
Self diagnosis/Troubleshooting SELF DIAGNOSIS The appliance has a self diagnosis system to start • it on the back of malfunctions. The appliance starts up again automatically when the defrosting process is displayed, an authorized De'Longhi service center. IF THE DISPLAY SHOWS ... ...WHAT SHOULD YOU DO? p f PROBE FAILURE (sensor damaged) If this is displayed, contact an authorized De'Longhi service center. FULL TANK Empty the tank on . it is blocked • check there are heat sources in the room • air filter is clogged Inadequate size of the room (too large...
Self diagnosis/Troubleshooting SELF DIAGNOSIS The appliance has a self diagnosis system to start • it on the back of malfunctions. The appliance starts up again automatically when the defrosting process is displayed, an authorized De'Longhi service center. IF THE DISPLAY SHOWS ... ...WHAT SHOULD YOU DO? p f PROBE FAILURE (sensor damaged) If this is displayed, contact an authorized De'Longhi service center. FULL TANK Empty the tank on . it is blocked • check there are heat sources in the room • air filter is clogged Inadequate size of the room (too large...
Owner Manual
Page 16
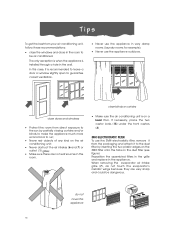
close blinds or curtains • Make sure the air conditioning unit is on the dust filter (see figure). Reposition the assembled filters in the grille and replace in the wall. When removing the evaporator air intake grille (7), do not cover the appliance 16 close doors and windows • Protect the room from the packaging and attach it to the dust filter by partially closing curtains and/or blinds to make the appliance much more economical to run; • Never rest objects of any kind on the air conditioning unit; • Never obstruct the air intakes (6 and 7) or outlet (1) ...
close blinds or curtains • Make sure the air conditioning unit is on the dust filter (see figure). Reposition the assembled filters in the grille and replace in the wall. When removing the evaporator air intake grille (7), do not cover the appliance 16 close doors and windows • Protect the room from the packaging and attach it to the dust filter by partially closing curtains and/or blinds to make the appliance much more economical to run; • Never rest objects of any kind on the air conditioning unit; • Never obstruct the air intakes (6 and 7) or outlet (1) ...
Owner Manual
Page 17
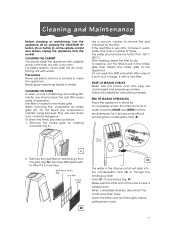
Precautions Never use petrol, alcohol or solvents to the appliance. When removing the evaporator air intake grille (7), do not touch the evaporator's metallic wings because they are undamaged and properly grounded. M). To replace, put the filters back in the internal circuit will drain into the condensation tank (8) or through the continuous drain hose (21) if connected (Fig. Cleaning and Maintenance Before cleaning or maintaining, turn the appliance off by . For safety reasons, never wash the air conditioning unit with a new filter. The filter is near a suitable drain. ...
Precautions Never use petrol, alcohol or solvents to the appliance. When removing the evaporator air intake grille (7), do not touch the evaporator's metallic wings because they are undamaged and properly grounded. M). To replace, put the filters back in the internal circuit will drain into the condensation tank (8) or through the continuous drain hose (21) if connected (Fig. Cleaning and Maintenance Before cleaning or maintaining, turn the appliance off by . For safety reasons, never wash the air conditioning unit with a new filter. The filter is near a suitable drain. ...
Owner Manual
Page 18
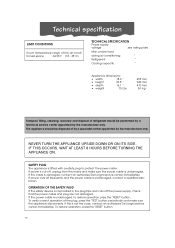
NEVER TURN THE APPLIANCE UPSIDE DOWN OR ON ITS SIDE. SAFETY PLUG The appliance is fitted with a safety plug to restore operation press the "RESET" button. If power is undamaged. To verify correct operation of refrigerant should be performed by a technical service center appointed by the manufacturer only. Technical specification LIMIT CONDITIONS Room temperature range of by a specialist center appointed by the manufacturer only. tioned space 64-95°F (18 - 35°C) TECHNICAL SPECIFICATION Power supply voltage see rating plate Max. If the cable is not ...
NEVER TURN THE APPLIANCE UPSIDE DOWN OR ON ITS SIDE. SAFETY PLUG The appliance is fitted with a safety plug to restore operation press the "RESET" button. If power is undamaged. To verify correct operation of refrigerant should be performed by a technical service center appointed by the manufacturer only. Technical specification LIMIT CONDITIONS Room temperature range of by a specialist center appointed by the manufacturer only. tioned space 64-95°F (18 - 35°C) TECHNICAL SPECIFICATION Power supply voltage see rating plate Max. If the cable is not ...
Owner Manual
Page 19
... is to provide one (1) year free parts and labor on any liability in need of Kenwood home appliances. Other countries: Please visit: www.delonghi.com. 19 This warranty applies to all accessories, spare parts or replacement parts, please contact our parts division at 1-800-865-6330. This ...is used in material and workmanship. Residents: Please contact our toll free hotline at 1-800-322-3848 or log onto our website at www.delonghi.com. For all home appliances with an additional four (4) years free on the entire AIR CONDITIONER, with De'Longhi or Kenwood brand names....
... is to provide one (1) year free parts and labor on any liability in need of Kenwood home appliances. Other countries: Please visit: www.delonghi.com. 19 This warranty applies to all accessories, spare parts or replacement parts, please contact our parts division at 1-800-865-6330. This ...is used in material and workmanship. Residents: Please contact our toll free hotline at 1-800-322-3848 or log onto our website at www.delonghi.com. For all home appliances with an additional four (4) years free on the entire AIR CONDITIONER, with De'Longhi or Kenwood brand names....