
User Guide
Page 4
... Raising the Projector Height 18 Lowering the Projector Height 18 Adjusting the Projector Zoom and Focus 19 Adjusting Projection Image Size 20 Using the Control Panel 21 Using the Remote Control 24 Using the On-Screen Display 25 Main Menu 26 INPUT SELECT 26 AUTO-ADJUST 27 SET UP 27 ...PICTURE (in PC Mode 28 PICTURE (in Video Mode 29 DISPLAY (in PC Mode 30 DISPLAY (in Video Mode 31 LAMP 32 LANGUAGE 33 OTHERS 34 4 Troubleshooting Your Projector 37 Changing the Lamp 41 5 Specifications 43 6 Contacting Dell 47 7 Appendix: Glossary 48...
... Raising the Projector Height 18 Lowering the Projector Height 18 Adjusting the Projector Zoom and Focus 19 Adjusting Projection Image Size 20 Using the Control Panel 21 Using the Remote Control 24 Using the On-Screen Display 25 Main Menu 26 INPUT SELECT 26 AUTO-ADJUST 27 SET UP 27 ...PICTURE (in PC Mode 28 PICTURE (in Video Mode 29 DISPLAY (in PC Mode 30 DISPLAY (in Video Mode 31 LAMP 32 LANGUAGE 33 OTHERS 34 4 Troubleshooting Your Projector 37 Changing the Lamp 41 5 Specifications 43 6 Contacting Dell 47 7 Appendix: Glossary 48...
User Guide
Page 22
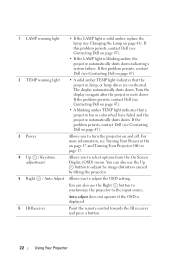
...the Right button to synchronize the projector to adjust the OSD setting. Auto adjust does not operate if the OSD is blinking amber, the projector automatically shuts down . For more information, see Turning Your Projector On on page 17 and Turning Your Projector Off on page 47). •... down . If this problem persists, contact Dell (see Contacting Dell on page 41). If the problem persists, contact Dell (see Contacting Dell on and off. If the problem persists, contact Dell (see Contacting Dell on page 47). 3 Power Allows you to turn the projector on page 47). • A blinking ...
...the Right button to synchronize the projector to adjust the OSD setting. Auto adjust does not operate if the OSD is blinking amber, the projector automatically shuts down . For more information, see Turning Your Projector On on page 17 and Turning Your Projector Off on page 47). •... down . If this problem persists, contact Dell (see Contacting Dell on page 41). If the problem persists, contact Dell (see Contacting Dell on and off. If the problem persists, contact Dell (see Contacting Dell on page 47). 3 Power Allows you to turn the projector on page 47). • A blinking ...
User Guide
Page 23
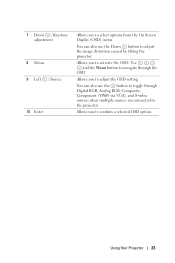
...Menu button to navigate through Digital RGB, Analog RGB, Composite, Component (YPbPr via VGA), and S-video sources when multiple sources are connected to the projector. Allows you to activate the OSD. Allows you to confirm a selected OSD option. You can also use the button to select options from the... On Screen Display (OSD) menu. 7 Down / Keystone adjustment 8 Menu 9 Left / Source 10 Enter Allows you to adjust the OSD setting. Allows you to toggle through the OSD. You can also use the Down button to adjust the image distortion caused by tilting the...
...Menu button to navigate through Digital RGB, Analog RGB, Composite, Component (YPbPr via VGA), and S-video sources when multiple sources are connected to the projector. Allows you to activate the OSD. Allows you to confirm a selected OSD option. You can also use the button to select options from the... On Screen Display (OSD) menu. 7 Down / Keystone adjustment 8 Menu 9 Left / Source 10 Enter Allows you to adjust the OSD setting. Allows you to toggle through the OSD. You can also use the Down button to adjust the image distortion caused by tilting the...
User Guide
Page 24
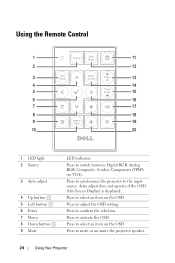
... adjust does not operate if the OSD (On-Screen Display) is displayed. Press to select an item on the OSD. Press to adjust the OSD setting. Press to confirm the selection. Press to the input source. Press to synchronize the projector to mute or un-mute the...
... adjust does not operate if the OSD (On-Screen Display) is displayed. Press to select an item on the OSD. Press to adjust the OSD setting. Press to confirm the selection. Press to the input source. Press to synchronize the projector to mute or un-mute the...
User Guide
Page 25
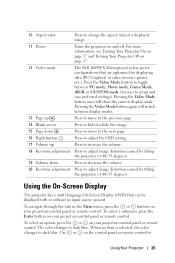
... or remote control. To navigate through the tabs in the Main menu, press the or buttons on page 17. 12 Video mode The Dell 1609WX Micro-projector has preset configurations that can be displayed with or without an input source present. To select a submenu, press the Enter button on and...next page. 16 Right button Press to adjust the OSD setting. 17 Volume up Press to increase the volume. 18 Keystone adjustment Press to adjust image distortion caused by tilting the projector. (+40/-35 degrees) Using the On-Screen Display The projector has a multi-language On-Screen Display (OSD) that...
... or remote control. To navigate through the tabs in the Main menu, press the or buttons on page 17. 12 Video mode The Dell 1609WX Micro-projector has preset configurations that can be displayed with or without an input source present. To select a submenu, press the Enter button on and...next page. 16 Right button Press to adjust the OSD setting. 17 Volume up Press to increase the volume. 18 Keystone adjustment Press to adjust image distortion caused by tilting the projector. (+40/-35 degrees) Using the On-Screen Display The projector has a multi-language On-Screen Display (OSD) that...

User Guide
Page 26
To go back to Main menu, go to detect VGA-A signal. VGA-B-Press Enter to autodetect the available input signals. adjust the settings. manually select the input signal. AUTO SOURCE-Select On (the default) to detect VGA-B signal. Main Menu INPUT SELECT The Input Select menu allows you ...-Press Enter to detect DVI-D signal. DVI-D-Press Enter to detect S-Video signal. If you press the Source button when the projector is set to Off, you to Back tab and press the Enter button on , it automatically finds the next available input signal. To exit the OSD, go ...
To go back to Main menu, go to detect VGA-A signal. VGA-B-Press Enter to autodetect the available input signals. adjust the settings. manually select the input signal. AUTO SOURCE-Select On (the default) to detect VGA-B signal. Main Menu INPUT SELECT The Input Select menu allows you ...-Press Enter to detect DVI-D signal. DVI-D-Press Enter to detect S-Video signal. If you press the Source button when the projector is set to Off, you to Back tab and press the Enter button on , it automatically finds the next available input signal. To exit the OSD, go ...
User Guide
Page 27
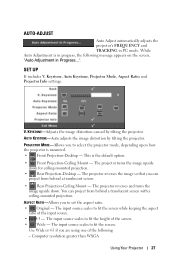
... option. • Front Projection-Ceiling Mount - Computer resolution greater than WXGA Using Your Projector 27 The input source scales to fit the screen. AUTO-ADJUST Auto Adjust automatically adjusts the projector's FREQUENCY and TRACKING in progress, the following : - Keystone, Auto Keystone, Projector Mode, Aspect Ratio and Projector Info settings. While Auto Adjustment is in PC mode...
... option. • Front Projection-Ceiling Mount - Computer resolution greater than WXGA Using Your Projector 27 The input source scales to fit the screen. AUTO-ADJUST Auto Adjust automatically adjusts the projector's FREQUENCY and TRACKING in progress, the following : - Keystone, Auto Keystone, Projector Mode, Aspect Ratio and Projector Info settings. While Auto Adjustment is in PC mode...

User Guide
Page 28
PICTURE (in PC Mode) Using the Picture menu, you to adjust the brightness of your projectors. The Picture menu, provides the following options: BRIGHTNESS-Use and to manually adjust the colours red, green, and blue. The screen appears cooler at...- COLOR ADJUST-Allows you can adjust the display settings of the image. When you to adjust the display contrast. CONTRAST-Use and to adjust the color temperature. Component cable (720p/1080i/1080p) PROJECTOR INFO-Displays the projector model name, the present input source and projector series number (PPID#). The values are saved in ...
PICTURE (in PC Mode) Using the Picture menu, you to adjust the brightness of your projectors. The Picture menu, provides the following options: BRIGHTNESS-Use and to manually adjust the colours red, green, and blue. The screen appears cooler at...- COLOR ADJUST-Allows you can adjust the display settings of the image. When you to adjust the display contrast. CONTRAST-Use and to adjust the color temperature. Component cable (720p/1080i/1080p) PROJECTOR INFO-Displays the projector model name, the present input source and projector series number (PPID#). The values are saved in ...

User Guide
Page 29
... in the Custom mode. When you to adjust the brightness of your projectors. The values are saved in the Color Adjust menu, the Custom mode is activated. SHARPNESS-Allows you can adjust the display settings of the image. The screen appears cooler at higher color temperatures and ...warmer at lower color temperatures. Using Your Projector 29 CONTRAST-Use and to adjust the image sharpness. Press to decrease the amount...
... in the Custom mode. When you to adjust the brightness of your projectors. The values are saved in the Color Adjust menu, the Custom mode is activated. SHARPNESS-Allows you can adjust the display settings of the image. The screen appears cooler at higher color temperatures and ...warmer at lower color temperatures. Using Your Projector 29 CONTRAST-Use and to adjust the image sharpness. Press to decrease the amount...

User Guide
Page 30
... DISPLAY (in PC Mode) Using the Display menu, you can adjust the display settings of the display. SIGNAL TYPE-Allows you adjust the settings for White Intensity or Degamma, the projector automatically switches to manually select signal type RGB, YCbCr, or YPbPr. VERTICAL POSITION-...to digitally magnify an image up . 30 Using Your Projector If you to Custom. ZOOM NAVIGATION-Press to optimize the projectors display mode: PC, Movie, sRGB (provides more accurate color representation), Game, and Custom (set your projectors. The Picture menu, provides the following options: VIDEO ...
... DISPLAY (in PC Mode) Using the Display menu, you can adjust the display settings of the display. SIGNAL TYPE-Allows you adjust the settings for White Intensity or Degamma, the projector automatically switches to manually select signal type RGB, YCbCr, or YPbPr. VERTICAL POSITION-...to digitally magnify an image up . 30 Using Your Projector If you to Custom. ZOOM NAVIGATION-Press to optimize the projectors display mode: PC, Movie, sRGB (provides more accurate color representation), Game, and Custom (set your projectors. The Picture menu, provides the following options: VIDEO ...

User Guide
Page 31
... Video Mode) Using the Display menu, you can adjust the display settings of your preferred settings). DEGAMMA-Adjust among the 4 preset values (1, 2, 3, 4) to sybchronize the phase of the display. Using Your Projector 31 TRACKING-Allows you experience an unstable or flickering image, use Frequency... vertical flickering wave, use Tracking to Custom. ZOOM NAVIGATION-Press to minimize the bars. If you adjust the settings for White Intensity or Degamma, the projector automatically switches to correct it. SIGNAL TYPE-Manually select signal type RGB, YCbCr, or YPbPr. ZOOM-Press to...
... Video Mode) Using the Display menu, you can adjust the display settings of your preferred settings). DEGAMMA-Adjust among the 4 preset values (1, 2, 3, 4) to sybchronize the phase of the display. Using Your Projector 31 TRACKING-Allows you experience an unstable or flickering image, use Frequency... vertical flickering wave, use Tracking to Custom. ZOOM NAVIGATION-Press to minimize the bars. If you adjust the settings for White Intensity or Degamma, the projector automatically switches to correct it. SIGNAL TYPE-Manually select signal type RGB, YCbCr, or YPbPr. ZOOM-Press to...
User Guide
Page 32
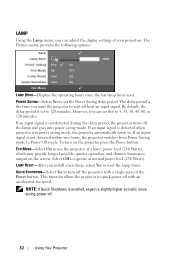
...on . If an input signal is detected when projector is not detected during power off the projector with an accelerated fan speed. LAMP Using the Lamp menu, you can adjust the display settings of the Power button. However, you can set the Power Saving delay period. If an input... signal is in power saving mode, the projector automatically turns on the projector press the Power button. The Picture menu, provides the following...
...on . If an input signal is detected when projector is not detected during power off the projector with an accelerated fan speed. LAMP Using the Lamp menu, you can adjust the display settings of the Power button. However, you can set the Power Saving delay period. If an input... signal is in power saving mode, the projector automatically turns on the projector press the Power button. The Picture menu, provides the following...
User Guide
Page 33
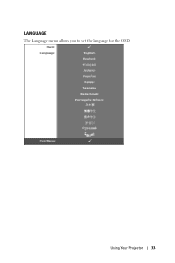
LANGUAGE The Language menu allows you to set the language for the OSD. Using Your Projector 33
LANGUAGE The Language menu allows you to set the language for the OSD. Using Your Projector 33
User Guide
Page 35
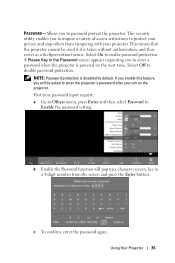
... menu, press Enter and then select Password to enable password protection. This means that the projector cannot be asked to enter the projector's password after you turn on the next time. Select On to Enable the password setting. NOTE: Password protection is taken without authorization, and thus serves as a theftprevention feature. If you...
... menu, press Enter and then select Password to enable password protection. This means that the projector cannot be asked to enter the projector's password after you turn on the next time. Select On to Enable the password setting. NOTE: Password protection is taken without authorization, and thus serves as a theftprevention feature. If you...

User Guide
Page 36
...Off to disable the function. Reset items include both computer sources and video source settings. 36 Using Your Projector TEST PATTERN-Select On to its utilities. d If the password verification is successful, you forget your ...password, contact DELL™ or qualified service personnel. After the three invalid attempts, the projector will be given another two chances. NOTE: If you may resume with accessing the projector's functions and its factory default settings...
...Off to disable the function. Reset items include both computer sources and video source settings. 36 Using Your Projector TEST PATTERN-Select On to its utilities. d If the password verification is successful, you forget your ...password, contact DELL™ or qualified service personnel. After the three invalid attempts, the projector will be given another two chances. NOTE: If you may resume with accessing the projector's functions and its factory default settings...

User Guide
Page 38
... required distance from the graphics card, please set the resolution of the computer to WXGA (1280x800) or XGA (1024 x 768): a Right-click the unused portion of the test pattern are not using a Dell™ portable computer, set the signal type to 39.4 ft [12 m]). 38 Troubleshooting Your Projector Adjust the tracking in the OSD Display...
... required distance from the graphics card, please set the resolution of the computer to WXGA (1280x800) or XGA (1024 x 768): a Right-click the unused portion of the test pattern are not using a Dell™ portable computer, set the signal type to 39.4 ft [12 m]). 38 Troubleshooting Your Projector Adjust the tracking in the OSD Display...

User Guide
Page 39
...adjust the aspect ratio in the Set Up menu in the OSD. If this occurs, the projector does not turn the display on again after the projector cools down. If the problem persists, contact Dell™ (see Contacting Dell on . TEMP light is reversed Select Set Up from the OSD and adjust... the projector mode. The OSD does not appear on...
...adjust the aspect ratio in the Set Up menu in the OSD. If this occurs, the projector does not turn the display on again after the projector cools down. If the problem persists, contact Dell™ (see Contacting Dell on . TEMP light is reversed Select Set Up from the OSD and adjust... the projector mode. The OSD does not appear on...

User Guide
Page 45
... Rate: Data Bits: Parity Stop Bits Value 19200 8 None 1 • Command types To pop up the OSD menu and adjust the settings. • Control command Syntax (From PC to Projector) [H][AC][SoP][CRC][ID][SoM][COMMAND] [H][AC][SoP][CRC][ID][SoM][COMMAND] [Value] • Example: Power ON Command (Send low byte firstly...: 0xbe, 0xef, 0x10, 0x05, 0x00, 0xc6, 0xff, 0x11, 0x11, 0x01, 0x00, 0x01 • Control Commands List To view the latest RS232 code, go to the Dell Support site at: support...
... Rate: Data Bits: Parity Stop Bits Value 19200 8 None 1 • Command types To pop up the OSD menu and adjust the settings. • Control command Syntax (From PC to Projector) [H][AC][SoP][CRC][ID][SoM][COMMAND] [H][AC][SoP][CRC][ID][SoM][COMMAND] [Value] • Example: Power ON Command (Send low byte firstly...: 0xbe, 0xef, 0x10, 0x05, 0x00, 0xc6, 0xff, 0x11, 0x11, 0x01, 0x00, 0x01 • Control Commands List To view the latest RS232 code, go to the Dell Support site at: support...

User Guide
Page 52
... Language 33 Main Menu 26 Others 34 Picture (in PC Mode) 28 Picture (in Video Mode) 29 Set Up 27 P phone numbers 47 Powering On/Off the Projector Powering Off the Projector 17 Powering On the Projector 17 R Remote Control 24 IR receiver 22 S Specifications Audio 43 Brightness 43 Color Wheel Speed 43 Contrast... 43 Projection Distance 43 Projection Lens 43 Projection Screen Size 43 Regulatory 44 RS232 Protocol 45 Uniformity 43 Video Compatibility 43 Weight 44 support contacting Dell 47 T telephone numbers 47 52 Index
... Language 33 Main Menu 26 Others 34 Picture (in PC Mode) 28 Picture (in Video Mode) 29 Set Up 27 P phone numbers 47 Powering On/Off the Projector Powering Off the Projector 17 Powering On the Projector 17 R Remote Control 24 IR receiver 22 S Specifications Audio 43 Brightness 43 Color Wheel Speed 43 Contrast... 43 Projection Distance 43 Projection Lens 43 Projection Screen Size 43 Regulatory 44 RS232 Protocol 45 Uniformity 43 Video Compatibility 43 Weight 44 support contacting Dell 47 T telephone numbers 47 52 Index

Protocol Document
Page 1
Dell™ 1609WX RS232 Protocol Document RS232 Projector Pin Assignment (Facing Projector) RS232 Serial Communication Cable Pin Assignment (Facing Cable) Pin Assignments RS232 PIN DESCRIPTION 1 2 TXD 3 RXD 4 5 GROUND 6 7 Not Used 8 Not Used 9 Note 1: The RS232 cable is not provided by Dell. MINI DIN-6 5 3 1, 2 6 4 RS232 Protocol Communication Settings Connection Settings Baud Rate Data Bits Parity Stop Bits Flow control Value 19200 bps 8 bits None 1 bit None Command Types To display the OSD menu and adjust the settings.
Dell™ 1609WX RS232 Protocol Document RS232 Projector Pin Assignment (Facing Projector) RS232 Serial Communication Cable Pin Assignment (Facing Cable) Pin Assignments RS232 PIN DESCRIPTION 1 2 TXD 3 RXD 4 5 GROUND 6 7 Not Used 8 Not Used 9 Note 1: The RS232 cable is not provided by Dell. MINI DIN-6 5 3 1, 2 6 4 RS232 Protocol Communication Settings Connection Settings Baud Rate Data Bits Parity Stop Bits Flow control Value 19200 bps 8 bits None 1 bit None Command Types To display the OSD menu and adjust the settings.


