User Guide
Page 3
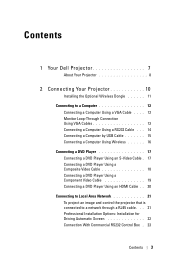
Contents 1 Your Dell Projector 7 About Your Projector 8 2 Connecting Your Projector 10 Installing the Optional Wireless Dongle 11 Connecting to a Computer 12 Connecting a Computer Using a VGA Cable . . . . 12 Monitor Loop-Through Connection Using VGA Cables 13 Connecting a Computer Using a RS232 Cable . . . 14 Connecting a Computer by USB Cable 15 Connecting a Computer Using Wireless 16 Connecting a DVD Player 17 Connecting a DVD Player Using an S-Video...
Contents 1 Your Dell Projector 7 About Your Projector 8 2 Connecting Your Projector 10 Installing the Optional Wireless Dongle 11 Connecting to a Computer 12 Connecting a Computer Using a VGA Cable . . . . 12 Monitor Loop-Through Connection Using VGA Cables 13 Connecting a Computer Using a RS232 Cable . . . 14 Connecting a Computer by USB Cable 15 Connecting a Computer Using Wireless 16 Connecting a DVD Player 17 Connecting a DVD Player Using an S-Video...

User Guide
Page 12
Connecting to a Computer Connecting a Computer Using a VGA Cable 1 Power cord 2 VGA to VGA cable 3 USB-A to use the Page Up and Page Down features on the remote control. 12 Connecting Your Projector NOTE: The Mini USB cable must be connected if you want to Mini USB-B cable NOTE: The Mini USB cable is not shipped with your projector.
Connecting to a Computer Connecting a Computer Using a VGA Cable 1 Power cord 2 VGA to VGA cable 3 USB-A to use the Page Up and Page Down features on the remote control. 12 Connecting Your Projector NOTE: The Mini USB cable must be connected if you want to Mini USB-B cable NOTE: The Mini USB cable is not shipped with your projector.

User Guide
Page 15
An additional USB cable can be purchased on the Dell website at www.dell.com. Only one USB cable is shipped with your projector. Connecting Your Projector 15 Connecting a Computer by USB Cable 1 Power cord 2 USB-A to USB-B cable NOTE: Plug and Play.
An additional USB cable can be purchased on the Dell website at www.dell.com. Only one USB cable is shipped with your projector. Connecting Your Projector 15 Connecting a Computer by USB Cable 1 Power cord 2 USB-A to USB-B cable NOTE: Plug and Play.

User Guide
Page 34
... Up feature. Press to hide/unhide the image. Pressing the Video Mode button again will show the current display mode. NOTE: The Mini USB cable must be connected if you want to navigate through the On-Screen Display (OSD) Menu items. 34 Using Your Projector Press to adjust image distortion caused by... not look at the screen, press and hold the laser button to the previous page. Press to use the Page Down feature. NOTE: The Mini USB cable must be connected if you want to choose S-Video source.
... Up feature. Press to hide/unhide the image. Pressing the Video Mode button again will show the current display mode. NOTE: The Mini USB cable must be connected if you want to navigate through the On-Screen Display (OSD) Menu items. 34 Using Your Projector Press to adjust image distortion caused by... not look at the screen, press and hold the laser button to the previous page. Press to use the Page Down feature. NOTE: The Mini USB cable must be connected if you want to choose S-Video source.

User Guide
Page 58
... then select Wireless Display on page 39. 58 Using Your Projector See "INPUT SOURCE WIRELESS/USB" on the sub-menu. See "Installing the Optional Wireless Dongle" on page 11. 2 Connect the power cable to select. 4 The wireless connection default is enable. NOTE: Use , , and buttons to navigate and to the wall outlet and...
... then select Wireless Display on page 39. 58 Using Your Projector See "INPUT SOURCE WIRELESS/USB" on the sub-menu. See "Installing the Optional Wireless Dongle" on page 11. 2 Connect the power cable to select. 4 The wireless connection default is enable. NOTE: Use , , and buttons to navigate and to the wall outlet and...
User Guide
Page 66
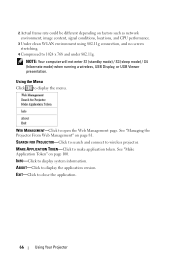
...information. INFO-Click to display the menu. See "Make Application Token" on page 81. SEARCH FOR PROJECTOR-Click to search and connect to open the Web Management page. WEB MANAGEMENT-Click to wireless projector. MAKE APPLICATION TOKEN-Click to 1024 x 768 and under .... NOTE: Your computer will not enter S1 (standby mode) / S3 (sleep mode) / S4 (hibernate mode) when running a wireless, USB Display, or USB Viewer presentation. 2 Actual frame rate could be different depending on factors such as network environment, image content, signal conditions, locations, and CPU performance...
...information. INFO-Click to display the menu. See "Make Application Token" on page 81. SEARCH FOR PROJECTOR-Click to search and connect to open the Web Management page. WEB MANAGEMENT-Click to wireless projector. MAKE APPLICATION TOKEN-Click to 1024 x 768 and under .... NOTE: Your computer will not enter S1 (standby mode) / S3 (sleep mode) / S4 (hibernate mode) when running a wireless, USB Display, or USB Viewer presentation. 2 Actual frame rate could be different depending on factors such as network environment, image content, signal conditions, locations, and CPU performance...

User Guide
Page 67
...Go (PtG) installation steps are enabled. 1 Plug the USB Flash to your projector. Using Your Projector 67 In order to complete the steps below: "Wireless and LAN" option and "Wireless connection" default are the same for the 4220 and 4320 models. NOTE: 1 When the Wireless and LAN function ... Settings menu, select the "Connected" in the Wireless option to install PtG are as follow: Operating System: - Lite Application Software" on the sub-menu. Lite" from the Dell Support site at: support.dell.com. 2 At INPUT SOURCE menu, select Wireless/USB and then select USB Viewer on page 72. &#...
...Go (PtG) installation steps are enabled. 1 Plug the USB Flash to your projector. Using Your Projector 67 In order to complete the steps below: "Wireless and LAN" option and "Wireless connection" default are the same for the 4220 and 4320 models. NOTE: 1 When the Wireless and LAN function ... Settings menu, select the "Connected" in the Wireless option to install PtG are as follow: Operating System: - Lite Application Software" on the sub-menu. Lite" from the Dell Support site at: support.dell.com. 2 At INPUT SOURCE menu, select Wireless/USB and then select USB Viewer on page 72. &#...

User Guide
Page 75
You will need these information to the projector and the computer. Using Your Projector 75 The Wireless Guide Screen shown below appears: 4 Take note of the LOGIN CODE, NETWORK NAME (SSID), and IP ADDRESS. Install the Dell Wireless Application Software on the sub-menu. 3 Access the Input Source menu, select the Wireless/USB and then select the Wireless Display on Your Computer 5 Connect the LAN cable to log in later.
You will need these information to the projector and the computer. Using Your Projector 75 The Wireless Guide Screen shown below appears: 4 Take note of the LOGIN CODE, NETWORK NAME (SSID), and IP ADDRESS. Install the Dell Wireless Application Software on the sub-menu. 3 Access the Input Source menu, select the Wireless/USB and then select the Wireless Display on Your Computer 5 Connect the LAN cable to log in later.

User Guide
Page 110
...jack (Blue) and one pair of projector through network and LAN Display. 12 V output: One 12 V DC / 200 mA max. Allow connection up to 2500 hours in eco mode) 110 Specifications RS232 port: One mini-DIN 6-pin for supporting HDMI 1.3. RJ45 port: One RJ45 connector ...Composite Video input: One Yellow RCA jack for Photo/PtG viewer (JPG/PPT format). USB (type A) port: One USB connector for CVBS signal. Conference Control mode. Wireless Standard: IEEE802.11b/g/n Wireless: One WiFi USB (type A) connector for control of RCA connector (Red/White). Supports Audio Projection (need...
...jack (Blue) and one pair of projector through network and LAN Display. 12 V output: One 12 V DC / 200 mA max. Allow connection up to 2500 hours in eco mode) 110 Specifications RS232 port: One mini-DIN 6-pin for supporting HDMI 1.3. RJ45 port: One RJ45 connector ...Composite Video input: One Yellow RCA jack for Photo/PtG viewer (JPG/PPT format). USB (type A) port: One USB connector for CVBS signal. Conference Control mode. Wireless Standard: IEEE802.11b/g/n Wireless: One WiFi USB (type A) connector for control of RCA connector (Red/White). Supports Audio Projection (need...

User Guide
Page 119
... a Composite Cable 18 Connecting with an HDMI Cable 20 Connecting with an S-video Cable 17 HDMI cable 20, 21, 23 Motorized projection screen 22 Power cord 12, 13, 14, 15, 17, 18, 19, 20, 21, 22, 23 RS232 cable 14 S-Video cable 17 To Computer 12 USB to USB cable 12 USB-A to USB-B cable 15... VGA to VGA cable 12, 13 VGA to YPbPr cable 19 Connection Ports +12 V DC out connector 10 Audio output connector 10 Audio-A input connector 10 Audio-B input connector...
... a Composite Cable 18 Connecting with an HDMI Cable 20 Connecting with an S-video Cable 17 HDMI cable 20, 21, 23 Motorized projection screen 22 Power cord 12, 13, 14, 15, 17, 18, 19, 20, 21, 22, 23 RS232 cable 14 S-Video cable 17 To Computer 12 USB to USB cable 12 USB-A to USB-B cable 15... VGA to VGA cable 12, 13 VGA to YPbPr cable 19 Connection Ports +12 V DC out connector 10 Audio output connector 10 Audio-A input connector 10 Audio-B input connector...


