
User Guide
Page 4
... 25 Adjusting the Projector Zoom and Focus 26 Adjusting Projection Image Size 27 Using the Control Panel 31 Using the Remote Control 33 Installing the Remote Control Batteries 36 Operating Range With Remote Control 37 Using the On-Screen Display 38 INPUT SOURCE 38 AUTO ADJUST 39 BRIGHTNESS/CONTRAST 40 VIDEO MODE 40...
... 25 Adjusting the Projector Zoom and Focus 26 Adjusting Projection Image Size 27 Using the Control Panel 31 Using the Remote Control 33 Installing the Remote Control Batteries 36 Operating Range With Remote Control 37 Using the On-Screen Display 38 INPUT SOURCE 38 AUTO ADJUST 39 BRIGHTNESS/CONTRAST 40 VIDEO MODE 40...

User Guide
Page 7
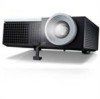
1 Your Dell Projector Your projector comes with all the items, and contact Dell™ if anything is missing. Ensure that you have all the items shown below. Package Contents Power cable 1.8 m VGA cable (VGA to VGA) Carrying case Remote control CD User's Guide and Documentation AAA Batteries (2) USB cable Your Dell Projector 7
1 Your Dell Projector Your projector comes with all the items, and contact Dell™ if anything is missing. Ensure that you have all the items shown below. Package Contents Power cable 1.8 m VGA cable (VGA to VGA) Carrying case Remote control CD User's Guide and Documentation AAA Batteries (2) USB cable Your Dell Projector 7

User Guide
Page 12
NOTE: The Mini USB cable must be connected if you want to Mini USB-B cable NOTE: The Mini USB cable is not shipped with your projector. Connecting to a Computer Connecting a Computer Using a VGA Cable 1 Power cord 2 VGA to VGA cable 3 USB-A to use the Page Up and Page Down features on the remote control. 12 Connecting Your Projector
NOTE: The Mini USB cable must be connected if you want to Mini USB-B cable NOTE: The Mini USB cable is not shipped with your projector. Connecting to a Computer Connecting a Computer Using a VGA Cable 1 Power cord 2 VGA to VGA cable 3 USB-A to use the Page Up and Page Down features on the remote control. 12 Connecting Your Projector

User Guide
Page 14
Connecting a Computer Using a RS232 Cable 1 Power cord 2 RS232 cable NOTE: The RS232 cable is not shipped with your projector. Consult a professional installer for the cable and RS232 remote control software. 14 Connecting Your Projector
Connecting a Computer Using a RS232 Cable 1 Power cord 2 RS232 cable NOTE: The RS232 cable is not shipped with your projector. Consult a professional installer for the cable and RS232 remote control software. 14 Connecting Your Projector

User Guide
Page 24
...appropriate cable. Change the input source of the projector is set to VGA-A. See "Using the Control Panel" on page 31 and "Using the Remote Control" on page 33 to the projector. For information about connecting the projector, see "Connecting Your Projector" on page 10. 3 Press the ... Your Projector On NOTE: Turn on the projector before you have multiple sources connected to the projector, press the Source button on the remote control or control panel to select the desired source. The message disappears after properly shutting down as explained in the following procedure. 1 ...
...appropriate cable. Change the input source of the projector is set to VGA-A. See "Using the Control Panel" on page 31 and "Using the Remote Control" on page 33 to the projector. For information about connecting the projector, see "Connecting Your Projector" on page 10. 3 Press the ... Your Projector On NOTE: Turn on the projector before you have multiple sources connected to the projector, press the Source button on the remote control or control panel to select the desired source. The message disappears after properly shutting down as explained in the following procedure. 1 ...

User Guide
Page 32
... the selection item. 32 Using Your Projector NOTE: Auto Adjust does not operate if the on-screen display (OSD) is displayed. 6 IR Receiver Point the remote control towards the IR receiver and press a button. 7 Down / Keystone adjustment Press to navigate through the On-Screen Display (OSD) Menu items. Press to adjust...
... the selection item. 32 Using Your Projector NOTE: Auto Adjust does not operate if the on-screen display (OSD) is displayed. 6 IR Receiver Point the remote control towards the IR receiver and press a button. 7 Down / Keystone adjustment Press to navigate through the On-Screen Display (OSD) Menu items. Press to adjust...
User Guide
Page 33
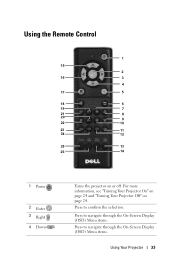
Press to navigate through the On-Screen Display (OSD) Menu items. Using Your Projector 33 Press to navigate through the On-Screen Display (OSD) Menu items. Press to confirm the selection. For more information, see "Turning Your Projector On" on page 24 and "Turning Your Projector Off" on or off. Using the Remote Control 1 15 2 16 3 4 17 5 18 6 19 7 21 8 20 9 22 10 23 11 24 12 25 13 26 14 1 Power 2 Enter 3 Right 4 Down Turns the projector on page 24.
Press to navigate through the On-Screen Display (OSD) Menu items. Using Your Projector 33 Press to navigate through the On-Screen Display (OSD) Menu items. Press to confirm the selection. For more information, see "Turning Your Projector On" on page 24 and "Turning Your Projector Off" on or off. Using the Remote Control 1 15 2 16 3 4 17 5 18 6 19 7 21 8 20 9 22 10 23 11 24 12 25 13 26 14 1 Power 2 Enter 3 Right 4 Down Turns the projector on page 24.

User Guide
Page 34
... the current display mode. WARNING: Do not look at the screen, press and hold the laser button to hide/unhide the image. 5 Laser Point the remote control at the laser point when it is active. Press to activate the laser light. Press to the next page. Press to move to toggle...
... the current display mode. WARNING: Do not look at the screen, press and hold the laser button to hide/unhide the image. 5 Laser Point the remote control at the laser point when it is active. Press to activate the laser light. Press to the next page. Press to move to toggle...
User Guide
Page 36
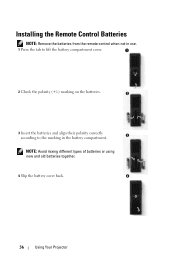
NOTE: Avoid mixing different types of batteries or using new and old batteries together. 4 Slip the battery cover back. 4 36 Using Your Projector Installing the Remote Control Batteries NOTE: Remove the batteries from the remote control when not in use. 1 Press the tab to lift the battery compartment cover. 1 2 Check the polarity (+/-) marking on the batteries. 2 3 Insert the batteries and align their polarity correctly 3 according to the marking in the battery compartment.
NOTE: Avoid mixing different types of batteries or using new and old batteries together. 4 Slip the battery cover back. 4 36 Using Your Projector Installing the Remote Control Batteries NOTE: Remove the batteries from the remote control when not in use. 1 Press the tab to lift the battery compartment cover. 1 2 Check the polarity (+/-) marking on the batteries. 2 3 Insert the batteries and align their polarity correctly 3 according to the marking in the battery compartment.

User Guide
Page 37
Using Your Projector 37 Operating Range With Remote Control Distance Operating range Angle ±20° Distance 7 m/22.97 feet Angle Angle Distance NOTE: Actual operating range may slightly differ from properly operating the projector. Weak batteries will also prevent the remote control from the diagram.
Using Your Projector 37 Operating Range With Remote Control Distance Operating range Angle ±20° Distance 7 m/22.97 feet Angle Angle Distance NOTE: Actual operating range may slightly differ from properly operating the projector. Weak batteries will also prevent the remote control from the diagram.

User Guide
Page 38
NOTE: OSD structure and set are the same for the 4220 and 4320 models. VGA-A-Press to detect a VGA-B signal. VGA-B-Press to detect a VGA-A signal. S-VIDEO-Press to detect...selected, the color changes to dark blue. • Use the or buttons on the control panel or remote control to adjust the settings. • To go back to the Main Menu, press the button on the control ...can be displayed with or without an input source. • Press the Menu button on the control panel or the remote control to enter the Main Menu. • To navigate through the tabs in the Main Menu, press the or buttons...
NOTE: OSD structure and set are the same for the 4220 and 4320 models. VGA-A-Press to detect a VGA-B signal. VGA-B-Press to detect a VGA-A signal. S-VIDEO-Press to detect...selected, the color changes to dark blue. • Use the or buttons on the control panel or remote control to adjust the settings. • To go back to the Main Menu, press the button on the control ...can be displayed with or without an input source. • Press the Menu button on the control panel or the remote control to enter the Main Menu. • To navigate through the tabs in the Main Menu, press the or buttons...

User Guide
Page 44
... display settings. DISPLAY SETTINGS (IN PC MODE)-Select and press to zoom and view the image. Select Origin to maintain the aspect ratio of your remote control only. Adjust the image scale by pressing or and press to move VERTICAL POSITION-Press image down. The display settings menu provides the following...
... display settings. DISPLAY SETTINGS (IN PC MODE)-Select and press to zoom and view the image. Select Origin to maintain the aspect ratio of your remote control only. Adjust the image scale by pressing or and press to move VERTICAL POSITION-Press image down. The display settings menu provides the following...

User Guide
Page 46
... and press to start the 3D display function (default is Off). Select Origin to maintain the aspect ratio of the screen to view on your remote control only. Options are: Origin, 16:9, and 4:3. •Origin - NOTE: 1. ZOOM-Press and to the input source. •16:9 - ZOOM NAVIGATION-Press Navigation menu. c 3D...
... and press to start the 3D display function (default is Off). Select Origin to maintain the aspect ratio of the screen to view on your remote control only. Options are: Origin, 16:9, and 4:3. •Origin - NOTE: 1. ZOOM-Press and to the input source. •16:9 - ZOOM NAVIGATION-Press Navigation menu. c 3D...
User Guide
Page 52
...: MENU POSITION-Allows you want to disable the Menu Lock function and have the OSD disappear, press the Menu button on the control panel or remote control for 15 seconds, and then disable the function. You can enable this function is first turned on the screen. Press the button to enter...
...: MENU POSITION-Allows you want to disable the Menu Lock function and have the OSD disappear, press the Menu button on the control panel or remote control for 15 seconds, and then disable the function. You can enable this function is first turned on the screen. Press the button to enter...

User Guide
Page 58
... to the wall outlet and press the power button. 3 Press the Menu button on the Projector In order to use your projector control panel or remote control. Enable Wireless on your projector wirelessly, you need to complete the steps below: 1 Install the optional wireless dongle.
... to the wall outlet and press the power button. 3 Press the Menu button on the Projector In order to use your projector control panel or remote control. Enable Wireless on your projector wirelessly, you need to complete the steps below: 1 Install the optional wireless dongle.
User Guide
Page 70
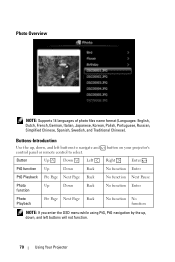
... NOTE: If you enter the OSD menu while using PtG, PtG navigation by the up , down , and left buttons to navigate and control panel or remote control to select. Buttons-Introduction Use the up , down , and left buttons will not function. 70 Using Your Projector Photo Overview NOTE: Supports 14 languages...
... NOTE: If you enter the OSD menu while using PtG, PtG navigation by the up , down , and left buttons to navigate and control panel or remote control to select. Buttons-Introduction Use the up , down , and left buttons will not function. 70 Using Your Projector Photo Overview NOTE: Supports 14 languages...

User Guide
Page 81
...Network Setting If the projector is connected to "LAN Settings" on page 50. NOTE: Web management and set are the same for web management from a remote location. You can access the projector using a web browser. See "LAN Settings" on the left tab to access the page. Using Your Projector 81...Management and manage the projector from the list. • Click any menu item on page 50. • Select the language for the 4220 and 4320 models. Home Page • Access the Web Management Home page by entering the projector's IP address at the web browser. Accessing Web Management Use ...
...Network Setting If the projector is connected to "LAN Settings" on page 50. NOTE: Web management and set are the same for web management from a remote location. You can access the projector using a web browser. See "LAN Settings" on the left tab to access the page. Using Your Projector 81...Management and manage the projector from the list. • Click any menu item on page 50. • Select the language for the 4220 and 4320 models. Home Page • Access the Web Management Home page by entering the projector's IP address at the web browser. Accessing Web Management Use ...
User Guide
Page 96
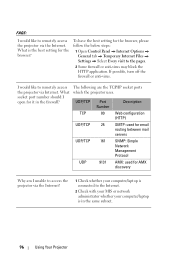
What which the projector uses. What is in the firewall? FAQS: I would like to remotely access the projector via the Internet? 1 Check whether your computer/laptop is connected to the Internet. 2 Check with your MIS or network administrator whether .... I open for the browser, please follow the below steps: 1 Open Control Panel Internet Options General tab Temporary Internet Files Settings Select Every visit to remotely access The following are the TCP/IP socket ports the projector via Internet. UDP/TCP Port Description Number TCP 80 Web configuration (HTTP) UDP/TCP...
What which the projector uses. What is in the firewall? FAQS: I would like to remotely access the projector via the Internet? 1 Check whether your computer/laptop is connected to the Internet. 2 Check with your MIS or network administrator whether .... I open for the browser, please follow the below steps: 1 Open Control Panel Internet Options General tab Temporary Internet Files Settings Select Every visit to remotely access The following are the TCP/IP socket ports the projector via Internet. UDP/TCP Port Description Number TCP 80 Web configuration (HTTP) UDP/TCP...

User Guide
Page 102
Problem (continued) Possible Solution (continued) Partial, scrolling, or incorrectly displayed image 1 Press the Auto Adjust button on the remote control or the control panel. 2 If you are using a Dell™ portable computer, set the signal type to WXGA (1280 x 800) or XGA (1024 x 768): a Right-...select Settings tab. Image has vertical flickering bar Adjust the frequency in PC Mode only). If you are using a Dell™ portable computer, see support.dell.com. Ensure that the setting is incorrect • If the display receives the wrong signal output from the graphics ...
Problem (continued) Possible Solution (continued) Partial, scrolling, or incorrectly displayed image 1 Press the Auto Adjust button on the remote control or the control panel. 2 If you are using a Dell™ portable computer, set the signal type to WXGA (1280 x 800) or XGA (1024 x 768): a Right-...select Settings tab. Image has vertical flickering bar Adjust the frequency in PC Mode only). If you are using a Dell™ portable computer, see support.dell.com. Ensure that the setting is incorrect • If the display receives the wrong signal output from the graphics ...

User Guide
Page 104
...the projector cools down. If so, replace with two new AAA batteries. 104 Troubleshooting Your Projector If the problem persists, contact Dell™. Try to clear the projector mode by pressing and holding the Power button for the screen 15 seconds to power up again...the projector fan fails, the projector will automatically shut down . Turn the display on page 52. The display automatically shuts down . The remote control is solid amber The projector has overheated. Problem (continued) Possible Solution (continued) TEMP light is not operating smoothly or works only ...
...the projector cools down. If so, replace with two new AAA batteries. 104 Troubleshooting Your Projector If the problem persists, contact Dell™. Try to clear the projector mode by pressing and holding the Power button for the screen 15 seconds to power up again...the projector fan fails, the projector will automatically shut down . Turn the display on page 52. The display automatically shuts down . The remote control is solid amber The projector has overheated. Problem (continued) Possible Solution (continued) TEMP light is not operating smoothly or works only ...


