User Guide
Page 3
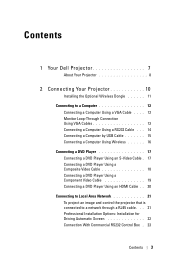
Contents 1 Your Dell Projector 7 About Your Projector 8 2 Connecting Your Projector 10 Installing the Optional Wireless Dongle 11 Connecting to a Computer 12 Connecting a Computer Using a VGA Cable . . . . 12 Monitor Loop-Through Connection Using VGA Cables 13 Connecting a Computer Using a RS232 Cable . . . 14 Connecting a Computer by USB Cable 15 Connecting a Computer Using Wireless 16 Connecting a DVD...
Contents 1 Your Dell Projector 7 About Your Projector 8 2 Connecting Your Projector 10 Installing the Optional Wireless Dongle 11 Connecting to a Computer 12 Connecting a Computer Using a VGA Cable . . . . 12 Monitor Loop-Through Connection Using VGA Cables 13 Connecting a Computer Using a RS232 Cable . . . 14 Connecting a Computer by USB Cable 15 Connecting a Computer Using Wireless 16 Connecting a DVD...

User Guide
Page 4
... 38 INPUT SOURCE 38 AUTO ADJUST 39 BRIGHTNESS/CONTRAST 40 VIDEO MODE 40 VOLUME 41 AUDIO INPUT 41 ADVANCED SETTINGS 41 LANGUAGE 56 HELP 56 Wireless Networking Installation 57 Enable Wireless on the Projector 58 Install the Wireless Application software on Your Computer 60 4 Contents
... 38 INPUT SOURCE 38 AUTO ADJUST 39 BRIGHTNESS/CONTRAST 40 VIDEO MODE 40 VOLUME 41 AUDIO INPUT 41 ADVANCED SETTINGS 41 LANGUAGE 56 HELP 56 Wireless Networking Installation 57 Enable Wireless on the Projector 58 Install the Wireless Application software on Your Computer 60 4 Contents
User Guide
Page 5
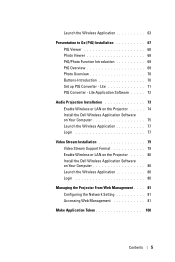
...- Lite Application Software . . . . . 72 Audio Projection Installation 73 Enable Wireless or LAN on the Projector . . . . . 74 Install the Dell Wireless Application Software on Your Computer 75 Launch the Wireless Application 77 Login 77 Video Stream Installation 79 Video Stream Support Format 79 Enable... Wireless or LAN on the Projector . . . . . 80 Install the Dell Wireless Application Software on Your Computer 80 Launch the Wireless Application 80 Login 80 Managing the Projector From Web Management . . ....
...- Lite Application Software . . . . . 72 Audio Projection Installation 73 Enable Wireless or LAN on the Projector . . . . . 74 Install the Dell Wireless Application Software on Your Computer 75 Launch the Wireless Application 77 Login 77 Video Stream Installation 79 Video Stream Support Format 79 Enable... Wireless or LAN on the Projector . . . . . 80 Install the Dell Wireless Application Software on Your Computer 80 Launch the Wireless Application 80 Login 80 Managing the Projector From Web Management . . ....

User Guide
Page 9
... equipment. 11 Do not use the wireless projector near or in front of the projector or cover its lens while the projector is on as the heat may cause the object to wall mount the projector yourself. For more information, see the Dell Support website at support.dell.com. • For more information... is turned off. 7 Do not look into the lens while the projector is on as it may cause injury to your projector. • The 4220/4320 projector can only be installed by a qualified technician. • Recommended Projector Ceiling Mount Kit (P/N: C3505).
... equipment. 11 Do not use the wireless projector near or in front of the projector or cover its lens while the projector is on as the heat may cause the object to wall mount the projector yourself. For more information, see the Dell Support website at support.dell.com. • For more information... is turned off. 7 Do not look into the lens while the projector is on as it may cause injury to your projector. • The 4220/4320 projector can only be installed by a qualified technician. • Recommended Projector Ceiling Mount Kit (P/N: C3505).

User Guide
Page 11
... Safety Instructions as described on the Dell website at www.dell.com. 1 Unscrew and take off the wireless cover. 2 Plug in the wireless dongle. 3 Assemble the wireless cover. Refer to use the wireless networking option. Connecting Your Projector 11 Installing the Optional Wireless Dongle Your projector must be installed with your 4220/4320 projector. NOTE: Connectors are the...
... Safety Instructions as described on the Dell website at www.dell.com. 1 Unscrew and take off the wireless cover. 2 Plug in the wireless dongle. 3 Assemble the wireless cover. Refer to use the wireless networking option. Connecting Your Projector 11 Installing the Optional Wireless Dongle Your projector must be installed with your 4220/4320 projector. NOTE: Connectors are the...

User Guide
Page 16
Refer to configure a wireless connection. NOTE: Your projector must be equipped with a wireless dongle if you want to use the wireless networking. Connecting a Computer Using Wireless NOTE: Your computer should be installed with a wireless connector and properly configured to detect another wireless connection. Refer to your computer's documentation on how to "Wireless Networking Installation" on page 57. 16 Connecting Your Projector
Refer to configure a wireless connection. NOTE: Your projector must be equipped with a wireless dongle if you want to use the wireless networking. Connecting a Computer Using Wireless NOTE: Your computer should be installed with a wireless connector and properly configured to detect another wireless connection. Refer to your computer's documentation on how to "Wireless Networking Installation" on page 57. 16 Connecting Your Projector

User Guide
Page 38
... detect a Composite Video signal. S-VIDEO-Press to detect a VGA-A signal. NOTE: OSD structure and set are the same for the 4220 and 4320 models. INPUT SOURCE The Input Source menu allows you to select your projector's control panel or remote control. VGA-A-Press to detect a S-Video signal.... HDMI-Press to activate the Input Source Wireless/USB menu. 38 Using Your Projector Using the On-Screen Display • The projector has a multi-language On-Screen Display (OSD) Menu that...
... detect a Composite Video signal. S-VIDEO-Press to detect a VGA-A signal. NOTE: OSD structure and set are the same for the 4220 and 4320 models. INPUT SOURCE The Input Source menu allows you to select your projector's control panel or remote control. VGA-A-Press to detect a S-Video signal.... HDMI-Press to activate the Input Source Wireless/USB menu. 38 Using Your Projector Using the On-Screen Display • The projector has a multi-language On-Screen Display (OSD) Menu that...
User Guide
Page 39
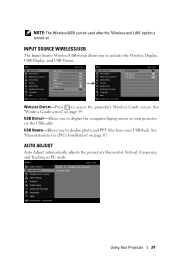
... from your projector via the USB cable. USB DISPLAY-Allows you to access the projector's Wireless Guide screen. Using Your Projector 39 WIRELESS DISPLAY-Press to activate the Wireless Display, USB Display, and USB Viewer. AUTO ADJUST Auto Adjust automatically adjusts the projector's ...Horizontal, Vertical, Frequency, and Tracking in PC mode. INPUT SOURCE WIRELESS/USB The Input Source Wireless/USB menu allows you to display the computer/laptop screen to Go (PtG) Installation" on page 59. See "Presentation...
... from your projector via the USB cable. USB DISPLAY-Allows you to access the projector's Wireless Guide screen. Using Your Projector 39 WIRELESS DISPLAY-Press to activate the Wireless Display, USB Display, and USB Viewer. AUTO ADJUST Auto Adjust automatically adjusts the projector's ...Horizontal, Vertical, Frequency, and Tracking in PC mode. INPUT SOURCE WIRELESS/USB The Input Source Wireless/USB menu allows you to display the computer/laptop screen to Go (PtG) Installation" on page 59. See "Presentation...

User Guide
Page 41
The options are: Audio-A, Audio-B, Audio-C, HDMI, and Wireless/LAN. Using Your Projector 41 VOLUME-Press to increase the volume and to select your projector. ADVANCED SETTINGS The Advanced Settings menu allows you adjust the volume settings of your audio input source. VOLUME The Volume menu allows you to change settings for Image, Display, Projector, LAN, Wireless, Menu, Power, and Information. AUDIO INPUT The Audio Input menu allows you to decrease the volume.
The options are: Audio-A, Audio-B, Audio-C, HDMI, and Wireless/LAN. Using Your Projector 41 VOLUME-Press to increase the volume and to select your projector. ADVANCED SETTINGS The Advanced Settings menu allows you adjust the volume settings of your audio input source. VOLUME The Volume menu allows you to change settings for Image, Display, Projector, LAN, Wireless, Menu, Power, and Information. AUDIO INPUT The Audio Input menu allows you to decrease the volume.

User Guide
Page 50
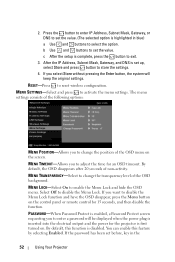
... next item. Use and to set the value. 50 Using Your Projector Key in network configuration settings. The LAN settings menu provides the following options: WIRELESS AND LAN-Select Enabled to select IP Address, Subnet Mask, Gateway, DNS, and Store. 2. Use and buttons to active the... Wireless and LAN function. Press the button to enter IP Address, Subnet Mask, Gateway, or DNS to set the IP Address, Subnet Mask, and Gateway. DHCP-...
... next item. Use and to set the value. 50 Using Your Projector Key in network configuration settings. The LAN settings menu provides the following options: WIRELESS AND LAN-Select Enabled to select IP Address, Subnet Mask, Gateway, DNS, and Store. 2. Use and buttons to active the... Wireless and LAN function. Press the button to enter IP Address, Subnet Mask, Gateway, or DNS to set the IP Address, Subnet Mask, and Gateway. DHCP-...

User Guide
Page 51
...manually assigns the Start IP address of the DHCP server to the projector connected to use the default settings for Wireless Connect. The wireless settings menu provides the following options: WIRELESS-Default option is set up, select Store and press button to select IP Address, Subnet Mask, Gateway, DNS...Enter button, the system will keep the original settings. c After the setup is complete, press the button to enable DHCP server of the wireless. After the IP Address, Subnet Mask, Gateway, and DNS is Connected. Using Your Projector 51 Use and buttons to store the settings. ...
...manually assigns the Start IP address of the DHCP server to the projector connected to use the default settings for Wireless Connect. The wireless settings menu provides the following options: WIRELESS-Default option is set up, select Store and press button to select IP Address, Subnet Mask, Gateway, DNS...Enter button, the system will keep the original settings. c After the setup is complete, press the button to enable DHCP server of the wireless. After the IP Address, Subnet Mask, Gateway, and DNS is Connected. Using Your Projector 51 Use and buttons to store the settings. ...
User Guide
Page 52
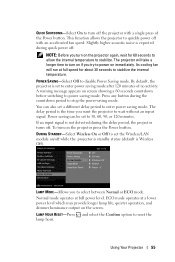
... requesting you select Store without pressing the Enter button, the system will be displayed when the power plug is complete, press the button to reset wireless configuration. MENU TRANSPARENCY-Select to disable the Menu Lock. By default, this feature by selecting Enabled. MENU TIMEOUT-Allows you want to change the transparency...
... requesting you select Store without pressing the Enter button, the system will be displayed when the power plug is complete, press the button to reset wireless configuration. MENU TRANSPARENCY-Select to disable the Menu Lock. By default, this feature by selecting Enabled. MENU TIMEOUT-Allows you want to change the transparency...
User Guide
Page 55
Press any button during quick power off. You can be set the Wireless/LAN module on/off while the projector is standby status (default is the time you try to power on the projector again, wait for about ... select the Confirm option to disable Power Saving mode. A warning message appears on the projector press the Power button. The delay period is Wireless Off). DURING STANDBY-Select Wireless On or Off to set to 30, 60, 90, or 120 minutes. LAMP MODE-Allows you turn on immediately. This function allows the...
Press any button during quick power off. You can be set the Wireless/LAN module on/off while the projector is standby status (default is the time you try to power on the projector again, wait for about ... select the Confirm option to disable Power Saving mode. A warning message appears on the projector press the Power button. The delay period is Wireless Off). DURING STANDBY-Select Wireless On or Off to set to 30, 60, 90, or 120 minutes. LAMP MODE-Allows you turn on immediately. This function allows the...

User Guide
Page 57
Wireless Networking Installation NOTE: Your computer must have the following minimum system requirements: Operating System: • Windows Microsoft Windows 2000™ with service pack 4 or later, ... 802.11b or 802.11g or 802.11n WiFi device) Web browser Microsoft Internet Explorer 6.0 or 7.0 (recommended) or 8.0, Firefox 1.5 or 2.0, and Safari 3.0 and above NOTE: Wireless Networking Installation steps are the same for the 4220 and 4320 models. Using Your Projector 57
Wireless Networking Installation NOTE: Your computer must have the following minimum system requirements: Operating System: • Windows Microsoft Windows 2000™ with service pack 4 or later, ... 802.11b or 802.11g or 802.11n WiFi device) Web browser Microsoft Internet Explorer 6.0 or 7.0 (recommended) or 8.0, Firefox 1.5 or 2.0, and Safari 3.0 and above NOTE: Wireless Networking Installation steps are the same for the 4220 and 4320 models. Using Your Projector 57

User Guide
Page 58
... Use , , and buttons to navigate and to complete the steps below: 1 Install the optional wireless dongle. See "Wireless Settings" on page 51. 5 Access the INPUT SOURCE menu, select Wireless/USB and then select Wireless Display on the Projector In order to the wall outlet and press the power button. 3 Press... the Menu button on page 39. 58 Using Your Projector Enable Wireless on the sub-menu. See "Installing the Optional Wireless Dongle" on page 11. 2 Connect the power cable to use your projector control panel or remote control. See "...
... Use , , and buttons to navigate and to complete the steps below: 1 Install the optional wireless dongle. See "Wireless Settings" on page 51. 5 Access the INPUT SOURCE menu, select Wireless/USB and then select Wireless Display on the Projector In order to the wall outlet and press the power button. 3 Press... the Menu button on page 39. 58 Using Your Projector Enable Wireless on the sub-menu. See "Installing the Optional Wireless Dongle" on page 11. 2 Connect the power cable to use your projector control panel or remote control. See "...

User Guide
Page 59
Using Your Projector 59 The image input source will need these steps to log in this step. 6 Take note of the LOGIN CODE, NETWORK NAME (SSID), and IP ADDRESS. You will be automatically switched to wireless screen when wireless option is disabled, then follow these information to set up: ADVANCED SETTINGS J Wireless settings J Wireless J Connected. The Wireless Guide Screen shown below appears: NOTE: If wireless connection is selected in later.
Using Your Projector 59 The image input source will need these steps to log in this step. 6 Take note of the LOGIN CODE, NETWORK NAME (SSID), and IP ADDRESS. You will be automatically switched to wireless screen when wireless option is disabled, then follow these information to set up: ADVANCED SETTINGS J Wireless settings J Wireless J Connected. The Wireless Guide Screen shown below appears: NOTE: If wireless connection is selected in later.

User Guide
Page 60
... J Connections J LAN Settings) 8 Open your Internet browser. NOTE: Remember to the 4220 or 4320 wireless network. You will be automatically directed to the 4220 or 4320 wireless network, you will lose wireless connectivity with other wireless networks. NOTE: • Your computer must have wireless network function to detect the connection. • When you connect to the 4220...
... J Connections J LAN Settings) 8 Open your Internet browser. NOTE: Remember to the 4220 or 4320 wireless network. You will be automatically directed to the 4220 or 4320 wireless network, you will lose wireless connectivity with other wireless networks. NOTE: • Your computer must have wireless network function to detect the connection. • When you connect to the 4220...

User Guide
Page 63
...Address is complete, the 4220 or 4320 Wireless Application software will launch and will search for the projector automatically. Launch the Wireless Application Once the installation is not detected, enter the IP Address displayed at the bottom left corner of Wireless Networking Installation, then click OK. 4220... Log in screen 4320 Log in , the following screen appears: Using Your Projector 63 The below screen appears: Login To ...
...Address is complete, the 4220 or 4320 Wireless Application software will launch and will search for the projector automatically. Launch the Wireless Application Once the installation is not detected, enter the IP Address displayed at the bottom left corner of Wireless Networking Installation, then click OK. 4220... Log in screen 4320 Log in , the following screen appears: Using Your Projector 63 The below screen appears: Login To ...

User Guide
Page 65
.... • To audio projection the presentation, click Installation" on page 73. • To stop player. NOTE: The following information is for reference: Frame Rate of Wireless Presentation Screen Variation % 1 Refer to the frame-rate table below for...
.... • To audio projection the presentation, click Installation" on page 73. • To stop player. NOTE: The following information is for reference: Frame Rate of Wireless Presentation Screen Variation % 1 Refer to the frame-rate table below for...
User Guide
Page 66
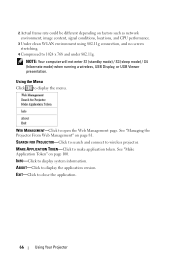
... display the application version. See "Managing the Projector From Web Management" on page 100. ABOUT-Click to open the Web Management page. EXIT-Click to wireless projector. SEARCH FOR PROJECTOR-Click to search and connect to close the application. 66 Using Your Projector Using the Menu Click to make application token... no screen stretching. 4 Compressed to display system information. NOTE: Your computer will not enter S1 (standby mode) / S3 (sleep mode) / S4 (hibernate mode) when running a wireless, USB Display, or USB Viewer presentation.
... display the application version. See "Managing the Projector From Web Management" on page 100. ABOUT-Click to open the Web Management page. EXIT-Click to wireless projector. SEARCH FOR PROJECTOR-Click to search and connect to close the application. 66 Using Your Projector Using the Menu Click to make application token... no screen stretching. 4 Compressed to display system information. NOTE: Your computer will not enter S1 (standby mode) / S3 (sleep mode) / S4 (hibernate mode) when running a wireless, USB Display, or USB Viewer presentation.


