
User Guide
Page 4
... 41 AUDIO INPUT 41 ADVANCED SETTINGS 41 LANGUAGE 56 HELP 56 Wireless Networking Installation 57 Enable Wireless on the Projector 58 Install the Wireless Application software on Your Computer 60 4 Contents
... 41 AUDIO INPUT 41 ADVANCED SETTINGS 41 LANGUAGE 56 HELP 56 Wireless Networking Installation 57 Enable Wireless on the Projector 58 Install the Wireless Application software on Your Computer 60 4 Contents
User Guide
Page 5
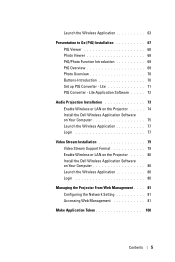
Lite 71 PtG Converter - Lite Application Software . . . . . 72 Audio Projection Installation 73 Enable Wireless or LAN on the Projector . . . . . 74 Install the Dell Wireless Application Software on Your Computer 75 Launch the Wireless Application 77 Login 77 Video Stream Installation 79 Video... Stream Support Format 79 Enable Wireless or LAN on the Projector . . . . . 80 Install the Dell Wireless Application Software on Your Computer 80 Launch the Wireless Application 80 Login 80 Managing the Projector From Web Management . . . . 81 Configuring the...
Lite 71 PtG Converter - Lite Application Software . . . . . 72 Audio Projection Installation 73 Enable Wireless or LAN on the Projector . . . . . 74 Install the Dell Wireless Application Software on Your Computer 75 Launch the Wireless Application 77 Login 77 Video Stream Installation 79 Video... Stream Support Format 79 Enable Wireless or LAN on the Projector . . . . . 80 Install the Dell Wireless Application Software on Your Computer 80 Launch the Wireless Application 80 Login 80 Managing the Projector From Web Management . . . . 81 Configuring the...

User Guide
Page 14
Consult a professional installer for the cable and RS232 remote control software. 14 Connecting Your Projector Connecting a Computer Using a RS232 Cable 1 Power cord 2 RS232 cable NOTE: The RS232 cable is not shipped with your projector.
Consult a professional installer for the cable and RS232 remote control software. 14 Connecting Your Projector Connecting a Computer Using a RS232 Cable 1 Power cord 2 RS232 cable NOTE: The RS232 cable is not shipped with your projector.

User Guide
Page 60
...Control Panel J Internet Options J Connections J LAN Settings) 8 Open your computer to the 4220 or 4320 Web Management web page. 60 Using Your Projector Install the Wireless Application software on Your Computer 7 Connect your Internet browser. NOTE: • Your computer must have wireless network ...function to detect the connection. • When you connect to the 4220 or 4320 wireless network, you will be automatically...
...Control Panel J Internet Options J Connections J LAN Settings) 8 Open your computer to the 4220 or 4320 Web Management web page. 60 Using Your Projector Install the Wireless Application software on Your Computer 7 Connect your Internet browser. NOTE: • Your computer must have wireless network ...function to detect the connection. • When you connect to the 4220 or 4320 wireless network, you will be automatically...

User Guide
Page 62
NOTE: You may choose to complete setup. 62 Using Your Projector Follow the on the computer, please contact your network administrator. 12 The installation software will launch. NOTE: If you are unable to install the application because of the software. 11 Click Run to proceed with the one-time installation of inadequate rights on -screen instructions to save the file and install it at a latter time. To do this, click Save.
NOTE: You may choose to complete setup. 62 Using Your Projector Follow the on the computer, please contact your network administrator. 12 The installation software will launch. NOTE: If you are unable to install the application because of the software. 11 Click Run to proceed with the one-time installation of inadequate rights on -screen instructions to save the file and install it at a latter time. To do this, click Save.

User Guide
Page 63
... appears: Login To communicate with your projector, enter the Login Code provided in Step 6 of Wireless Networking Installation, then click OK. 4220 Log in screen 4320 Log in , the following screen appears: Using Your Projector 63 Understanding the Buttons After a successful log in screen NOTE: If the IP Address is complete...
... appears: Login To communicate with your projector, enter the Login Code provided in Step 6 of Wireless Networking Installation, then click OK. 4220 Log in screen 4320 Log in , the following screen appears: Using Your Projector 63 Understanding the Buttons After a successful log in screen NOTE: If the IP Address is complete...

User Guide
Page 67
See "PtG Converter - Lite Application Software" on page 39. Using Your Projector 67 NOTE: • Supports only the JPEG format ... the steps below: "Wireless and LAN" option and "Wireless connection" default are the same for the 4220 and 4320 models. Office 2003 or Office 2007 NOTE: Presentation to Go (PtG) installation steps are enabled. 1 Plug the USB... "Connected" in the Wireless option to install PtG are as follow: Operating System: - Lite" from the Dell Support site at: support.dell.com. 2 At INPUT SOURCE menu, select Wireless/USB and then select USB Viewer on the sub-menu. ...
See "PtG Converter - Lite Application Software" on page 39. Using Your Projector 67 NOTE: • Supports only the JPEG format ... the steps below: "Wireless and LAN" option and "Wireless connection" default are the same for the 4220 and 4320 models. Office 2003 or Office 2007 NOTE: Presentation to Go (PtG) installation steps are enabled. 1 Plug the USB... "Connected" in the Wireless option to install PtG are as follow: Operating System: - Lite" from the Dell Support site at: support.dell.com. 2 At INPUT SOURCE menu, select Wireless/USB and then select USB Viewer on the sub-menu. ...
User Guide
Page 72
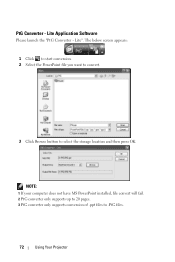
The below screen appears: 1 Click to start conversion. 2 Select the PowerPoint file you want to convert. 3 Click Browse button to .PtG files. 72 Using Your Projector PtG Converter - NOTE: 1 If your computer does not have MS PowerPoint installed, file convert will fail. 2 PtG converter only supports up to 20 pages. 3 PtG converter only supports conversion of .ppt files to select the storage location and then press OK. Lite Application Software Please launch the "PtG Converter - Lite".
The below screen appears: 1 Click to start conversion. 2 Select the PowerPoint file you want to convert. 3 Click Browse button to .PtG files. 72 Using Your Projector PtG Converter - NOTE: 1 If your computer does not have MS PowerPoint installed, file convert will fail. 2 PtG converter only supports up to 20 pages. 3 PtG converter only supports conversion of .ppt files to select the storage location and then press OK. Lite Application Software Please launch the "PtG Converter - Lite".

User Guide
Page 75
The Wireless Guide Screen shown below appears: 4 Take note of the LOGIN CODE, NETWORK NAME (SSID), and IP ADDRESS. Using Your Projector 75 3 Access the Input Source menu, select the Wireless/USB and then select the Wireless Display on Your Computer 5 Connect the LAN cable to log in later. Install the Dell Wireless Application Software on the sub-menu. You will need these information to the projector and the computer.
The Wireless Guide Screen shown below appears: 4 Take note of the LOGIN CODE, NETWORK NAME (SSID), and IP ADDRESS. Using Your Projector 75 3 Access the Input Source menu, select the Wireless/USB and then select the Wireless Display on Your Computer 5 Connect the LAN cable to log in later. Install the Dell Wireless Application Software on the sub-menu. You will need these information to the projector and the computer.
User Guide
Page 76
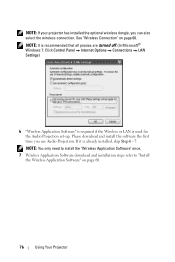
... are turned off. (In Microsoft® Windows 7: Click Control Panel Internet Options Connections LAN Settings) 6 "Wireless Application Software" is required if the Wireless or LAN is already installed, skip Step 6 - 7. NOTE: You only need to install the "Wireless Application... Software" once. 7 Wireless Application Software download and installation steps refer to "Install the Wireless Application Software" on page 60. Please download and install the software the first time you can also select the wireless connection. NOTE: If...
... are turned off. (In Microsoft® Windows 7: Click Control Panel Internet Options Connections LAN Settings) 6 "Wireless Application Software" is required if the Wireless or LAN is already installed, skip Step 6 - 7. NOTE: You only need to install the "Wireless Application... Software" once. 7 Wireless Application Software download and installation steps refer to "Install the Wireless Application Software" on page 60. Please download and install the software the first time you can also select the wireless connection. NOTE: If...

User Guide
Page 78
10 You are now logged into the 4220 or 4320 Wireless Application. NOTE: Audio projector function need install extra driver, if your computer do not install driver, will pop-up need install driver message on ... Projection" button in the application to enable Audio Projection function. You can download the "extra driver" from the Dell Support site at support.dell.com. 12 Executing the Windows Media Player or others audio player software (example: Winamp player...) on screen. Press the "Play" button in the application to starting the LAN or...
10 You are now logged into the 4220 or 4320 Wireless Application. NOTE: Audio projector function need install extra driver, if your computer do not install driver, will pop-up need install driver message on ... Projection" button in the application to enable Audio Projection function. You can download the "extra driver" from the Dell Support site at support.dell.com. 12 Executing the Windows Media Player or others audio player software (example: Winamp player...) on screen. Press the "Play" button in the application to starting the LAN or...

User Guide
Page 80
Login Please refer to steps 9 of the Audio Projection Installation to install the Dell Wireless Application Software. Install the Dell Wireless Application Software on the Projector Please refer to steps 1 to 4 of the Audio Projection Installation to launching the Wireless Application. Click "Video Mode"...refer to steps 5 to 7 of the Audio Projection Installation to log-in the application. 1 You are now logged into the 4220 or 4320 Wireless Application. Launch the Wireless Application Please refer to steps 8 of the Audio Projection Installation to select the video or music files and ...
Login Please refer to steps 9 of the Audio Projection Installation to install the Dell Wireless Application Software. Install the Dell Wireless Application Software on the Projector Please refer to steps 1 to 4 of the Audio Projection Installation to launching the Wireless Application. Click "Video Mode"...refer to steps 5 to 7 of the Audio Projection Installation to log-in the application. 1 You are now logged into the 4220 or 4320 Wireless Application. Launch the Wireless Application Please refer to steps 8 of the Audio Projection Installation to select the video or music files and ...

User Guide
Page 82
Download the Wireless Application Software See also "Wireless Networking Installation" on page 57. Click the Download button of the corresponding operating system of your computer. 82 Using Your Projector
Download the Wireless Application Software See also "Wireless Networking Installation" on page 57. Click the Download button of the corresponding operating system of your computer. 82 Using Your Projector
User Guide
Page 100
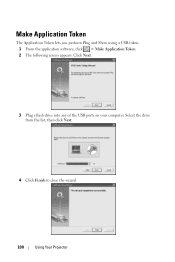
Select the drive from the list, then click Next. 4 Click Finish to close the wizard. 100 Using Your Projector Make Application Token The Application Token lets you perform Plug and Show using a USB token. 1 From the application software, click > Make Application Token. 2 The following screen appears. Click Next. 3 Plug a flash drive into any of the USB ports on your computer.
Select the drive from the list, then click Next. 4 Click Finish to close the wizard. 100 Using Your Projector Make Application Token The Application Token lets you perform Plug and Show using a USB token. 1 From the application software, click > Make Application Token. 2 The following screen appears. Click Next. 3 Plug a flash drive into any of the USB ports on your computer.