Service Manual
Page 4
... sensor service check 2-103 Input tray(s) service check 2-103 Interconnect card service check 2-105 Main drive service check 2-106 Operator panel service check 2-107 One or more operator panel buttons fail 2-107 No buttons work 2-107 Operator panel display 2-108 Options service check 2-109 Flash Memory Option(s 2-109 DRAM Memory Option(s 2-109 Hard Disk Option 2-109 Output bin sensor standard tray service check 2-110 Output expander service check 2-111 Paper feed service check 2-113 Paper size sensing service check 2-114 Parallel port service check 2-117 Print quality service...
... sensor service check 2-103 Input tray(s) service check 2-103 Interconnect card service check 2-105 Main drive service check 2-106 Operator panel service check 2-107 One or more operator panel buttons fail 2-107 No buttons work 2-107 Operator panel display 2-108 Options service check 2-109 Flash Memory Option(s 2-109 DRAM Memory Option(s 2-109 Hard Disk Option 2-109 Output bin sensor standard tray service check 2-110 Output expander service check 2-111 Paper feed service check 2-113 Paper size sensing service check 2-114 Parallel port service check 2-117 Print quality service...
Service Manual
Page 38
... following steps to the Card Stock & Label Guide available on the Dell Web site at www.dell.com. Partial sheets also contaminate your printer and your printer and cartridge warranties. • Use labels that : - Have nicked edges or bent corners. - mixing print media can cause feeding problems. • Do not use envelopes that can set the Paper Type to Labels, the Labels Texture to Smooth, and the Label Weight to minimize jams, do not use label sheets with laser printers.
... following steps to the Card Stock & Label Guide available on the Dell Web site at www.dell.com. Partial sheets also contaminate your printer and your printer and cartridge warranties. • Use labels that : - Have nicked edges or bent corners. - mixing print media can cause feeding problems. • Do not use envelopes that can set the Paper Type to Labels, the Labels Texture to Smooth, and the Label Weight to minimize jams, do not use label sheets with laser printers.
Service Manual
Page 43
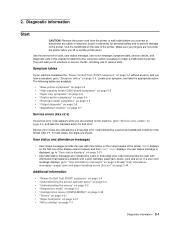
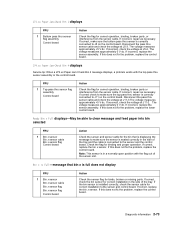
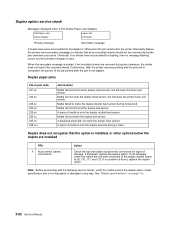
...; User status messages provide the user with a print cartridge, paper jam, option, port, and so on page 2-5. If a user status message is displayed, go to "User attendance messages" on page 2-32 and "User attendance messages-paper jams and paper handling errors (2xx.xx)" on page 2-8, and take the appropriate action. Additional information • "Power-On Self Test (POST) sequence" on page 2-4 • "Understanding the printer operator panel" on page 2-2 • "Understanding the menus" on page 2-3 • "Diagnostics mode" on page 3-2 • "Configuration menu (CONFIG MENU...
...; User status messages provide the user with a print cartridge, paper jam, option, port, and so on page 2-5. If a user status message is displayed, go to "User attendance messages" on page 2-32 and "User attendance messages-paper jams and paper handling errors (2xx.xx)" on page 2-8, and take the appropriate action. Additional information • "Power-On Self Test (POST) sequence" on page 2-4 • "Understanding the printer operator panel" on page 2-2 • "Understanding the menus" on page 2-3 • "Diagnostics mode" on page 3-2 • "Configuration menu (CONFIG MENU...
Service Manual
Page 45
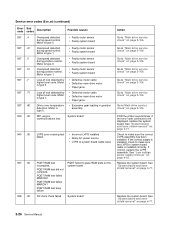
... be used. This is where you must resolve. Menu Paper Menu Reports Settings Paper Menu Default Source Paper Size/Type Configure MP Envelope Enhance Substitute Size Paper Texture Paper Weight Paper Loading Custom Types Universal Setup Bin Setup Reports Menu Settings Page Device Statistics Network Setup Page Network Setup Page Profiles List Print Quick Ref NetWare Setup Page Print Fonts Print Directory Settings Setup Menu Finishing Menu Quality Menu Utilities Menu PDF Menu PostScript Menu PCL Menu HTML Menu Image Menu Network/Ports IPv6 TCP/IP Standard Network Network Standard USB USB...
... be used. This is where you must resolve. Menu Paper Menu Reports Settings Paper Menu Default Source Paper Size/Type Configure MP Envelope Enhance Substitute Size Paper Texture Paper Weight Paper Loading Custom Types Universal Setup Bin Setup Reports Menu Settings Page Device Statistics Network Setup Page Network Setup Page Profiles List Print Quick Ref NetWare Setup Page Print Fonts Print Directory Settings Setup Menu Finishing Menu Quality Menu Utilities Menu PDF Menu PostScript Menu PCL Menu HTML Menu Image Menu Network/Ports IPv6 TCP/IP Standard Network Network Standard USB USB...
Service Manual
Page 68
...; Paper jams Driver over temperature detection. Go to "Main drive service check" on page 2-106. POR the printer several times, if the error code continues to make sure the correct LVPS assembly has been installed. See "System board and inner shield removal" on page 2-106. If correct, replace the LVPS assembly. Go to "Main drive service check" on page 4-77. Go to "Main drive service check" on page 2-106. Motor is installed correctly. Motor is type...
...; Paper jams Driver over temperature detection. Go to "Main drive service check" on page 2-106. POR the printer several times, if the error code continues to make sure the correct LVPS assembly has been installed. See "System board and inner shield removal" on page 2-106. If correct, replace the LVPS assembly. Go to "Main drive service check" on page 4-77. Go to "Main drive service check" on page 2-106. Motor is installed correctly. Motor is type...
Service Manual
Page 70
... cover) • System board assembly • Interconnect card assembly Only replace one or the printer will be rendered inoperable. Warning: Never install and remove components listed above . If this procedure is not followed, the printer will be rendered inoperable. Service error codes (9xx.xx) (continued) Error code Sub codes Description 953 .00 Possible causes Action Replace the operator panel board or upper front cover. Warning: When replacing any one of troubleshooting...
... cover) • System board assembly • Interconnect card assembly Only replace one or the printer will be rendered inoperable. Warning: Never install and remove components listed above . If this procedure is not followed, the printer will be rendered inoperable. Service error codes (9xx.xx) (continued) Error code Sub codes Description 953 .00 Possible causes Action Replace the operator panel board or upper front cover. Warning: When replacing any one of troubleshooting...
Service Manual
Page 78
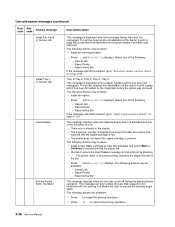
...feeder was removed. User attendance messages (continued) Error code Sub code Primary message Install Env Feed or Cancel Job Install Tray x or Cancel Job Load Staples Priming Failed Retry. Tray x=Tray 2, Tray 3, Tray 4, Tray 5. The printer starts or resumes printing, but allows the user to cancel the priming operation. 2-36 Service Manual Select one of the following : - Cancel Job - Reset Printer - Reset Active Bin This message displays when an error has occurred during the staple priming operation. This message not only notifies the user that the staple cartridge is low...
...feeder was removed. User attendance messages (continued) Error code Sub code Primary message Install Env Feed or Cancel Job Install Tray x or Cancel Job Load Staples Priming Failed Retry. Tray x=Tray 2, Tray 3, Tray 4, Tray 5. The printer starts or resumes printing, but allows the user to cancel the priming operation. 2-36 Service Manual Select one of the following : - Cancel Job - Reset Printer - Reset Active Bin This message displays when an error has occurred during the staple priming operation. This message not only notifies the user that the staple cartridge is low...
Service Manual
Page 87
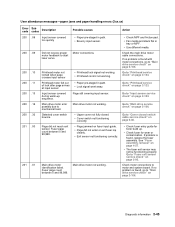
... after page arrives at input sensor • Paper pre-staged in path. • Bouncy input sensor. Main drive motor error possibly due to "Printhead service check" on page 2-80. • Check fuser entry guide for wear or contamination. Detected cover switch bounce. • Upper cover not fully closed switch/ cable service check" on page 2-123. Go to mechanical load. Go to "Fuser exit sensor service check" on page 2-106. User attendance messages-paper jams and paper handling errors (2xx.xx) Error code Sub codes Description...
... after page arrives at input sensor • Paper pre-staged in path. • Bouncy input sensor. Main drive motor error possibly due to "Printhead service check" on page 2-80. • Check fuser entry guide for wear or contamination. Detected cover switch bounce. • Upper cover not fully closed switch/ cable service check" on page 2-123. Go to mechanical load. Go to "Fuser exit sensor service check" on page 2-106. User attendance messages-paper jams and paper handling errors (2xx.xx) Error code Sub codes Description...
Service Manual
Page 88
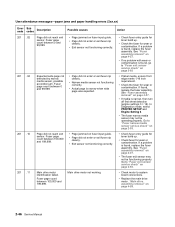
... found , replace the fuser assembly. Go to "Fuser exit sensor service check" on fuser input guide. • Page did not enter or exit fuser nip cleanly. • Exit sensor not functioning correctly. If a problem is found , replace the fuser assembly. If a problem is found , go to "Fuser narrow media sensor service check" on page 4-27. • If media is narrow, then turn off first sheet detection (engine settings 3 = 16). User attendance messages-paper jams and paper handling errors (2xx.xx) Error code Sub codes Description...
... found , replace the fuser assembly. Go to "Fuser exit sensor service check" on fuser input guide. • Page did not enter or exit fuser nip cleanly. • Exit sensor not functioning correctly. If a problem is found , replace the fuser assembly. If a problem is found , go to "Fuser narrow media sensor service check" on page 4-27. • If media is narrow, then turn off first sheet detection (engine settings 3 = 16). User attendance messages-paper jams and paper handling errors (2xx.xx) Error code Sub codes Description...
Service Manual
Page 115
... Paper Jam-Check Bin 1 displays FRU 1 Bottom pass thru sensor flag assembly Control board Action Check the flag for binding and proper operation. If this does not fix the problem, replace the control board. If this does not fix the problem, replace the control board. 274.xx Paper Jam-Check Bin 4 displays Service tip: When a 274.xx Paper Jam Check Bin 4 message displays, a problem exists with the flag out of the tray and the cable is full does not display FRU 1 Bin x sensor Bin x sensor cable Bin x sensor flag Bin x sensor...
... Paper Jam-Check Bin 1 displays FRU 1 Bottom pass thru sensor flag assembly Control board Action Check the flag for binding and proper operation. If this does not fix the problem, replace the control board. If this does not fix the problem, replace the control board. 274.xx Paper Jam-Check Bin 4 displays Service tip: When a 274.xx Paper Jam Check Bin 4 message displays, a problem exists with the flag out of the tray and the cable is full does not display FRU 1 Bin x sensor Bin x sensor cable Bin x sensor flag Bin x sensor...
Service Manual
Page 117
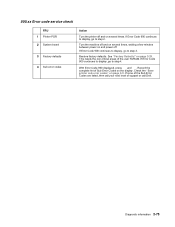
... Sub Error Codes are listed, then call Dell. If Error Code 900 continues to display, go to step 2. This resets the non-critical areas of support or call your next level of the user NVRAM. Check the "Base printer sub error codes" on page 3-28. Turn the machine off . 900.xx Error code service check FRU 1 Printer POR 2 System board 3 Factory defaults 4 Sub error codes Action Turn the printer off and on several times, waiting a few minutes between power...
... Sub Error Codes are listed, then call Dell. If Error Code 900 continues to display, go to step 2. This resets the non-critical areas of support or call your next level of the user NVRAM. Check the "Base printer sub error codes" on page 3-28. Turn the machine off . 900.xx Error code service check FRU 1 Printer POR 2 System board 3 Factory defaults 4 Sub error codes Action Turn the printer off and on several times, waiting a few minutes between power...
Service Manual
Page 124
... removed during the jam clearance procedure. If damaged, replace the duplex option. Media did leave the printer fuser exit sensor. Duplex does not recognize that all accumulated sheets should not be stapled or offset when the jam is detected, the printer alternately flashes the primary and secondary messages to make the duplex double feed sensor during a reset. Note: Before proceeding with the following service checks, verify the media used . See "Media specifications" on page 1-9. 2-82 Service Manual A piece of the job printed...
... removed during the jam clearance procedure. If damaged, replace the duplex option. Media did leave the printer fuser exit sensor. Duplex does not recognize that all accumulated sheets should not be stapled or offset when the jam is detected, the printer alternately flashes the primary and secondary messages to make the duplex double feed sensor during a reset. Note: Before proceeding with the following service checks, verify the media used . See "Media specifications" on page 1-9. 2-82 Service Manual A piece of the job printed...
Service Manual
Page 131
... for any problems are working. Disconnect the AC line cord from the LVPS cable and pull the LVPS out far enough to fuser AC cable. If correct, replace the LVPS to NORMAL before you begin, or use caution if the printer must be cleared by turning the printer on and off and allowing it is found , replace the fuser top cover assembly."Fuser narrow media sensor removal" on the fuser control card.
... for any problems are working. Disconnect the AC line cord from the LVPS cable and pull the LVPS out far enough to fuser AC cable. If correct, replace the LVPS to NORMAL before you begin, or use caution if the printer must be cleared by turning the printer on and off and allowing it is found , replace the fuser top cover assembly."Fuser narrow media sensor removal" on the fuser control card.

Service Manual
Page 144
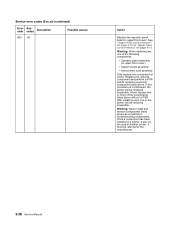
... printer sub error codes" on page 2-9. If incorrect, repair as necessary. 2-102 Service Manual The voltage measures approximately 0 V dc. The problem is correctly connected to J3 on the lower control board. Otherwise, replace the High-capacity output stacker option. 202.xx Paper Jam Open Rear Door displays and a sheet of paper is jammed prior to the pass thru sensor flag or 202.xx Paper Jam Open Rear Door displays, a sheet of paper feeds out to the standard bin even though bin x is installed, check each...
... printer sub error codes" on page 2-9. If incorrect, repair as necessary. 2-102 Service Manual The voltage measures approximately 0 V dc. The problem is correctly connected to J3 on the lower control board. Otherwise, replace the High-capacity output stacker option. 202.xx Paper Jam Open Rear Door displays and a sheet of paper is jammed prior to the pass thru sensor flag or 202.xx Paper Jam Open Rear Door displays, a sheet of paper feeds out to the standard bin even though bin x is installed, check each...

Service Manual
Page 154
... 0 V dc. Disconnect the pass thru sensor cable from the sensor cable, If incorrect, repair as necessary. If incorrect, replace the sensor assembly. or replace the output expander option. 271.xx Paper Jam-Check Bin x, POST incomplete FRU 1 Pass thru sensor and flag assembly Control board Action Check the sensor flag for correct installation of the sensor cable at J5 on the control board. If this does not fix the problem, replace the output expander option. 271.xx Paper jam -
... 0 V dc. Disconnect the pass thru sensor cable from the sensor cable, If incorrect, repair as necessary. If incorrect, replace the sensor assembly. or replace the output expander option. 271.xx Paper Jam-Check Bin x, POST incomplete FRU 1 Pass thru sensor and flag assembly Control board Action Check the sensor flag for correct installation of the sensor cable at J5 on the control board. If this does not fix the problem, replace the output expander option. 271.xx Paper jam -
Service Manual
Page 158
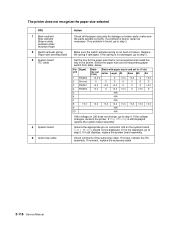
... ITC assembly. If incorrect, replace the autocomp cable. 2-116 Service Manual If a problem is not damaged, go to step 3. Tray 1 Missing should not be displayed. If the spring is found , go to step 2. If it still displays, replace the system board assembly. make sure the parts operate correctly. Pin Signal J26 Static Static with paper tray in the printer. The printer does not recognize the paper size selected FRU 1 Back...
... ITC assembly. If incorrect, replace the autocomp cable. 2-116 Service Manual If a problem is not damaged, go to step 3. Tray 1 Missing should not be displayed. If the spring is found , go to step 2. If it still displays, replace the system board assembly. make sure the parts operate correctly. Pin Signal J26 Static Static with paper tray in the printer. The printer does not recognize the paper size selected FRU 1 Back...

Service Manual
Page 159
... drum. If incorrect, replace the system board. Select the following : • Install another print cartridge if available before proceeding with the service checks. • Use Tray 1 to printer ground. FRU 1 High voltage contacts 2 Charge roll conductive bushing 3 HVPS Action Check the high voltage contacts on the display for the installed software can return the printer to the original customer printer setup. • Print Resolution: Set to 300 dpi (print quality problems should be checked...
... drum. If incorrect, replace the system board. Select the following : • Install another print cartridge if available before proceeding with the service checks. • Use Tray 1 to printer ground. FRU 1 High voltage contacts 2 Charge roll conductive bushing 3 HVPS Action Check the high voltage contacts on the display for the installed software can return the printer to the original customer printer setup. • Print Resolution: Set to 300 dpi (print quality problems should be checked...

Service Manual
Page 166
... on page 5-7. If correct, replace the stapler card assembly. Check continuity of damage or broken parts. Make sure the door correctly actuates the stapler side access door switch. If this does not fix the problem, replace the stapler option. 2-124 Service Manual If incorrect, remove the finisher option, and go to the top cover assembly, the ground clips are installed, and the brush is the only option not recognized by the base printer...
... on page 5-7. If correct, replace the stapler card assembly. Check continuity of damage or broken parts. Make sure the door correctly actuates the stapler side access door switch. If this does not fix the problem, replace the stapler option. 2-124 Service Manual If incorrect, remove the finisher option, and go to the top cover assembly, the ground clips are installed, and the brush is the only option not recognized by the base printer...
Service Manual
Page 192
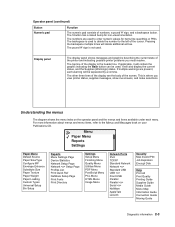
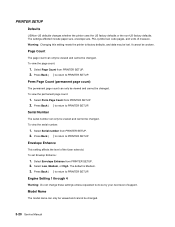
... lost. Serial Number The serial number can only be viewed and cannot be changed . The settings affected include paper size, envelope size, PCL symbol set Envelop Enhance: 1. Press Back ( ) to return to do so by your next level of support. Select Perm Page Count from PRINTER SETUP. 2. To view the serial number: 1. PRINTER SETUP Defaults US/Non-US defaults changes whether the printer uses the US factory defaults or the non-US factory defaults. It cannot be changed . 3-20 Service Manual Page Count The page count can only...
... lost. Serial Number The serial number can only be viewed and cannot be changed . The settings affected include paper size, envelope size, PCL symbol set Envelop Enhance: 1. Press Back ( ) to return to do so by your next level of support. Select Perm Page Count from PRINTER SETUP. 2. To view the serial number: 1. PRINTER SETUP Defaults US/Non-US defaults changes whether the printer uses the US factory defaults or the non-US factory defaults. It cannot be changed . 3-20 Service Manual Page Count The page count can only...
Service Manual
Page 413
...driver A-14 for confidential jobs A-14 power takeoff shaft and spring 4-73 power-on self test (POST) 2-4 preventive maintenance 6-1 print media avoiding jams 1-20 card stock 1-19 characteristics 1-16 envelopes 1-17 guidelines 1-16 labels 1-18 sizes 1-9 storing 1-19 types 1-11 unsatisfactory types 1-16 weight 1-12 print quality service check 2-117 troubleshooting 3-33 print quality pages 3-6, 3-26 print registration 3-4 printhead adjustment 4-2 parts catalog 7-10 removal 4-74 service check 2-123 printing identifying output bins A-18 linking output bins A-20 Q quality pages 3-6, 3-26 Quick Disk...
...driver A-14 for confidential jobs A-14 power takeoff shaft and spring 4-73 power-on self test (POST) 2-4 preventive maintenance 6-1 print media avoiding jams 1-20 card stock 1-19 characteristics 1-16 envelopes 1-17 guidelines 1-16 labels 1-18 sizes 1-9 storing 1-19 types 1-11 unsatisfactory types 1-16 weight 1-12 print quality service check 2-117 troubleshooting 3-33 print quality pages 3-6, 3-26 print registration 3-4 printhead adjustment 4-2 parts catalog 7-10 removal 4-74 service check 2-123 printing identifying output bins A-18 linking output bins A-20 Q quality pages 3-6, 3-26 Quick Disk...


