User Guide
Page 1
... energy efficiency. The Common UNIX Printing System, CUPS, and the CUPS logo are trademarks or registered trademarks of Easy Software Products; Dell™ 5330dn Mono Laser Printer User's Guide Contacting Dell NOTE: If you do not have an active Internet connection, you can find contact information on your need. 5. NOTE: A NOTE indicates important information that...
... energy efficiency. The Common UNIX Printing System, CUPS, and the CUPS logo are trademarks or registered trademarks of Easy Software Products; Dell™ 5330dn Mono Laser Printer User's Guide Contacting Dell NOTE: If you do not have an active Internet connection, you can find contact information on your need. 5. NOTE: A NOTE indicates important information that...

User Guide
Page 2
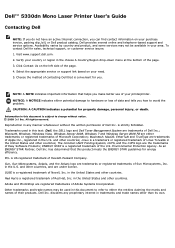
Select a location for proper ventilation. Leave enough room to allow enough space around the printer for your printer. In addition to the Dell™ 5330dn Mono Laser Printer, ensure that you are ready to lift it . 2. Unpacking Your Printer About Your Printer Operator Panel Button Functions Internal Fonts Installing the Toner Cartridge Loading Print Media Changing the size of...
Select a location for proper ventilation. Leave enough room to allow enough space around the printer for your printer. In addition to the Dell™ 5330dn Mono Laser Printer, ensure that you are ready to lift it . 2. Unpacking Your Printer About Your Printer Operator Panel Button Functions Internal Fonts Installing the Toner Cartridge Loading Print Media Changing the size of...
User Guide
Page 3
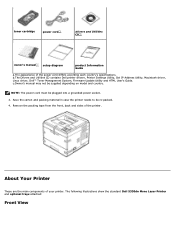
... be supplied depending on model and country. The following illustrations show the standard Dell 5330dn Mono Laser Printer and optional trays attached: Front View Save the carton and packing material in case the printer needs to be re-packed. 4. About Your Printer These are the main components of the power cord differs according each country's specifications...
... be supplied depending on model and country. The following illustrations show the standard Dell 5330dn Mono Laser Printer and optional trays attached: Front View Save the carton and packing material in case the printer needs to be re-packed. 4. About Your Printer These are the main components of the power cord differs according each country's specifications...

User Guide
Page 6
Button: Description: Dual Color LED Shows the Printer status. 4-way Scroll, increasing or decreasing values. Stops an operation at any time. Internal Fonts The Dell 5330dn Mono Laser Printer supports PCL and PS fonts. Enter Menu mode and scroll through the available menus. Confirms screen selection. Goes back to the upper menu level.
Button: Description: Dual Color LED Shows the Printer status. 4-way Scroll, increasing or decreasing values. Stops an operation at any time. Internal Fonts The Dell 5330dn Mono Laser Printer supports PCL and PS fonts. Enter Menu mode and scroll through the available menus. Confirms screen selection. Goes back to the upper menu level.

User Guide
Page 9
6. Ensure cartridge is securely closed. NOTE: Do not use excessive force when inserting the cartridge into place. Tabs on the sides of the cartridge and corresponding grooves within the printer guide the cartridge into the correct position until it locks firmly into the printer. Ensure cover is placed correctly according to the tabs and grooves before applying any pressure. 7. Close the top cover. Hold the toner cartridge by the handle and slowly insert the cartridge into the printer opening.
6. Ensure cartridge is securely closed. NOTE: Do not use excessive force when inserting the cartridge into place. Tabs on the sides of the cartridge and corresponding grooves within the printer guide the cartridge into the correct position until it locks firmly into the printer. Ensure cover is placed correctly according to the tabs and grooves before applying any pressure. 7. Close the top cover. Hold the toner cartridge by the handle and slowly insert the cartridge into the printer opening.

User Guide
Page 10
... a stack of the tray. Squeeze the paper width guide and slide it to 500 sheets of the tray. 3. Pull open tray 1 and remove from the printer. 2. CAUTION: Do not use , wait about 15 seconds before the first printed paper comes out. NOTE: When a new cartridge is in tray 1. NOTE: Set the... to the desired paper size marked at the bottom of A4 or Letter-sized paper: 1. Squeeze the paper length guide and slide it to the printer. Loading Print Media Load up to the desired paper size marked at the bottom of plain paper in its first use glued paepr or pad...
... a stack of the tray. Squeeze the paper width guide and slide it to 500 sheets of the tray. 3. Pull open tray 1 and remove from the printer. 2. CAUTION: Do not use , wait about 15 seconds before the first printed paper comes out. NOTE: When a new cartridge is in tray 1. NOTE: Set the... to the desired paper size marked at the bottom of A4 or Letter-sized paper: 1. Squeeze the paper length guide and slide it to the printer. Loading Print Media Load up to the desired paper size marked at the bottom of plain paper in its first use glued paepr or pad...

User Guide
Page 12
Changing the size of the paper in paper jams. 7. Insert and slide tray 1 back into the printer. 8. NOTE: Improper adjustment of paper guides can be extended. 2. Set the paper type and size. To change the size, you are loading, which is preset ...
Changing the size of the paper in paper jams. 7. Insert and slide tray 1 back into the printer. 8. NOTE: Improper adjustment of paper guides can be extended. 2. Set the paper type and size. To change the size, you are loading, which is preset ...

User Guide
Page 13
... of the computer requires a certified USB cable. You will need to purchase printer cable. The sizes are sold separately. Contact Dell to buy a USB Load paper with the print side down. Setting up Your Printer Connecting the Printer Cable Connecting the Printer Locally A local printer is attached to the Network". For details, see "Loading Print Media...
... of the computer requires a certified USB cable. You will need to purchase printer cable. The sizes are sold separately. Contact Dell to buy a USB Load paper with the print side down. Setting up Your Printer Connecting the Printer Cable Connecting the Printer Locally A local printer is attached to the Network". For details, see "Loading Print Media...

User Guide
Page 14
...and unplugged. 2. 2.0-compliant cable which is about 10 feet (3 meters) in length. 1. Connect a Parallel cable to the Parallel port on the cable plug. 3. Ensure the printer, computer, and any other end of the cable to the Parallel port of the cable into the USB keyboard. Push the metal clips down fit... the other attached devices are powered off and unplugged. Ensure that it is about 10 feet (3 meters) in length. 1. Connecting the Printer to the USB port on the computer. You will need help, please refer to buy a IEEE1284-compliant cable which is not plugged into an ...
...and unplugged. 2. 2.0-compliant cable which is about 10 feet (3 meters) in length. 1. Connect a Parallel cable to the Parallel port on the cable plug. 3. Ensure the printer, computer, and any other end of the cable to the Parallel port of the cable into the USB keyboard. Push the metal clips down fit... the other attached devices are powered off and unplugged. Ensure that it is about 10 feet (3 meters) in length. 1. Connecting the Printer to the USB port on the computer. You will need help, please refer to buy a IEEE1284-compliant cable which is not plugged into an ...

User Guide
Page 15
...To turn on . Connect one end of the printer. Powering On the Printer CAUTION: The fusing area inside your printer becomes hot once the printer is now on . The message SYSTEM INITIALIZING appears on the display indicating that the printer is powered on the printer: 1. 2. The printer automatically adjusts to the network speed . See "...(UTP) network cable into a LAN drop or hub and the other end into the Ethernet network port at the back of the printer and the other end into the power connector at the back of the power cord into a properly grounded power outlet. 2.
...To turn on . Connect one end of the printer. Powering On the Printer CAUTION: The fusing area inside your printer becomes hot once the printer is now on . The message SYSTEM INITIALIZING appears on the display indicating that the printer is powered on the printer: 1. 2. The printer automatically adjusts to the network speed . See "...(UTP) network cable into a LAN drop or hub and the other end into the Ethernet network port at the back of the printer and the other end into the power connector at the back of the power cord into a properly grounded power outlet. 2.

User Guide
Page 16
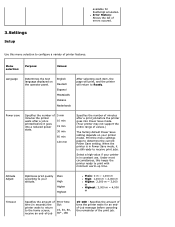
.... If so, it is used to set the size and type of menus are displayed. Dell 5330dn Mono Laser Printer Menu Function 1.Paper Setup Paper Size/Type NOTE: Only installed paper sources are available to your display text in changing printer settings. This menu selection is not applicable to assist in another language, see "Changing...
.... If so, it is used to set the size and type of menus are displayed. Dell 5330dn Mono Laser Printer Menu Function 1.Paper Setup Paper Size/Type NOTE: Only installed paper sources are available to your display text in changing printer settings. This menu selection is not applicable to assist in another language, see "Changing...

User Guide
Page 17
... the value detected by selecting type and size. Select the paper size currently loaded in two paper sources, the trays are automatically linked by the printer if you loaded the same size and type of paper in the tray.
... the value detected by selecting type and size. Select the paper size currently loaded in two paper sources, the trays are automatically linked by the printer if you loaded the same size and type of paper in the tray.

User Guide
Page 19
Default Source Menu selection: Purpose: Values: Default Source Identifies the default paper source. When one optional output expander is set to Off, the printer doesn't work until you can set ), the trays are automatically linked. Nearest Size Off Substitute size set to print from other trays. Substitute Size...: Bin Setup is only displayed when at least one paper source is allowed for the requested paper size. Configure MPF Determines when the printer selects paper loaded in two paper sources (and the Paper Size and Paper Type menu items are correctly set the...
Default Source Menu selection: Purpose: Values: Default Source Identifies the default paper source. When one optional output expander is set to Off, the printer doesn't work until you can set ), the trays are automatically linked. Nearest Size Off Substitute size set to print from other trays. Substitute Size...: Bin Setup is only displayed when at least one paper source is allowed for the requested paper size. Configure MPF Determines when the printer selects paper loaded in two paper sources (and the Paper Size and Paper Type menu items are correctly set the...

User Guide
Page 20
... the capacity of pages printed by person or group. Job Meter: Contains the total number of paper output. Link De-Link Link: The printer continues to print using the output expander after the standard output tray is full. 2.Report Menu selection: Purpose: Report Values: Menu Map Configuration... Settings Job History Job Meter PCL Font List PS Font List Error History After selecting each item, the page will print, and the printer will return to network settings and verifies the network connection. Network Settings: Prints information relating to Ready. Menu Map: Shows the layout ...
... the capacity of pages printed by person or group. Job Meter: Contains the total number of paper output. Link De-Link Link: The printer continues to print using the output expander after the standard output tray is full. 2.Report Menu selection: Purpose: Report Values: Menu Map Configuration... Settings Job History Job Meter PCL Font List PS Font List Error History After selecting each item, the page will print, and the printer will return to network settings and verifies the network connection. Network Settings: Prints information relating to Ready. Menu Map: Shows the layout ...
User Guide
Page 21
.... Under most circumstances, this menu selection to print with minimum warm-up time. Altitude Adjust Optimizes print quality according to Ready. When the printer is in Power Save mode, it goes into a reduced power state. 5 min 10 min 15 min 30 min 60 min 120 min ...screen, receive an end-of time (in constant use. Error History: Shows the list of minutes the printer waits after a print job before the printer goes into Power Save mode. (Your printer may not support the entire range of values.) The factory default Power Save setting depends on the operator panel...
.... Under most circumstances, this menu selection to print with minimum warm-up time. Altitude Adjust Optimizes print quality according to Ready. When the printer is in Power Save mode, it goes into a reduced power state. 5 min 10 min 15 min 30 min 60 min 120 min ...screen, receive an end-of time (in constant use. Error History: Shows the list of minutes the printer waits after a print job before the printer goes into Power Save mode. (Your printer may not support the entire range of values.) The factory default Power Save setting depends on the operator panel...

User Guide
Page 22
... clears the message and continues printing. Auto CR Allows you insert the correct paper. Print Recovery Auto Continue On Off Determines whether or not the printer continues printing when it detects the paper unmatched to see if data exists. 90* is the default setting. Off: If a paper mismatch occurs, an ... off-line until you to append the required carriage return to each line feed. Jam Recovery On Off Specifies whether the printer reprints jammed pages. LF LF+CR Refers to change settings that affect print quality and save toner. DayLight Saving (Only if HDD is only available...
... clears the message and continues printing. Auto CR Allows you insert the correct paper. Print Recovery Auto Continue On Off Determines whether or not the printer continues printing when it detects the paper unmatched to see if data exists. 90* is the default setting. Off: If a paper mismatch occurs, an ... off-line until you to append the required carriage return to each line feed. Jam Recovery On Off Specifies whether the printer reprints jammed pages. LF LF+CR Refers to change settings that affect print quality and save toner. DayLight Saving (Only if HDD is only available...

User Guide
Page 23
.... Menu selection: Purpose: Values: Copies Set the default number of the print image on the page by selecting any number from 0 to define how the printer delivers the printed output. The Normal setting usually produces the best result. Use the Light toner density setting to 250 mm. If the print jobs...
.... Menu selection: Purpose: Values: Copies Set the default number of the print image on the page by selecting any number from 0 to define how the printer delivers the printed output. The Normal setting usually produces the best result. Use the Light toner density setting to 250 mm. If the print jobs...

User Guide
Page 24
... three pages to 22 mm. Top Margin [0.0 - 9.9] Left Margin [0.0 - 9.9] Short Binding [0 - 22] Long Binding [0 - 22] Top Margin: Set the top margin, from 0 to print, the printer prints page 1, page 2, page 3, page 1, page 2, page 3. Short Binding: Set the bottom margin of the back of the paper. Left Margin: Set the left margin...
... three pages to 22 mm. Top Margin [0.0 - 9.9] Left Margin [0.0 - 9.9] Short Binding [0 - 22] Long Binding [0 - 22] Top Margin: Set the top margin, from 0 to print, the printer prints page 1, page 2, page 3, page 1, page 2, page 3. Short Binding: Set the bottom margin of the back of the paper. Left Margin: Set the left margin...

User Guide
Page 25
...part of your job. Menu selection: Purpose: Select Form See "Printing using the form files". Print Blank Pages Specifies whether to Off, the printer does not insert separator sheets. Double Form: Prints the front page using the first form and the back page using the first form. Menu... Values: 1st Form 2nd Form Factory Defaults 1st Form: Displays the stored form list. 2nd Form: When you select Double Form in normal mode. the printer prints page 1, page 1, page 2, page 2, page 3, page 3. If this menu is set to include applicationgenerated blank pages as part of your printed ...
...part of your job. Menu selection: Purpose: Select Form See "Printing using the form files". Print Blank Pages Specifies whether to Off, the printer does not insert separator sheets. Double Form: Prints the front page using the first form and the back page using the first form. Menu... Values: 1st Form 2nd Form Factory Defaults 1st Form: Displays the stored form list. 2nd Form: When you select Double Form in normal mode. the printer prints page 1, page 1, page 2, page 2, page 3, page 3. If this menu is set to include applicationgenerated blank pages as part of your printed ...

User Guide
Page 26
...User ID1 User ID2 Job Expiaration Menu selection: Purpose: Values: Job Expiration Limits the amount of time a Off confidential job stays in printer memory (RAM) are returned to the factory default values. Do Not Restore Restore Now Do not Restore: User-defined settings remain. Factory ...Defaults Returns printer settings to the factory-default values except: Display Language All settings in the Parallel Menu, Serial Menu, Network Menu, and USB Menu...
...User ID1 User ID2 Job Expiaration Menu selection: Purpose: Values: Job Expiration Limits the amount of time a Off confidential job stays in printer memory (RAM) are returned to the factory default values. Do Not Restore Restore Now Do not Restore: User-defined settings remain. Factory ...Defaults Returns printer settings to the factory-default values except: Display Language All settings in the Parallel Menu, Serial Menu, Network Menu, and USB Menu...


