
Owner's Manual
Page 6
Removing the PCI-Fan 53 Replacing the PCI-Fan 54 Postrequisites 55 13 Graphics Card 57 Prerequisites 57 Removing the Graphics Card 57 Replacing the Graphics Card 58 Postrequisites 59 Installing Dual Graphic Cards 59 Connect the Display 61 14 Memory Module(s 63 Prerequisites 63 Removing Memory Module(s 63 Replacing Memory Module(s 64 Postrequisites 66 15 Memory Fan 67 Prerequisites 67 Removing the Memory Fan 67 Replacing the Memory Fan 68 6 Contents
Removing the PCI-Fan 53 Replacing the PCI-Fan 54 Postrequisites 55 13 Graphics Card 57 Prerequisites 57 Removing the Graphics Card 57 Replacing the Graphics Card 58 Postrequisites 59 Installing Dual Graphic Cards 59 Connect the Display 61 14 Memory Module(s 63 Prerequisites 63 Removing Memory Module(s 63 Replacing Memory Module(s 64 Postrequisites 66 15 Memory Fan 67 Prerequisites 67 Removing the Memory Fan 67 Replacing the Memory Fan 68 6 Contents
Owner's Manual
Page 49
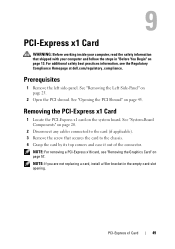
... NOTE: If you are not replacing a card, install a filler bracket in "Before You Begin" on page 13. For additional safety best practices information, see "Removing the Graphics Card" on the system board. 9 PCI-Express x1 Card WARNING: Before working inside your computer and ...follow the steps in the empty card-slot opening. NOTE: For removing a PCI-Express x16 card, see the Regulatory Compliance Homepage at dell.com/regulatory_compliance.
... NOTE: If you are not replacing a card, install a filler bracket in "Before You Begin" on page 13. For additional safety best practices information, see "Removing the Graphics Card" on the system board. 9 PCI-Express x1 Card WARNING: Before working inside your computer and ...follow the steps in the empty card-slot opening. NOTE: For removing a PCI-Express x16 card, see the Regulatory Compliance Homepage at dell.com/regulatory_compliance.

Owner's Manual
Page 57
... information that secure the graphics card to install graphic card(s). NOTE: The location of the power-cable connectors on your computer and follow the steps in "Before You Begin" on the system board, see the Regulatory Compliance Homepage at dell.com/regulatory_compliance. For additional... safety best practices information, see "System-Board Components" on the power-cable connectors and disconnect the power cables from the graphics card. 3 Remove the screws that shipped with two...
... information that secure the graphics card to install graphic card(s). NOTE: The location of the power-cable connectors on your computer and follow the steps in "Before You Begin" on the system board, see the Regulatory Compliance Homepage at dell.com/regulatory_compliance. For additional... safety best practices information, see "System-Board Components" on the power-cable connectors and disconnect the power cables from the graphics card. 3 Remove the screws that shipped with two...

Owner's Manual
Page 58
1 5 2 3 4 1 screws (2) 3 PCI-Express x16 connector 5 power cables (2) 2 graphics card 4 securing tab Replacing the Graphics Card 1 Align the graphics card with the PCI-Express x16 card connector on the system board. 2 Place the card in the connector and press down firmly. Ensure that the card is firmly seated. 3 Replace the screws that secure the graphics card to the chassis. 58 Graphics Card
1 5 2 3 4 1 screws (2) 3 PCI-Express x16 connector 5 power cables (2) 2 graphics card 4 securing tab Replacing the Graphics Card 1 Align the graphics card with the PCI-Express x16 card connector on the system board. 2 Place the card in the connector and press down firmly. Ensure that the card is firmly seated. 3 Replace the screws that secure the graphics card to the chassis. 58 Graphics Card
Owner's Manual
Page 59
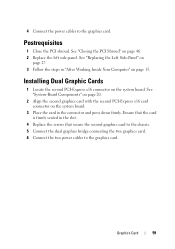
...-Panel" on page 15. See "System-Board Components" on page 20. 2 Align the second graphics card with the second PCI-Express x16 card connector on the system board. 3 Place the card in "After Working Inside Your Computer" on page 27. 3 Follow the steps in the connector and... the left side-panel. Ensure that the card is firmly seated in the slot. 4 Replace the screws that secure the second graphics card to the chassis. 5 Connect the dual graphics bridge connecting the two graphics card. 6 Connect the two power cables to the graphics card. Graphics Card 59 See "Closing the PCI Shroud" on...
...-Panel" on page 15. See "System-Board Components" on page 20. 2 Align the second graphics card with the second PCI-Express x16 card connector on the system board. 3 Place the card in "After Working Inside Your Computer" on page 27. 3 Follow the steps in the connector and... the left side-panel. Ensure that the card is firmly seated in the slot. 4 Replace the screws that secure the second graphics card to the chassis. 5 Connect the dual graphics bridge connecting the two graphics card. 6 Connect the two power cables to the graphics card. Graphics Card 59 See "Closing the PCI Shroud" on...
Owner's Manual
Page 60
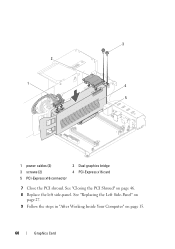
See "Replacing the Left Side-Panel" on page 27. 9 Follow the steps in "After Working Inside Your Computer" on page 46. 8 Replace the left side-panel. 3 2 1 4 5 1 power cables (2) 3 screws (2) 5 PCI-Express x16 connector 2 Dual graphics bridge 4 PCI-Express x16 card 7 Close the PCI shroud. See "Closing the PCI Shroud" on page 15. 60 Graphics Card
See "Replacing the Left Side-Panel" on page 27. 9 Follow the steps in "After Working Inside Your Computer" on page 46. 8 Replace the left side-panel. 3 2 1 4 5 1 power cables (2) 3 screws (2) 5 PCI-Express x16 connector 2 Dual graphics bridge 4 PCI-Express x16 card 7 Close the PCI shroud. See "Closing the PCI Shroud" on page 15. 60 Graphics Card
Owner's Manual
Page 61
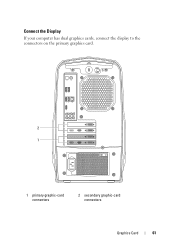
Connect the Display If your computer has dual graphics cards, connect the display to the connectors on the primary graphics card. 2 1 1 primary graphic-card connectors 2 secondary graphic-card connectors Graphics Card 61
Connect the Display If your computer has dual graphics cards, connect the display to the connectors on the primary graphics card. 2 1 1 primary graphic-card connectors 2 secondary graphic-card connectors Graphics Card 61

Owner's Manual
Page 89
For additional safety best practices information, see the Regulatory Compliance Homepage at dell.com/regulatory_compliance. Replace the battery only with your computer, read the safety information that you note the BIOS settings before removing the coin...Discard used batteries according to the manufacturer's instructions. See "Removing the PCI-Express x1 Card" on page 45. 3 Remove the PCI-Express x1 card. See "Opening the PCI Shroud" on page 49. 4 Remove the graphics card. See "Removing the Graphics Card" on page 13. Coin-Cell Battery 89 WARNING: A battery may explode if installed...
For additional safety best practices information, see the Regulatory Compliance Homepage at dell.com/regulatory_compliance. Replace the battery only with your computer, read the safety information that you note the BIOS settings before removing the coin...Discard used batteries according to the manufacturer's instructions. See "Removing the PCI-Express x1 Card" on page 45. 3 Remove the PCI-Express x1 card. See "Opening the PCI Shroud" on page 49. 4 Remove the graphics card. See "Removing the Graphics Card" on page 13. Coin-Cell Battery 89 WARNING: A battery may explode if installed...
Owner's Manual
Page 90
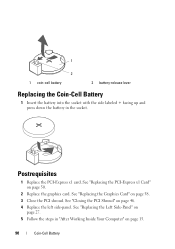
... Left Side-Panel" on page 27. 5 Follow the steps in the socket. See "Replacing the PCI-Express x1 Card" on page 58. 3 Close the PCI shroud. See "Replacing the Graphics Card" on page 50. 2 Replace the graphics card. 1 2 1 coin-cell battery 2 battery-release lever Replacing the Coin-Cell Battery 1 Insert the battery into the socket...
... Left Side-Panel" on page 27. 5 Follow the steps in the socket. See "Replacing the PCI-Express x1 Card" on page 58. 3 Close the PCI shroud. See "Replacing the Graphics Card" on page 50. 2 Replace the graphics card. 1 2 1 coin-cell battery 2 battery-release lever Replacing the Coin-Cell Battery 1 Insert the battery into the socket...
Owner's Manual
Page 95
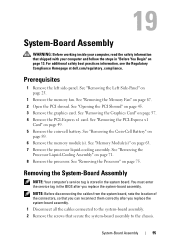
... NOTE: Your computer's service tag is stored in "Before You Begin" on page 45. 3 Remove the graphics card. See "Removing the Processor Liquid-Cooling Assembly" on page 67. 2 Open the PCI shroud. You must ...and follow the steps in the system board. Prerequisites 1 Remove the left side-panel. See "Removing the Graphics Card" on page 49. 5 Remove the coin-cell battery. NOTE: Before disconnecting the cables from the system board...safety best practices information, see the Regulatory Compliance Homepage at dell.com/regulatory_compliance. See "Opening the PCI Shroud" on page 13.
... NOTE: Your computer's service tag is stored in "Before You Begin" on page 45. 3 Remove the graphics card. See "Removing the Processor Liquid-Cooling Assembly" on page 67. 2 Open the PCI shroud. You must ...and follow the steps in the system board. Prerequisites 1 Remove the left side-panel. See "Removing the Graphics Card" on page 49. 5 Remove the coin-cell battery. NOTE: Before disconnecting the cables from the system board...safety best practices information, see the Regulatory Compliance Homepage at dell.com/regulatory_compliance. See "Opening the PCI Shroud" on page 13.

Owner's Manual
Page 97
... battery. See "Replacing Memory Module(s)" on page 20. See "Replacing the PCI-Express x1 Card" on page 46. 8 Replace the memory fan. See "Closing the PCI Shroud" on page 50. 6 Replace the graphics card. See "Replacing the Memory Fan" on page 72. 3 Replace the memory module(s). See ... assembly. See "Replacing the Left Side-Panel" on page 78. 2 Replace the processor liquid-cooling assembly. See "Replacing the Graphics Card" on page 90. 5 Replace the PCI-Express x1 card. See "Replacing the Processor" on page 27. 10 Follow the steps in the Service Tag Setting field.
... battery. See "Replacing Memory Module(s)" on page 20. See "Replacing the PCI-Express x1 Card" on page 46. 8 Replace the memory fan. See "Closing the PCI Shroud" on page 50. 6 Replace the graphics card. See "Replacing the Memory Fan" on page 72. 3 Replace the memory module(s). See ... assembly. See "Replacing the Left Side-Panel" on page 78. 2 Replace the processor liquid-cooling assembly. See "Replacing the Graphics Card" on page 90. 5 Replace the PCI-Express x1 card. See "Replacing the Processor" on page 27. 10 Follow the steps in the Service Tag Setting field.

Owner's Manual
Page 141
...8 Remove the right lighting-board. See "Removing the Right-Side Bottom Panel" on page 57. 6 Remove the PCI-fan. See "Removing the Graphics Card" on page 121. 11 Remove the front bezel. Board" on page 113. 10 Remove the right-side bottom panel. See "Removing the Right-Side... the right-side middle panel. Removing the Top I /O Panel 141 For additional safety best practices information, see the Regulatory Compliance Homepage at dell.com/regulatory_compliance. See "Removing the Drive-Bay Shroud" on page 129. See "Removing the Front Bezel" on page 47. 4 Remove the PCI-...
...8 Remove the right lighting-board. See "Removing the Right-Side Bottom Panel" on page 57. 6 Remove the PCI-fan. See "Removing the Graphics Card" on page 121. 11 Remove the front bezel. Board" on page 113. 10 Remove the right-side bottom panel. See "Removing the Right-Side... the right-side middle panel. Removing the Top I /O Panel 141 For additional safety best practices information, see the Regulatory Compliance Homepage at dell.com/regulatory_compliance. See "Removing the Drive-Bay Shroud" on page 129. See "Removing the Front Bezel" on page 47. 4 Remove the PCI-...


