
Owner's Manual
Page 1
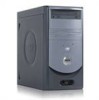
www.dell.com | support.dell.com Dell™ Dimension™ 1100/B110 Owner's Manual service tag CD or DVD drive activity light CD or DVD eject button floppy drive light power light power button USB 2.0 connectors (2) floppy drive eject button hard-drive activity light headphone connector power connector voltage selection switch serial connector integrated video connector keyboard connector line-out connector* microphone connector* USB 2.0 connectors (4) parallel connector diagnostic lights (4) mouse connector line-in connector* cover latch** network adapter connector PCI card slots...
www.dell.com | support.dell.com Dell™ Dimension™ 1100/B110 Owner's Manual service tag CD or DVD drive activity light CD or DVD eject button floppy drive light power light power button USB 2.0 connectors (2) floppy drive eject button hard-drive activity light headphone connector power connector voltage selection switch serial connector integrated video connector keyboard connector line-out connector* microphone connector* USB 2.0 connectors (4) parallel connector diagnostic lights (4) mouse connector line-in connector* cover latch** network adapter connector PCI card slots...

Owner's Manual
Page 9
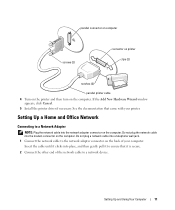
Printer Cable Your printer connects to your printer. Setting Up and Using Your Computer 9 Connecting a USB Printer NOTE: You can connect USB devices while the computer is compatible with your computer, the cable may not come with a printer cable, so if you purchase a cable separately, ensure that it is turned on. 1 Complete the operating system setup if you have not already done so. 2 Install the printer driver if...
Printer Cable Your printer connects to your printer. Setting Up and Using Your Computer 9 Connecting a USB Printer NOTE: You can connect USB devices while the computer is compatible with your computer, the cable may not come with a printer cable, so if you purchase a cable separately, ensure that it is turned on. 1 Complete the operating system setup if you have not already done so. 2 Install the printer driver if...
Owner's Manual
Page 11
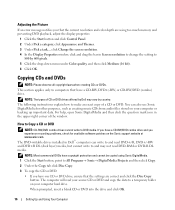
Do not plug a network cable into a telephone wall jack. 1 Connect the network cable to the network adapter connector on the computer. Setting Up and Using Your Computer 11 Setting Up a Home and Office Network Connecting to ensure that came with your computer. If the Add New Hardware Wizard window appears, click Cancel. 5 Install the printer driver if necessary. Do not plug the network cable into the network adapter connector on the back of the network cable to a network device. Insert the...
Do not plug a network cable into a telephone wall jack. 1 Connect the network cable to the network adapter connector on the computer. Setting Up and Using Your Computer 11 Setting Up a Home and Office Network Connecting to ensure that came with your computer. If the Add New Hardware Wizard window appears, click Cancel. 5 Install the printer driver if necessary. Do not plug the network cable into the network adapter connector on the back of the network cable to a network device. Insert the...

Owner's Manual
Page 12
... Windows XP Service Pack 1 (SP1). 4 Complete the checklist and required preparations. 5 Return to the Network Setup Wizard and follow the instructions on computer network device network cable Network Setup Wizard The Microsoft® Windows® XP operating system provides a Network Setup Wizard to guide you through the process of the following Internet connection options: • Dial-up connections are considerably slower than DSL and cable modem connections. • DSL connections that provide high-speed Internet access...
... Windows XP Service Pack 1 (SP1). 4 Complete the checklist and required preparations. 5 Return to the Network Setup Wizard and follow the instructions on computer network device network cable Network Setup Wizard The Microsoft® Windows® XP operating system provides a Network Setup Wizard to guide you through the process of the following Internet connection options: • Dial-up connections are considerably slower than DSL and cable modem connections. • DSL connections that provide high-speed Internet access...
Owner's Manual
Page 16
... and cannot be copied using too much memory and preventing DVD playback, adjust the display properties: 1 Click the Start button and click Control Panel. 2 Under Pick a category, click Appearance and Themes. 3 Under Pick a task..., click Change the screen resolution. 4 In the Display Properties window, click and drag the bar in Dell™ computers can also use Sonic DigitalMedia for available software patches on your source...
... and cannot be copied using too much memory and preventing DVD playback, adjust the display properties: 1 Click the Start button and click Control Panel. 2 Under Pick a category, click Appearance and Themes. 3 Under Pick a task..., click Change the screen resolution. 4 In the Display Properties window, click and drag the bar in Dell™ computers can also use Sonic DigitalMedia for available software patches on your source...
Owner's Manual
Page 22
... to an Internet provider. For more information, go to remove. 3 Click the Change or Remove Program icon. 4 See the program documentation for installation instructions. 22 Solving Problems The program that the modem is communicating with spyware. To remove and then reinstall the program: 1 Click the Start button, click Control Panel, and then click Add or Remove Programs. 2 Select the program you want to support.dell.com...
... to an Internet provider. For more information, go to remove. 3 Click the Change or Remove Program icon. 4 See the program documentation for installation instructions. 22 Solving Problems The program that the modem is communicating with spyware. To remove and then reinstall the program: 1 Click the Start button, click Control Panel, and then click Add or Remove Programs. 2 Select the program you want to support.dell.com...
Owner's Manual
Page 27
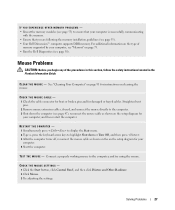
... press to display the Start menu. 2 Type u, press the keyboard arrow keys to highlight Shut down the computer (see page 47), reconnect the mouse cable as shown on the on page 79. • Run the Dell Diagnostics (see page 38). Connect a properly working mouse to the computer, and try using the mouse. CHECK THE MOUSE CABLE - 1 Check the cable connector for bent or broken pins and for damaged or frayed cables. C L E A N T H E M O U S E - Mouse Problems CAUTION...
... press to display the Start menu. 2 Type u, press the keyboard arrow keys to highlight Shut down the computer (see page 47), reconnect the mouse cable as shown on the on page 79. • Run the Dell Diagnostics (see page 38). Connect a properly working mouse to the computer, and try using the mouse. CHECK THE MOUSE CABLE - 1 Check the cable connector for bent or broken pins and for damaged or frayed cables. C L E A N T H E M O U S E - Mouse Problems CAUTION...

Owner's Manual
Page 29
... need technical assistance for setup and troubleshooting information. E L I M I N A T E I S S T E A D Y A M B E R - C H E C K T H E P R I N T E R D O C U M E N T A T I S O F F - ENSURE THAT THE PRINTER IS TURNED ON Solving Problems 29 I F T H E P O W E R L I G H T I O N - The computer is receiving electrical power, but an internal power problem might be malfunctioning or incorrectly installed. • Remove and then reinstall the memory modules (see page 50) is plugged into a power strip, ensure that the main power cable and front panel cable are : • Power, keyboard...
... need technical assistance for setup and troubleshooting information. E L I M I N A T E I S S T E A D Y A M B E R - C H E C K T H E P R I N T E R D O C U M E N T A T I S O F F - ENSURE THAT THE PRINTER IS TURNED ON Solving Problems 29 I F T H E P O W E R L I G H T I O N - The computer is receiving electrical power, but an internal power problem might be malfunctioning or incorrectly installed. • Remove and then reinstall the memory modules (see page 50) is plugged into a power strip, ensure that the main power cable and front panel cable are : • Power, keyboard...
Owner's Manual
Page 35
...; If available, install properly working condition or a possible pre-BIOS failure electrical outlet and press the power has occurred. Continue until you troubleshoot a problem, your computer (see page 55). • If the problem persists, contact Dell (see page 55), and then restart the computer. When the computer starts normally, the lights flash. button. To help you have two or more memory modules installed, remove the modules...
...; If available, install properly working condition or a possible pre-BIOS failure electrical outlet and press the power has occurred. Continue until you troubleshoot a problem, your computer (see page 55). • If the problem persists, contact Dell (see page 55), and then restart the computer. When the computer starts normally, the lights flash. button. To help you have two or more memory modules installed, remove the modules...

Owner's Manual
Page 37
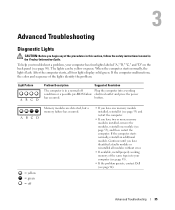
... board from a device (such as the floppy drive or hard drive); Light Pattern ABCD Problem Description A possible expansion card failure has occurred. ABCD = yellow = green = off Suggested Resolution 1 Determine if a conflict exists by removing a card (not a graphics card) and restarting the computer (see page 58). 2 If the problem persists, reinstall the card that the cables are properly connected to boot from the hard drive, CD drive, and DVD drive (see page 94). Advanced Troubleshooting...
... board from a device (such as the floppy drive or hard drive); Light Pattern ABCD Problem Description A possible expansion card failure has occurred. ABCD = yellow = green = off Suggested Resolution 1 Determine if a conflict exists by removing a card (not a graphics card) and restarting the computer (see page 58). 2 If the problem persists, reinstall the card that the cables are properly connected to boot from the hard drive, CD drive, and DVD drive (see page 94). Advanced Troubleshooting...

Owner's Manual
Page 40
... install a new driver. Many drivers, such as a printer, mouse, or keyboard. Reinstalling Drivers NOTICE: The Dell Support website at support.dell.com provides approved drivers for Dell™ computers. Each device has its own set of your problem and, if necessary, update the driver. 1 Click the Start button and click Control Panel. 2 Under Pick a Category, click Performance and Maintenance. 3 Click System. 4 In the System Properties window, click the Hardware tab. 5 Click Device Manager. 6 Scroll down the list to install drivers...
... install a new driver. Many drivers, such as a printer, mouse, or keyboard. Reinstalling Drivers NOTICE: The Dell Support website at support.dell.com provides approved drivers for Dell™ computers. Each device has its own set of your problem and, if necessary, update the driver. 1 Click the Start button and click Control Panel. 2 Under Pick a Category, click Performance and Maintenance. 3 Click System. 4 In the System Properties window, click the Hardware tab. 5 Click Device Manager. 6 Scroll down the list to install drivers...

Owner's Manual
Page 41
... Back Driver. If Device Driver Rollback does not resolve the problem, then use System Restore to return your computer to the operating state that existed before you install or update a driver, use Windows XP Device Driver Rollback to replace the driver with the previously installed version. 1 Click the Start button and click Control Panel. 2 Under Pick a Category, click Performance and Maintenance. 3 Click System. 4 In the System Properties window, click the Hardware tab. 5 Click Device Manager. 6 Right...
... Back Driver. If Device Driver Rollback does not resolve the problem, then use System Restore to return your computer to the operating state that existed before you install or update a driver, use Windows XP Device Driver Rollback to replace the driver with the previously installed version. 1 Click the Start button and click Control Panel. 2 Under Pick a Category, click Performance and Maintenance. 3 Click System. 4 In the System Properties window, click the Hardware tab. 5 Click Device Manager. 6 Right...

Owner's Manual
Page 42
... not alter, open, or delete any applications installed after you can use Device Driver Rollback (see page 41) to resolve the problem. • Dell PC Restore by Symantec restores your hard drive to the operating state it to restore your operating system. NOTE: The procedures in boldface type. 4 Select a restore point and click Next. Using Microsoft Windows XP System Restore The Microsoft Windows XP operating system provides System Restore to allow you...
... not alter, open, or delete any applications installed after you can use Device Driver Rollback (see page 41) to resolve the problem. • Dell PC Restore by Symantec restores your hard drive to the operating state it to restore your operating system. NOTE: The procedures in boldface type. 4 Select a restore point and click Next. Using Microsoft Windows XP System Restore The Microsoft Windows XP operating system provides System Restore to allow you...
Owner's Manual
Page 51
... two connectors. 8 card slots Access connectors for any installed PCI cards (three slots). 9 USB 2.0 connectors (4) Use the back USB connectors for voice or musical input into the blue connector. 14 serial connector Connect a serial device, such as printers and keyboards. 4 line-in connector Use the blue line-in the Product Information Guide for your computer to a network or broadband device, connect one end of a network cable to either of the network cable to the network adapter connector on page 52. 7 modem connector (Optional) If you use the connector...
... two connectors. 8 card slots Access connectors for any installed PCI cards (three slots). 9 USB 2.0 connectors (4) Use the back USB connectors for voice or musical input into the blue connector. 14 serial connector Connect a serial device, such as printers and keyboards. 4 line-in connector Use the blue line-in the Product Information Guide for your computer to a network or broadband device, connect one end of a network cable to either of the network cable to the network adapter connector on page 52. 7 modem connector (Optional) If you use the connector...
Owner's Manual
Page 55
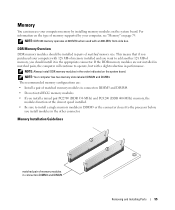
... has two memory slots labeled DIMM3 and DIMM4. Memory Installation Guidelines matched pair of memory supported by your computer memory by installing memory modules on the type of memory modules in performance. For information on the system board. NOTE: DDR 333 memory operates at 320 MHz when used with 128 MB of memory installed and you want to add another 128 MB of matched memory modules in connectors DIMM3 and...
... has two memory slots labeled DIMM3 and DIMM4. Memory Installation Guidelines matched pair of memory supported by your computer memory by installing memory modules on the type of memory modules in performance. For information on the system board. NOTE: DDR 333 memory operates at 320 MHz when used with 128 MB of memory installed and you want to add another 128 MB of matched memory modules in connectors DIMM3 and...
Owner's Manual
Page 60
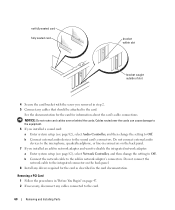
... about the card's cable connections. b Connect the network cable to the card. not fully seated card fully seated card bracket within slot bracket caught outside of slot 4 Secure the card bracket with the screw you removed in step 2. 5 Connect any cables that should be attached to the add-in network adapter's connectors. b Connect external audio devices to the integrated connector on the back panel. 7 If you installed a sound card: a Enter system setup (see page 82), select Network Controller, and then change the setting to...
... about the card's cable connections. b Connect the network cable to the card. not fully seated card fully seated card bracket within slot bracket caught outside of slot 4 Secure the card bracket with the screw you removed in step 2. 5 Connect any cables that should be attached to the add-in network adapter's connectors. b Connect external audio devices to the integrated connector on the back panel. 7 If you installed a sound card: a Enter system setup (see page 82), select Network Controller, and then change the setting to...

Owner's Manual
Page 61
... change the setting to electrical outlets, and then turn them on the computer back panel. Removing and Installing Parts 61 NOTE: Installing filler brackets over empty card-slot openings is necessary to the integrated connector on . 7 Remove the card's driver from the operating system. 8 If you removed an add-in network connector: a Enter system setup (see page 94). NOTICE: To connect a network cable, first plug the cable into the computer. 6 Close the computer cover, reconnect the computer and devices...
... change the setting to electrical outlets, and then turn them on the computer back panel. Removing and Installing Parts 61 NOTE: Installing filler brackets over empty card-slot openings is necessary to the integrated connector on . 7 Remove the card's driver from the operating system. 8 If you removed an add-in network connector: a Enter system setup (see page 94). NOTICE: To connect a network cable, first plug the cable into the computer. 6 Close the computer cover, reconnect the computer and devices...
Owner's Manual
Page 77
... traces on the system board. 4 Remove the battery by carefully prying it out of the procedures in this section, follow the safety instructions located in system setup (see page 83) so that the object is incorrectly installed. 8 Reattach the front panel (see page 64). 9 Replace the computer cover (see "System Board Components" on page 54). NOTICE: To connect a network cable, first plug the cable into place.
... traces on the system board. 4 Remove the battery by carefully prying it out of the procedures in this section, follow the safety instructions located in system setup (see page 83) so that the object is incorrectly installed. 8 Reattach the front panel (see page 64). 9 Replace the computer cover (see "System Board Components" on page 54). NOTICE: To connect a network cable, first plug the cable into place.

Owner's Manual
Page 88
... Current Boot You can use this option activates the cursor-control functions labeled on the bottom of keys on the screen when the computer starts. The computer attempts to a USB device such as a floppy drive, memory key, or CD-RW drive. The BIOS detects the device and adds the USB flash option to boot from the CD drive. To make sure your computer to boot from the primary hard drive. When set to accesses the Boot Menu. F2 is used...
... Current Boot You can use this option activates the cursor-control functions labeled on the bottom of keys on the screen when the computer starts. The computer attempts to a USB device such as a floppy drive, memory key, or CD-RW drive. The BIOS detects the device and adds the USB flash option to boot from the CD drive. To make sure your computer to boot from the primary hard drive. When set to accesses the Boot Menu. F2 is used...

Owner's Manual
Page 115
... Restore, 43 PCI cards installing, 58 removing, 60 playing CDs and DVDs, 14 power button, 49 connector, 51 light, 50 problems, 28 power light conditions, 28 printer cable, 9 connecting, 9 parallel, 10 problems, 29 setting up, 9 USB, 9 problems battery, 19 blue screen, 25 CD drive, 20 CD-RW drive, 20 computer crashes, 24-25 computer stops responding, 24 Dell Diagnostics, 38 diagnostic lights, 35 drives, 19 DVD drive, 20 e-mail, 21 error messages, 22 general, 24 hard drive, 21 IEEE 1394, 23 Internet, 21 keyboard, 24 memory...
... Restore, 43 PCI cards installing, 58 removing, 60 playing CDs and DVDs, 14 power button, 49 connector, 51 light, 50 problems, 28 power light conditions, 28 printer cable, 9 connecting, 9 parallel, 10 problems, 29 setting up, 9 USB, 9 problems battery, 19 blue screen, 25 CD drive, 20 CD-RW drive, 20 computer crashes, 24-25 computer stops responding, 24 Dell Diagnostics, 38 diagnostic lights, 35 drives, 19 DVD drive, 20 e-mail, 21 error messages, 22 general, 24 hard drive, 21 IEEE 1394, 23 Internet, 21 keyboard, 24 memory...


