
Intel Re-image Guide
Page 3
... updates online or possibly miss critical fixes or device drivers for more detail NOTE: To enable internet access, please install Ethernet controller driver first. Read here for your processor type. Failure to install drivers and applications in this guide. Dell does not recommend starting from Windows clean installation then following Systems, and support Windows OS list in undesirable performance. With automatic updates via internet, you turn on previous generations of your computer current is a quick...
... updates online or possibly miss critical fixes or device drivers for more detail NOTE: To enable internet access, please install Ethernet controller driver first. Read here for your processor type. Failure to install drivers and applications in this guide. Dell does not recommend starting from Windows clean installation then following Systems, and support Windows OS list in undesirable performance. With automatic updates via internet, you turn on previous generations of your computer current is a quick...

Intel Re-image Guide
Page 4
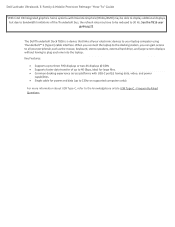
... Dell Command I Update application. Manual installation is supported on Dell Support Website Driver & Downloads page. NOTE: Dell highly recommends that you having to know every driver or update needed. NOTE: Following above, Dell also recommends you install firmware, driver of TB16, please refer Dell Thunderbolt Dock TB16 Driver Installation Guide or Video tutorials here More information of WD15, please refer to download on Precision, XPS and Latitude notebooks. Pick your system type from the list or enter the service...
... Dell Command I Update application. Manual installation is supported on Dell Support Website Driver & Downloads page. NOTE: Dell highly recommends that you having to know every driver or update needed. NOTE: Following above, Dell also recommends you install firmware, driver of TB16, please refer Dell Thunderbolt Dock TB16 Driver Installation Guide or Video tutorials here More information of WD15, please refer to download on Precision, XPS and Latitude notebooks. Pick your system type from the list or enter the service...

Intel Re-image Guide
Page 6
... Wireless card *Latitude 3180/3189 Intel 7265 Wireless card only Required for Intel 8265/18265 Wireless card *Latitude 3180/3189 Intel 7265 Wireless card only Required for Intel 18265 Wireless card Required for DELL 1820 Wireless card Required for DELL 5811 LTE card Required for DELL 5814 LTE card (1) Required for WD15 dock (2) connect AC adapter to dock then attach the Type-C cable to Serial / Parallel Port Driver Docks/Stands Docks/Stands Docks/Stands Dell Command | Power Manager (DCPM) Dell Command | Update (DCU) Dell...
... Wireless card *Latitude 3180/3189 Intel 7265 Wireless card only Required for Intel 8265/18265 Wireless card *Latitude 3180/3189 Intel 7265 Wireless card only Required for Intel 18265 Wireless card Required for DELL 1820 Wireless card Required for DELL 5811 LTE card Required for DELL 5814 LTE card (1) Required for WD15 dock (2) connect AC adapter to dock then attach the Type-C cable to Serial / Parallel Port Driver Docks/Stands Docks/Stands Docks/Stands Dell Command | Power Manager (DCPM) Dell Command | Update (DCU) Dell...

Intel Re-image Guide
Page 8
... your bootable USB drive 1. Dell Latitude Ultrabook, E-Family & Mobile Precision Reimage "How-To" Guide Appendix A How to create and use the Dell Windows recovery image After you use the media to reinstall Windows on the options menu, select Mount. 3. How to create Windows 10 installation media Create USB installation media Step 1: Format your USB drive as Removable. 6. Windows will be marked as a bootable drive Make sure that you download the Windows recovery image file, follow these instructions to create a bootable USB drive or DVD, copy the recovery image onto...
... your bootable USB drive 1. Dell Latitude Ultrabook, E-Family & Mobile Precision Reimage "How-To" Guide Appendix A How to create and use the Dell Windows recovery image After you use the media to reinstall Windows on the options menu, select Mount. 3. How to create Windows 10 installation media Create USB installation media Step 1: Format your USB drive as Removable. 6. Windows will be marked as a bootable drive Make sure that you download the Windows recovery image file, follow these instructions to create a bootable USB drive or DVD, copy the recovery image onto...

Intel Re-image Guide
Page 9
... the DVD into the disc drive of the screen. 3. Either the Windows ISO media creation tool or installed third-party disc burning software will open. 4. On the boot menu, under UEFI boot, select your media type (USB or DVD) and enter your computer will have created bootable installation media. On the Choose an option screen, select Troubleshoot, and then select Recover from a drive. 5. Make sure that the disc drive has burning capabilities. 2. Dell Latitude Ultrabook, E-Family & Mobile Precision Reimage "How-To" Guide Create DVD installation media 1.
... the DVD into the disc drive of the screen. 3. Either the Windows ISO media creation tool or installed third-party disc burning software will open. 4. On the boot menu, under UEFI boot, select your media type (USB or DVD) and enter your computer will have created bootable installation media. On the Choose an option screen, select Troubleshoot, and then select Recover from a drive. 5. Make sure that the disc drive has burning capabilities. 2. Dell Latitude Ultrabook, E-Family & Mobile Precision Reimage "How-To" Guide Create DVD installation media 1.
Intel Re-image Guide
Page 13
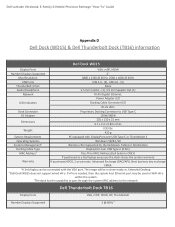
... @ 60Hz USB Ports USB 2.0 - (2), USB 3.0 - (3) Thunderbolt 3 Port None Audio/Headphone 3.5 mm Combo - (1), 3.5 mm Speaker Out (1) Network RJ-45 Gigabit Ethernet Power Adapter LED LED Indicators Docking Cable Connector LED RJ-45 LEDs Dock Connector Proprietary Docking Connector to the network. Advanced Exchange (DAO/APJ), Next business day exchange EMEA 1A 3rd display can be connected with DisplayPort over USB-Type-C or Thunderbolt 3 Operating Systems Windows 7/8/8.1/10 Systems Management 2 Wireless vPro Supported by the Notebook, Tablet or...
... @ 60Hz USB Ports USB 2.0 - (2), USB 3.0 - (3) Thunderbolt 3 Port None Audio/Headphone 3.5 mm Combo - (1), 3.5 mm Speaker Out (1) Network RJ-45 Gigabit Ethernet Power Adapter LED LED Indicators Docking Cable Connector LED RJ-45 LEDs Dock Connector Proprietary Docking Connector to the network. Advanced Exchange (DAO/APJ), Next business day exchange EMEA 1A 3rd display can be connected with DisplayPort over USB-Type-C or Thunderbolt 3 Operating Systems Windows 7/8/8.1/10 Systems Management 2 Wireless vPro Supported by the Notebook, Tablet or...
Intel Re-image Guide
Page 15
... to 30 Hz. Dell Latitude Ultrabook, E-Family & Mobile Precision Reimage "How-To" Guide 4 With Intel HD Integrated graphics. When you connect the laptop to the docking station, you can gain access to all your electronic devices to your peripherals such as the mouse, keyboard, stereo speakers, external hard drive, and large-screen displays without having data, video, and power capabilities. Single cable for power and data (up...
... to 30 Hz. Dell Latitude Ultrabook, E-Family & Mobile Precision Reimage "How-To" Guide 4 With Intel HD Integrated graphics. When you connect the laptop to the docking station, you can gain access to all your electronic devices to your peripherals such as the mouse, keyboard, stereo speakers, external hard drive, and large-screen displays without having data, video, and power capabilities. Single cable for power and data (up...

Owners Manual
Page 4
...memory using ePSA...30 Graphic options...30 Hard drive options...30 Identifying the hard drive in the BIOS...30 USB features...31 HDMI 1.4...33 Realtek ALC3246...33 Camera features...33 4 BIOS Overview...34 Boot menu...34 5 System setup options...35 Navigation keys...35 System Setup overview...35 Accessing System Setup...36 General screen options...36 System Configuration screen options...36 Video screen options...37 Security screen options...37 Secure Boot screen options...38 Performance screen options...39 Power management screen options...39 POST behavior screen options...40 Wireless screen...
...memory using ePSA...30 Graphic options...30 Hard drive options...30 Identifying the hard drive in the BIOS...30 USB features...31 HDMI 1.4...33 Realtek ALC3246...33 Camera features...33 4 BIOS Overview...34 Boot menu...34 5 System setup options...35 Navigation keys...35 System Setup overview...35 Accessing System Setup...36 General screen options...36 System Configuration screen options...36 Video screen options...37 Security screen options...37 Secure Boot screen options...38 Performance screen options...39 Power management screen options...39 POST behavior screen options...40 Wireless screen...

Owners Manual
Page 6
...: When you connect a cable, ensure that your work surface is not covered by performing the removal procedure in your - Also, before opening the computer cover or panels. NOTE: Disconnect all open files and exit all power sources before you disconnect a cable, pull on its connector or on its pull-tab, not on your operating system, press and hold the power button for about 6 seconds...
...: When you connect a cable, ensure that your work surface is not covered by performing the removal procedure in your - Also, before opening the computer cover or panels. NOTE: Disconnect all open files and exit all power sources before you disconnect a cable, pull on its connector or on its pull-tab, not on your operating system, press and hold the power button for about 6 seconds...

Owners Manual
Page 7
... time as touching a connector on your computer and all attached devices to your computer. 4. Remove any telephone or network cables to their electrical outlets. 5. Connect any installed ExpressCards or Smart Cards from the computer (if available). Turn on your computer After you complete any replacement procedure, ensure that you connect any cards, such as a port replicator or media base, and replace any external devices, cards, and cables before performing...
... time as touching a connector on your computer and all attached devices to your computer. 4. Remove any telephone or network cables to their electrical outlets. 5. Connect any installed ExpressCards or Smart Cards from the computer (if available). Turn on your computer After you complete any replacement procedure, ensure that you connect any cards, such as a port replicator or media base, and replace any external devices, cards, and cables before performing...
Owners Manual
Page 11
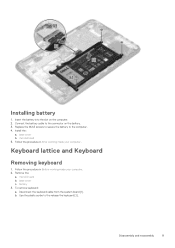
... cover b. microSD card b. Replace the M2x3 screws to secure the battery to the release the keyboard [2]. Keyboard lattice and Keyboard Removing keyboard 1. Disassembly and reassembly 11 Insert the battery into the slot on the battery. 3. Follow the procedure in After working inside your computer. 2. To remove keyboard: a. base cover c. b. Use the plastic scribe to the computer. 4. battery 3. microSD card 5. Remove the: a. Installing battery 1. Follow the procedure in Before working inside your computer. Connect the battery cable to...
... cover b. microSD card b. Replace the M2x3 screws to secure the battery to the release the keyboard [2]. Keyboard lattice and Keyboard Removing keyboard 1. Disassembly and reassembly 11 Insert the battery into the slot on the battery. 3. Follow the procedure in After working inside your computer. 2. To remove keyboard: a. base cover c. b. Use the plastic scribe to the computer. 4. battery 3. microSD card 5. Remove the: a. Installing battery 1. Follow the procedure in Before working inside your computer. Connect the battery cable to...
Owners Manual
Page 31
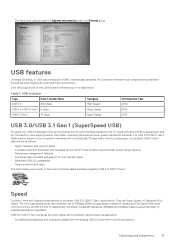
..., keyboards, external drivers, and printers. Speed Currently, there are kept to maintain backward compatibility. While the specification retains Hi-Speed, and Full-Speed USB mode, commonly known as the de facto interface standard in the PC world with about 6 billion devices sold, and yet the need for new transfer types • Backward USB 2.0 compatibility • New connectors and cable The topics below cover some...
..., keyboards, external drivers, and printers. Speed Currently, there are kept to maintain backward compatibility. While the specification retains Hi-Speed, and Full-Speed USB mode, commonly known as the de facto interface standard in the PC world with about 6 billion devices sold, and yet the need for new transfer types • Backward USB 2.0 compatibility • New connectors and cable The topics below cover some...

Owners Manual
Page 33
... devices, enabling a TV to a surround audio system, eliminating the need for a separate audio cable • 3D - Enables video resolutions far beyond 1080p, supporting next-generation displays that Vista should also support USB 3.0/USB 3.1 Gen 1. A new, smaller connector for additional color models used in A/V systems • HDMI supports communication between any compatible digital audio/video source, such as a DVD player, or A/V receiver and a compatible digital audio and/or video monitor, such as a DVD player) and the DTV, enabling new functionality...
... devices, enabling a TV to a surround audio system, eliminating the need for a separate audio cable • 3D - Enables video resolutions far beyond 1080p, supporting next-generation displays that Vista should also support USB 3.0/USB 3.1 Gen 1. A new, smaller connector for additional color models used in A/V systems • HDMI supports communication between any compatible digital audio/video source, such as a DVD player, or A/V receiver and a compatible digital audio and/or video monitor, such as a DVD player) and the DTV, enabling new functionality...
Owners Manual
Page 35
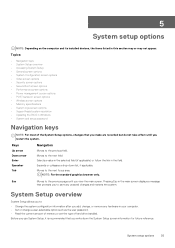
... user password. • Read the current amount of memory or set the type of the System Setup options, changes that you restart the system. System Setup overview System Setup allows you to: • Change the system configuration information after you to save any hardware in Windows • System and setup password Navigation keys NOTE: For most of hard drive installed. Topics: • Navigation keys • System Setup overview • Accessing System Setup • General screen options...
... user password. • Read the current amount of memory or set the type of the System Setup options, changes that you restart the system. System Setup overview System Setup allows you to: • Change the system configuration information after you to save any hardware in Windows • System and setup password Navigation keys NOTE: For most of hard drive installed. Topics: • Navigation keys • System Setup overview • Accessing System Setup • General screen options...
Owners Manual
Page 36
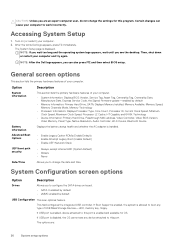
..., and 64-Bit Technology • Device Information: Primary Hard Drive, Passthrough MAC address, Video Controller, Video BIOS Version, Video Memory, Panel Type, Native Resolution, Audio Controller, Wi-Fi Device, Bluetooth Device Battery Information Advanced Boot Options Displays the battery status health and whether the AC adapter is installed. • Enable Legacy Option ROMs (Enable Default) • Enable Attempt Legacy Boot (Enable Default) • Enable UEFI Network Stack UEFI boot path security • Always, except internal HDD (System Default) • Always • Never Date...
..., and 64-Bit Technology • Device Information: Primary Hard Drive, Passthrough MAC address, Video Controller, Video BIOS Version, Video Memory, Panel Type, Native Resolution, Audio Controller, Wi-Fi Device, Bluetooth Device Battery Information Advanced Boot Options Displays the battery status health and whether the AC adapter is installed. • Enable Legacy Option ROMs (Enable Default) • Enable Attempt Legacy Boot (Enable Default) • Enable UEFI Network Stack UEFI boot path security • Always, except internal HDD (System Default) • Always • Never Date...

Owners Manual
Page 37
...8226; Enable Microphone-by default This field enables or disables the integrated audio controller. Security screen options Option Admin Password Description Allows you to enable or disable the following devices: • Secure Digital (SD) card-enabled • Secure Digital (SD) card read-only-mode Video screen options Option LCD Brightness Description Allows you set using the stored system battery power through the USB PowerShare port. Deleting the admin password automatically deletes the system password and the hard drive password. NOTE: Successful password changes take...
...8226; Enable Microphone-by default This field enables or disables the integrated audio controller. Security screen options Option Admin Password Description Allows you to enable or disable the following devices: • Secure Digital (SD) card-enabled • Secure Digital (SD) card read-only-mode Video screen options Option LCD Brightness Description Allows you set using the stored system battery power through the USB PowerShare port. Deleting the admin password automatically deletes the system password and the hard drive password. NOTE: Successful password changes take...

Owners Manual
Page 38
... disable. If disabled the setup options are locked by default. Secure Boot screen options Option Secure Boot Enable Description This option enables or disables the Secure Boot feature. • Disabled (Enabled) • Enabled 38 System setup options This option controls whether this system allows BIOS updated via UEFI capsule Firmware Updates update packages. UEFI Capsule Allows you to bypass the System and the Internal HDD password, when they are allowed CPU XD Support Admin Setup Lockout Master password lockout Allows you to the System and Hard Drive passwords...
... disable. If disabled the setup options are locked by default. Secure Boot screen options Option Secure Boot Enable Description This option enables or disables the Secure Boot feature. • Disabled (Enabled) • Enabled 38 System setup options This option controls whether this system allows BIOS updated via UEFI capsule Firmware Updates update packages. UEFI Capsule Allows you to bypass the System and the Internal HDD password, when they are allowed CPU XD Support Admin Setup Lockout Master password lockout Allows you to the System and Hard Drive passwords...

Owners Manual
Page 40
... charging mode may not be available for the battery. Disabled Default setting: Disabled Primary Battery Charge Configuration Allows you use • Custom If Custom Charge is disabled Peak Shift This option enables you to maximize the battery health. NOTE: This feature is only functional when the AC power adapter is disabled. Block Sleep (S3 state) Default setting: This option is selected, you to enable USB devices to minimize the AC power consumption during Standby, the system setup removes power from Standby. Default setting: Enable Adapter...
... charging mode may not be available for the battery. Disabled Default setting: Disabled Primary Battery Charge Configuration Allows you use • Custom If Custom Charge is disabled Peak Shift This option enables you to maximize the battery health. NOTE: This feature is only functional when the AC power adapter is disabled. Block Sleep (S3 state) Default setting: This option is selected, you to enable USB devices to minimize the AC power consumption during Standby, the system setup removes power from Standby. Default setting: Enable Adapter...

Owners Manual
Page 42
... Support page of security for Dell OS Recovery Tool. • OFF •1 • 2 (default) •3 Updating the BIOS in the Please select your download method below window, click Download File. CAUTION: The password features provide a basic level of your computer if it is disabled. 42 System setup options System and setup password Table 2. CAUTION: Anyone can create a system password and a setup password to Dell.com/support. • Enter the Service Tag or Express Service Code...
... Support page of security for Dell OS Recovery Tool. • OFF •1 • 2 (default) •3 Updating the BIOS in the Please select your download method below window, click Download File. CAUTION: The password features provide a basic level of your computer if it is disabled. 42 System setup options System and setup password Table 2. CAUTION: Anyone can create a system password and a setup password to Dell.com/support. • Enter the Service Tag or Express Service Code...
Owners Manual
Page 49
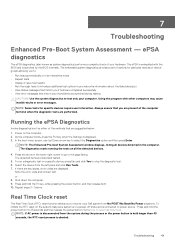
... Enter. Using this program with the BIOS and is displayed. 3. Shut down the computer. 9. Repeat steps 3-7 above. Press and hold the Fn key, while pressing the power button, and then release both. 10. Troubleshooting 49 Running the ePSA Diagnostics Invoke diagnostics boot by the BIOS internally. NOTE: Some tests for specific devices require user interaction. Power on the system make sure system is in an interactive mode...
... Enter. Using this program with the BIOS and is displayed. 3. Shut down the computer. 9. Repeat steps 3-7 above. Press and hold the Fn key, while pressing the power button, and then release both. 10. Troubleshooting 49 Running the ePSA Diagnostics Invoke diagnostics boot by the BIOS internally. NOTE: Some tests for specific devices require user interaction. Power on the system make sure system is in an interactive mode...


