Intel Re-image Guide
Page 15
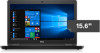
...laptop computer using Thunderbolt™ 3 (Type-C) cable interface. For more information about USB Type-C, refer to plug each one into the laptop. Dell Latitude Ultrabook, E-Family & Mobile Precision Reimage "How-To" Guide 4 With Intel HD Integrated graphics. When you connect the laptop to the docking ...station, you can gain access to all your electronic devices to your peripherals such as the mouse, keyboard, stereo speakers, external hard drive, and large-screen displays without having data, video, and power capabilities. Single cable for ...
...laptop computer using Thunderbolt™ 3 (Type-C) cable interface. For more information about USB Type-C, refer to plug each one into the laptop. Dell Latitude Ultrabook, E-Family & Mobile Precision Reimage "How-To" Guide 4 With Intel HD Integrated graphics. When you connect the laptop to the docking ...station, you can gain access to all your electronic devices to your peripherals such as the mouse, keyboard, stereo speakers, external hard drive, and large-screen displays without having data, video, and power capabilities. Single cable for ...
Owners Manual
Page 3
......22 Removing display assembly...22 Installing display assembly...23 Display bezel...24 Removing display bezel...24 Contents 3 optional...10 Installing battery...11 Keyboard lattice and Keyboard...11 Removing keyboard...11 Installing keyboard...12 Solid State Drive - Contents 1 Working on your computer...6 Safety instructions...6 Turning off your computer...7 2 Disassembly and reassembly...8 Recommended tools...8 microSD card...
......22 Removing display assembly...22 Installing display assembly...23 Display bezel...24 Removing display bezel...24 Contents 3 optional...10 Installing battery...11 Keyboard lattice and Keyboard...11 Removing keyboard...11 Installing keyboard...12 Solid State Drive - Contents 1 Working on your computer...6 Safety instructions...6 Turning off your computer...7 2 Disassembly and reassembly...8 Recommended tools...8 microSD card...
Owners Manual
Page 5
ePSA diagnostics 49 Running the ePSA Diagnostics...49 Real Time Clock reset...49 8 Contacting Dell...51 Contents 5 System and setup password...42 Assigning a system setup password...43 Deleting or changing an ...44 Storage specifications...45 Audio specifications...45 Video specifications...45 Camera specifications...45 Communication specifications...46 Port and connector specifications...46 Keyboard specifications...46 Touchpad specifications...46 Battery specifications...47 AC adapter specifications...47 Physical specifications...47 Environmental specifications...48 7 Troubleshooting...49...
ePSA diagnostics 49 Running the ePSA Diagnostics...49 Real Time Clock reset...49 8 Contacting Dell...51 Contents 5 System and setup password...42 Assigning a system setup password...43 Deleting or changing an ...44 Storage specifications...45 Audio specifications...45 Video specifications...45 Camera specifications...45 Communication specifications...46 Port and connector specifications...46 Keyboard specifications...46 Touchpad specifications...46 Battery specifications...47 AC adapter specifications...47 Physical specifications...47 Environmental specifications...48 7 Troubleshooting...49...
Owners Manual
Page 11
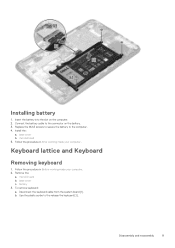
... board [1]. base cover b. microSD card b. battery 3. Disassembly and reassembly 11 Insert the battery into the slot on the battery. 3. microSD card 5. base cover c. To remove keyboard: a. Follow the procedure in After working inside your computer. 2. Install the: a. Use the plastic scribe to the computer. 4. Connect the battery cable to the connector...
... board [1]. base cover b. microSD card b. battery 3. Disassembly and reassembly 11 Insert the battery into the slot on the battery. 3. microSD card 5. base cover c. To remove keyboard: a. Follow the procedure in After working inside your computer. 2. Install the: a. Use the plastic scribe to the computer. 4. Connect the battery cable to the connector...

Owners Manual
Page 12
Installing keyboard 1. NOTE: The two release holes for the keyboard are indicated by the "KB" labeling. 4. Slide and lift the keyboard away from the computer. Align the keyboard trim with the tabs on the computer, and press it until it clicks into place. 12 Disassembly and reassembly
Installing keyboard 1. NOTE: The two release holes for the keyboard are indicated by the "KB" labeling. 4. Slide and lift the keyboard away from the computer. Align the keyboard trim with the tabs on the computer, and press it until it clicks into place. 12 Disassembly and reassembly
Owners Manual
Page 13
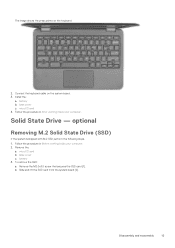
... Drive (SSD) If the system is shipped with M.2 SSD perform the following steps. 1. Follow the procedure in After working inside your computer. 2. Connect the keyboard cable on the keyboard. 2. base cover c. Remove the M2.0x3.0 screw that secures the SSD card [1]. microSD card 4. base cover c. The image shows the press points on...
... Drive (SSD) If the system is shipped with M.2 SSD perform the following steps. 1. Follow the procedure in After working inside your computer. 2. Connect the keyboard cable on the keyboard. 2. base cover c. Remove the M2.0x3.0 screw that secures the SSD card [1]. microSD card 4. base cover c. The image shows the press points on...

Owners Manual
Page 19
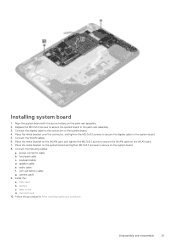
... the: a. Follow the procedure in Before working inside your computer. audio cable [1] b. System board Removing system board 1. microSD card 6. base cover c. Disconnect the following cables: a. keyboard cable [2] c.
... the: a. Follow the procedure in Before working inside your computer. audio cable [1] b. System board Removing system board 1. microSD card 6. base cover c. Disconnect the following cables: a. keyboard cable [2] c.
Owners Manual
Page 21
Replace the M2.0x3.0 screws to secure the system board to the system board. 5. Connect the WLAN cables. 6. keyboard cable d. Follow the procedure in After working inside your computer. Installing system board 1. touchpad cable c. coin cell battery cable g. Disassembly and reassembly 21 Align the ...
Replace the M2.0x3.0 screws to secure the system board to the system board. 5. Connect the WLAN cables. 6. keyboard cable d. Follow the procedure in After working inside your computer. Installing system board 1. touchpad cable c. coin cell battery cable g. Disassembly and reassembly 21 Align the ...

Owners Manual
Page 30
...or restart your system. Graphic options This laptop is shipped with the following actions after the Dell logo is shipped with the Intel 100 Series chipset. This laptop is displayed • With keyboard - Intel Celeron 3865U Intel HD graphics 610 3. Tap F2 until the Entering BIOS setup ...message appears. Turn on your system. 2. Perform one of the following list of 4 GB LPDDR3 1600 Mhz. When the Dell logo appears, perform the following graphics ...
...or restart your system. Graphic options This laptop is shipped with the following actions after the Dell logo is shipped with the Intel 100 Series chipset. This laptop is displayed • With keyboard - Intel Celeron 3865U Intel HD graphics 610 3. Tap F2 until the Entering BIOS setup ...message appears. Turn on your system. 2. Perform one of the following list of 4 GB LPDDR3 1600 Mhz. When the Dell logo appears, perform the following graphics ...
Owners Manual
Page 31
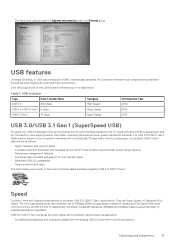
... in parallel with the existing USB 2.0 bus (refer to the picture below). It dramatically simplified the connection between host computers and peripheral devices like mice, keyboards, external drivers, and printers. While the specification retains Hi-Speed, and Full-Speed USB mode, commonly known as USB 2.0 and 1.1 respectively, the slower modes still...
... in parallel with the existing USB 2.0 bus (refer to the picture below). It dramatically simplified the connection between host computers and peripheral devices like mice, keyboards, external drivers, and printers. While the specification retains Hi-Speed, and Full-Speed USB mode, commonly known as USB 2.0 and 1.1 respectively, the slower modes still...

Owners Manual
Page 37
... must set the admin password before you set , change , or delete the administrator (admin) password. The options are: • Enable Microphone-by default NOTE: USB keyboard and mouse always work in the BIOS setup irrespective of the Administrator and System passwords. • min-4-by default This field enables or disables the...
... must set the admin password before you set , change , or delete the administrator (admin) password. The options are: • Enable Microphone-by default NOTE: USB keyboard and mouse always work in the BIOS setup irrespective of the Administrator and System passwords. • min-4-by default This field enables or disables the...

Owners Manual
Page 44
... specifications • Memory specifications • Storage specifications • Audio specifications • Video specifications • Camera specifications • Communication specifications • Port and connector specifications • Keyboard specifications • Touchpad specifications • Battery specifications • AC adapter specifications • Physical specifications • Environmental specifications System specifications Feature Chipset DRAM bus width Flash...
... specifications • Memory specifications • Storage specifications • Audio specifications • Video specifications • Camera specifications • Communication specifications • Port and connector specifications • Keyboard specifications • Touchpad specifications • Battery specifications • AC adapter specifications • Physical specifications • Environmental specifications System specifications Feature Chipset DRAM bus width Flash...

Owners Manual
Page 46
... USB 3.1 Gen 1 with PowerShare • One USB 3.1 Gen 1 port • One microSD card Up to SD 3.0 Docking has two options: • Dell D1000 USB 3.0 Dock • Dell Entry USB 3.0 Dock Keyboard specifications Feature Number of keys Specification • United States: 82 keys • United Kingdom: 83 keys • Europe: 83 keys • Brazil...
... USB 3.1 Gen 1 with PowerShare • One USB 3.1 Gen 1 port • One microSD card Up to SD 3.0 Docking has two options: • Dell D1000 USB 3.0 Dock • Dell Entry USB 3.0 Dock Keyboard specifications Feature Number of keys Specification • United States: 82 keys • United Kingdom: 83 keys • Europe: 83 keys • Brazil...


