
Quick Reference Guide
Page 3
... 12 Setting Up Your Computer 13 Small Desktop Computer 14 Mini-tower Computer 15 Completed Setup 16 Small Desktop Computer 16 Mini-Tower Computer 16 Solving Problems 17 Dell Diagnostics 17 System Lights 19 Diagnostic Lights 20 Beep Codes 22 Running the Dell™ IDE Hard Drive Diagnostics 23 Resolving Software and Hardware Incompatibilities 24 Using Microsoft® Windows® XP System Restore 25 Reinstalling Microsoft® Windows® XP 26 Using the Drivers and Utilities...
... 12 Setting Up Your Computer 13 Small Desktop Computer 14 Mini-tower Computer 15 Completed Setup 16 Small Desktop Computer 16 Mini-Tower Computer 16 Solving Problems 17 Dell Diagnostics 17 System Lights 19 Diagnostic Lights 20 Beep Codes 22 Running the Dell™ IDE Hard Drive Diagnostics 23 Resolving Software and Hardware Incompatibilities 24 Using Microsoft® Windows® XP System Restore 25 Reinstalling Microsoft® Windows® XP 26 Using the Drivers and Utilities...
Quick Reference Guide
Page 5
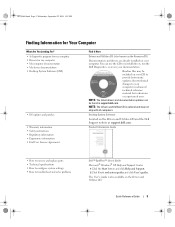
...-minute updates about technical changes to troubleshoot and solve problems Dell™ OptiPlex™ User's Guide Microsoft® Windows® XP Help and Support Center 1 Click the Start button and click Help and Support. 2 Click User's and system guides and click User's guides. Quick Reference Guide 5 Readme files may not ship with all computers. The User's Guide is optional and may be found at support.dell.com. Product Information Guide • How to remove and replace parts • Technical specifications •...
...-minute updates about technical changes to troubleshoot and solve problems Dell™ OptiPlex™ User's Guide Microsoft® Windows® XP Help and Support Center 1 Click the Start button and click Help and Support. 2 Click User's and system guides and click User's guides. Quick Reference Guide 5 Readme files may not ship with all computers. The User's Guide is optional and may be found at support.dell.com. Product Information Guide • How to remove and replace parts • Technical specifications •...
Quick Reference Guide
Page 6
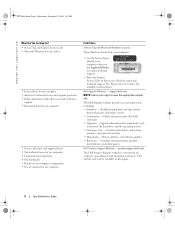
... Service Tag and Microsoft Windows License These labels are located on my computer configuration • Service contract for components, such as memory, the hard drive, and the operating system • Customer Care - Contact information, order status, warranty, and repair information • Downloads - Dell Support Website - This website may not be available in all regions. 6 Quick Reference Guide Drivers, patches, and software updates • Reference - Computer documentation, product specifications...
... Service Tag and Microsoft Windows License These labels are located on my computer configuration • Service contract for components, such as memory, the hard drive, and the operating system • Customer Care - Contact information, order status, warranty, and repair information • Downloads - Dell Support Website - This website may not be available in all regions. 6 Quick Reference Guide Drivers, patches, and software updates • Reference - Computer documentation, product specifications...

Quick Reference Guide
Page 7
... Reference Guide 7 Your operating system product key label is already installed on the operating system you reinstall your operating system, use the Operating System CD. To reinstall your operating system, use the Drivers and Utilities CD to reinstall my operating system • Regulatory Model Information and Chassis Type Find It Here Windows Help and Support Center 1 Click the Start button and click Help and Support. 2 Type a word or phrase that describes your problem...
... Reference Guide 7 Your operating system product key label is already installed on the operating system you reinstall your operating system, use the Operating System CD. To reinstall your operating system, use the Drivers and Utilities CD to reinstall my operating system • Regulatory Model Information and Chassis Type Find It Here Windows Help and Support Center 1 Click the Start button and click Help and Support. 2 Type a word or phrase that describes your problem...

Quick Reference Guide
Page 8
... Desktop Computer Front and Back Views service tag front panel door headphone connector USB 2.0 connectors (2) CejDe/cDtVbDutdtorinvCeejeDc/tDbVuDtt-odnrive Microsoft Windows Product Key front panel door power light power button floppy-drive eject button floppy-drive activity light hard-drive activity light parallel connector link integrity light mouse connector network adapter connector network activity light line-in connector serial connector video connector diagnostic lights optional card slots (2) power connector low-profile PCI card slot line-out connector microphone connector...
... Desktop Computer Front and Back Views service tag front panel door headphone connector USB 2.0 connectors (2) CejDe/cDtVbDutdtorinvCeejeDc/tDbVuDtt-odnrive Microsoft Windows Product Key front panel door power light power button floppy-drive eject button floppy-drive activity light hard-drive activity light parallel connector link integrity light mouse connector network adapter connector network activity light line-in connector serial connector video connector diagnostic lights optional card slots (2) power connector low-profile PCI card slot line-out connector microphone connector...

Quick Reference Guide
Page 11
... Computer Front and Back Views service tag CD or DVD drive activity light CD or DVD eject button second drive bay floppy drive light power light floppy drive eject button hard-drive activity light power button USB 2.0 connectors (2) headphone connector power connector voltage selection switch serial connector video connector keyboard connector line-out connector microphone connector USB 2.0 connectors (4) PCI card slots (3) parallel connector diagnostic lights (4) mouse connector line-in connector cover latch network adapter connector security cable slot Quick Reference Guide 11
... Computer Front and Back Views service tag CD or DVD drive activity light CD or DVD eject button second drive bay floppy drive light power light floppy drive eject button hard-drive activity light power button USB 2.0 connectors (2) headphone connector power connector voltage selection switch serial connector video connector keyboard connector line-out connector microphone connector USB 2.0 connectors (4) PCI card slots (3) parallel connector diagnostic lights (4) mouse connector line-in connector cover latch network adapter connector security cable slot Quick Reference Guide 11

Quick Reference Guide
Page 13
... with a manual voltage selection switch, set up your location. Align and gently insert the monitor cable to operate a PS/2 mouse and a USB mouse simultaneously. Tighten the thumbscrews on the back of your computer and operating system. Quick Reference Guide 13 NOTE: If you have a USB-compliant mouse or keyboard, use the USB connectors on the cable connectors. Computers with a voltage selection switch on the back panel. NOTE: Before you have the video connector underneath...
... with a manual voltage selection switch, set up your location. Align and gently insert the monitor cable to operate a PS/2 mouse and a USB mouse simultaneously. Tighten the thumbscrews on the back of your computer and operating system. Quick Reference Guide 13 NOTE: If you have a USB-compliant mouse or keyboard, use the USB connectors on the cable connectors. Computers with a voltage selection switch on the back panel. NOTE: Before you have the video connector underneath...
Quick Reference Guide
Page 17
... no diagnostics utility partition has been found, run . Express Service Code Service Tag Dell Diagnostics CAUTION: Before you see the Microsoft® Windows® desktop. and then contact Dell from the optional Drivers and Utilities CD (also known as your computer. 2 When the DELL™ logo appears, press immediately. Starting the Dell Diagnostics From Your Hard Drive 1 Turn on (or restart) your computer. Start the Dell Diagnostics from either your hard drive or from the same location as...
... no diagnostics utility partition has been found, run . Express Service Code Service Tag Dell Diagnostics CAUTION: Before you see the Microsoft® Windows® desktop. and then contact Dell from the optional Drivers and Utilities CD (also known as your computer. 2 When the DELL™ logo appears, press immediately. Starting the Dell Diagnostics From Your Hard Drive 1 Turn on (or restart) your computer. Start the Dell Diagnostics from either your hard drive or from the same location as...
Quick Reference Guide
Page 18
... error code and a description of the problem you want . On the next start-up, the computer boots according to the devices specified in system setup. 3 When the boot device list appears, highlight IDE CD-ROM Device and press . 4 Select the IDE CD-ROM Device option from the CD boot menu. 5 Select the Boot from CD-ROM option from the menu that appears. 6 Type 1 to start the Dell Diagnostics. 8 Select Run the 32 Bit Dell Diagnostics from the numbered list. Run Express Test...
... error code and a description of the problem you want . On the next start-up, the computer boots according to the devices specified in system setup. 3 When the boot device list appears, highlight IDE CD-ROM Device and press . 4 Select the IDE CD-ROM Device option from the CD boot menu. 5 Select the Boot from CD-ROM option from the menu that appears. 6 Type 1 to start the Dell Diagnostics. 8 Select Run the 32 Bit Dell Diagnostics from the numbered list. Run Express Test...
Quick Reference Guide
Page 19
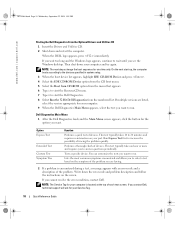
... running the Dell Diagnostics from the Drivers and Utilities CD, remove the CD. 5 Close the test screen to return to see if the specific problem is running, allow the testing to wake the computer. To exit the Dell Diagnostics and restart the computer, close the Main Menu screen. Blinking green The computer is required. Quick Reference Guide 19 times and then turns off Check "Diagnostic Lights" on the keyboard to complete. The Dell Diagnostics obtains configuration...
... running the Dell Diagnostics from the Drivers and Utilities CD, remove the CD. 5 Close the test screen to return to see if the specific problem is running, allow the testing to wake the computer. To exit the Dell Diagnostics and restart the computer, close the Main Menu screen. Blinking green The computer is required. Quick Reference Guide 19 times and then turns off Check "Diagnostic Lights" on the keyboard to complete. The Dell Diagnostics obtains configuration...
Quick Reference Guide
Page 20
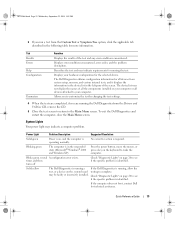
... PM Power Light Problem Description Suggested Resolution Blinking yellow A power supply or system board failure has occurred. if the specific problem is not identified, contact Dell for instructions on the lights change as the boot process completes. The lights can be faulty or incorrectly installed. See "Beep Codes" on page 20 to see if the specific problem is plugged into a working or a possible pre-BIOS failure has electrical outlet and that you troubleshoot a problem, your online User's Guide. power button. 20...
... PM Power Light Problem Description Suggested Resolution Blinking yellow A power supply or system board failure has occurred. if the specific problem is not identified, contact Dell for instructions on the lights change as the boot process completes. The lights can be faulty or incorrectly installed. See "Beep Codes" on page 20 to see if the specific problem is plugged into a working or a possible pre-BIOS failure has electrical outlet and that you troubleshoot a problem, your online User's Guide. power button. 20...

Quick Reference Guide
Page 21
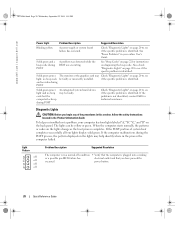
... starts normally, troubleshoot the last card removed from the computer for each move. • If the problem persists, contact Dell. A possible IDE drive failure has occurred. • Reseat all USB devices, check cable connections, and then restart the computer. If the computer starts normally, reinstall the second module. • If available, install properly working memory of the same type into your computer. • If the problem persists, contact Dell...
... starts normally, troubleshoot the last card removed from the computer for each move. • If the problem persists, contact Dell. A possible IDE drive failure has occurred. • Reseat all USB devices, check cable connections, and then restart the computer. If the computer starts normally, reinstall the second module. • If available, install properly working memory of the same type into your computer. • If the problem persists, contact Dell...
Quick Reference Guide
Page 22
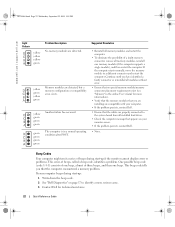
... the monitor cannot display errors or problems. This series of a faulty memory connector, remove all modules without error. • Ensure that no special memory module/memory connector placement requirements exist (see "Memory" in a normal operating condition after POST. If your monitor screen. • If the problem persists, contact Dell. • None. The computer is in the online User's Guide for more serious cause. 3 Contact Dell for technical assistance. 22 Quick Reference Guide This beep code...
... the monitor cannot display errors or problems. This series of a faulty memory connector, remove all modules without error. • Ensure that no special memory module/memory connector placement requirements exist (see "Memory" in a normal operating condition after POST. If your monitor screen. • If the problem persists, contact Dell. • None. The computer is in the online User's Guide for more serious cause. 3 Contact Dell for technical assistance. 22 Quick Reference Guide This beep code...
Quick Reference Guide
Page 23
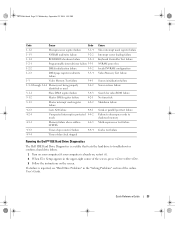
... port test failure Failure to decompress code to shadowed memory Math-coprocessor test failure Cache test failure Running the Dell™ IDE Hard Drive Diagnostics The Dell IDE Hard Drive Diagnostics is a utility that tests the hard drive to troubleshoot or confirm a hard drive failure. 1 Turn on your computer (if your computer is reported, see "Hard Drive Problems" in the upper-right corner of the screen, press . 3 Follow the instructions on , restart it). 2 When F2= Setup appears in the "Solving Problems" section of the online User's Guide...
... port test failure Failure to decompress code to shadowed memory Math-coprocessor test failure Cache test failure Running the Dell™ IDE Hard Drive Diagnostics The Dell IDE Hard Drive Diagnostics is a utility that tests the hard drive to troubleshoot or confirm a hard drive failure. 1 Turn on your computer (if your computer is reported, see "Hard Drive Problems" in the upper-right corner of the screen, press . 3 Follow the instructions on , restart it). 2 When F2= Setup appears in the "Solving Problems" section of the online User's Guide...
Quick Reference Guide
Page 24
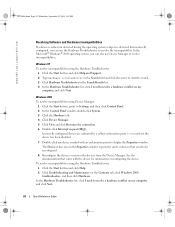
....dell.com | support.dell.com Resolving Software and Hardware Incompatibilities If a device is either not detected during the operating system setup or is detected but incorrectly configured, you can use Device Manager to be reconfigured. 8 Reconfigure the devices or remove the devices from the Device Manager. Windows XP To resolve incompatibilities using the Hardware Troubleshooter: 1 Click the Start button and click Help. 2 Click Troubleshooting and Maintenance on my computer and click Next. 24 Quick Reference Guide...
....dell.com | support.dell.com Resolving Software and Hardware Incompatibilities If a device is either not detected during the operating system setup or is detected but incorrectly configured, you can use Device Manager to be reconfigured. 8 Reconfigure the devices or remove the devices from the Device Manager. Windows XP To resolve incompatibilities using the Hardware Troubleshooter: 1 Click the Start button and click Help. 2 Click Troubleshooting and Maintenance on my computer and click Next. 24 Quick Reference Guide...

Quick Reference Guide
Page 26
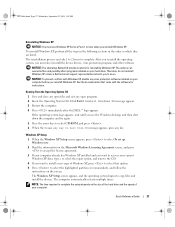
.... To see if System Restore is enabled: 1 Click the Start button and click Control Panel. 2 Click Performance and Maintenance. 3 Click System. 4 Click the System Restore tab. 5 Ensure that were installed during assembly of free hard-disk space available, System Restore is automatically disabled. If Device Driver Rollback does not resolve the problem, then use System Restore to return your primary hard drive. To reinstall Windows XP, you reinstall Windows XP with all data...
.... To see if System Restore is enabled: 1 Click the Start button and click Control Panel. 2 Click Performance and Maintenance. 3 Click System. 4 Click the System Restore tab. 5 Ensure that were installed during assembly of free hard-disk space available, System Restore is automatically disabled. If Device Driver Rollback does not resolve the problem, then use System Restore to return your primary hard drive. To reinstall Windows XP, you reinstall Windows XP with all data...
Quick Reference Guide
Page 27
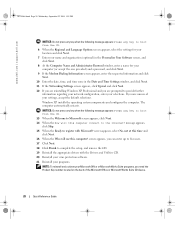
... To set up Windows now. 2 Read the information on the Microsoft Windows Licensing Agreement screen, and press to accept the license agreement. 3 If your computer already has Windows XP installed and you want to install a new copy of Windows XP, press to select that came with Windows XP, disable any virus protection software installed on your current Windows XP data, type r to select the repair option, and remove...
... To set up Windows now. 2 Read the information on the Microsoft Windows Licensing Agreement screen, and press to accept the license agreement. 3 If your computer already has Windows XP installed and you want to install a new copy of Windows XP, press to select that came with Windows XP, disable any virus protection software installed on your current Windows XP data, type r to select the repair option, and remove...
Quick Reference Guide
Page 28
... key when the following message appears: Press any key to boot from the CD. 13 When the Welcome to Microsoft screen appears, click Next. 14 When the How will use this computer connect to the Internet? If you are unsure of the Microsoft Office or Microsoft Works Suite CD sleeve. 28 Quick Reference Guide Windows XP installs the operating system components and configures...
... key when the following message appears: Press any key to boot from the CD. 13 When the Welcome to Microsoft screen appears, click Next. 14 When the How will use this computer connect to the Internet? If you are unsure of the Microsoft Office or Microsoft Works Suite CD sleeve. 28 Quick Reference Guide Windows XP installs the operating system components and configures...
Quick Reference Guide
Page 29
... Installation window opens to inform you are running Windows. 1 Turn on the screen. 2 Click the appropriate driver and follow the instructions to download the driver to your computer. If you that the Drivers and Utilities CD is displayed on the computer and allow it to boot to the Windows desktop. 2 Insert the Drivers and Utilities CD into the CD drive. Quick Reference Guide 29 The Drivers and Utilities CD scans your computer's hardware and operating...
... Installation window opens to inform you are running Windows. 1 Turn on the screen. 2 Click the appropriate driver and follow the instructions to download the driver to your computer. If you that the Drivers and Utilities CD is displayed on the computer and allow it to boot to the Windows desktop. 2 Insert the Drivers and Utilities CD into the CD drive. Quick Reference Guide 29 The Drivers and Utilities CD scans your computer's hardware and operating...

Quick Reference Guide
Page 32
... P power light, 19 problems beep codes, 22 conflicts, 24 Dell Diagnostics, 17 diagnostic lights, 19-20 restore to previous state, 25 R reinstalling Drivers and Utilities CD, 5 ResourceCD, 5 Windows XP, 26 ResourceCD Dell Diagnostics, 17 S Service Tag, 6 software conflicts, 24 stand attach, 10 remove, 10 system lights, 19 System Restore, 25 T troubleshooting conflicts, 24 Dell Diagnostics, 17 diagnostic lights, 19-20 Hardware Troubleshooter, 24 Help and Support Center, 7 restore to previous state, 25 U User's Guide, 5 W Windows 2000 Device Manager, 24 Hardware Troubleshooter, 24 Windows XP...
... P power light, 19 problems beep codes, 22 conflicts, 24 Dell Diagnostics, 17 diagnostic lights, 19-20 restore to previous state, 25 R reinstalling Drivers and Utilities CD, 5 ResourceCD, 5 Windows XP, 26 ResourceCD Dell Diagnostics, 17 S Service Tag, 6 software conflicts, 24 stand attach, 10 remove, 10 system lights, 19 System Restore, 25 T troubleshooting conflicts, 24 Dell Diagnostics, 17 diagnostic lights, 19-20 Hardware Troubleshooter, 24 Help and Support Center, 7 restore to previous state, 25 U User's Guide, 5 W Windows 2000 Device Manager, 24 Hardware Troubleshooter, 24 Windows XP...


