Quick Reference Guide
Page 3
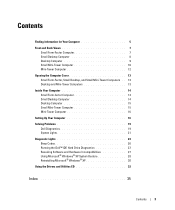
... 14 Small Desktop Computer 14 Desktop Computer 15 Small Mini-Tower Computer 15 Mini-Tower Computer 16 Setting Up Your Computer 16 Solving Problems 19 Dell Diagnostics 19 System Lights 21 Diagnostic Lights 23 Beep Codes 26 Running the Dell™ IDE Hard Drive Diagnostics 27 Resolving Software and Hardware Incompatibilities 27 Using Microsoft® Windows® XP System Restore 28 Reinstalling Microsoft® Windows® XP 30 Using the Drivers and Utilities CD 32...
... 14 Small Desktop Computer 14 Desktop Computer 15 Small Mini-Tower Computer 15 Mini-Tower Computer 16 Setting Up Your Computer 16 Solving Problems 19 Dell Diagnostics 19 System Lights 21 Diagnostic Lights 23 Beep Codes 26 Running the Dell™ IDE Hard Drive Diagnostics 27 Resolving Software and Hardware Incompatibilities 27 Using Microsoft® Windows® XP System Restore 28 Reinstalling Microsoft® Windows® XP 30 Using the Drivers and Utilities CD 32...

Quick Reference Guide
Page 5
... use the CD to troubleshoot and solve problems Dell™ OptiPlex™ User's Guide Microsoft® Windows® XP Help and Support Center 1 Click the Start button and click Help and Support. 2 Click User's and system guides and click User's guides. • Service Tag and Express Service Code • Microsoft Windows License Label Service Tag and Microsoft Windows License These labels are already installed on your documentation. Product Information Guide • How to remove and replace parts • Technical specifications...
... use the CD to troubleshoot and solve problems Dell™ OptiPlex™ User's Guide Microsoft® Windows® XP Help and Support Center 1 Click the Start button and click Help and Support. 2 Click User's and system guides and click User's guides. • Service Tag and Express Service Code • Microsoft Windows License Label Service Tag and Microsoft Windows License These labels are already installed on your documentation. Product Information Guide • How to remove and replace parts • Technical specifications...

Quick Reference Guide
Page 6
...; Latest drivers for devices (such as memory, the hard drive, and the operating system • Services and Warranties - Desktop chassis • DHM - See your OptiPlex User's Guide for components, such as a modem) Windows Help and Support Center 1 Click the Start button and click Help and Support. 2 Type a word or phrase that describes your computer. Small form-factor chassis • DHS - support.dell.com NOTE: Select your region to technical service and support questions...
...; Latest drivers for devices (such as memory, the hard drive, and the operating system • Services and Warranties - Desktop chassis • DHM - See your OptiPlex User's Guide for components, such as a modem) Windows Help and Support Center 1 Click the Start button and click Help and Support. 2 Type a word or phrase that describes your computer. Small form-factor chassis • DHS - support.dell.com NOTE: Select your region to technical service and support questions...
Quick Reference Guide
Page 7
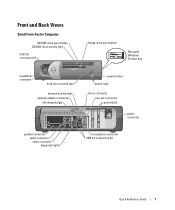
Front and Back Views Small Form-Factor Computer CD/DVD-drive eject button CD/DVD-drive activity light USB 2.0 connectors (2) floppy-drive eject button Microsoft Windows Product Key headphone connector hard-drive activity light network activity light network adapter connector link integrity light power button power light line-in connector line-out connector card slots (2) power connector parallel connector serial connector video connector diagnostic lights microphone connector USB 2.0 connectors (6) Quick Reference Guide 7
Front and Back Views Small Form-Factor Computer CD/DVD-drive eject button CD/DVD-drive activity light USB 2.0 connectors (2) floppy-drive eject button Microsoft Windows Product Key headphone connector hard-drive activity light network activity light network adapter connector link integrity light power button power light line-in connector line-out connector card slots (2) power connector parallel connector serial connector video connector diagnostic lights microphone connector USB 2.0 connectors (6) Quick Reference Guide 7

Quick Reference Guide
Page 9
Desktop Computer CD/DVD-drive eject button USB 2.0 connectors (2) power button power light Microsoft Windows Product Key floppy-drive eject button microphone connector diagnostic lights headphone connector network activity light network adapter connector link integrity light line-in connector line-out connector voltage selection switch card slots (3) power connector parallel connector serial connector video connector microphone connector USB 2.0 connectors (6) Quick Reference Guide 9
Desktop Computer CD/DVD-drive eject button USB 2.0 connectors (2) power button power light Microsoft Windows Product Key floppy-drive eject button microphone connector diagnostic lights headphone connector network activity light network adapter connector link integrity light line-in connector line-out connector voltage selection switch card slots (3) power connector parallel connector serial connector video connector microphone connector USB 2.0 connectors (6) Quick Reference Guide 9

Quick Reference Guide
Page 10
power connector voltage selection switch parallel connector video connector diagnostic lights USB 2.0 connectors (6) microphone connector line-out connector card slots (5) CD/DVD-drive eject button floppy-drive eject button hard-drive activity light front panel door headphone connector USB 2.0 connectors (2) serial connector link integrity light network adapter connector network activity light line-in connector 10 Quick Reference Guide www.dell.com | support.dell.com Small Mini-Tower Computer Microsoft Windows Product Key floppy-drive activity light power light power button front-panel ...
power connector voltage selection switch parallel connector video connector diagnostic lights USB 2.0 connectors (6) microphone connector line-out connector card slots (5) CD/DVD-drive eject button floppy-drive eject button hard-drive activity light front panel door headphone connector USB 2.0 connectors (2) serial connector link integrity light network adapter connector network activity light line-in connector 10 Quick Reference Guide www.dell.com | support.dell.com Small Mini-Tower Computer Microsoft Windows Product Key floppy-drive activity light power light power button front-panel ...

Quick Reference Guide
Page 12
www.dell.com | support.dell.com Mini-Tower Computer Microsoft Windows Product Key microphone connector headphone connector diagnostic lights CD/DVD-drive eject button floppy-drive eject button USB 2.0 connectors (2) power button power light voltage selection switch line-out connector network activity light network adapter connector link integrity light parallel connector 12 Quick Reference Guide power connector line-in connector microphone connector USB 2.0 connectors (6) video connector serial connector card slots (4)
www.dell.com | support.dell.com Mini-Tower Computer Microsoft Windows Product Key microphone connector headphone connector diagnostic lights CD/DVD-drive eject button floppy-drive eject button USB 2.0 connectors (2) power button power light voltage selection switch line-out connector network activity light network adapter connector link integrity light parallel connector 12 Quick Reference Guide power connector line-in connector microphone connector USB 2.0 connectors (6) video connector serial connector card slots (4)

Quick Reference Guide
Page 16
... a modem card), connect the appropriate cable to the card, not to properly set up your computer. You must complete all the steps to the connector on the back panel. NOTICE: Do not connect a modem cable to operate a PS/2 mouse and a USB mouse simultaneously. 2 Connect the modem or network cable. www.dell.com | support.dell.com Mini-Tower Computer power supply floppy drive CD/DVD drive chassis intrusion switch SATA connectors (2) system board PCI-E x16 connector heat sink shroud assembly hard drive Setting Up...
... a modem card), connect the appropriate cable to the card, not to properly set up your computer. You must complete all the steps to the connector on the back panel. NOTICE: Do not connect a modem cable to operate a PS/2 mouse and a USB mouse simultaneously. 2 Connect the modem or network cable. www.dell.com | support.dell.com Mini-Tower Computer power supply floppy drive CD/DVD drive chassis intrusion switch SATA connectors (2) system board PCI-E x16 connector heat sink shroud assembly hard drive Setting Up...

Quick Reference Guide
Page 17
... power available in your location. 3 Connect the monitor. Computers with the device or software, or contact the vendor to verify that the device or software is set to avoid bending connector pins. See the documentation that came with a voltage selection switch on the cable connectors. Set Up Your Keyboard and Mouse Quick Reference Guide 17 NOTE: Your computer may vary slightly from the following setup figures. NOTE: Before you install...
... power available in your location. 3 Connect the monitor. Computers with the device or software, or contact the vendor to verify that the device or software is set to avoid bending connector pins. See the documentation that came with a voltage selection switch on the cable connectors. Set Up Your Keyboard and Mouse Quick Reference Guide 17 NOTE: Your computer may vary slightly from the following setup figures. NOTE: Before you install...

Quick Reference Guide
Page 19
... the boot device list appears, highlight Boot to Utility Partition and press . 4 When the Dell Diagnostics Main Menu appears, select the test you want to wait until you contact Dell for your online User's Guide and run . and then contact Dell from the optional Drivers and Utilities CD (also known as your Express Service Code and Service Tag below; record your computer. For the latest troubleshooting information available for technical assistance. Solving Problems Dell provides a number...
... the boot device list appears, highlight Boot to Utility Partition and press . 4 When the Dell Diagnostics Main Menu appears, select the test you want to wait until you contact Dell for your online User's Guide and run . and then contact Dell from the optional Drivers and Utilities CD (also known as your Express Service Code and Service Tag below; record your computer. For the latest troubleshooting information available for technical assistance. Solving Problems Dell provides a number...

Quick Reference Guide
Page 21
... Dell, technical support will ask for all the components installed on the keyboard to the Main Menu screen. NOTE: The Service Tag for your hardware configuration for the selected device. Tab Results Errors Help Configuration Parameters Function Displays the results of all devices from the Drivers and Utilities CD (optional), remove the CD. 5 Close the test screen to return to wake the computer. Displays your computer is identified. If you are running the test. The device list...
... Dell, technical support will ask for all the components installed on the keyboard to the Main Menu screen. NOTE: The Service Tag for your hardware configuration for the selected device. Tab Results Errors Help Configuration Parameters Function Displays the results of all devices from the Drivers and Utilities CD (optional), remove the CD. 5 Close the test screen to return to wake the computer. Displays your computer is identified. If you are running the test. The device list...

Quick Reference Guide
Page 22
... incorrectly installed. See "Beep Codes" on page 26 for instructions on page 23 to see your online User's Guide. Blinking yellow A power supply or system board failure has occurred. See "Power Problems" in your online User's Guide. 22 Quick Reference Guide the specific problem is identified. and no video during POST A problem was detected while the BIOS was executing. Check "Diagnostic Lights" on contacting Dell, see if the specific problem is identified. If the Dell Diagnostics is running a test, or a device...
... incorrectly installed. See "Beep Codes" on page 26 for instructions on page 23 to see your online User's Guide. Blinking yellow A power supply or system board failure has occurred. See "Power Problems" in your online User's Guide. 22 Quick Reference Guide the specific problem is identified. and no video during POST A problem was detected while the BIOS was executing. Check "Diagnostic Lights" on contacting Dell, see if the specific problem is identified. If the Dell Diagnostics is running a test, or a device...

Quick Reference Guide
Page 24
... Software and Hardware Incompatibilities" on contacting Dell, see your online User's Guide. • Determine if a conflict exists by removing a card (not the graphics card) and then restarting the computer. • If the problem persists, reinstall the card that you have two or more memory modules installed, remove the modules, reinstall one memory module installed, reinstall it and restart the computer. www.dell.com | support.dell.com Light Pattern Problem Description Memory modules...
... Software and Hardware Incompatibilities" on contacting Dell, see your online User's Guide. • Determine if a conflict exists by removing a card (not the graphics card) and then restarting the computer. • If the problem persists, reinstall the card that you have two or more memory modules installed, remove the modules, reinstall one memory module installed, reinstall it and restart the computer. www.dell.com | support.dell.com Light Pattern Problem Description Memory modules...

Quick Reference Guide
Page 25
A possible floppy or hard drive failure has Reseat all USB devices, check cable connections, and then restart the computer. For information on contacting Dell, see your online User's Guide. For information on contacting Dell, see your computer. • If the problem persists, contact Dell. YGGG Reinstall all power and data cables and occurred. No memory modules are detected. Light Pattern Problem Description Suggested Resolution A possible graphics card failure has occurred. restart the...
A possible floppy or hard drive failure has Reseat all USB devices, check cable connections, and then restart the computer. For information on contacting Dell, see your online User's Guide. For information on contacting Dell, see your computer. • If the problem persists, contact Dell. YGGG Reinstall all power and data cables and occurred. No memory modules are detected. Light Pattern Problem Description Suggested Resolution A possible graphics card failure has occurred. restart the...

Quick Reference Guide
Page 26
... installing are compatible with your computer beeps during start -up if the monitor cannot display errors or problems. This series of three beeps, and then one beep, a burst of beeps, called a beep code, identifies a problem. For information on your online User's Guide. • Ensure that appears on contacting Dell, see your monitor screen. • If the problem persists, contact Dell. One possible beep code (code 1-3-1) consists of one beep. Code 1-1-2 1-1-3 1-1-4 1-2-1 Cause Microprocessor register failure NVRAM read/write failure ROM BIOS...
... installing are compatible with your computer beeps during start -up if the monitor cannot display errors or problems. This series of three beeps, and then one beep, a burst of beeps, called a beep code, identifies a problem. For information on your online User's Guide. • Ensure that appears on contacting Dell, see your monitor screen. • If the problem persists, contact Dell. One possible beep code (code 1-3-1) consists of one beep. Code 1-1-2 1-1-3 1-1-4 1-2-1 Cause Microprocessor register failure NVRAM read/write failure ROM BIOS...

Quick Reference Guide
Page 27
... Search for video ROM failure No timer tick Shutdown failure Serial or parallel port test failure Failure to decompress code to shadowed memory Math-coprocessor test failure Cache test failure Running the Dell™ IDE Hard Drive Diagnostics The Dell IDE Hard Drive Diagnostics is a utility that tests the hard drive to troubleshoot or confirm a hard drive failure. 1 Turn on your computer (if your computer is already on the screen. Windows XP To resolve incompatibilities using the Hardware Troubleshooter: 1 Click the Start button and click Help and Support. 2 Type hardware troubleshooter in...
... Search for video ROM failure No timer tick Shutdown failure Serial or parallel port test failure Failure to decompress code to shadowed memory Math-coprocessor test failure Cache test failure Running the Dell™ IDE Hard Drive Diagnostics The Dell IDE Hard Drive Diagnostics is a utility that tests the hard drive to troubleshoot or confirm a hard drive failure. 1 Turn on your computer (if your computer is already on the screen. Windows XP To resolve incompatibilities using the Hardware Troubleshooter: 1 Click the Start button and click Help and Support. 2 Type hardware troubleshooter in...

Quick Reference Guide
Page 28
... Hardware Troubleshooter: 1 Click the Start button and click Help. 2 Click Troubleshooting and Maintenance on using Device Manager: 1 Click the Start button, point to resolve a hardware conflict on configuring the device. Using Microsoft® Windows® XP System Restore The Microsoft® Windows® XP operating system provides System Restore to allow you to return your computer to an earlier operating state (without affecting data files) if changes to the hardware, software, or other system settings...
... Hardware Troubleshooter: 1 Click the Start button and click Help. 2 Click Troubleshooting and Maintenance on using Device Manager: 1 Click the Start button, point to resolve a hardware conflict on configuring the device. Using Microsoft® Windows® XP System Restore The Microsoft® Windows® XP operating system provides System Restore to allow you to return your computer to an earlier operating state (without affecting data files) if changes to the hardware, software, or other system settings...

Quick Reference Guide
Page 30
... virus protection software installed on your computer before you installed the new device driver. Therefore, do so. To see if System Restore is enabled: 1 Click the Start button and click Control Panel. 2 Click Performance and Maintenance. 3 Click System. 4 Click the System Restore tab. 5 Ensure that Turn off System Restore is the first drive detected by the computer. If Device Driver Rollback does not resolve the problem, then use Windows XP Service Pack 1 or...
... virus protection software installed on your computer before you installed the new device driver. Therefore, do so. To see if System Restore is enabled: 1 Click the Start button and click Control Panel. 2 Click Performance and Maintenance. 3 Click System. 4 Click the System Restore tab. 5 Ensure that Turn off System Restore is the first drive detected by the computer. If Device Driver Rollback does not resolve the problem, then use Windows XP Service Pack 1 or...

Quick Reference Guide
Page 31
... message appears: Press any key. Quick Reference Guide 31 The Windows XP Setup screen appears, and the operating system begins to boot from the CD. 6 When the Regional and Language Options screen appears, select the settings for your location and click Next. 7 Enter your name and organization (optional) in the Date and Time Settings window, and click Next. 11 If the Networking Settings screen appears, click Typical and...
... message appears: Press any key. Quick Reference Guide 31 The Windows XP Setup screen appears, and the operating system begins to boot from the CD. 6 When the Regional and Language Options screen appears, select the settings for your location and click Next. 7 Enter your name and organization (optional) in the Date and Time Settings window, and click Next. 11 If the Networking Settings screen appears, click Typical and...

Quick Reference Guide
Page 32
..., the ResourceCD Installation window opens to inform you are running the Windows operating system: NOTE: To access device drivers and user documentation, you must use the Drivers and Utilities CD (also known as the ResourceCD) while you are running Windows. 1 Turn on the back of your selections. screen appears, you can enter up to five users. 17 Click Next. 18 Click Finish to complete the setup, and remove the CD. 19...
..., the ResourceCD Installation window opens to inform you are running the Windows operating system: NOTE: To access device drivers and user documentation, you must use the Drivers and Utilities CD (also known as the ResourceCD) while you are running Windows. 1 Turn on the back of your selections. screen appears, you can enter up to five users. 17 Click Next. 18 Click Finish to complete the setup, and remove the CD. 19...


