Monitor Users Guide
Page 4
... and USB cable 29 Connecting the HDMI cable (optional 30 Connecting the VGA cable (optional 30 Organizing cables 31 Removing the stand 32 Wall mounting (optional 33 Operating your monitor 34 Power on the monitor 34 Accessing the Menu Launcher 35 Using the navigation keys 36 Accessing the OSD menu 37 Using the joystick to lock the button(s 49 Using the joystick to unlock the button(s 50 OSD warning messages 51 Setting the maximum resolution 54 Using the tilt, swivel, and vertical...
... and USB cable 29 Connecting the HDMI cable (optional 30 Connecting the VGA cable (optional 30 Organizing cables 31 Removing the stand 32 Wall mounting (optional 33 Operating your monitor 34 Power on the monitor 34 Accessing the Menu Launcher 35 Using the navigation keys 36 Accessing the OSD menu 37 Using the joystick to lock the button(s 49 Using the joystick to unlock the button(s 50 OSD warning messages 51 Setting the maximum resolution 54 Using the tilt, swivel, and vertical...

Monitor Users Guide
Page 6
... shock, do not place the monitor inside of controls, adjustments, or procedures other than those specified in this documentation may result in horizontal position. 6 │ Safety instructions Keep the documentation at a secure location for future reference. Adjustment of the display. • Connect the power cable from the monitor to a wall outlet that your monitor is shipped with your monitor. Before using the monitor, read the safety information that...
... shock, do not place the monitor inside of controls, adjustments, or procedures other than those specified in this documentation may result in horizontal position. 6 │ Safety instructions Keep the documentation at a secure location for future reference. Adjustment of the display. • Connect the power cable from the monitor to a wall outlet that your monitor is shipped with your monitor. Before using the monitor, read the safety information that...

Monitor Users Guide
Page 9
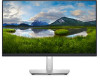
Product features The Dell P2422HA monitor has an active matrix, Thin-Film Transistor (TFT), Liquid Crystal Display (LCD), and LED backlight. In our ongoing efforts to diversity and we are continually improving the user experience for lower resolutions. • Color gamut of 99% sRGB. • Digital connectivity with DisplayPort and HDMI. • Equipped with TUV Rheinland (Hardware Solution) at factory reset/default setting model (Preset mode: Standard). Dell Technologies is designed to...
Product features The Dell P2422HA monitor has an active matrix, Thin-Film Transistor (TFT), Liquid Crystal Display (LCD), and LED backlight. In our ongoing efforts to diversity and we are continually improving the user experience for lower resolutions. • Color gamut of 99% sRGB. • Digital connectivity with DisplayPort and HDMI. • Equipped with TUV Rheinland (Hardware Solution) at factory reset/default setting model (Preset mode: Standard). Dell Technologies is designed to...
Monitor Users Guide
Page 11
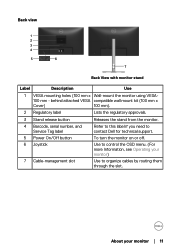
... slot. Back view 1 2 3 4 5 6 7 Back View with monitor stand Label Description Use 1 VESA mounting holes (100 mm x Wall-mount the monitor using VESA- 100 mm - behind attached VESA compatible wall mount kit (100 mm x Cover) 100 mm). 2 Regulatory label Lists the regulatory approvals. 3 Stand release button 4 Barcode, serial number, and Service Tag label 5 Power On/Off button 6 Joystick 7 Cable-management slot Releases the stand from the monitor. About your monitor) Use to contact Dell for technical support. To turn the monitor on or off...
... slot. Back view 1 2 3 4 5 6 7 Back View with monitor stand Label Description Use 1 VESA mounting holes (100 mm x Wall-mount the monitor using VESA- 100 mm - behind attached VESA compatible wall mount kit (100 mm x Cover) 100 mm). 2 Regulatory label Lists the regulatory approvals. 3 Stand release button 4 Barcode, serial number, and Service Tag label 5 Power On/Off button 6 Joystick 7 Cable-management slot Releases the stand from the monitor. About your monitor) Use to contact Dell for technical support. To turn the monitor on or off...
Monitor Users Guide
Page 12
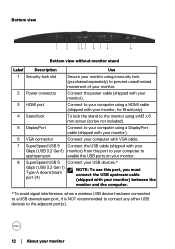
...8 8 Bottom view without monitor stand Label Description Use 1 Security-lock slot Secure your monitor using a security lock (purchased separately) to prevent unauthorized movement of your monitor. 2 Power connector Connect the power cable (shipped with your monitor). 3 HDMI port Connect to your computer using a HDMI cable (shipped with your monitor, for Brazil only). 4 Stand lock To lock the stand to the monitor using a M3 x 6 mm screw (screw not included). 5 DisplayPort Connect to your computer using a DisplayPort cable (shipped with your monitor). 6 VGA connector Connect your...
...8 8 Bottom view without monitor stand Label Description Use 1 Security-lock slot Secure your monitor using a security lock (purchased separately) to prevent unauthorized movement of your monitor. 2 Power connector Connect the power cable (shipped with your monitor). 3 HDMI port Connect to your computer using a HDMI cable (shipped with your monitor, for Brazil only). 4 Stand lock To lock the stand to the monitor using a M3 x 6 mm screw (screw not included). 5 DisplayPort Connect to your computer using a DisplayPort cable (shipped with your monitor). 6 VGA connector Connect your...
Monitor Users Guide
Page 13
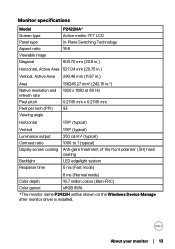
About your monitor │ 13 Monitor specifications Model Screen type Panel type Aspect ratio P2422HA* Active matrix-TFT LCD In-Plane Switching Technology 16:9 Viewable image Diagonal 604.70 mm (23.8 in.) Horizontal, Active Area 527.04 mm (20.75 in.) Vertical, Active Area 296.46 mm (11.67 in.) Area Native resolution and refresh rate Pixel pitch 156246.27 mm2 (242.15 in.2) 1920 x 1080 at 60 Hz...
About your monitor │ 13 Monitor specifications Model Screen type Panel type Aspect ratio P2422HA* Active matrix-TFT LCD In-Plane Switching Technology 16:9 Viewable image Diagonal 604.70 mm (23.8 in.) Horizontal, Active Area 527.04 mm (20.75 in.) Vertical, Active Area 296.46 mm (11.67 in.) Area Native resolution and refresh rate Pixel pitch 156246.27 mm2 (242.15 in.2) 1920 x 1080 at 60 Hz...
Monitor Users Guide
Page 27
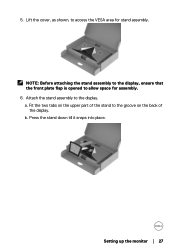
a. Press the stand down till it snaps into place. 5. Fit the two tabs on the back of the display. Lift the cover, as shown, to the groove on the upper part of the stand to access the VESA area for assembly. 6. NOTE: Before attaching the stand assembly to the display, ensure that the front plate flap is opened to the display. b. Attach the stand assembly to allow space for stand assembly. Setting up the monitor │ 27
a. Press the stand down till it snaps into place. 5. Fit the two tabs on the back of the display. Lift the cover, as shown, to the groove on the upper part of the stand to access the VESA area for assembly. 6. NOTE: Before attaching the stand assembly to the display, ensure that the front plate flap is opened to the display. b. Attach the stand assembly to allow space for stand assembly. Setting up the monitor │ 27
Monitor Users Guide
Page 29
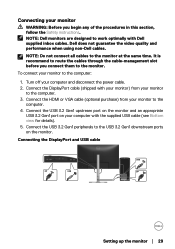
... Safety instructions. Turn off your monitor to the computer: 1. NOTE: Dell monitors are designed to work optimally with your monitor) from your monitor to the computer. 4. Dell does not guarantee the video quality and performance when using non-Dell cables. NOTE: Do not connect all cables to the monitor at the same time. Connect the USB 3.2 Gen1 peripherals to the USB 3.2 Gen1 downstream ports on your computer with the supplied USB cable (see Bottom view...
... Safety instructions. Turn off your monitor to the computer: 1. NOTE: Dell monitors are designed to work optimally with your monitor) from your monitor to the computer. 4. Dell does not guarantee the video quality and performance when using non-Dell cables. NOTE: Do not connect all cables to the monitor at the same time. Connect the USB 3.2 Gen1 peripherals to the USB 3.2 Gen1 downstream ports on your computer with the supplied USB cable (see Bottom view...

Monitor Users Guide
Page 41
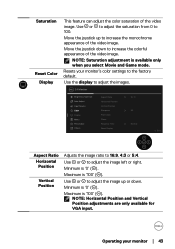
Preset Modes Allows you to manually adjust the color settings. Move the joystick to choose from a list of preset color modes. • Standard: Loads the monitor's default color settings. The screen appears warmer with a blue tint. • Custom Color: Allows you to adjust the R/G/B color values and create your own preset color mode. 24 Monitor Brightness/Contrast Preset Modes Standard Auto Adjust Input Color Format Movie Input Source Reset Color Game Color Warm Display Cool Menu Custom Color Personalize Others Exit Operating your monitor │ 41...
Preset Modes Allows you to manually adjust the color settings. Move the joystick to choose from a list of preset color modes. • Standard: Loads the monitor's default color settings. The screen appears warmer with a blue tint. • Custom Color: Allows you to adjust the R/G/B color values and create your own preset color mode. 24 Monitor Brightness/Contrast Preset Modes Standard Auto Adjust Input Color Format Movie Input Source Reset Color Game Color Warm Display Cool Menu Custom Color Personalize Others Exit Operating your monitor │ 41...
Monitor Users Guide
Page 43
... Operating your monitor's color settings to increase the monochrome appearance of the video image. Use the display to adjust the images. 24 Monitor Brightness/Contrast Aspect Ratio 16 : 9 Auto Adjust Horizontal Position Input Source Vertical Position Color Sharpness 50 Display Pixel Clock Menu Phase Personalize Response Time Normal Others Reset Display Exit Aspect Ratio Horizontal Position Vertical Position Adjusts the image ratio to increase the colorful appearance of the video image. Minimum is '0' ( ). Use or to adjust the image up to the factory default.
... Operating your monitor's color settings to increase the monochrome appearance of the video image. Use the display to adjust the images. 24 Monitor Brightness/Contrast Aspect Ratio 16 : 9 Auto Adjust Horizontal Position Input Source Vertical Position Color Sharpness 50 Display Pixel Clock Menu Phase Personalize Response Time Normal Others Reset Display Exit Aspect Ratio Horizontal Position Vertical Position Adjusts the image ratio to increase the colorful appearance of the video image. Minimum is '0' ( ). Use or to adjust the image up to the factory default.
Monitor Users Guide
Page 45
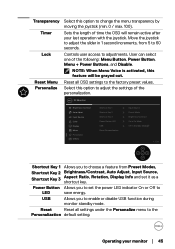
... time the OSD will be grayed out. Move the joystick to adjust the slider in Standby Mode Exit Shortcut Key 1 Allows you to choose a feature from 5 to LED save energy. Operating your last operation with the joystick. User can select one of the personalization. 24 Monitor Brightness/Contrast Auto Adjust Input Source Color Display Menu Personalize Others Shortcut Key 1 Shortcut Key 2 Shortcut Key 3 Power Button LED USB Reset Personalization Input Source Preset Mode Brightness/Contract...
... time the OSD will be grayed out. Move the joystick to adjust the slider in Standby Mode Exit Shortcut Key 1 Allows you to choose a feature from 5 to LED save energy. Operating your last operation with the joystick. User can select one of the personalization. 24 Monitor Brightness/Contrast Auto Adjust Input Source Color Display Menu Personalize Others Shortcut Key 1 Shortcut Key 2 Shortcut Key 3 Power Button LED USB Reset Personalization Input Source Preset Mode Brightness/Contract...

Monitor Users Guide
Page 46
... to adjust the OSD settings, such as the DDC/CI, LCD Conditioning, and so on. 24 Monitor Brightness/Contrast Auto Adjust Input Source Color Display Menu Personalize Others Display Info DDC/CI LCD Conditioning Service Tag Menu Voice Reset Others Factory Reset Select On O xxxxxx On ENERGY STAR® Exit Display Info DDC/CI Displays the monitor's current settings. You can disable this option to adjust the monitor settings using software on your monitor Others Select this feature by selecting on for best user...
... to adjust the OSD settings, such as the DDC/CI, LCD Conditioning, and so on. 24 Monitor Brightness/Contrast Auto Adjust Input Source Color Display Menu Personalize Others Display Info DDC/CI LCD Conditioning Service Tag Menu Voice Reset Others Factory Reset Select On O xxxxxx On ENERGY STAR® Exit Display Info DDC/CI Displays the monitor's current settings. You can disable this option to adjust the monitor settings using software on your monitor Others Select this feature by selecting on for best user...

Monitor Users Guide
Page 48
Factory Reset Restore all preset values to compensate for LED aging. 48 │ Operating your monitor These are also the settings for ENERGY STAR® tests. 24 Monitor Brightness/Contrast Auto Adjust Input Source Color Display Menu Personalize Others Display Info DDC/CI LCD Conditioning Service Tag Menu Voice Reset Others Factory Reset Select On O xxxxxx On ENERGY STAR® Exit NOTE: Your monitor has a built-in feature to automatically calibrate the brightness to the factory default settings.
Factory Reset Restore all preset values to compensate for LED aging. 48 │ Operating your monitor These are also the settings for ENERGY STAR® tests. 24 Monitor Brightness/Contrast Auto Adjust Input Source Color Display Menu Personalize Others Display Info DDC/CI LCD Conditioning Service Tag Menu Voice Reset Others Factory Reset Select On O xxxxxx On ENERGY STAR® Exit NOTE: Your monitor has a built-in feature to automatically calibrate the brightness to the factory default settings.
Monitor Users Guide
Page 51
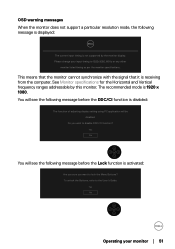
See Monitor specifications for the Horizontal and Vertical frequency ranges addressable by this monitor. You will be disabled. To unlock the Buttons, refer to lock the Menu Buttons? OSD warning messages When the monitor does not support a particular resolution mode, the following message before the DDC/CI function is activated: Are you sure you wish to disable DDC/CI function? Yes No Operating your monitor │ 51 The recommended mode is receiving...
See Monitor specifications for the Horizontal and Vertical frequency ranges addressable by this monitor. You will be disabled. To unlock the Buttons, refer to lock the Menu Buttons? OSD warning messages When the monitor does not support a particular resolution mode, the following message before the DDC/CI function is activated: Are you sure you wish to disable DDC/CI function? Yes No Operating your monitor │ 51 The recommended mode is receiving...
Monitor Users Guide
Page 54
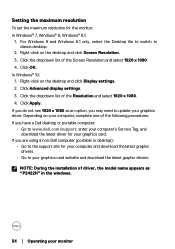
...'s Service Tag, and download the latest driver for your graphics driver. NOTE: During the installation of the following procedures: If you have a Dell desktop or portable computer: • Go to the support site for the monitor: In Windows® 7, Windows® 8, Windows® 8.1: 1. Click OK. Right-click on the desktop and click Screen Resolution. 3. Click Apply. Right-click on the desktop and click Display settings...
...'s Service Tag, and download the latest driver for your graphics driver. NOTE: During the installation of the following procedures: If you have a Dell desktop or portable computer: • Go to the support site for the monitor: In Windows® 7, Windows® 8, Windows® 8.1: 1. Click OK. Right-click on the desktop and click Screen Resolution. 3. Click Apply. Right-click on the desktop and click Display settings...
Monitor Users Guide
Page 59
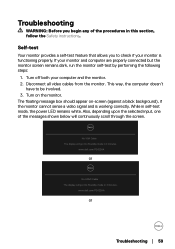
... your monitor is working correctly. Self-test Your monitor provides a self-test feature that allows you begin any of the messages shown below will continuously scroll through the screen. While in 4 minutes. www.dell.com/P2422HA or No HDMI Cable The display will go into Standby mode in self-test mode, the power LED remains white. If your computer and the monitor. 2. www.dell.com/P2422HA or Troubleshooting...
... your monitor is working correctly. Self-test Your monitor provides a self-test feature that allows you begin any of the messages shown below will continuously scroll through the screen. While in 4 minutes. www.dell.com/P2422HA or No HDMI Cable The display will go into Standby mode in self-test mode, the power LED remains white. If your computer and the monitor. 2. www.dell.com/P2422HA or Troubleshooting...

Monitor Users Guide
Page 60
... inherent problem with your monitor, or with your monitor is clean (no dust particles on the surface of the screen). 2. Move and hold the joystick up/down/left/right about 4 seconds until a popup menu appears. No DP Cable The display will go into Standby mode in 4 minutes. Ensure that helps you determine if any screen abnormality you use the previous procedure, check your video controller...
... inherent problem with your monitor, or with your monitor is clean (no dust particles on the surface of the screen). 2. Move and hold the joystick up/down/left/right about 4 seconds until a popup menu appears. No DP Cable The display will go into Standby mode in 4 minutes. Ensure that helps you determine if any screen abnormality you use the previous procedure, check your video controller...

Monitor Users Guide
Page 62
... the power button is pressed. • Ensure that the correct input source is selected in LCD technology. • For more information on Dell Monitor Quality and Pixel Policy, see Dell Support site at : www.dell.com/pixelguidelines. 62 │ Troubleshooting Shaky/jittery video • Reset the monitor to the correct aspect ratio. Poor focus • Eliminate video extension cables. • Reset the monitor to Factory Settings (Factory Reset). • Change the video resolution to Factory Settings (Factory Reset). • Check environmental...
... the power button is pressed. • Ensure that the correct input source is selected in LCD technology. • For more information on Dell Monitor Quality and Pixel Policy, see Dell Support site at : www.dell.com/pixelguidelines. 62 │ Troubleshooting Shaky/jittery video • Reset the monitor to the correct aspect ratio. Poor focus • Eliminate video extension cables. • Reset the monitor to Factory Settings (Factory Reset). • Change the video resolution to Factory Settings (Factory Reset). • Check environmental...
Monitor Users Guide
Page 63
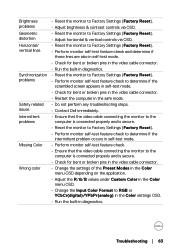
...problems Missing Color Wrong color • Reset the monitor to Factory Settings (Factory Reset). • Adjust brightness & contrast controls via OSD. • Reset the monitor to Factory Settings (Factory Reset). • Adjust horizontal & vertical controls via OSD. • Reset the monitor to Factory Settings (Factory Reset). • Perform monitor self-test feature check and determine if these lines are also in self-test mode. • Check for bent or broken pins in the video cable connector. • Run the built-in diagnostics. • Reset the monitor to Factory Settings (Factory...
...problems Missing Color Wrong color • Reset the monitor to Factory Settings (Factory Reset). • Adjust brightness & contrast controls via OSD. • Reset the monitor to Factory Settings (Factory Reset). • Adjust horizontal & vertical controls via OSD. • Reset the monitor to Factory Settings (Factory Reset). • Perform monitor self-test feature check and determine if these lines are also in self-test mode. • Check for bent or broken pins in the video cable connector. • Run the built-in diagnostics. • Reset the monitor to Factory Settings (Factory...

Monitor Users Guide
Page 64
..., see Using the joystick to unlock the button(s)). The picture does not fill the entire screen • Due to different video formats (aspect ratio) of screen idle time. Product-specific problems Specific Symptoms Possible Solutions Screen image is too • Check the Aspect Ratio setting in diagnostics. 64 │ Troubleshooting No input signal • Check the signal source. Cannot adjust the monitor with the joystick • Turn Off the monitor, unplug the power cord, plug it back...
..., see Using the joystick to unlock the button(s)). The picture does not fill the entire screen • Due to different video formats (aspect ratio) of screen idle time. Product-specific problems Specific Symptoms Possible Solutions Screen image is too • Check the Aspect Ratio setting in diagnostics. 64 │ Troubleshooting No input signal • Check the signal source. Cannot adjust the monitor with the joystick • Turn Off the monitor, unplug the power cord, plug it back...


