

S2418HN/S2418NX Users Guide
Page 3
Contents About Your Monitor 5 Package Contents 5 Product Features 6 Identifying Parts and Controls 7 Monitor Specifications 9 Plug-and-Play 16 LCD Monitor Quality and Pixel Policy 16 Setting Up the Monitor 17 Attaching the Stand 17 Connecting Your Monitor 17 Removing the Monitor Stand 20 Operating the Monitor 21 Turning on the Monitor 21 Using the Front Panel Controls 21 Using the On-Screen Display (OSD) Menu 24 Troubleshooting 38 Self-Test 38 Built-in Diagnostics 39 Common Problems 40 Product Specific Problems 41 Contents | 3
Contents About Your Monitor 5 Package Contents 5 Product Features 6 Identifying Parts and Controls 7 Monitor Specifications 9 Plug-and-Play 16 LCD Monitor Quality and Pixel Policy 16 Setting Up the Monitor 17 Attaching the Stand 17 Connecting Your Monitor 17 Removing the Monitor Stand 20 Operating the Monitor 21 Turning on the Monitor 21 Using the Front Panel Controls 21 Using the On-Screen Display (OSD) Menu 24 Troubleshooting 38 Self-Test 38 Built-in Diagnostics 39 Common Problems 40 Product Specific Problems 41 Contents | 3
S2418HN/S2418NX Users Guide
Page 6
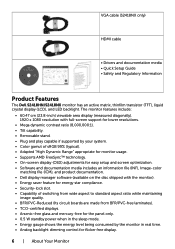
...; Drivers and documentation media • Quick Setup Guide • Safety and Regulatory Information Product Features The Dell S2418HN/S2418NX monitor has an active matrix, thinfilm transistor (TFT), liquid crystal display (LCD), and LED backlight. The monitor features include: • 60.47 cm (23.8-inch) viewable area display (measured diagonally). 1920 x 1080 resolution with full-screen support for lower resolutions. • Mega dynamic contrast ratio (8,000,000:1). • Tilt capability. • Removable stand. • Plug...
...; Drivers and documentation media • Quick Setup Guide • Safety and Regulatory Information Product Features The Dell S2418HN/S2418NX monitor has an active matrix, thinfilm transistor (TFT), liquid crystal display (LCD), and LED backlight. The monitor features include: • 60.47 cm (23.8-inch) viewable area display (measured diagonally). 1920 x 1080 resolution with full-screen support for lower resolutions. • Mega dynamic contrast ratio (8,000,000:1). • Tilt capability. • Removable stand. • Plug...
S2418HN/S2418NX Users Guide
Page 8
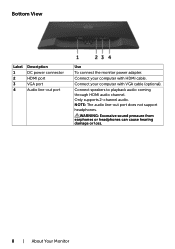
Bottom View Label 1 2 3 4 Description DC power connector HDMI port VGA port Audio line-out port Use To connect the monitor power adapter. Connect your computer with HDMI cable. Only supports 2-channel audio. NOTE: The audio line-out port does not support headphones. Connect speakers to playback audio coming through HDMI audio channel. Connect your computer with VGA cable (optional). WARNING: Excessive sound pressure from earphones or headphones can cause hearing damage or loss. 8 | About Your Monitor
Bottom View Label 1 2 3 4 Description DC power connector HDMI port VGA port Audio line-out port Use To connect the monitor power adapter. Connect your computer with HDMI cable. Only supports 2-channel audio. NOTE: The audio line-out port does not support headphones. Connect speakers to playback audio coming through HDMI audio channel. Connect your computer with VGA cable (optional). WARNING: Excessive sound pressure from earphones or headphones can cause hearing damage or loss. 8 | About Your Monitor
S2418HN/S2418NX Users Guide
Page 13
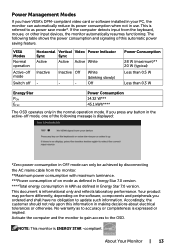
...-compliant video card or software installed in your PC, the monitor can only be achieved by disconnecting the AC mains cable from the keyboard, mouse, or other input devices, the monitor automatically resumes functioning. The following message is displayed: *Zero power consumption in OFF mode can automatically reduce its power consumption when not in the active-off Horizontal Vertical Video Power Indicator Sync Sync Active Active Active White Inactive - White (blinking...
...-compliant video card or software installed in your PC, the monitor can only be achieved by disconnecting the AC mains cable from the keyboard, mouse, or other input devices, the monitor automatically resumes functioning. The following message is displayed: *Zero power consumption in OFF mode can automatically reduce its power consumption when not in the active-off Horizontal Vertical Video Power Indicator Sync Sync Active Active Active White Inactive - White (blinking...

S2418HN/S2418NX Users Guide
Page 17
... monitor protective cover and place the moitor with its place. Setting Up the Monitor Attaching the Stand NOTE: The stand riser and stand base are detached when the monitor is applicable for the default stand. To connect your computer. 2 Connect the VGA (Optional)/HDMI cable from the factory. Setting Up the Monitor | 17 CAUTION: Place monitor on a flat, clean, and soft surface to the computer. 3 Switch on your monitor. 4 Select the correct input source at Monitor OSD Menu and turn...
... monitor protective cover and place the moitor with its place. Setting Up the Monitor Attaching the Stand NOTE: The stand riser and stand base are detached when the monitor is applicable for the default stand. To connect your computer. 2 Connect the VGA (Optional)/HDMI cable from the factory. Setting Up the Monitor | 17 CAUTION: Place monitor on a flat, clean, and soft surface to the computer. 3 Switch on your monitor. 4 Select the correct input source at Monitor OSD Menu and turn...
S2418HN/S2418NX Users Guide
Page 18
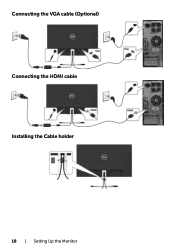
Connecting the VGA cable (Optional) Connecting the HDMI cable Installing the Cable holder 18 | Setting Up the Monitor
Connecting the VGA cable (Optional) Connecting the HDMI cable Installing the Cable holder 18 | Setting Up the Monitor
S2418HN/S2418NX Users Guide
Page 27
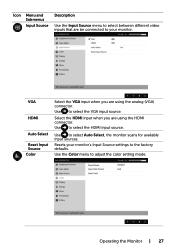
... color setting mode. Use the Color menu to select the HDMI input source. Select the HDMI input when you are using the analog (VGA) connector. Use to select the VGA input source. Resets your monitor. Operating the Monitor | 27 Icon Menu and Submenus Input Source Description Use the Input Source menu to select between different video inputs that are be connected to your monitor's Input Source settings to the factory defaults. Use to select Auto Select, the monitor scans for available input sources. VGA HDMI Auto Select Reset Input Source Color Select the VGA input...
... color setting mode. Use the Color menu to select the HDMI input source. Select the HDMI input when you are using the analog (VGA) connector. Use to select the VGA input source. Resets your monitor. Operating the Monitor | 27 Icon Menu and Submenus Input Source Description Use the Input Source menu to select between different video inputs that are be connected to your monitor's Input Source settings to the factory defaults. Use to select Auto Select, the monitor scans for available input sources. VGA HDMI Auto Select Reset Input Source Color Select the VGA input...
S2418HN/S2418NX Users Guide
Page 28
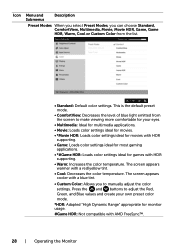
The screen appears cooler with a red/yellow tint. • Cool: Decreases the color temperature. Icon Menu and Submenus Description Preset Modes When you select Preset Modes, you to manually adjust the color settings. Press the and buttons to make viewing more comfortable for your own preset color mode. *HDR: Adapted "High Dynamic Range" appropriate for games with AMD FreeSync™. 28 | Operating the Monitor The screen appears warmer with a blue tint...
The screen appears cooler with a red/yellow tint. • Cool: Decreases the color temperature. Icon Menu and Submenus Description Preset Modes When you select Preset Modes, you to manually adjust the color settings. Press the and buttons to make viewing more comfortable for your own preset color mode. *HDR: Adapted "High Dynamic Range" appropriate for games with AMD FreeSync™. 28 | Operating the Monitor The screen appears warmer with a blue tint...
S2418HN/S2418NX Users Guide
Page 30
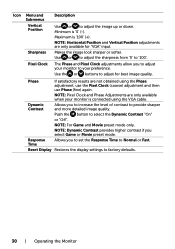
... '0' (-). Minimum is '100' (+). NOTE: Horizontal Position and Vertical Position adjustments are only available for best image quality. Push the button to factory defaults. 30 | Operating the Monitor Use or to adjust the sharpness from '0' to adjust the image up or down. NOTE: For Game and Movie preset mode only. Dynamic Contrast Allows you select Game or Movie preset mode. Icon Menu and Submenus Vertical Position Sharpness Pixel Clock Description Use or to '100'.
... '0' (-). Minimum is '100' (+). NOTE: Horizontal Position and Vertical Position adjustments are only available for best image quality. Push the button to factory defaults. 30 | Operating the Monitor Use or to adjust the sharpness from '0' to adjust the image up or down. NOTE: For Game and Movie preset mode only. Dynamic Contrast Allows you select Game or Movie preset mode. Icon Menu and Submenus Vertical Position Sharpness Pixel Clock Description Use or to '100'.
S2418HN/S2418NX Users Guide
Page 32
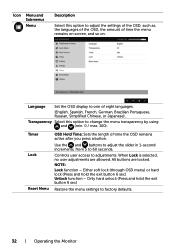
... lock (through OSD menu) or hard lock (Press and hold the exit button 6 sec) Restore the menu settings to 60 seconds. Controls user access to change the menu transparency by using and (min. 0 / max. 100). NOTE: Lock function - Only hard unlock (Press and hold the exit button 6 sec) Unlock function - Use the and buttons to adjust the slider in 1-second increments, from 5 to factory defaults. 32 | Operating the Monitor Language Set the OSD display to adjust the settings...
... lock (through OSD menu) or hard lock (Press and hold the exit button 6 sec) Restore the menu settings to 60 seconds. Controls user access to change the menu transparency by using and (min. 0 / max. 100). NOTE: Lock function - Only hard unlock (Press and hold the exit button 6 sec) Unlock function - Use the and buttons to adjust the slider in 1-second increments, from 5 to factory defaults. 32 | Operating the Monitor Language Set the OSD display to adjust the settings...
S2418HN/S2418NX Users Guide
Page 34
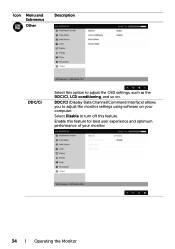
Icon Menu and Submenus Other Description DDC/CI Select this option to adjust the OSD settings, such as the DDC/CI, LCD conditioning, and so on your monitor. 34 | Operating the Monitor Enable this feature. Select Disable to adjust the monitor settings using software on . DDC/CI (Display Data Channel/Command Interface) allows you to turn off this feature for best user experience and optimum performance of your computer.
Icon Menu and Submenus Other Description DDC/CI Select this option to adjust the OSD settings, such as the DDC/CI, LCD conditioning, and so on your monitor. 34 | Operating the Monitor Enable this feature. Select Disable to adjust the monitor settings using software on . DDC/CI (Display Data Channel/Command Interface) allows you to turn off this feature for best user experience and optimum performance of your computer.
S2418HN/S2418NX Users Guide
Page 38
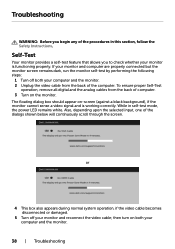
... and the monitor. 38 | Troubleshooting then turn on -screen (against a black background), if the monitor cannot sense a video signal and is functioning properly. The floating dialog box should appear on both your computer and the monitor. 2 Unplug the video cable from the back of the procedures in self-test mode, the power LED remains white. To ensure proper Self-Test operation, remove all digital and the analog cables from...
... and the monitor. 38 | Troubleshooting then turn on -screen (against a black background), if the monitor cannot sense a video signal and is functioning properly. The floating dialog box should appear on both your computer and the monitor. 2 Unplug the video cable from the back of the procedures in self-test mode, the power LED remains white. To ensure proper Self-Test operation, remove all digital and the analog cables from...
S2418HN/S2418NX Users Guide
Page 39
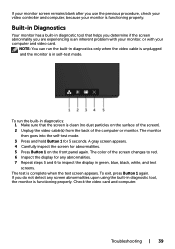
... of the screen). 2 Unplug the video cable(s) from the back of the screen changes to inspect the display in diagnostics: 1 Make sure that helps you determine if the screen abnormality you are experiencing is clean (no dust particles on the front panel again. If you use the previous procedure, check your video controller and computer, because your computer and video card. Built-in Diagnostics Your monitor has a built...
... of the screen). 2 Unplug the video cable(s) from the back of the screen changes to inspect the display in diagnostics: 1 Make sure that helps you determine if the screen abnormality you are experiencing is clean (no dust particles on the front panel again. If you use the previous procedure, check your video controller and computer, because your computer and video card. Built-in Diagnostics Your monitor has a built...

S2418HN/S2418NX Users Guide
Page 40
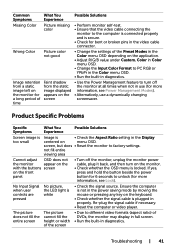
... intermittent problem occurs in the Input Source menu. Stuck-on Pixels LCD screen has bright spots • Cycle power On-Off. • Pixel that is permanently off and is a natural defect that canoccur in the Input Source menu. No Video/Power No picture or no • Increase brightness & contrast controls via OSD. LED on monitor to the computer is connected properly & off is secure. • Reset the monitor to factory settings. • Perform monitor self-test feature check to factory settings.
... intermittent problem occurs in the Input Source menu. Stuck-on Pixels LCD screen has bright spots • Cycle power On-Off. • Pixel that is permanently off and is a natural defect that canoccur in the Input Source menu. No Video/Power No picture or no • Increase brightness & contrast controls via OSD. LED on monitor to the computer is connected properly & off is secure. • Reset the monitor to factory settings. • Perform monitor self-test feature check to factory settings.
S2418HN/S2418NX Users Guide
Page 41
...; Change the Input Color Format to PC RGB or YPbPr in the Color menu OSD. • Run the built-in diagnostics. • Use the Power Management feature to unlock (for bent or broken pins in the video cable connector. • Change the settings of the Preset Modes in the Color menu OSD depending on the keyboard. • Check whether the signal cable is white • Check the signal source. No Input Signal when user controls are pressed No picture, the LED light is plugged...
...; Change the Input Color Format to PC RGB or YPbPr in the Color menu OSD. • Run the built-in diagnostics. • Use the Power Management feature to unlock (for bent or broken pins in the video cable connector. • Change the settings of the Preset Modes in the Color menu OSD depending on the keyboard. • Check whether the signal cable is white • Check the signal source. No Input Signal when user controls are pressed No picture, the LED light is plugged...

S2418HN/S2418NX Users Guide
Page 43
... | 43 NOTE: If you select movie HDR or game HDR in Color on OSD functions can be supported. Dell computer 1 Go to www.dell.com/support, enter your service tag, and download the latest driver for your graphics card. 2 After installing the drivers for your graphics driver. Setting Up Your Monitor NOTE: The maximum input resolution to 3840 x 2160 while you are using, and follow the given steps.
... | 43 NOTE: If you select movie HDR or game HDR in Color on OSD functions can be supported. Dell computer 1 Go to www.dell.com/support, enter your service tag, and download the latest driver for your graphics card. 2 After installing the drivers for your graphics driver. Setting Up Your Monitor NOTE: The maximum input resolution to 3840 x 2160 while you are using, and follow the given steps.

S2418HN/S2418NX Users Guide
Page 44
... to the graphic card provider website for updated driver (for example, http://www.ATI.com or http://www.NVIDIA.com). 7 After installing the drivers for your computer or consider purchasing a graphics adapter that supports the video resolution. 44 | Appendix In Windows 10: 1 Right-click on the desktop and click Personalization. 3 Click Change Display Settings. 4 Click Advanced Settings. 5 Identify your graphics controller supplier from the description...
... to the graphic card provider website for updated driver (for example, http://www.ATI.com or http://www.NVIDIA.com). 7 After installing the drivers for your computer or consider purchasing a graphics adapter that supports the video resolution. 44 | Appendix In Windows 10: 1 Right-click on the desktop and click Personalization. 3 Click Change Display Settings. 4 Click Advanced Settings. 5 Identify your graphics controller supplier from the description...
S2418HN/S2418NX Display Manager Users Guide
Page 4
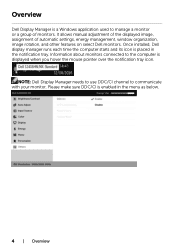
It allows manual adjustment of the displayed image, assignment of monitors. Once installed, Dell display manager runs each time the computer starts and its icon is enabled in the notification tray. NOTE: Dell Display Manager needs to use DDC/CI channel to manage a monitor or a group of automatic settings, energy management, window organization, image rotation, and other features on select Dell monitors. Information about monitors connected to the computer is a Windows application used to...
It allows manual adjustment of the displayed image, assignment of monitors. Once installed, Dell display manager runs each time the computer starts and its icon is enabled in the notification tray. NOTE: Dell Display Manager needs to use DDC/CI channel to manage a monitor or a group of automatic settings, energy management, window organization, image rotation, and other features on select Dell monitors. Information about monitors connected to the computer is a Windows application used to...
S2418HN/S2418NX Display Manager Users Guide
Page 7
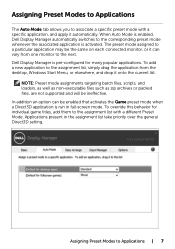
... The Auto Mode tab allows you to associate a specific preset mode with a different Preset Mode. Dell Display Manager is run in the assignment list take priority over the general Direct3D setting. Applications present in full-screen mode. In addition an option can vary from the desktop, Windows Start Menu, or elsewhere, and drop it onto the current list. When Auto Mode is enabled, Dell Display Manager automatically switches...
... The Auto Mode tab allows you to associate a specific preset mode with a different Preset Mode. Dell Display Manager is run in the assignment list take priority over the general Direct3D setting. Applications present in full-screen mode. In addition an option can vary from the desktop, Windows Start Menu, or elsewhere, and drop it onto the current list. When Auto Mode is enabled, Dell Display Manager automatically switches...
S2418HN/S2418NX Display Manager Users Guide
Page 13
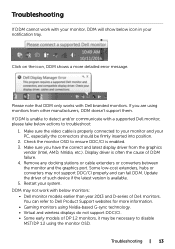
... refer to troubleshoot: 1. Check the monitor OSD to ensure DDC/CI is unable to detect and/or communicate with a supported Dell monitor, please take below actions to Dell Product Support websites for more detailed error message. Please note that DDM only works with Dell branded monitors. Make sure the video cable is often the cause of DDM failure. 4. Display driver is properly connected to disable MST/DP 1.2 using Nvidia-based G-sync technology. •...
... refer to troubleshoot: 1. Check the monitor OSD to ensure DDC/CI is unable to detect and/or communicate with a supported Dell monitor, please take below actions to Dell Product Support websites for more detailed error message. Please note that DDM only works with Dell branded monitors. Make sure the video cable is often the cause of DDM failure. 4. Display driver is properly connected to disable MST/DP 1.2 using Nvidia-based G-sync technology. •...


