
User Guide
Page 36
...-Press to activate Wireless Display, USB Display and USB Viewer. NOTE: The Multiple Display can manually select the input signal. AUTO SOURCE-Select Off (the default) to access the projector's Wireless Guide screen. Wireless Display-Press to lock the current input signal. INPUT SELECT The Input... Select menu allows you to activate Input Select Multiple Display menu. Multiple Display-Press to select your projector's input source. S-VIDEO-Press to detect VGA-A signal. Default is set to Off, you press the Source button when the ...
...-Press to activate Wireless Display, USB Display and USB Viewer. NOTE: The Multiple Display can manually select the input signal. AUTO SOURCE-Select Off (the default) to access the projector's Wireless Guide screen. Wireless Display-Press to lock the current input signal. INPUT SELECT The Input... Select menu allows you to activate Input Select Multiple Display menu. Multiple Display-Press to select your projector's input source. S-VIDEO-Press to detect VGA-A signal. Default is set to Off, you press the Source button when the ...

User Guide
Page 39
COLOR TEMP-Allows you to manually adjust the colors red, green, and blue. CUSTOM COLOR ADJUST-Allows you adjust the values in the Color Adjust menu, the Custom mode is from ... in the image (available for NTSC only). TINT-Press to increase the amount of green in the image and to increase the amount of your projector. PICTURE ADVANCED Using the Picture Advanced menu, you to adjust the display white intensity. The screen appears cooler at higher color temperatures and warmer at...
COLOR TEMP-Allows you to manually adjust the colors red, green, and blue. CUSTOM COLOR ADJUST-Allows you adjust the values in the Color Adjust menu, the Custom mode is from ... in the image (available for NTSC only). TINT-Press to increase the amount of green in the image and to increase the amount of your projector. PICTURE ADVANCED Using the Picture Advanced menu, you to adjust the display white intensity. The screen appears cooler at higher color temperatures and warmer at...

User Guide
Page 44
... a translucent screen with a wallmounted projection. The projector reverses and turns the image upside down for wall-mounted projection. • Rear Projection-Desktop - KEYSTONE-Manually adjust the vertical image distortion caused by tilting the projector. Default is off . V. STANDBY VGA OUTPUT-...Select On or Off the VGA output function at projector standby status. Default is Off. 3D DISPLAY-Select ...
... a translucent screen with a wallmounted projection. The projector reverses and turns the image upside down for wall-mounted projection. • Rear Projection-Desktop - KEYSTONE-Manually adjust the vertical image distortion caused by tilting the projector. Default is off . V. STANDBY VGA OUTPUT-...Select On or Off the VGA output function at projector standby status. Default is Off. 3D DISPLAY-Select ...
User Guide
Page 46
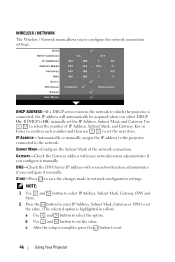
... highlighted in yellow) a Use and button to set the IP Address, Subnet Mask, and Gateway. IP ADDRESS-Automatically or manually assigns the IP address to the projector connected to configure the network connection settings. NOTE: 1 Use and button to select IP Address, Subnet Mask, Gateway, DNS and... Mask, Gateway or DNS to select the option. b Use and button to exit. 46 Using Your Projector Key in network configuration settings. c After the setup is Off, manually set the value. (The selected option is connected, the IP address will automatically be acquired when you select...
... highlighted in yellow) a Use and button to set the IP Address, Subnet Mask, and Gateway. IP ADDRESS-Automatically or manually assigns the IP address to the projector connected to configure the network connection settings. NOTE: 1 Use and button to select IP Address, Subnet Mask, Gateway, DNS and... Mask, Gateway or DNS to select the option. b Use and button to exit. 46 Using Your Projector Key in network configuration settings. c After the setup is Off, manually set the value. (The selected option is connected, the IP address will automatically be acquired when you select...

User Guide
Page 63
...computer resumes from standby or hibernation mode, the display over USB can also be resumed automatically. Using Your Projector 63 USB Display Driver Installation In order to use your USB Display, you need to complete the steps... below: 1 Enable Wireless / Network connection on page 46. See "WIRELESS / NETWORK" on the projector. NOTE: • If the warning message appears, please ignore and allow for installation. • You may require ... "Input Select Multiple Display" on page 36. 4 Start the installation manually by clicking "dousb_install.Cab" on CD Drive.
...computer resumes from standby or hibernation mode, the display over USB can also be resumed automatically. Using Your Projector 63 USB Display Driver Installation In order to use your USB Display, you need to complete the steps... below: 1 Enable Wireless / Network connection on page 46. See "WIRELESS / NETWORK" on the projector. NOTE: • If the warning message appears, please ignore and allow for installation. • You may require ... "Input Select Multiple Display" on page 36. 4 Start the installation manually by clicking "dousb_install.Cab" on CD Drive.
User Guide
Page 75
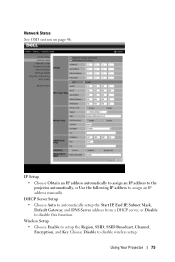
...address automatically to assign an IP address to the projector automatically, or Use the following IP address to setup the Region, SSID, SSID Broadcast, Channel, Encryption, and Key. Wireless Setup • Choose Enable to assign an IP address manually. Network Status See OSD section on page 46.... Using Your Projector 75 DHCP Server Setup • Choose Auto to automatically setup the Start IP, End IP, Subnet Mask, Default...
...address automatically to assign an IP address to the projector automatically, or Use the following IP address to setup the Region, SSID, SSID Broadcast, Channel, Encryption, and Key. Wireless Setup • Choose Enable to assign an IP address manually. Network Status See OSD section on page 46.... Using Your Projector 75 DHCP Server Setup • Choose Auto to automatically setup the Start IP, End IP, Subnet Mask, Default...


