
Users Guide
Page 3
... parts and controls 9 Front view 9 Back view 10 Bottom view 11 Monitor specifications 13 Resolution specifications 15 Supported video modes 15 Preset display modes 15 Electrical specifications 16 Physical characteristics 17 Environmental characteristics 18 Pin assignments 19 Plug and play capability 21 Universal Serial Bus (USB) interface 21 USB 3.2 upstream connector 22 USB 3.2 downstream connector 22 USB Type-C connector 23 USB ports 23 RJ45 connector 24 Support OS 25 LCD monitor quality and pixel policy 25 Maintenance guidelines 25 Cleaning your monitor 25...
... parts and controls 9 Front view 9 Back view 10 Bottom view 11 Monitor specifications 13 Resolution specifications 15 Supported video modes 15 Preset display modes 15 Electrical specifications 16 Physical characteristics 17 Environmental characteristics 18 Pin assignments 19 Plug and play capability 21 Universal Serial Bus (USB) interface 21 USB 3.2 upstream connector 22 USB 3.2 downstream connector 22 USB Type-C connector 23 USB ports 23 RJ45 connector 24 Support OS 25 LCD monitor quality and pixel policy 25 Maintenance guidelines 25 Cleaning your monitor 25...
Users Guide
Page 4
...) cable. . 30 Connecting the HDMI cable 31 Connecting the USB Type-C cable 32 Connecting the super speed USB 5 Gbps (USB 3.2 Gen1) cable. . 33 Connecting the monitor for RJ45 Cable (Optional 34 Organizing your cables 34 Removing the monitor stand 35 VESA wall mounting (optional 35 Operating the monitor 37 Power on the monitor 37 Using the Joystick Control 37 Using the On-Screen Display (OSD) menu 39 Accessing the menu system 39 OSD warning message 57 Setting the maximum resolution 61 Setting the KVM switch 62 Setting the Auto...
...) cable. . 30 Connecting the HDMI cable 31 Connecting the USB Type-C cable 32 Connecting the super speed USB 5 Gbps (USB 3.2 Gen1) cable. . 33 Connecting the monitor for RJ45 Cable (Optional 34 Organizing your cables 34 Removing the monitor stand 35 VESA wall mounting (optional 35 Operating the monitor 37 Power on the monitor 37 Using the Joystick Control 37 Using the On-Screen Display (OSD) menu 39 Accessing the menu system 39 OSD warning message 57 Setting the maximum resolution 61 Setting the KVM switch 62 Setting the Auto...
Users Guide
Page 8
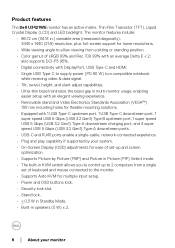
...%. • Digital connectivity with DisplayPort, USB Type-C and HDMI. • Single USB Type-C to supply power (PD 90 W) to the monitor. • Supports Auto KVM for multiple input setup. • Power and OSD buttons lock. • Security lock slot. • Stand lock. • < 0.3 W in Standby Mode. • Built-in multi-monitor usage, enabling easier setup with an elegant viewing experience. • Removable stand and Video Electronics Standards Association (VESA™) 100 mm mounting holes for ease of set-up...
...%. • Digital connectivity with DisplayPort, USB Type-C and HDMI. • Single USB Type-C to supply power (PD 90 W) to the monitor. • Supports Auto KVM for multiple input setup. • Power and OSD buttons lock. • Security lock slot. • Stand lock. • < 0.3 W in Standby Mode. • Built-in multi-monitor usage, enabling easier setup with an elegant viewing experience. • Removable stand and Video Electronics Standards Association (VESA™) 100 mm mounting holes for ease of set-up...
Users Guide
Page 10
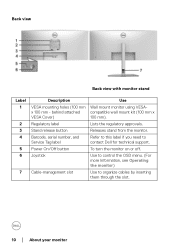
... label if you need to organize cables by inserting them through the slot. 10 │ About your monitor Use to control the OSD menu. (For more Information, see Operating the monitor) Use to contact Dell for technical support. To turn the monitor on or off. behind attached VESA Cover) Regulatory label Stand release button Barcode, serial number, and Service Tag label Power On/Off button Joystick Cable-management slot Use Wall mount monitor using VESAcompatible wall mount kit (100 mm...
... label if you need to organize cables by inserting them through the slot. 10 │ About your monitor Use to control the OSD menu. (For more Information, see Operating the monitor) Use to contact Dell for technical support. To turn the monitor on or off. behind attached VESA Cover) Regulatory label Stand release button Barcode, serial number, and Service Tag label Power On/Off button Joystick Cable-management slot Use Wall mount monitor using VESAcompatible wall mount kit (100 mm...
Users Guide
Page 12
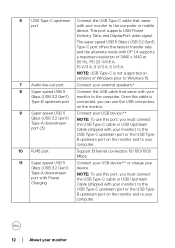
... Power Charging NOTE: To use this port, you must connect the USB Type-C cable or USB Upstream Cable (shipped with DP 1.4 supports a maximum resolution of Windows prior to Windows 10. 7 Audio line-out port Connect your external speakers.* 8 Super speed USB 5 Connect the USB cable that came with your USB device.** Gbps (USB 3.2 Gen1) Type-A downstream port (3) NOTE: To use this port, you must connect the USB Type-C cable or USB Upstream Cable (shipped with your monitor) to the USB Type-C upstream port...
... Power Charging NOTE: To use this port, you must connect the USB Type-C cable or USB Upstream Cable (shipped with DP 1.4 supports a maximum resolution of Windows prior to Windows 10. 7 Audio line-out port Connect your external speakers.* 8 Super speed USB 5 Connect the USB cable that came with your USB device.** Gbps (USB 3.2 Gen1) Type-A downstream port (3) NOTE: To use this port, you must connect the USB Type-C cable or USB Upstream Cable (shipped with your monitor) to the USB Type-C upstream port...
Users Guide
Page 13
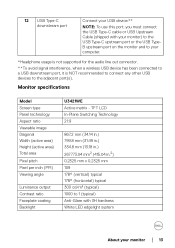
... a wireless USB device has been connected to a USB downstream port, it is NOT recommended to connect any other USB devices to 1 (typical) Anti-Glare with 3H hardness White LED edgelight system About your monitor │ 13 Monitor specifications Model Screen type Panel technology Aspect ratio Viewable image Diagonal Width (active area) Height (active area) Total area Pixel pitch Pixel per inch (PPI) Viewing angle Luminance output Contrast ratio Faceplate coating Backlight U3421WE Active...
... a wireless USB device has been connected to a USB downstream port, it is NOT recommended to connect any other USB devices to 1 (typical) Anti-Glare with 3H hardness White LED edgelight system About your monitor │ 13 Monitor specifications Model Screen type Panel technology Aspect ratio Viewable image Diagonal Width (active area) Height (active area) Total area Pixel pitch Pixel per inch (PPI) Viewing angle Luminance output Contrast ratio Faceplate coating Backlight U3421WE Active...

Users Guide
Page 16
... supporting the HDMI 2.0 optional specification, including HDMI Ethernet Channel (HEC), Audio Return Channel (ARC), standard for 3D format and resolutions, and standard for 4K digital cinema resolution. **HBR3/DisplayPort 1.4/DP audio is supported. 1 As defined in EU 2019/2021 and EU 2019/2013. 2 Max brightness and contrast setting with maximum power loading on all USB ports. 3 Pon: Power consumption of On mode as defined in Energy Star 8.0 version. VESA...
... supporting the HDMI 2.0 optional specification, including HDMI Ethernet Channel (HEC), Audio Return Channel (ARC), standard for 3D format and resolutions, and standard for 4K digital cinema resolution. **HBR3/DisplayPort 1.4/DP audio is supported. 1 As defined in EU 2019/2021 and EU 2019/2013. 2 Max brightness and contrast setting with maximum power loading on all USB ports. 3 Pon: Power consumption of On mode as defined in Energy Star 8.0 version. VESA...

Users Guide
Page 27
... monitor. Setting up the monitor Attaching the stand NOTE: The stand is not installed at the factory when shipped. Remove the stand riser and stand base from the top cushion that secures it. 2. To attach the monitor stand: 1. Lift the screw handle and turn the screw clockwise. 5. Follow the instructions on the flaps of carton to remove the stand from the packaging cushion. 3. After fully tightening the screw, fold the screw...
... monitor. Setting up the monitor Attaching the stand NOTE: The stand is not installed at the factory when shipped. Remove the stand riser and stand base from the top cushion that secures it. 2. To attach the monitor stand: 1. Lift the screw handle and turn the screw clockwise. 5. Follow the instructions on the flaps of carton to remove the stand from the packaging cushion. 3. After fully tightening the screw, fold the screw...
Users Guide
Page 30
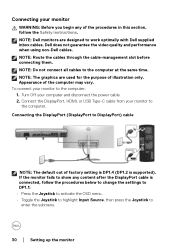
... used for the purpose of the procedures in this section, follow the procedures below to change the settings to DP1.1: • Press the Joystick to activate the OSD menu. • Toggle the Joystick to highlight Input Source, then press the Joystick to enter the submenu. 30 │ Setting up the monitor NOTE: The graphics are designed to work optimally with Dell supplied inbox cables...
... used for the purpose of the procedures in this section, follow the procedures below to change the settings to DP1.1: • Press the Joystick to activate the OSD menu. • Toggle the Joystick to highlight Input Source, then press the Joystick to enter the submenu. 30 │ Setting up the monitor NOTE: The graphics are designed to work optimally with Dell supplied inbox cables...

Users Guide
Page 34
... │ Setting up the monitor See USB and Setting the KVM switch for RJ45 Cable (Optional) NOTE: RJ45 cable is complete. If it does not display an image, see Common problems. 5. Connecting the monitor for details. 4. * When connecting two computers to the monitor, configure the USB settings from the OSD menu to share a single set of keyboard and mouse connected to organize the cables. Use the cable slot on the monitor stand to the monitor between...
... │ Setting up the monitor See USB and Setting the KVM switch for RJ45 Cable (Optional) NOTE: RJ45 cable is complete. If it does not display an image, see Common problems. 5. Connecting the monitor for details. 4. * When connecting two computers to the monitor, configure the USB settings from the OSD menu to share a single set of keyboard and mouse connected to organize the cables. Use the cable slot on the monitor stand to the monitor between...
Users Guide
Page 42
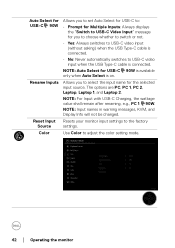
...-C cable is connected. • No: Never automatically switches to USB-C video input when the USB Type-C cable is on. Color Use Color to the factory Source settings. NOTE: For Input with USB-C Charging, the wattage value shall remain after renaming, e.g., PC 1 90W. NOTE: Input names in warning messages, KVM, and Display Info will not be changed. NOTE: Auto Select for USB-C 90W is available only when Auto Select is connected. Reset Input Resets your monitor input settings to adjust the color setting mode...
...-C cable is connected. • No: Never automatically switches to USB-C video input when the USB Type-C cable is on. Color Use Color to the factory Source settings. NOTE: For Input with USB-C Charging, the wattage value shall remain after renaming, e.g., PC 1 90W. NOTE: Input names in warning messages, KVM, and Display Info will not be changed. NOTE: Auto Select for USB-C 90W is available only when Auto Select is connected. Reset Input Resets your monitor input settings to adjust the color setting mode...
Users Guide
Page 44
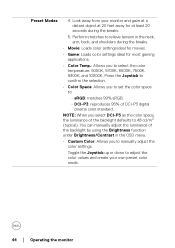
... in the OSD menu. • Custom Color: Allows you to set the color space to 48 cd/m2 (typical). Perform stretches to select the color temperature: 5000K, 5700K, 6500K, 7500K, 9300K, and 10000K. sRGB: matches 99% sRGB. - DCI-P3: reproduces 95% of the backlight defaults to : - You can manually adjust the luminance of the backlight by using the Brightness function under Brightness/Contrast in the...
... in the OSD menu. • Custom Color: Allows you to set the color space to 48 cd/m2 (typical). Perform stretches to select the color temperature: 5000K, 5700K, 6500K, 7500K, 9300K, and 10000K. sRGB: matches 99% sRGB. - DCI-P3: reproduces 95% of the backlight defaults to : - You can manually adjust the luminance of the backlight by using the Brightness function under Brightness/Contrast in the...
Users Guide
Page 46
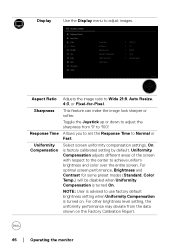
... Time to achieve uniform brightness and color over the entire screen. For optimal screen performance, Brightness and Contrast for -Pixel. NOTE: User is turned on the Factory Calibration Report. 46 │ Operating the monitor Aspect Ratio Adjusts the image ratio to use factory default brightness setting when Uniformity Compensation is advised to Wide 21:9, Auto Resize, 4:3, or Pixel-for some preset modes (Standard, Color Temp.) will be disabled when Uniformity Compensation is factory calibrated setting by default. Toggle the Joystick...
... Time to achieve uniform brightness and color over the entire screen. For optimal screen performance, Brightness and Contrast for -Pixel. NOTE: User is turned on the Factory Calibration Report. 46 │ Operating the monitor Aspect Ratio Adjusts the image ratio to use factory default brightness setting when Uniformity Compensation is advised to Wide 21:9, Auto Resize, 4:3, or Pixel-for some preset modes (Standard, Color Temp.) will be disabled when Uniformity Compensation is factory calibrated setting by default. Toggle the Joystick...
Users Guide
Page 53
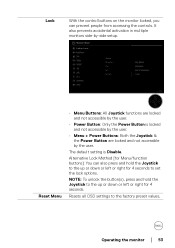
... user. Reset Menu • Menu Buttons: All Joystick functions are locked and not accessible by the user. • Power Button: Only the Power Button is Disable. The default setting is locked and not accessible by the user. • Menu + Power Buttons: Both the Joystick & the Power Button are locked and not accessible by -side setup. Resets all OSD settings to the factory preset values. Alternative Lock Method [for Menu/function buttons]: You can prevent people from accessing the controls. NOTE: To unlock...
... user. Reset Menu • Menu Buttons: All Joystick functions are locked and not accessible by the user. • Power Button: Only the Power Button is Disable. The default setting is locked and not accessible by the user. • Menu + Power Buttons: Both the Joystick & the Power Button are locked and not accessible by -side setup. Resets all OSD settings to the factory preset values. Alternative Lock Method [for Menu/function buttons]: You can prevent people from accessing the controls. NOTE: To unlock...

Users Guide
Page 56
Firmware Service Tag Reset Others Displays the firmware version of image retention, the program may take some time to the factory preset values. 56 │ Operating the monitor This string is required when you look for phone support, check your monitor. You can enable this feature by selecting On. Depending on the degree of your warranty status, update drivers on Dell's website, etc. Resets all settings under the Others menu to run. LCD Conditioning Helps reduce minor cases of your monitor. Displays the service tag of image retention.
Firmware Service Tag Reset Others Displays the firmware version of image retention, the program may take some time to the factory preset values. 56 │ Operating the monitor This string is required when you look for phone support, check your monitor. You can enable this feature by selecting On. Depending on the degree of your warranty status, update drivers on Dell's website, etc. Resets all settings under the Others menu to run. LCD Conditioning Helps reduce minor cases of your monitor. Displays the service tag of image retention.
Users Guide
Page 62
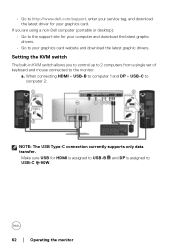
....dell.com/support, enter your service tag, and download the latest driver for HDMI is assigned to USB-B and DP is assigned to USB-C 90W. 62 │ Operating the monitor If you to control up to 2 computers from a single set of keyboard and mouse connected to the monitor. When connecting HDMI + USB-B to computer 1 and DP + USB-C to your graphics card website and download the latest graphic drivers. Setting the KVM switch...
....dell.com/support, enter your service tag, and download the latest driver for HDMI is assigned to USB-B and DP is assigned to USB-C 90W. 62 │ Operating the monitor If you to control up to 2 computers from a single set of keyboard and mouse connected to the monitor. When connecting HDMI + USB-B to computer 1 and DP + USB-C to your graphics card website and download the latest graphic drivers. Setting the KVM switch...
Users Guide
Page 69
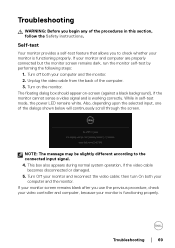
..., if the video cable becomes disconnected or damaged. 5. then turn On both your monitor is working correctly. If your monitor screen remains blank after you use the previous procedure, check your video controller and computer, because your computer and the monitor. 2. Turn off both your monitor and reconnect the video cable; Troubleshooting WARNING: Before you begin any of the procedures in self-test mode, the power LED remains white. NOTE: The...
..., if the video cable becomes disconnected or damaged. 5. then turn On both your monitor is working correctly. If your monitor screen remains blank after you use the previous procedure, check your video controller and computer, because your computer and the monitor. 2. Turn off both your monitor and reconnect the video cable; Troubleshooting WARNING: Before you begin any of the procedures in self-test mode, the power LED remains white. NOTE: The...
Users Guide
Page 72
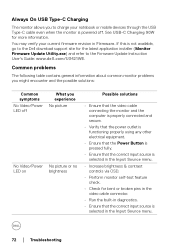
... current firmware revision in the Input Source menu. 72 │ Troubleshooting You may verify your notebook or mobile devices through the USB Type-C cable even when the monitor is powered off What you to the Firmware Update Instruction User's Guide: www.dell.com/U3421WE. Always On USB Type-C Charging The monitor allows you experience No picture No Video/Power No picture or no LED on brightness Possible solutions • Ensure that the video cable connecting the monitor and...
... current firmware revision in the Input Source menu. 72 │ Troubleshooting You may verify your notebook or mobile devices through the USB Type-C cable even when the monitor is powered off What you to the Firmware Update Instruction User's Guide: www.dell.com/U3421WE. Always On USB Type-C Charging The monitor allows you experience No picture No Video/Power No picture or no LED on brightness Possible solutions • Ensure that the video cable connecting the monitor and...
Users Guide
Page 75
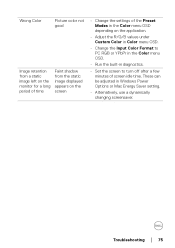
... turn off after a few minutes of the Preset Modes in the Color menu OSD depending on the application. • Adjust the R/G/B values under Custom Color in Color menu OSD. • Change the Input Color Format to PC RGB or YPbPr in the Color menu OSD. • Run the built-in Windows Power Options or Mac Energy Saver setting. • Alternatively, use a dynamically changing screensaver. Wrong Color Picture color not good Image retention from a static image left on the monitor...
... turn off after a few minutes of the Preset Modes in the Color menu OSD depending on the application. • Adjust the R/G/B values under Custom Color in Color menu OSD. • Change the Input Color Format to PC RGB or YPbPr in the Color menu OSD. • Run the built-in Windows Power Options or Mac Energy Saver setting. • Alternatively, use a dynamically changing screensaver. Wrong Color Picture color not good Image retention from a static image left on the monitor...
Users Guide
Page 76
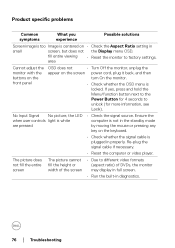
... locked. Cannot adjust the monitor with the buttons on the front panel OSD does not • Turn Off the monitor, unplug the appear on the screen power cord, plug it back, and then turn On the monitor. • Check whether the OSD menu is centered on the keyboard. • Check whether the signal cable is white are pressed • Check the signal source. No Input Signal No picture, the LED when user controls light is plugged in smal l screen, but does not the Display menu OSD...
... locked. Cannot adjust the monitor with the buttons on the front panel OSD does not • Turn Off the monitor, unplug the appear on the screen power cord, plug it back, and then turn On the monitor. • Check whether the OSD menu is centered on the keyboard. • Check whether the signal cable is white are pressed • Check the signal source. No Input Signal No picture, the LED when user controls light is plugged in smal l screen, but does not the Display menu OSD...


