
Owners Manual
Page 1
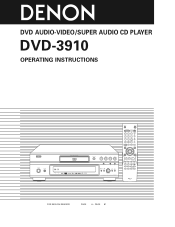
... READERS PAGE 006 ~ PAGE 081 DVD AUDIO-VIDEO/SUPER AUDIO CD PLAYER DVD-3910 OPERATING INSTRUCTIONS ON / STANDBY DENON LINK AL 24 PLUS OPEN / CLOSE PLAY STOP STILL / PAUSE HDMI / DVI SELECT FORMAT VIDEO MODE SUPER AUDIO CD SETUP PURE DIRECT SELECT PUSH ENTER DVD AUDIO-VIDEO / SUPER AUDIO CD PLAYER DVD-3910 POWER OFF POWER ON HDMI...
... READERS PAGE 006 ~ PAGE 081 DVD AUDIO-VIDEO/SUPER AUDIO CD PLAYER DVD-3910 OPERATING INSTRUCTIONS ON / STANDBY DENON LINK AL 24 PLUS OPEN / CLOSE PLAY STOP STILL / PAUSE HDMI / DVI SELECT FORMAT VIDEO MODE SUPER AUDIO CD SETUP PURE DIRECT SELECT PUSH ENTER DVD AUDIO-VIDEO / SUPER AUDIO CD PLAYER DVD-3910 POWER OFF POWER ON HDMI...

Owners Manual
Page 6
...connectors The DVD-3910 can be connected to make sure the following items are included with a single cable. (4) DVI-D connector Digital video signals are transferred in the carton: q Audio video cord 1 w Remote control unit (RC-972 1 e R6P/AA batteries 2 r Power supply cord 1 t DENON LINK cord... 1 y IEEE 1394 cord 1 u Operating instructions 1 i Service station list 1 q r w RC-972 MENU STOP SETUP REPEAT RANDOM MARKER PICT ADJ. When playing DVD AUDIO with one of video signals is possible by connecting an HDCP...
...connectors The DVD-3910 can be connected to make sure the following items are included with a single cable. (4) DVI-D connector Digital video signals are transferred in the carton: q Audio video cord 1 w Remote control unit (RC-972 1 e R6P/AA batteries 2 r Power supply cord 1 t DENON LINK cord... 1 y IEEE 1394 cord 1 u Operating instructions 1 i Service station list 1 q r w RC-972 MENU STOP SETUP REPEAT RANDOM MARKER PICT ADJ. When playing DVD AUDIO with one of video signals is possible by connecting an HDCP...

Owners Manual
Page 10
... the picture. • Set the "TV ASPECT" in "VIDEO SETUP" in "SETUP" to • Set the "TV TYPE" in "VIDEO SETUP" in "SETUP" to comply with your TV's aspect. (See page 36.) comply with 5.1ch audio output, set to the DVD-3910's S-Video output connector using a commercially available S-Video connection cord. ...the power is equipped with connection be generated and damage the speakers. have been completed. prohibit signals. If the TV is on the "SETUP" menu to the DVD-3910's VIDEO OUT or S-VIDEO OUT and AUDIO OUT. Do not connect it to NTSC. (See pages 36, 37.) in "VIDEO OUT"...
... the picture. • Set the "TV ASPECT" in "VIDEO SETUP" in "SETUP" to • Set the "TV TYPE" in "VIDEO SETUP" in "SETUP" to comply with your TV's aspect. (See page 36.) comply with 5.1ch audio output, set to the DVD-3910's S-Video output connector using a commercially available S-Video connection cord. ...the power is equipped with connection be generated and damage the speakers. have been completed. prohibit signals. If the TV is on the "SETUP" menu to the DVD-3910's VIDEO OUT or S-VIDEO OUT and AUDIO OUT. Do not connect it to NTSC. (See pages 36, 37.) in "VIDEO OUT"...

Owners Manual
Page 11
... reproduction of the colors. • The color component input connectors may be marked differently on some TVs or monitors (PR, PB and Y/R- DVD-3910 ENGLISH To power outlet TV L R AUDIO IN PR/CR PB/CB Y COMPONENT VIDEO IN NOTES: • Use the three commercially available ...video cords to connect the DVD-3910's color component output connectors to the TV or monitor. • Set the "TV TYPE" in "VIDEO SETUP" in "SETUP" to the TV's operating instructions. • Connect in "SETUP" to a TV or Monitor Equipped with your TV's video format....
... reproduction of the colors. • The color component input connectors may be marked differently on some TVs or monitors (PR, PB and Y/R- DVD-3910 ENGLISH To power outlet TV L R AUDIO IN PR/CR PB/CB Y COMPONENT VIDEO IN NOTES: • Use the three commercially available ...video cords to connect the DVD-3910's color component output connectors to the TV or monitor. • Set the "TV TYPE" in "VIDEO SETUP" in "SETUP" to the TV's operating instructions. • Connect in "SETUP" to a TV or Monitor Equipped with your TV's video format....

Owners Manual
Page 12
...Digital or DTS decoder is not DTS-compatible. • When playing copyright-protected linear PCM or packed PCM DVDs, in the proper directly, then insert it securely as far as it goes. 12 DVD-3910 To power outlet Front speaker (left) 75Ω/ohms pin-plug (or) cable (commercially available) Digital ...is played while using a decoder, etc., that is not compatible with 96 kHz/88.2 kHz signals, set "LPCM (44.1 kHz/48 kHz)" under "AUDIO SETUP" at "SETUP" to "ON" (see pages 38, 41.) or make analog connections. (See page 14.) • When making digital connections to an AV amplifier that ...
...Digital or DTS decoder is not DTS-compatible. • When playing copyright-protected linear PCM or packed PCM DVDs, in the proper directly, then insert it securely as far as it goes. 12 DVD-3910 To power outlet Front speaker (left) 75Ω/ohms pin-plug (or) cable (commercially available) Digital ...is played while using a decoder, etc., that is not compatible with 96 kHz/88.2 kHz signals, set "LPCM (44.1 kHz/48 kHz)" under "AUDIO SETUP" at "SETUP" to "ON" (see pages 38, 41.) or make analog connections. (See page 14.) • When making digital connections to an AV amplifier that ...

Owners Manual
Page 14
DVD-3910 To power outlet Front speaker (left) SURROUND SUBWOOFER CENTER FRONT Center speaker Front speaker (right) Subwoofer Surround speaker (left) CH SEL ENTER Surround speaker (right) ... 5.1-channel input terminals NOTES: • For multi-channel connections, set "AUDIO CHANNEL" under "AUDIO SETUP" at "SETUP" to "MULTI CHANNEL" and make the "SPEAKER CONFIGURATION", "CHANNEL LEVEL" and "DELAY TIME" settings. (See pages 38 ~ 42.) • With the DVD-3910, we recommend turning the digital output off by using the PURE DIRECT MODE and...
DVD-3910 To power outlet Front speaker (left) SURROUND SUBWOOFER CENTER FRONT Center speaker Front speaker (right) Subwoofer Surround speaker (left) CH SEL ENTER Surround speaker (right) ... 5.1-channel input terminals NOTES: • For multi-channel connections, set "AUDIO CHANNEL" under "AUDIO SETUP" at "SETUP" to "MULTI CHANNEL" and make the "SPEAKER CONFIGURATION", "CHANNEL LEVEL" and "DELAY TIME" settings. (See pages 38 ~ 42.) • With the DVD-3910, we recommend turning the digital output off by using the PURE DIRECT MODE and...

Owners Manual
Page 15
... into two channels (analog). (Only the front left and right channels are output for sources for which down-mixing is prohibited.) 15 DVD-3910 B Optical fiber cable (commercially available) Digital audio input connector (OPTICAL) (or) 75Ω/ohms pin-plug cable (commercially available) ...connections to record Super Audio CDs. (6) Connecting to a Stereo Component DVD-3910 Stereo component NOTE: • When connecting to a 2-channel audio stereo device using the 5.1ch AUDIO OUT, set "AUDIO CHANNEL" under "AUDIO SETUP" on the "SETUP" to a Digital Recorder (MD Recorder, DAT Deck, etc.) ...
... into two channels (analog). (Only the front left and right channels are output for sources for which down-mixing is prohibited.) 15 DVD-3910 B Optical fiber cable (commercially available) Digital audio input connector (OPTICAL) (or) 75Ω/ohms pin-plug cable (commercially available) ...connections to record Super Audio CDs. (6) Connecting to a Stereo Component DVD-3910 Stereo component NOTE: • When connecting to a 2-channel audio stereo device using the 5.1ch AUDIO OUT, set "AUDIO CHANNEL" under "AUDIO SETUP" on the "SETUP" to a Digital Recorder (MD Recorder, DAT Deck, etc.) ...

Owners Manual
Page 16
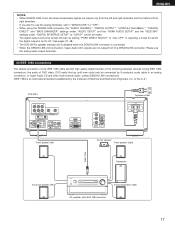
...multi-channel signals of DVD audio is possible for this.) 2 Compatibility with DENON LINK connections is not possible when using a DENON LINK S.E. settings: • At "DIGITAL INTERFACE SETUP" under "SETUP", set "DENON LINK" to "2nd". (See pages 32 ~ 35.) (If you connect the DENON LINK, set to ..., with the same quality as the signals recorded on a DENON LINK S.E. (2nd) compatible AV amplifier (Playback with previous models: Digital audio signals output from the DVD player to "2nd".) 16 DVD-3910 To power outlet DENON LINK Front speaker (left) Center speaker Front speaker (right)...
...multi-channel signals of DVD audio is possible for this.) 2 Compatibility with DENON LINK connections is not possible when using a DENON LINK S.E. settings: • At "DIGITAL INTERFACE SETUP" under "SETUP", set "DENON LINK" to "2nd". (See pages 32 ~ 35.) (If you connect the DENON LINK, set to ..., with the same quality as the signals recorded on a DENON LINK S.E. (2nd) compatible AV amplifier (Playback with previous models: Digital audio signals output from the DVD player to "2nd".) 16 DVD-3910 To power outlet DENON LINK Front speaker (left) Center speaker Front speaker (right)...
Owners Manual
Page 17
... ENHANCER" settings under "AUDIO SETUP" and the "HDMI AUDIO SETUP" and the "IEEE1394" settings under "DIGITAL INTERFACE SETUP" at "SETUP" cannot be connected by 5-conductor audio cable in an analog connection, or Super Audio CD and other multi-channel audio. (unless DENON LINK connections) (IEEE 1394 is... cannot be turned off . (See pages 47, 48.) • The DVD-3910's speaker settings are invalidated when the DENON LINK connector is an international standard established by the Institute of the U.S.) DVD-3910 To power outlet Front speaker (left) IEEE 1394 Center speaker Front speaker ...
... ENHANCER" settings under "AUDIO SETUP" and the "HDMI AUDIO SETUP" and the "IEEE1394" settings under "DIGITAL INTERFACE SETUP" at "SETUP" cannot be connected by 5-conductor audio cable in an analog connection, or Super Audio CD and other multi-channel audio. (unless DENON LINK connections) (IEEE 1394 is... cannot be turned off . (See pages 47, 48.) • The DVD-3910's speaker settings are invalidated when the DENON LINK connector is an international standard established by the Institute of the U.S.) DVD-3910 To power outlet Front speaker (left) IEEE 1394 Center speaker Front speaker ...

Owners Manual
Page 18
...q Daisy chain connections Connect the sets in the other than the included IEEE 1394 cable, please use the included IEEE 1394 cable. "AUDIO SETUP" cannot be transmitted and received between the two devices. Up to 15 sets can be turned off , some devices are not able to relay...and i-Link (a Sony trademark) audio signals cannot be made . w Tree (tower) connections Connect the sets in parallel and in 1 second. ✽ The DVD-3910's IEEE 1394 mode is no guarantee of the operation of your amplifier for information about your amplifier. 18 Note that supports IEEE 1394. ENGLISH NOTES...
...q Daisy chain connections Connect the sets in the other than the included IEEE 1394 cable, please use the included IEEE 1394 cable. "AUDIO SETUP" cannot be transmitted and received between the two devices. Up to 15 sets can be turned off , some devices are not able to relay...and i-Link (a Sony trademark) audio signals cannot be made . w Tree (tower) connections Connect the sets in parallel and in 1 second. ✽ The DVD-3910's IEEE 1394 mode is no guarantee of the operation of your amplifier for information about your amplifier. 18 Note that supports IEEE 1394. ENGLISH NOTES...
Owners Manual
Page 19
...(See Pages 47, 48.) Also note that is set HDMI to enjoy the multi-channel audio output from an analog audio output connector, DENON LINK, or with the audio output from an HDMI connector and the connection point does not support a DTS, Dolby Digital, or other sources...some devices can the settings of "AUDIO CHANNEL", "DIGITAL OUTPUT", "LCPM (44.1kHz/48kHz)", "SOURCE DIRECT", or "BASS ENHANCER" under "DIGITAL INTERFACE SETUP" of the DVD-3910. however, the DVD-3910 cannot be controlled by the HDCP (content protection function), the image will not be possible to "OFF" at "HDMI AUDIO...
...(See Pages 47, 48.) Also note that is set HDMI to enjoy the multi-channel audio output from an analog audio output connector, DENON LINK, or with the audio output from an HDMI connector and the connection point does not support a DTS, Dolby Digital, or other sources...some devices can the settings of "AUDIO CHANNEL", "DIGITAL OUTPUT", "LCPM (44.1kHz/48kHz)", "SOURCE DIRECT", or "BASS ENHANCER" under "DIGITAL INTERFACE SETUP" of the DVD-3910. however, the DVD-3910 cannot be controlled by the HDCP (content protection function), the image will not be possible to "OFF" at "HDMI AUDIO...

Owners Manual
Page 20
...; terminal (Only Video) (Only Video) x *1 Among the monitors that support HDMI/DVI-D. In connections with equipment such as this . 20 DVD-3910 Monitor equipped with DVI-D input connectors DVI-D Input connector 24P DVI-D cable (commercially available) NOTE: HDMI and DVI connectors. • The table... data encryption and authentication of the partner equipment. Use analog audio outputs, DENON LINK, or IEEE 1394 connectors to provide the audio output at "DIGITAL INTERFACE SETUP" under "SETUP", set "HDMI AUDIO SETUP" to a DVI-D compatible monitor (HDCP compatible) with an HDMI-DVI ...
...; terminal (Only Video) (Only Video) x *1 Among the monitors that support HDMI/DVI-D. In connections with equipment such as this . 20 DVD-3910 Monitor equipped with DVI-D input connectors DVI-D Input connector 24P DVI-D cable (commercially available) NOTE: HDMI and DVI connectors. • The table... data encryption and authentication of the partner equipment. Use analog audio outputs, DENON LINK, or IEEE 1394 connectors to provide the audio output at "DIGITAL INTERFACE SETUP" under "SETUP", set "HDMI AUDIO SETUP" to a DVI-D compatible monitor (HDCP compatible) with an HDMI-DVI ...
Owners Manual
Page 21
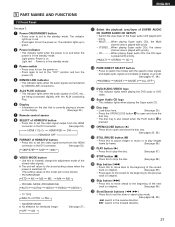
...chapter). @1 Skip button (9) • Press this to set to switch the modes with priority. r DENON LINK indicator • This indicator lights when the audio signals are being processed digitally with the AL24 ... (See page 37.) !1 Select the playback area/layer of SUPER AUDIO CD (SUPER AUDIO CD SETUP) • Switch the area /layer of the Super audio CDS played with priory. •... CDs, the CDs layer is pressed. !6 OPEN/CLOSE button (5) • Press this to the beginning of a DVD, etc., are transferred by frame. (See page 58.) !8 PLAY button (1) • Press this to the "...
...chapter). @1 Skip button (9) • Press this to set to switch the modes with priority. r DENON LINK indicator • This indicator lights when the audio signals are being processed digitally with the AL24 ... (See page 37.) !1 Select the playback area/layer of SUPER AUDIO CD (SUPER AUDIO CD SETUP) • Switch the area /layer of the Super audio CDS played with priory. •... CDs, the CDs layer is pressed. !6 OPEN/CLOSE button (5) • Press this to the beginning of a DVD, etc., are transferred by frame. (See page 58.) !8 PLAY button (1) • Press this to the "...

Owners Manual
Page 23
... inside of the battery compartment, then insert new batteries. (2) Using the Remote Control Unit Approx. 7 meters RC-972 30° MENU STOP REPEAT RANDOM SETUP PICT ADJ. w Place two R6P/AA batteries in the battery compartment in malfunction. 23 NOTES: • It may be difficult to operate the remote control...not pointed directly at the remote control sensor. • The remote control unit can be operated at the same time. ENGLISH 6 REMOTE CONTROL UNIT 2 The DVD-3910 can be controlled from close to the main unit, replace the batteries with respect to the remote control sensor.
... inside of the battery compartment, then insert new batteries. (2) Using the Remote Control Unit Approx. 7 meters RC-972 30° MENU STOP REPEAT RANDOM SETUP PICT ADJ. w Place two R6P/AA batteries in the battery compartment in malfunction. 23 NOTES: • It may be difficult to operate the remote control...not pointed directly at the remote control sensor. • The remote control unit can be operated at the same time. ENGLISH 6 REMOTE CONTROL UNIT 2 The DVD-3910 can be controlled from close to the main unit, replace the batteries with respect to the remote control sensor.
Owners Manual
Page 24
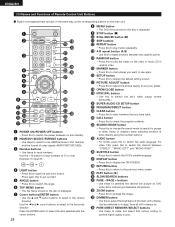
...numbers. q w e r t y u i o !0 !1 !3 !5 !2 !4 !7 !6 POWER OFF POWER ON HDMI/DVI SELECT FORMAT NTSC/PAL OPEN/ CLOSE SUPER AUDIO CD SETUP PROGRAM /DIRECT CLEAR SEARCH MODE CALL BACK LIGHT ANGLE SUBTITLE AUDIO TOP MENU DISPLAY !9 !8 @0 @1 @2 @3 @4 @5 @6 @7 MENU RETURN STOP STILL/PAUSE PLAY SKIP SLOW/SEARCH ...this to switch the power between "STEREO", "MONO LEFT" and "MONO RIGHT". @6 SUBTITLE button • Press this to switch the DVD's subtitle language. @7 DISPLAY button • Press this to display the ON-SCREEN. @8 RETURN button • Press this to return to...
...numbers. q w e r t y u i o !0 !1 !3 !5 !2 !4 !7 !6 POWER OFF POWER ON HDMI/DVI SELECT FORMAT NTSC/PAL OPEN/ CLOSE SUPER AUDIO CD SETUP PROGRAM /DIRECT CLEAR SEARCH MODE CALL BACK LIGHT ANGLE SUBTITLE AUDIO TOP MENU DISPLAY !9 !8 @0 @1 @2 @3 @4 @5 @6 @7 MENU RETURN STOP STILL/PAUSE PLAY SKIP SLOW/SEARCH ...this to switch the power between "STEREO", "MONO LEFT" and "MONO RIGHT". @6 SUBTITLE button • Press this to switch the DVD's subtitle language. @7 DISPLAY button • Press this to display the ON-SCREEN. @8 RETURN button • Press this to return to...

Owners Manual
Page 26
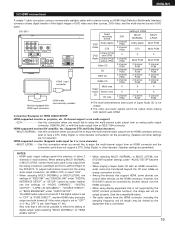
... I SC MENUS OSD LANGUAGE ENGL I SH OFF ENGL I SH ENGL I SH Use this to set the DVD-3910's screen mode. (TV aspect and Remote control unit TV type.) E X I T SE TUP AUDIO SETUP Use this to set the DVD-3910's audio output mode. (Digital and LPCM output settings.) SEL ECT : DE C I S I ON : ENTE... R BUT TON Use the 0 and 1 cursor buttons to set the output of DVI, HDMI, DENON LINK and IEEE1394 terminals. SELECT HDMFIO/DRVMI AT ...
... I SC MENUS OSD LANGUAGE ENGL I SH OFF ENGL I SH ENGL I SH Use this to set the DVD-3910's screen mode. (TV aspect and Remote control unit TV type.) E X I T SE TUP AUDIO SETUP Use this to set the DVD-3910's audio output mode. (Digital and LPCM output settings.) SEL ECT : DE C I S I ON : ENTE... R BUT TON Use the 0 and 1 cursor buttons to set the output of DVI, HDMI, DENON LINK and IEEE1394 terminals. SELECT HDMFIO/DRVMI AT ...

Owners Manual
Page 29
.... OTHERS Use the number buttons to select the desired setting, then press the ENTER button. When "LANGUAGE SETUP" is selected: ENGLISH (Factory default) Select this when you want to play the DVD with the sound in English. JAPANESE Select this when you want to set the language of the menus recorded... on the TV. DIALOG Use this to play the DVD with the sound in German. DISC MENUS Use this to play the DVD with the sound in Spanish. FRENCH Select this when you want to play the DVD with the sound in French. 3 SPANISH Select this when you want...
.... OTHERS Use the number buttons to select the desired setting, then press the ENTER button. When "LANGUAGE SETUP" is selected: ENGLISH (Factory default) Select this when you want to play the DVD with the sound in English. JAPANESE Select this when you want to set the language of the menus recorded... on the TV. DIALOG Use this to play the DVD with the sound in German. DISC MENUS Use this to play the DVD with the sound in Spanish. FRENCH Select this when you want to play the DVD with the sound in French. 3 SPANISH Select this when you want...

Owners Manual
Page 30
...buttons to input the language number. (See "Language code list" on the remote control unit. 30 It is also possible to quit by pressing the SETUP button on page 31.) r When "OSD LANGUAGE" is selected: ENGLISH (Factory default) Select this to set the OSD language to French. SPANISH Select... off the subtitle display.) ENGLISH Select this when you want to display the menus in German. GERMAN Select this when you want to play the DVD with the subtitles in Japanese. L ANGUAGE SE TUP D I ALOG SUBT I TL E D I SC MENUS OSD LANGUAGE E X I T SE TUP OF F ENGL I SH F RENCH SPANI...
...buttons to input the language number. (See "Language code list" on the remote control unit. 30 It is also possible to quit by pressing the SETUP button on page 31.) r When "OSD LANGUAGE" is selected: ENGLISH (Factory default) Select this to set the OSD language to French. SPANISH Select... off the subtitle display.) ENGLISH Select this when you want to display the menus in German. GERMAN Select this when you want to play the DVD with the subtitles in Japanese. L ANGUAGE SE TUP D I ALOG SUBT I TL E D I SC MENUS OSD LANGUAGE E X I T SE TUP OF F ENGL I SH F RENCH SPANI...
Owners Manual
Page 34
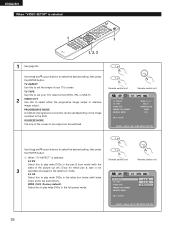
... is possible is 15 feet (4.5 meters). When the HDMI connection cable is disconnected, the "SPEAKER CONFIGURATION", "CHANNEL LEVEL", and "DELAY TIME" settings under "HDMI SPEAKER SETUP" are made with the above speaker mode setting. ✽ Press the RETURN button to return to the "HDMI SPEAKER... SETUP" menu. The delay time setting can be the same. For DVD audio discs, the disc's settings are given priority, so the sound may not be used to select the setting item, then press...
... is possible is 15 feet (4.5 meters). When the HDMI connection cable is disconnected, the "SPEAKER CONFIGURATION", "CHANNEL LEVEL", and "DELAY TIME" settings under "HDMI SPEAKER SETUP" are made with the above speaker mode setting. ✽ Press the RETURN button to return to the "HDMI SPEAKER... SETUP" menu. The delay time setting can be the same. For DVD audio discs, the disc's settings are given priority, so the sound may not be used to select the setting item, then press...
Owners Manual
Page 36
...either the progressive image output or interlace image output. q When "TV ASPECT" is selected RC-972 1 MENU STOP REPEAT RANDOM SETUP ADPJIUCSUTRE MARKER SKIP A-B ZOOM STILL/PAUSE PLAY PAGE SLOW/SEARCH MEMORPYURE DSIREELECCTT DIMMER TOP MENU BACK LIGHT ANGLE SUBTITLE SEARCH MODE CALL...T SE TUP 4 : 3 PS 4 : 3 LB WIDE ( 16 : 9 ) SEL ECT : DE C I S I ON : ENTER BUT TON Use the • and ª cursor buttons to the DVD. TV ASPECT Use this to set depending on the image recorded to select the desired setting, then press the ENTER button. SQUEEZE MODE The size...
...either the progressive image output or interlace image output. q When "TV ASPECT" is selected RC-972 1 MENU STOP REPEAT RANDOM SETUP ADPJIUCSUTRE MARKER SKIP A-B ZOOM STILL/PAUSE PLAY PAGE SLOW/SEARCH MEMORPYURE DSIREELECCTT DIMMER TOP MENU BACK LIGHT ANGLE SUBTITLE SEARCH MODE CALL...T SE TUP 4 : 3 PS 4 : 3 LB WIDE ( 16 : 9 ) SEL ECT : DE C I S I ON : ENTER BUT TON Use the • and ª cursor buttons to the DVD. TV ASPECT Use this to set depending on the image recorded to select the desired setting, then press the ENTER button. SQUEEZE MODE The size...


