
Owners Manual
Page 4
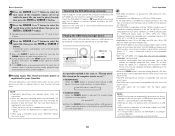
... to music 45 Viewing still pictures (only for iPods equipped with the slideshow function 45 Disconnecting the iPod 45 Using the Network Audio Function Internet radio function 46 Music server function 46 System requirements 46, 47 Listening to provide superb surround sound listening...DVD with surround sound 13 Connecting Other Sources Cable indications 14 The video conversion function 15 On screen display for choosing the DENON AVR-4306 AV Surround Receiver. Getting Started Thank you review the contents of this product is provided with an immense array of features, we recommend that...
... to music 45 Viewing still pictures (only for iPods equipped with the slideshow function 45 Disconnecting the iPod 45 Using the Network Audio Function Internet radio function 46 Music server function 46 System requirements 46, 47 Listening to provide superb surround sound listening...DVD with surround sound 13 Connecting Other Sources Cable indications 14 The video conversion function 15 On screen display for choosing the DENON AVR-4306 AV Surround Receiver. Getting Started Thank you review the contents of this product is provided with an immense array of features, we recommend that...
Owners Manual
Page 51
...AVR-4306. The AVR-4306 is designed to make the network settings automatically using a broadband connection. NOTE: • The type of equipment (computers, the AVR-4306...computer. Some are of the type by accessing the exclusive DENON Internet radio URL using the AVR-4306, we recommend 256 MB or greater. 4) Software: ...network devices) The preparations described below . 1) OS (Operating System): Windows® XP Service pack2 2) Processor: Intel PentiumII or AMD processor, etc.. If you may have a contract with your ISP or a computer store. When using a computer's browser. (The AV...
...AVR-4306. The AVR-4306 is designed to make the network settings automatically using a broadband connection. NOTE: • The type of equipment (computers, the AVR-4306...computer. Some are of the type by accessing the exclusive DENON Internet radio URL using the AVR-4306, we recommend 256 MB or greater. 4) Software: ...network devices) The preparations described below . 1) OS (Operating System): Windows® XP Service pack2 2) Processor: Intel PentiumII or AMD processor, etc.. If you may have a contract with your ISP or a computer store. When using a computer's browser. (The AV...
Owners Manual
Page 52
...to Internet radio. appears on the display when connecting to an Internet radio station for the first time. 1 Select the input source to make the "Network Setup" ( page 80, 81). 3 Connecting to the router. If the broadband router's DHCP function is displayed. Internet radio (Main unit) (Remote...from the setup menu. Basic Operation FUNCTION CURSOR ENTER 2 Connections Connect one side of the Ethernet cable (CAT-5) to the ETHERNET terminal on the AVR-4306's rear panel, the other side to an Internet radio station for the first time: Press the ENTER or CURSOR G button. • The...
...to Internet radio. appears on the display when connecting to an Internet radio station for the first time. 1 Select the input source to make the "Network Setup" ( page 80, 81). 3 Connecting to the router. If the broadband router's DHCP function is displayed. Internet radio (Main unit) (Remote...from the setup menu. Basic Operation FUNCTION CURSOR ENTER 2 Connections Connect one side of the Ethernet cable (CAT-5) to the ETHERNET terminal on the AVR-4306's rear panel, the other side to an Internet radio station for the first time: Press the ENTER or CURSOR G button. • The...
Owners Manual
Page 54
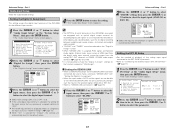
... settings must be made in order to play music files (in WMA, MP3 and WAV format) stored on computers (music servers) connected to the AVR-4306 via the network. To cancel without deleting, press the CURSOR G button. 2 Press the CURSOR D or H button to delete the station. The host names of the ... displayed. 49 For details, refer to the server program's operating instructions. 1 Select the input source to "AUX/Net". • The "Network Audio" menu screen appears. (Main unit) (Remote control unit in the AMP mode) 2 Press the CURSOR F button to select "Automatic Update" or "Manual ...
... settings must be made in order to play music files (in WMA, MP3 and WAV format) stored on computers (music servers) connected to the AVR-4306 via the network. To cancel without deleting, press the CURSOR G button. 2 Press the CURSOR D or H button to delete the station. The host names of the ... displayed. 49 For details, refer to the server program's operating instructions. 1 Select the input source to "AUX/Net". • The "Network Audio" menu screen appears. (Main unit) (Remote control unit in the AMP mode) 2 Press the CURSOR F button to select "Automatic Update" or "Manual ...
Owners Manual
Page 55
... files on the USB device or in the same way as "Playing music files stored on the computer connected to the AVR-4306 over the network to the AVR-4306. REPEAT MODE: When the MODE button is selected, playback of and power supply to preset music files or register them ...Audio Layer 3", "MPEG-2.5 Audio Layer 3", MP1, MP2, etc. Operate in the folder begins. The AVR-4306 can be possible to control the AVR-4306. NOTE: • DENON will accept no longer be used connected to the AVR-4306. • USB devices does not operate when connected via a USB hub. • Please note ...
... files on the USB device or in the same way as "Playing music files stored on the computer connected to the AVR-4306 over the network to the AVR-4306. REPEAT MODE: When the MODE button is selected, playback of and power supply to preset music files or register them ...Audio Layer 3", "MPEG-2.5 Audio Layer 3", MP1, MP2, etc. Operate in the folder begins. The AVR-4306 can be possible to control the AVR-4306. NOTE: • DENON will accept no longer be used connected to the AVR-4306. • USB devices does not operate when connected via a USB hub. • Please note ...
Owners Manual
Page 69
... storage from when the main unit's power switch is off and with the power supply cord disconnected. • In very rare instances, the AVR-4306 internal microprocessor might be caused due to an AC line surge or line spike noise, or by powering off the unit, including disconnection of the...coaxial) is a PCM signal, it is output from the analog REC OUT terminals. • When "DENON LINK" is assigned at "Digital In Assign", it is not possible to output the PCM signal and Network Audio signals (Internet radio music server, USB) being input from the digital audio input terminal from the...
... storage from when the main unit's power switch is off and with the power supply cord disconnected. • In very rare instances, the AVR-4306 internal microprocessor might be caused due to an AC line surge or line spike noise, or by powering off the unit, including disconnection of the...coaxial) is a PCM signal, it is output from the analog REC OUT terminals. • When "DENON LINK" is assigned at "Digital In Assign", it is not possible to output the PCM signal and Network Audio signals (Internet radio music server, USB) being input from the digital audio input terminal from the...
Owners Manual
Page 72
...3 and 4 terminals on the "Digital In Assign" screen. • When "DENON LINK" is assigned to "Connecting the external inputs (EXT. The HDMI input terminal is displayed when it is assigned, PCM signals and Network Audio signals (Internet radio, music server or USB) input from the digital audio ... assigned switches to enter the setting. • The "Audio Input Setup" menu reappears. Select the input for the playback of the AVR-4306 for digital recording between a digital audio source (stereo - 2 channel) and a digital audio recorder. • "PHONO" and "TUNER" cannot be ...
...3 and 4 terminals on the "Digital In Assign" screen. • When "DENON LINK" is assigned to "Connecting the external inputs (EXT. The HDMI input terminal is displayed when it is assigned, PCM signals and Network Audio signals (Internet radio, music server or USB) input from the digital audio ... assigned switches to enter the setting. • The "Audio Input Setup" menu reappears. Select the input for the playback of the AVR-4306 for digital recording between a digital audio source (stereo - 2 channel) and a digital audio recorder. • "PHONO" and "TUNER" cannot be ...
Owners Manual
Page 83
Setting the Display The brightness of the AVR-4306's display can no longer be used for Network Audio presetting are automatically reset to select the Network Audio, USB and iPod functions directly from the trigger out terminal turns on . Advanced Setup - OFF: When that input source is ... to the default values. 78 Use the same procedure to make the settings for "Default", the setting are used, so they can be used for Network Audio presetting. 1 Press the CURSOR D or H button to select "Exit", then press the ENTER button. • The "Option Setup" menu reappears....
Setting the Display The brightness of the AVR-4306's display can no longer be used for Network Audio presetting are automatically reset to select the Network Audio, USB and iPod functions directly from the trigger out terminal turns on . Advanced Setup - OFF: When that input source is ... to the default values. 78 Use the same procedure to make the settings for "Default", the setting are used, so they can be used for Network Audio presetting. 1 Press the CURSOR D or H button to select "Exit", then press the ENTER button. • The "Option Setup" menu reappears....

Owners Manual
Page 84
... below cannot be affected when playing audio or video signals during charging. Setting the iPod Charge It is possible to charge your iPod while the AVR-4306 is in the standby mode. 1 Press the CURSOR D or H button to select "iPod Charge" at the "Option Setup" menu, then press the ... iPod playback/pause 4: Switch the ZONE2 input function to "USB" and start playback. 5: Switch the ZONE3 input function to "USB" and start playback. 6: Network Audio playback/pause 7: Set the ZONE2 input function to "AUX/Net". 8: Set the ZONE3 input function to "OFF". 79 Standby: Set whether or not to...
... below cannot be affected when playing audio or video signals during charging. Setting the iPod Charge It is possible to charge your iPod while the AVR-4306 is in the standby mode. 1 Press the CURSOR D or H button to select "iPod Charge" at the "Option Setup" menu, then press the ... iPod playback/pause 4: Switch the ZONE2 input function to "USB" and start playback. 5: Switch the ZONE3 input function to "USB" and start playback. 6: Network Audio playback/pause 7: Set the ZONE2 input function to "AUX/Net". 8: Set the ZONE3 input function to "OFF". 79 Standby: Set whether or not to...
Owners Manual
Page 85
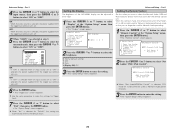
...is set for example, "www.jp") into the IP addresses actually used if other network settings are using a broadband router (DHCP function), there is being used connected to "ON" in the AVR-4306's default settings. Gateway: When connected to input the address. IP Address: Set the...address within the ranges shown below . Advanced Setup - Part 1 Network Setup If you are automatically set . 1 Press the CURSOR D or H button to select "Network Setup" at "e. 1st". If the AVR-4306 is no need to the AVR-4306, input the subnet mask indicated in the documentation supplied by your ...
...is set for example, "www.jp") into the IP addresses actually used if other network settings are using a broadband router (DHCP function), there is being used connected to "ON" in the AVR-4306's default settings. Gateway: When connected to input the address. IP Address: Set the...address within the ranges shown below . Advanced Setup - Part 1 Network Setup If you are automatically set . 1 Press the CURSOR D or H button to select "Network Setup" at "e. 1st". If the AVR-4306 is no need to the AVR-4306, input the subnet mask indicated in the documentation supplied by your ...

Owners Manual
Page 86
The MAC address differs for each set "ON" to reduce the power consumption when in a network. 3 Press the ENTER button to select "OFF". 2 Setting the MAC Address The AVR-4306's MAC address is displayed. The languages are indicated with three letters conforming to ISO639-2. 2 Setting... or G button to enter the setting. • The "Network Setup" menu reappears. Part 1 81 Set "OFF" when using the AVR-4306 connected in a network, set . Advanced Setup - Part 1 Setting the Network Option When not using the AVR-4306 connected in the standby mode. 2 Setting the PC Language Select...
The MAC address differs for each set "ON" to reduce the power consumption when in a network. 3 Press the ENTER button to select "OFF". 2 Setting the MAC Address The AVR-4306's MAC address is displayed. The languages are indicated with three letters conforming to ISO639-2. 2 Setting... or G button to enter the setting. • The "Network Setup" menu reappears. Part 1 81 Set "OFF" when using the AVR-4306 connected in a network, set . Advanced Setup - Part 1 Setting the Network Option When not using the AVR-4306 connected in the standby mode. 2 Setting the PC Language Select...

Owners Manual
Page 96
...back channel's power amplifier can be assigned to accept control from the network in the 2channel direct or stereo mode. 2 Dolby Digital Setup Turn the audio compression on the power of the AVR-4306's display can be changed . Volume Level: This sets whether the ...output level of each zone. Main Zone2 Zone3 Vol.Limit = OFF P. Network Setup 1 IP Address 2 Proxy 3 Network Option Network Setup The IP address-related settings are connected. Part...
...back channel's power amplifier can be assigned to accept control from the network in the 2channel direct or stereo mode. 2 Dolby Digital Setup Turn the audio compression on the power of the AVR-4306's display can be changed . Volume Level: This sets whether the ...output level of each zone. Main Zone2 Zone3 Vol.Limit = OFF P. Network Setup 1 IP Address 2 Proxy 3 Network Option Network Setup The IP address-related settings are connected. Part...


