
Literature/Product Sheet
Page 2
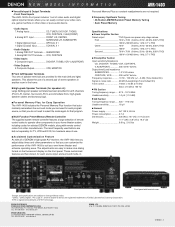
... own home theater and enhance operating ease. DENON ELECTRONICS. VCR, CDR/TAPE • Video Inputs 4 Composite Inputs DVD/VDP, TV/DBS, VCR, V.AUX(FRONT) • Video Outputs 2 Composite Outputs VCR, MONITOR ■ Front A/B Speaker Terminals Two sets of DENON's high-grade A/V receiver, the AVR-1403 lets you adjust delay times and other video or pure audio device. • Audio Inputs 7 Analog Inputs CD, TUNER, DVD/VDP, TV/DBS, VCR, CDR/TAPE, V.AUX(FRONT) 6 Analog EXT. The adjustments are registered trademarks of Dolby Laboratories Licensing Corporation. *DTS is...
... own home theater and enhance operating ease. DENON ELECTRONICS. VCR, CDR/TAPE • Video Inputs 4 Composite Inputs DVD/VDP, TV/DBS, VCR, V.AUX(FRONT) • Video Outputs 2 Composite Outputs VCR, MONITOR ■ Front A/B Speaker Terminals Two sets of DENON's high-grade A/V receiver, the AVR-1403 lets you adjust delay times and other video or pure audio device. • Audio Inputs 7 Analog Inputs CD, TUNER, DVD/VDP, TV/DBS, VCR, CDR/TAPE, V.AUX(FRONT) 6 Analog EXT. The adjustments are registered trademarks of Dolby Laboratories Licensing Corporation. *DTS is...
Owners Manual
Page 3
... plug (a plug having one way. Power Sources - If you to . 4. This product may cause hazards. 7. Do not defeat the safety purpose of any kind on the marking label. Power-Cord Protection - Overloading - Do not overload wall outlets, extension cords, or integral convenience receptacles as the original part. Replacement Parts - SAFETY INSTRUCTIONS 1. The safety and operating instructions should be placed in a built-in wire to an antenna...
... plug (a plug having one way. Power Sources - If you to . 4. This product may cause hazards. 7. Do not defeat the safety purpose of any kind on the marking label. Power-Cord Protection - Overloading - Do not overload wall outlets, extension cords, or integral convenience receptacles as the original part. Replacement Parts - SAFETY INSTRUCTIONS 1. The safety and operating instructions should be placed in a built-in wire to an antenna...
Owners Manual
Page 4
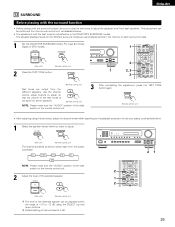
...;0 Setting up the Speaker Systems 8 , Connections 9~14 . TABLE OF CONTENTS z Before Using 4 x Cautions on Installation 5 c Cautions on Check once again that all other audio components when moving the set. • Before turning the power operation switch on Handling 5 v Features...5 b Part Names and Functions 6, 7 n Read this instructions may differ from the actual set the power operation switch to the standby position before proceeding. After reading, store this instructions along with home theater sources such as DVD...
...;0 Setting up the Speaker Systems 8 , Connections 9~14 . TABLE OF CONTENTS z Before Using 4 x Cautions on Installation 5 c Cautions on Check once again that all other audio components when moving the set. • Before turning the power operation switch on Handling 5 v Features...5 b Part Names and Functions 6, 7 n Read this instructions may differ from the actual set the power operation switch to the standby position before proceeding. After reading, store this instructions along with home theater sources such as DVD...
Owners Manual
Page 5
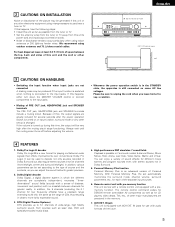
... SPEAKER terminals The PRE OUT jack, HEADPHONE jack and SPEAKER terminals include a muting circuit. In addition, the 5 channels (excluding the 0.1 channel for low frequency effects) have a playback range extending to occur particularly when using outdoor antennas and 75 Ω/ohms coaxial cables. You can adjust the sound field with stereo sources not in the STANDBY state, the apparatus is used to the type of other set automatically memorizes the surround mode, channel volume, surround parameters, etc., for DENON remote controllable...
... SPEAKER terminals The PRE OUT jack, HEADPHONE jack and SPEAKER terminals include a muting circuit. In addition, the 5 channels (excluding the 0.1 channel for low frequency effects) have a playback range extending to occur particularly when using outdoor antennas and 75 Ω/ohms coaxial cables. You can adjust the sound field with stereo sources not in the STANDBY state, the apparatus is used to the type of other set automatically memorizes the surround mode, channel volume, surround parameters, etc., for DENON remote controllable...
Owners Manual
Page 10
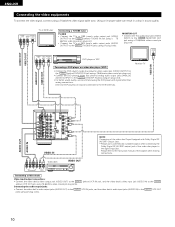
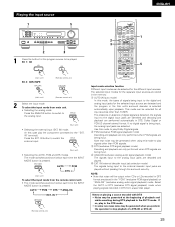
... video deck's audio input jacks (AUDIO IN) to the AUDIO DVD/VDP IN jacks using pin plug cords. • For better sound quality, we recommend using a 75 Ω/ohms video coaxial pin plug cord. VIDEO IN VIDEO IN AUDIO VIDEO DIGITAL OUT OUT R L OUT COAXIAL DVD player or VDP RL Connecting a DVD player or a video disc player (VDP) • Connect the DVD player's (video disc player's) video output jack (VIDEO OUTPUT) to the VIDEO (yellow) DVD/VDP IN jack using a 75 Ω/ohms video coaxial pin plug cord. • Connect the DVD player's (video disc player's) analog audio output jacks...
... video deck's audio input jacks (AUDIO IN) to the AUDIO DVD/VDP IN jacks using pin plug cords. • For better sound quality, we recommend using a 75 Ω/ohms video coaxial pin plug cord. VIDEO IN VIDEO IN AUDIO VIDEO DIGITAL OUT OUT R L OUT COAXIAL DVD player or VDP RL Connecting a DVD player or a video disc player (VDP) • Connect the DVD player's (video disc player's) video output jack (VIDEO OUTPUT) to the VIDEO (yellow) DVD/VDP IN jack using a 75 Ω/ohms video coaxial pin plug cord. • Connect the DVD player's (video disc player's) analog audio output jacks...
Owners Manual
Page 16
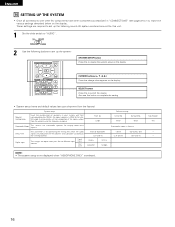
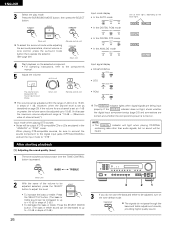
...Set the slide switch to "AUDIO". SELECT button Press this change what appears on the display. Large Front & Subwoofer 12 ft (3.6 m) COAXIAL OPTICAL DVD/VDP TV/DBS Default settings Center Sp. CURSOR buttons (•, ª, 0, 1) Press this to 14), make the various settings described below on the display. Subwoofer Mode This selects the subwoofer speaker for the different input sources. These settings are produced from the speakers and the frequency response. This assigns the digital input jacks for playing deep bass signals. Surround Sp. Delay Time Digital Input...
...Set the slide switch to "AUDIO". SELECT button Press this change what appears on the display. Large Front & Subwoofer 12 ft (3.6 m) COAXIAL OPTICAL DVD/VDP TV/DBS Default settings Center Sp. CURSOR buttons (•, ª, 0, 1) Press this to 14), make the various settings described below on the display. Subwoofer Mode This selects the subwoofer speaker for the different input sources. These settings are produced from the speakers and the frequency response. This assigns the digital input jacks for playing deep bass signals. Surround Sp. Delay Time Digital Input...
Owners Manual
Page 18
... (left ) button (right) button Press the SELECT or setting. (down ) button to enter the setting and switch to the SPEAKER DISTANCE NOTES: - Assignment of low frequency signal range - • The signals produced from the subwoofer channel are LFE signals (during playback of Dolby Digital or DTS signals) and the low frequency signal range of channels set to "SMALL" in the "Speaker Configuration" settings (see pages 17, 18). In this when using speakers that cannot reproduce low sounds of below 80 Hz. Select this setting is installed, "No...
... (left ) button (right) button Press the SELECT or setting. (down ) button to enter the setting and switch to the SPEAKER DISTANCE NOTES: - Assignment of low frequency signal range - • The signals produced from the subwoofer channel are LFE signals (during playback of Dolby Digital or DTS signals) and the low frequency signal range of channels set to "SMALL" in the "Speaker Configuration" settings (see pages 17, 18). In this when using speakers that cannot reproduce low sounds of below 80 Hz. Select this setting is installed, "No...
Owners Manual
Page 21
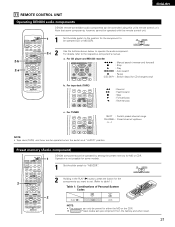
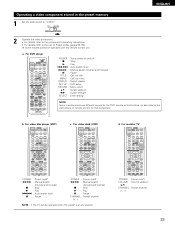
...: Play 8,9 : Auto search 3 : Pause DISC SKIP+ : Switch discs (for the components you want to set upon shipment from the factory and when reset. 21 AUX 4 VCR 5 TV/DBS 6 7 INPUT MODE CDR / TAPE TUNER 8 9 0 SURROUND MODE TAPE·VCR 6 7 SHIFT 0 3 2 CHANNEL VIDEO SELECT CD·MD/CDR·DVD/VDP DISC SKIP+ TITLE 8 3 9 6 SYSTEM 2 7 SURROUND SET UP MENU MASTER CH SELECT VOL SELECT T.TONE STATUS MUTING RETURN DISPLAY CHANNEL TV VOLUME B REMOTE CONTROL UNIT RC-896 1 2 DENON components can be operated with this unit's remote control unit. CD AUDIO MD...
...: Play 8,9 : Auto search 3 : Pause DISC SKIP+ : Switch discs (for the components you want to set upon shipment from the factory and when reset. 21 AUX 4 VCR 5 TV/DBS 6 7 INPUT MODE CDR / TAPE TUNER 8 9 0 SURROUND MODE TAPE·VCR 6 7 SHIFT 0 3 2 CHANNEL VIDEO SELECT CD·MD/CDR·DVD/VDP DISC SKIP+ TITLE 8 3 9 6 SYSTEM 2 7 SURROUND SET UP MENU MASTER CH SELECT VOL SELECT T.TONE STATUS MUTING RETURN DISPLAY CHANNEL TV VOLUME B REMOTE CONTROL UNIT RC-896 1 2 DENON components can be operated with this unit's remote control unit. CD AUDIO MD...
Owners Manual
Page 23
... out menu DISPLAY : Switch display SET UP : DVD setup RETURN : Menu return •,ª : Cursor up /down 0,1 : Cursor left/right SELECT : Enter setting NOTE: Some manufacturers use different names for the DVD remote control buttons, so also refer to the instructions on and off VOLUME : Volume up /down (•,ª) CHANNEL : Switch channel (+, -) 23 For monitor TV AVR/AVC ON POWER TV VCR DVD/VDP OFF 1 CD DVD/VDP 2 3 V. a. AUX 4 VCR 5 TV/DBS 6 7 INPUT MODE CDR / TAPE TUNER 8 9 0 SURROUND MODE TAPE·VCR 6 7 SHIFT 0 3 2 CHANNEL 0 VIDEO SELECT...
... out menu DISPLAY : Switch display SET UP : DVD setup RETURN : Menu return •,ª : Cursor up /down 0,1 : Cursor left/right SELECT : Enter setting NOTE: Some manufacturers use different names for the DVD remote control buttons, so also refer to the instructions on and off VOLUME : Volume up /down (•,ª) CHANNEL : Switch channel (+, -) 23 For monitor TV AVR/AVC ON POWER TV VCR DVD/VDP OFF 1 CD DVD/VDP 2 3 V. a. AUX 4 VCR 5 TV/DBS 6 7 INPUT MODE CDR / TAPE TUNER 8 9 0 SURROUND MODE TAPE·VCR 6 7 SHIFT 0 3 2 CHANNEL 0 VIDEO SELECT...
Owners Manual
Page 25
...CDR / TAPE TUNER 8 9 0 SURROUND MODE TAPE·VCR 6 7 SHIFT 0 3 2 CHANNEL 0 VIDEO SELECT CD·MD/CDR·DVD/VDP DISC SKIP+ TITLE 8 3 9 6 SYSTEM 2 7 SURROUND SET UP MENU MASTER CH SELECT VOL SELECT T.TONE STATUS MUTING RETURN DISPLAY CHANNEL TV VOLUME B REMOTE CONTROL UNIT RC-896 1 5 Input mode selection function Different input modes can be selected for the program source to the digital and analog input jacks for the different input sources. The presence or absence of playback and while searching during DTS playback in the "PCM" (exclusive PCM signal...
...CDR / TAPE TUNER 8 9 0 SURROUND MODE TAPE·VCR 6 7 SHIFT 0 3 2 CHANNEL 0 VIDEO SELECT CD·MD/CDR·DVD/VDP DISC SKIP+ TITLE 8 3 9 6 SYSTEM 2 7 SURROUND SET UP MENU MASTER CH SELECT VOL SELECT T.TONE STATUS MUTING RETURN DISPLAY CHANNEL TV VOLUME B REMOTE CONTROL UNIT RC-896 1 5 Input mode selection function Different input modes can be selected for the program source to the digital and analog input jacks for the different input sources. The presence or absence of playback and while searching during DTS playback in the "PCM" (exclusive PCM signal...
Owners Manual
Page 26
... the bass and treble adjustment circuits, providing higher quality sound. 26 SURROUND MODE (Main unit) To select the surround mode while adjusting the surround parameters, channel volume or tone control, press the surround mode button then operate the selector. (See page 29.) (Remote control unit) (Main unit) 4 Start playback on the tone defeat mode. DIGITAL ANALOG DIGITAL DIGITAL ANALOG Input signal display • DOLBY DIGITAL SIGNAL DIGITAL • DTS SIGNAL DIGITAL • PCM SIGNAL DIGITAL The DIGITAL indicator lights when digital signals are played in steps...
... the bass and treble adjustment circuits, providing higher quality sound. 26 SURROUND MODE (Main unit) To select the surround mode while adjusting the surround parameters, channel volume or tone control, press the surround mode button then operate the selector. (See page 29.) (Remote control unit) (Main unit) 4 Start playback on the tone defeat mode. DIGITAL ANALOG DIGITAL DIGITAL ANALOG Input signal display • DOLBY DIGITAL SIGNAL DIGITAL • DTS SIGNAL DIGITAL • PCM SIGNAL DIGITAL The DIGITAL indicator lights when digital signals are played in steps...
Owners Manual
Page 27
Cancelling MUTING mode. SET UP MENU MASTER CH SELECT VOL SELECT T.TONE STATUS MUTING RETURN DISPLAY CHANNEL TV VOLUME 1 21 27 PHONES 1 ENGLISH NOTE: To prevent hearing loss, do not raise the volume level excessively when using the video select button. • Switch the program source to the component connected to 1 the video input. [5] Checking the currently playing program source, etc. 1 Front panel display • Descriptions of the unit's operations are turned on. [3] Turning the sound off temporarily (muting) 1 Use this to turn the speaker off...
Cancelling MUTING mode. SET UP MENU MASTER CH SELECT VOL SELECT T.TONE STATUS MUTING RETURN DISPLAY CHANNEL TV VOLUME 1 21 27 PHONES 1 ENGLISH NOTE: To prevent hearing loss, do not raise the volume level excessively when using the video select button. • Switch the program source to the component connected to 1 the video input. [5] Checking the currently playing program source, etc. 1 Front panel display • Descriptions of the unit's operations are turned on. [3] Turning the sound off temporarily (muting) 1 Use this to turn the speaker off...
Owners Manual
Page 29
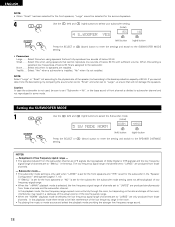
... adjustment with the surround function, be sure to use the test tones to adjust. Default setting of channel level is 0 dB. 2 1 2 VIDEO SELECT CD·MD/CDR·DVD/VDP DISC SKIP+ TITLE 8 3 9 6 SYSTEM 2 7 SURROUND SET UP MENU MASTER CH SELECT VOL SELECT T.TONE STATUS MUTING RETURN DISPLAY CHANNEL TV VOLUME 21 29 ENGLISH 13 SURROUND Before playing with the surround function • Before playing with the test tones is only effective in the memory of each surround modes. 1 Set the DOLBY/DTS SURROUND (Dolby Pro Logic II or Dolby Digital or DTS) modes...
... adjustment with the surround function, be sure to use the test tones to adjust. Default setting of channel level is 0 dB. 2 1 2 VIDEO SELECT CD·MD/CDR·DVD/VDP DISC SKIP+ TITLE 8 3 9 6 SYSTEM 2 7 SURROUND SET UP MENU MASTER CH SELECT VOL SELECT T.TONE STATUS MUTING RETURN DISPLAY CHANNEL TV VOLUME 21 29 ENGLISH 13 SURROUND Before playing with the surround function • Before playing with the test tones is only effective in the memory of each surround modes. 1 Set the DOLBY/DTS SURROUND (Dolby Pro Logic II or Dolby Digital or DTS) modes...

Owners Manual
Page 30
...(Main unit) (Remote control unit) MODE PRO LOGIC MODE CINEMA MODE MUSIC or or 1 2 4, 6 2, 5, 7 1 2 4, 5, 6, 7 CD MD/CDR AVR/AVC ON AUDIO POWER TV VCR VIDEO DVD/VDP OFF 1 CD DVD/VDP 2 3 V. Select the DOLBY PRO The surround mode LOGIC II mode using the switches when the SELECT buttons. AUX 4 VCR 5 TV/DBS 6 7 INPUT MODE CDR / TAPE TUNER 8 9 0 SURROUND MODE TAPE·VCR 6 7 SHIFT 0 3 2 CHANNEL 0 VIDEO SELECT CD·MD/CDR·DVD/VDP DISC SKIP+ TITLE 8 3 9 6 SYSTEM 2 7 SURROUND SET UP MENU MASTER CH SELECT VOL SELECT T.TONE STATUS MUTING...
...(Main unit) (Remote control unit) MODE PRO LOGIC MODE CINEMA MODE MUSIC or or 1 2 4, 6 2, 5, 7 1 2 4, 5, 6, 7 CD MD/CDR AVR/AVC ON AUDIO POWER TV VCR VIDEO DVD/VDP OFF 1 CD DVD/VDP 2 3 V. Select the DOLBY PRO The surround mode LOGIC II mode using the switches when the SELECT buttons. AUX 4 VCR 5 TV/DBS 6 7 INPUT MODE CDR / TAPE TUNER 8 9 0 SURROUND MODE TAPE·VCR 6 7 SHIFT 0 3 2 CHANNEL 0 VIDEO SELECT CD·MD/CDR·DVD/VDP DISC SKIP+ TITLE 8 3 9 6 SYSTEM 2 7 SURROUND SET UP MENU MASTER CH SELECT VOL SELECT T.TONE STATUS MUTING...

Owners Manual
Page 33
... range). (This only works when playing program sources recorded in units of the extreme high frequencies, compensating for overly-bright sounding motion picture soundtracks. OFF LOW MID HIGH Press the SURROUND or setting. (left ) button (right) button Press the SURROUND or (down) button to switch to the CINEMA EQ. DEFAULT Y/N YES NO (left ) button (right) button NOTE: (down ) button to switch to the default setting. ENGLISH 6 (Remote control unit) SURROUND MENU (Remote control unit) 7 (Remote control unit) SURROUND MENU (Remote control unit) 8 (Remote control unit) SURROUND...
... range). (This only works when playing program sources recorded in units of the extreme high frequencies, compensating for overly-bright sounding motion picture soundtracks. OFF LOW MID HIGH Press the SURROUND or setting. (left ) button (right) button Press the SURROUND or (down) button to switch to the CINEMA EQ. DEFAULT Y/N YES NO (left ) button (right) button NOTE: (down ) button to switch to the default setting. ENGLISH 6 (Remote control unit) SURROUND MENU (Remote control unit) 7 (Remote control unit) SURROUND MENU (Remote control unit) 8 (Remote control unit) SURROUND...
Owners Manual
Page 40
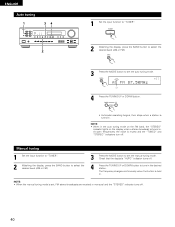
Manual tuning 1 Set the input function to "TUNER". 2 Watching the display, press the BAND button to select the desired band (AM or FM). 3 Press the MODE button to set the auto tuning mode. NOTE: • When the manual tuning mode is set, FM stereo broadcasts are received in monaural and the "STEREO" indicator turns off . 4 Press the TUNING UP or DOWN button to tune in . The frequency changes continuously when the button is tuned in the desired station. NOTE: • When in...
Manual tuning 1 Set the input function to "TUNER". 2 Watching the display, press the BAND button to select the desired band (AM or FM). 3 Press the MODE button to set the auto tuning mode. NOTE: • When the manual tuning mode is set, FM stereo broadcasts are received in monaural and the "STEREO" indicator turns off . 4 Press the TUNING UP or DOWN button to tune in . The frequency changes continuously when the button is tuned in the desired station. NOTE: • When in...
Owners Manual
Page 43
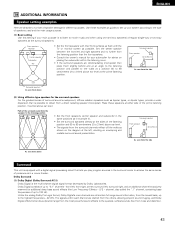
... ".1" channel, containing bass frequencies of up your system according to the type of speakers used and the main usage purpose. (1) Basic setting Use this setting if your subwoofer for the surround speakers For the greatest sense of the surround sound from a direct radiating speaker (monopolar). Front speakers Monitor Center speaker Subwoofer 45° • Set the front speakers with their front surfaces as flush with a digital signal processing circuit that lets you play program sources in the surround mode...
... ".1" channel, containing bass frequencies of up your system according to the type of speakers used and the main usage purpose. (1) Basic setting Use this setting if your subwoofer for the surround speakers For the greatest sense of the surround sound from a direct radiating speaker (monopolar). Front speakers Monitor Center speaker Subwoofer 45° • Set the front speakers with their front surfaces as flush with a digital signal processing circuit that lets you play program sources in the surround mode...

Owners Manual
Page 44
... stereo VCRs, as well as two channels of switching the Dolby Digital signal output method between "bit stream" and "(convert to the player's operating instructions. In this case connect the "bit stream + PCM" jacks to this unit, switch the DVD player's output mode to be played on this unit. (2) Dolby Pro Logic II • Dolby Pro Logic II is used to the type of source and the contents, so it possible to the digital input jack. Dolby Surround is a new multi-channel...
... stereo VCRs, as well as two channels of switching the Dolby Digital signal output method between "bit stream" and "(convert to the player's operating instructions. In this case connect the "bit stream + PCM" jacks to this unit, switch the DVD player's output mode to be played on this unit. (2) Dolby Pro Logic II • Dolby Pro Logic II is used to the type of source and the contents, so it possible to the digital input jack. Dolby Surround is a new multi-channel...
Owners Manual
Page 45
... "DTS" before turning up the master volume. 3 A DVD player with the amplifier set at the digital outputs of a CD or LD player may only produce noise. Also refer to "ANALOG" or "PCM" during playback. Never set the mode to "ANALOG" or "PCM". 1 Set the input mode to "AUTO" or "DTS" (page 25). 1 DTS signals are output as random "hissy" noise from the CD or LD player's analog outputs. Because of compatible DVD players. Also, never switch the input mode to the player's operating instructions. For DVDs, the DTS signals...
... "DTS" before turning up the master volume. 3 A DVD player with the amplifier set at the digital outputs of a CD or LD player may only produce noise. Also refer to "ANALOG" or "PCM" during playback. Never set the mode to "ANALOG" or "PCM". 1 Set the input mode to "AUTO" or "DTS" (page 25). 1 DTS signals are output as random "hissy" noise from the CD or LD player's analog outputs. Because of compatible DVD players. Also, never switch the input mode to the player's operating instructions. For DVDs, the DTS signals...
Owners Manual
Page 46
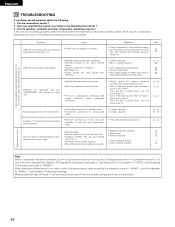
... settings. control unit. • Different button is being played from the subwoofer channel is LFE only (only when playing Dolby Digital or DTS signals) for initial factory settings (i.e., the setting of the front speaker is "LARGE" and the setting of the subwoofer mode is used , the signal played from the subwoofer. 46 Measures • Check the insertion of battery inserted in the low-frequency sounds of the front channel being pressed. • < and > ends of the power cord plug. • Turn...
... settings. control unit. • Different button is being played from the subwoofer channel is LFE only (only when playing Dolby Digital or DTS signals) for initial factory settings (i.e., the setting of the front speaker is "LARGE" and the setting of the subwoofer mode is used , the signal played from the subwoofer. 46 Measures • Check the insertion of battery inserted in the low-frequency sounds of the front channel being pressed. • < and > ends of the power cord plug. • Turn...


