
Owners Manual
Page 8
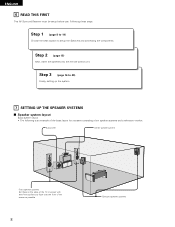
... the TV or screen with their front surfaces as flush with the front of the screen as possible. 8 Surround speaker systems Step 3 (page 16 to setup the Speakers and connecting the components. Step 1 (page 8 to 14) Choose the best location to 20) Finally, setting up the system. 7 SETTING UP THE SPEAKER... Set these steps. Step 2 (page 15) Next, insert the batteries into the remote control unit. ENGLISH 6 READ THIS FIRST This AV Surround Receiver must be setup before use.
... the TV or screen with their front surfaces as flush with the front of the screen as possible. 8 Surround speaker systems Step 3 (page 16 to setup the Speakers and connecting the components. Step 1 (page 8 to 14) Choose the best location to 20) Finally, setting up the system. 7 SETTING UP THE SPEAKER... Set these steps. Step 2 (page 15) Next, insert the batteries into the remote control unit. ENGLISH 6 READ THIS FIRST This AV Surround Receiver must be setup before use.
Owners Manual
Page 16
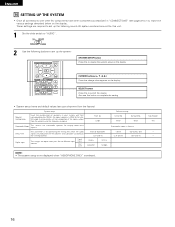
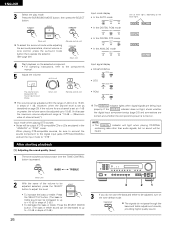
... Front Sp. Small Small Subwoofer mode = Normal Center 12 ft (3.6 m) Surround L & R 10 ft (3.0 m) NOTE: • The system setup is not displayed when "HEADPHONE ONLY" is for full-size, full-range) to automatically set the composition of the signals output from the speakers and...8 3 9 6 SYSTEM 2 7 SURROUND SET UP MENU MASTER CH SELECT VOL SELECT T.TONE STATUS MUTING RETURN DISPLAY SYSTEM SETUP button Press this to display the system setup on the display. Delay Time Digital Input This parameter is selected. Sub Woofer Yes - - 16 Subwoofer Mode This selects...
... Front Sp. Small Small Subwoofer mode = Normal Center 12 ft (3.6 m) Surround L & R 10 ft (3.0 m) NOTE: • The system setup is not displayed when "HEADPHONE ONLY" is for full-size, full-range) to automatically set the composition of the signals output from the speakers and...8 3 9 6 SYSTEM 2 7 SURROUND SET UP MENU MASTER CH SELECT VOL SELECT T.TONE STATUS MUTING RETURN DISPLAY SYSTEM SETUP button Press this to display the system setup on the display. Delay Time Digital Input This parameter is selected. Sub Woofer Yes - - 16 Subwoofer Mode This selects...
Owners Manual
Page 18
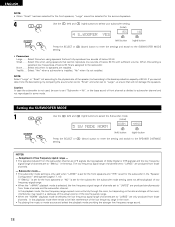
... (left ) button (right) button Press the SELECT or setting. (down ) button to enter the settings and switch to subwoofer channel and not reproduced in the setup. Subwoofer mode - • The subwoofer mode setting is only valid when "LARGE" is set for the front speakers and "YES" is selected, low frequencies of...
... (left ) button (right) button Press the SELECT or setting. (down ) button to enter the settings and switch to subwoofer channel and not reproduced in the setup. Subwoofer mode - • The subwoofer mode setting is only valid when "LARGE" is set for the front speakers and "YES" is selected, low frequencies of...
Owners Manual
Page 20
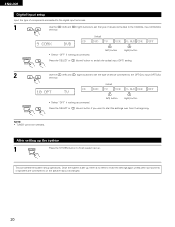
NOTE: • TUNER cannot be selected. Once the system is set up . This completes the system setup operations. ENGLISH Digital input setup Input the type of components connected to the digital input terminals. 1 Use the (left) and terminal. (right) buttons to set the type of device connected ...
NOTE: • TUNER cannot be selected. Once the system is set up . This completes the system setup operations. ENGLISH Digital input setup Input the type of components connected to the digital input terminals. 1 Use the (left) and terminal. (right) buttons to set the type of device connected ...
Owners Manual
Page 23
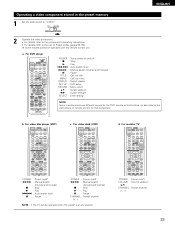
... (cue) 6,7 : Manual search (reverse and forward) 3 : Pause TITLE : Call out title MENU : Call out menu DISPLAY : Switch display SET UP : DVD setup RETURN : Menu return •,ª : Cursor up /down 0,1 : Cursor left/right SELECT : Enter setting NOTE: Some manufacturers use different names for the DVD remote ... 6,7 : Manual search (forward and reverse) 2 : Stop 1 : Play 8,9 : Auto search (cue) 3 : Pause c. a. For video disc player (VDP) AVR/AVC ON POWER TV VCR DVD/VDP OFF 1 CD DVD/VDP 2 3 V. CD MD/CDR AUDIO VIDEO 2 Operate the video component. • For details, refer ...
... (cue) 6,7 : Manual search (reverse and forward) 3 : Pause TITLE : Call out title MENU : Call out menu DISPLAY : Switch display SET UP : DVD setup RETURN : Menu return •,ª : Cursor up /down 0,1 : Cursor left/right SELECT : Enter setting NOTE: Some manufacturers use different names for the DVD remote ... 6,7 : Manual search (forward and reverse) 2 : Stop 1 : Play 8,9 : Auto search (cue) 3 : Pause c. a. For video disc player (VDP) AVR/AVC ON POWER TV VCR DVD/VDP OFF 1 CD DVD/VDP 2 3 V. CD MD/CDR AUDIO VIDEO 2 Operate the video component. • For details, refer ...
Owners Manual
Page 26
... case the maximum volume adjustment range is displayed on the input signal. If the DIGITAL indicator does not light, check whether the digital input component setup (page 20) and connections are being input properly.
... case the maximum volume adjustment range is displayed on the input signal. If the DIGITAL indicator does not light, check whether the digital input component setup (page 20) and connections are being input properly.
Owners Manual
Page 46
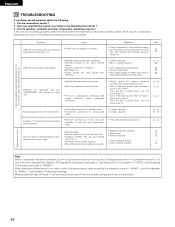
... and sound not produced when power switch set to on . • Turn off the set 's power, then ventilate it well to "SMALL" in the system setup mode try setting the subwoofer mode to "+MAIN", or the front speaker to cool it down , turn the power back on . Positions of instruments reversed...
... and sound not produced when power switch set to on . • Turn off the set 's power, then ventilate it well to "SMALL" in the system setup mode try setting the subwoofer mode to "+MAIN", or the front speaker to cool it down , turn the power back on . Positions of instruments reversed...


