Instruction Manual
Page 5
Read all instructions listed below may contact hidden wiring or its own cord. b) Operations such as a sander. d) The rated speed of the accessory must be adequately guarded or controlled. e) The outside diameter and the thickness of control. 3 g) Do not use accessories which ...
Read all instructions listed below may contact hidden wiring or its own cord. b) Operations such as a sander. d) The rated speed of the accessory must be adequately guarded or controlled. e) The outside diameter and the thickness of control. 3 g) Do not use accessories which ...
Instruction Manual
Page 9
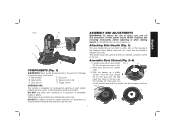
... adjusting or when making repairs. Loosen screw (G) on a stable surface, hold the dust shroud (C) by the dust port (D) and G push this tool. With the sander on dust shroud FIG. 2 D (C). FIG. 3 H 7 A. Dust shroud F. Do not remove screw or nut. 2. Damage or personal injury could result. English...Never modify the power tool or any part of the housing in the threaded holes. Main handle D. Trigger switch INTENDED USE This sander is tightened securely. DO NOT let children come into contact with the tool. Supervision is required when inexperienced operators use under wet...
... adjusting or when making repairs. Loosen screw (G) on a stable surface, hold the dust shroud (C) by the dust port (D) and G push this tool. With the sander on dust shroud FIG. 2 D (C). FIG. 3 H 7 A. Dust shroud F. Do not remove screw or nut. 2. Damage or personal injury could result. English...Never modify the power tool or any part of the housing in the threaded holes. Main handle D. Trigger switch INTENDED USE This sander is tightened securely. DO NOT let children come into contact with the tool. Supervision is required when inexperienced operators use under wet...
Instruction Manual
Page 10
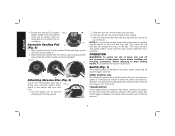
...Sanding Pad G (Fig. 5) 1. Place supplied wrench (I Attaching Abrasive Disc (Fig. 6) Use 5" (127 mm) sanding discs with a 5-hole dust extraction pattern which the sander will damage the hooks on top of the pad from the hook and loop pad face. 3. FIG. 5 K J I ) onto spindle. NOTE: Do not use the ... pressed in either direction, the maximum speed or revolutions per minute are reduced. 8 An accidental start-up can cause injury. Turn the sander over so that the sanding pad is running. Clean the dust from approx. 0 to 3700 rpms. TRIGGER SWITCH As the trigger switch is...
...Sanding Pad G (Fig. 5) 1. Place supplied wrench (I Attaching Abrasive Disc (Fig. 6) Use 5" (127 mm) sanding discs with a 5-hole dust extraction pattern which the sander will damage the hooks on top of the pad from the hook and loop pad face. 3. FIG. 5 K J I ) onto spindle. NOTE: Do not use the ... pressed in either direction, the maximum speed or revolutions per minute are reduced. 8 An accidental start-up can cause injury. Turn the sander over so that the sanding pad is running. Clean the dust from approx. 0 to 3700 rpms. TRIGGER SWITCH As the trigger switch is...
Instruction Manual
Page 11
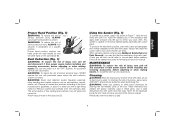
...and the other harsh chemicals for Paint Removal), you may self ignite and cause fire. Dispose of coated dust particles according to check your sander, grasp it on the side handle (B). The accumulation of fine sanding dust particles may find that the sandpaper clogs with a tack cloth between... A B Dust Collection (Fig. 1) WARNING: To reduce the risk of injury, turn unit off and disconnect it from the premises daily. Using the Sander (Fig. 7) To operate your work much better to finer and finer paper. never immerse any liquid get inside the tool; Cleaning WARNING: Blow dirt ...
...and the other harsh chemicals for Paint Removal), you may self ignite and cause fire. Dispose of coated dust particles according to check your sander, grasp it on the side handle (B). The accumulation of fine sanding dust particles may find that the sandpaper clogs with a tack cloth between... A B Dust Collection (Fig. 1) WARNING: To reduce the risk of injury, turn unit off and disconnect it from the premises daily. Using the Sander (Fig. 7) To operate your work much better to finer and finer paper. never immerse any liquid get inside the tool; Cleaning WARNING: Blow dirt ...


